Comments / Questions (45)
![]() Lucy De Kort wrote:
Lucy De Kort wrote:
Ik ben het met Angela eens het patroon klopt niet het is veel compacter dan het voorbeeld .ik heb het op naalden 4 gebreid dus zou het losser moeten zijn ,,jammer van mijn werk.
13.02.2019 - 16:50
![]() Rita wrote:
Rita wrote:
Bene grazie,!!
08.02.2019 - 17:33
![]() Rita wrote:
Rita wrote:
Buongiorno, per la verità non so se ho capito,! Devo lavorarlo o no il quadrato nero? Corrisponde a una maglia dritta o passata scusate potete essere più chiari? O magari vanno prese tutte insieme!? Grazie
08.02.2019 - 16:51DROPS Design answered:
Buongiorno Rita. È come se non ci fosse il quadrato nero. P.es alla riga 27 del diag. A5, lavora 2 m insieme a diritto, 2 m diritto, 1 gettato. Buon lavoro!
08.02.2019 - 17:18
![]() Rita wrote:
Rita wrote:
Nel diagramma, nessuna maglia vuol dire passata a dritto? Come altrimenti salto il quadrato? Grazie
08.02.2019 - 15:46DROPS Design answered:
Buongiorno Rita. Deve lavorare la maglia successiva sul ferro come indicato nel primo quadrato non nero (dopo quelli neri) nel diagramma. P.es: se dopo il quadrato nero trova un quadrato bianco e sta lavorando sul diritto del lavoro, lavora la maglia successiva a diritto. Buon lavoro!
08.02.2019 - 16:17
![]() Rita wrote:
Rita wrote:
Grazie, adesso ho capito!!!
31.01.2019 - 13:26
![]() Rita wrote:
Rita wrote:
Ho cominciato questo scialle dalla foto bellissimo a mi sembra che la spiegazione non corrisponda!! Viene cominciato dalla punta centrale giusto....
29.01.2019 - 23:08DROPS Design answered:
Buongiorno Rita. Lo scialle ha inizio dalla parte centrale, in alto. Si inizia quindi con la parte lavorata a maglia rasata con i buchi (diag. A1 e A2) e si procede verso la punta in basso seguendo gli altri diagrammi come indicato. Buon lavoro!
30.01.2019 - 06:44
![]() Lena wrote:
Lena wrote:
Hej! Är rättelserna gjorda på mönstersidan efter insändaren om fel från den 7.12.2018? Sjalen är ju så fin och den behöver jag sticka NU.... ✊🏻
13.01.2019 - 23:04DROPS Design answered:
Hei Lena. Ja diagrammene ble oppdatert 7.12.2018. God fornøyelse
16.01.2019 - 15:03
![]() Kajsa wrote:
Kajsa wrote:
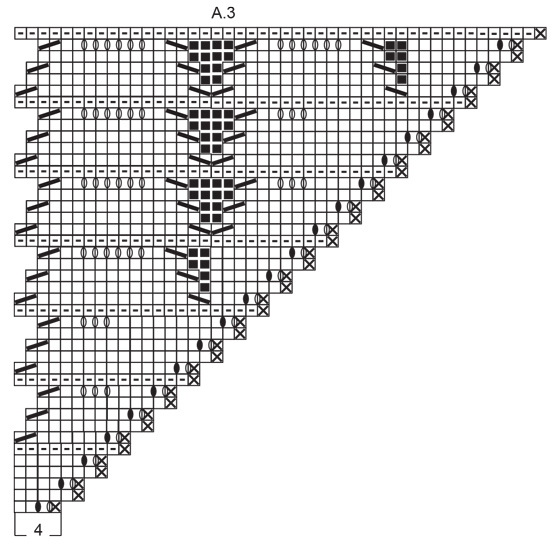
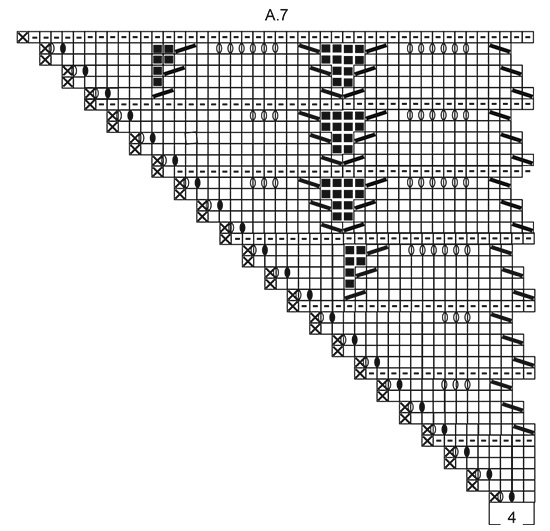
Hej! Jag har problem med diagram A3 och A7, nämligen följande: Varv 11 startar med tolv maskor, sedan ökas fyra med omslag och minskas 1, vilket gör att efter varv 11 finns 15 maskor på stickan. Varv 12 börjar dock med 16 maskor. Hur hänger det ihop? Tacksam för snabbt svar! /Kajsa
07.12.2018 - 08:35DROPS Design answered:
Hei Kajsa. Du har helt rett i at dette ikke går opp. Her mangler det 1 kast. Det skal altså være 3 kast etter hverandre, sånn som på rad 17. Omgang 11 av A.3 strikkes slik: 1 vrang, 1 kast, 1 rett, 1 sort kast, 4 rett, 1 kast, 1 rett, 1 kast, 1 rett, 1 kast, 2 rett, 2 rett sammen. A.7 strikkes likt, men motsatt rekkefølge. Vi skal få rettet dette i diagrammet snarest. Takk for beskjed og god fornøyelse
07.12.2018 - 09:40Katerina wrote:
Could i find instructions about this pattern in greek? unfortunately my mum doesn't understand english. Thank you in advance.
23.10.2018 - 19:49DROPS Design answered:
Hi Katerina, Unfortunately we have not translated this pattern into Greek. Hopefully we will be able to do so in the not too distant future. Kind regards.
24.10.2018 - 07:57
![]() Melanie wrote:
Melanie wrote:
Hallo, ich bin gerade dabei dieses Tuch zu stricken, nur leider verwirrt mich ein Teil der Anleitung. Ich habe bereits Diagramm A.1 und A.2 gestrickt, habe also nun genau 81 Maschen auf der Rundnadel. Der nächste Absatz ist mir unklar; könnt ihr das nochmal einfacher erklären? Oder muss ich einfach nur nochmal A.1 und A.2 stricken? Ich bin leider ratlos ohne Diagramm. Liebe Grüße und danke
15.07.2018 - 14:07DROPS Design answered:
Liebe Melanie, nachdem Sie A.1 und A.2 einmal in der Höhe gestrickt haben, stricken Sie weiter wie in A.1 und A.2 (= mit den Zunahmen am Anfang bzw am Ende A.1/A.2, dh am Anfang und am Ende der Reihe sowie auf beiden Seiten der mittleren Maschen und das Lochmuster wie zuvor wiederholen) bis Sie 333 M (= 166 M auf beiden Seiten der mittleren M) auf der Nadel haben. Viel Spaß beim stricken!
16.07.2018 - 09:11
High Tide#hightideshawl |
|||||||||||||||||||||||||
 |
 |
||||||||||||||||||||||||
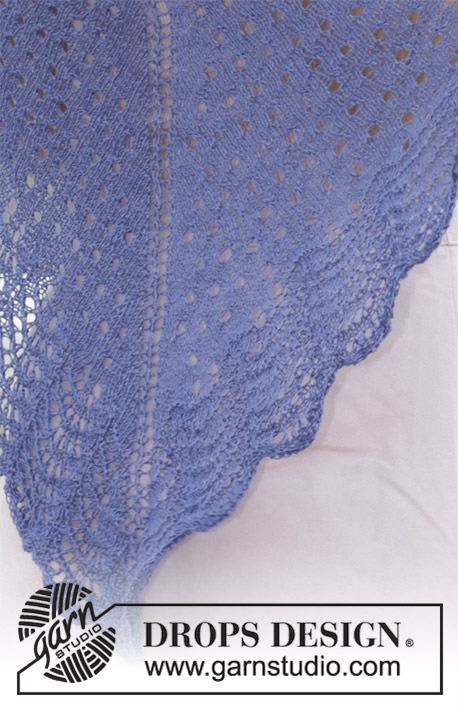
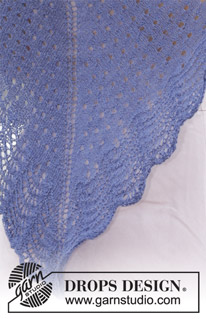
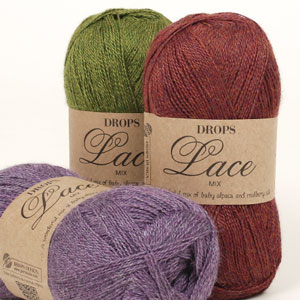
Knitted shawl with lace and wave pattern. The piece is worked top down in DROPS Lace.
DROPS 186-26 |
|||||||||||||||||||||||||
|
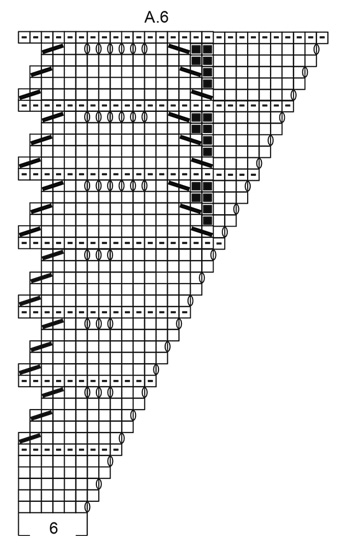
INFORMATION FOR THE PATTERN: RIDGE/GARTER STITCH (worked back and forth): 1 ridge = Knit 2 rows. PATTERN: See diagrams A.1 to A.7. The diagrams show all the rows in the pattern seen from the right side. CASTING OFF TIP To avoid the cast-off edge being tight you can make yarn overs at the same time as you cast off. Make yarn overs above all the yarn overs from the previous row with yarn overs; the yarn overs are then cast off as normal stitches. Make sure you do not tighten the strand. If the cast-off edge is still tight, you can use a larger needle size to cast off. SHAPING: If you are using another yarn from yarn group A, the shawl will not need to be stretched when finished; but dampen it and lay it flat in the right shape. Allow it to dry. Repeat this process each time the shawl is washed. ---------------------------------------------------------- SHAWL: The piece is worked back and forth with circular needle to give enough room for all the stitches. It is worked top down. Cast on 5 stitches with circular needle size 3 mm and Lace. Now work the next 2 rows as follows: ROW 1 (= right side): Work 1 edge stitch in GARTER STITCH - see description above, 1 yarn over, 1 stitch in stocking stitch, 1 yarn over, 1 stitch in stocking stitch, 1 yarn over, 1 stitch in stocking stitch, 1 yarn over and 1 edge stitch in garter stitch. ROW 2 (= wrong side): 2 edge stitches in garter stitch, purl until there are 2 stitches left and 2 edge stitches in garter stitch = 9 stitches on the needle. Then work according to diagrams A.1 and A.2 as follows: Work diagram A.1 over the first 4 stitches, 1 stitch in stocking stitch (= mid-stitch - this is worked in stocking stitch throughout the whole piece), work A.2 over the last 4 stitches. Continue working like this according to A.1 and A.2 until the diagrams have been worked 1 time in height = 81 stitches on the needle. READ THE WHOLE OF THE NEXT SECTION BEFORE CONTINUING! Now you will continue with pattern and increases in the same way as in A1 and A.2. You are increasing 2 stitches at the beginning and end of the row and increasing on each side of the mid-stitch. The row of holes is worked in the same way; it is important to make sure the rows of holes are above each other (as before) and that there are at least 5 stitches stocking stitch on each side of the mid-stitch. Work like this until you have increased a total of 54 times and there are 333 stitches on the needle (= 166 stitches on each side of the mid-stitch). Now continue as follows on the next row from the right side: Work diagram A.3 over 4 stitches, repeat diagram A.4 over the next 156 stitches (= 12 repeats in width), work A.5 over 6 stitches, 1 stitch in stocking stitch (= mid-stitch), A.6 over 6 stitches, repeat diagram A.4 over the next 156 stitches (= 12 repeats in width), work A.7 over the last 4 stitches. Work the diagrams like this 1 time in height = 555 stitches on the needle. Work 2 ridges. READ CASTING OFF TIP and cast off with knit on the next row. Cut and fasten the strand. STRETCHING: Place the shawl in luke-warm water until it is thoroughly wet. Press the water carefully out of the shawl - do not twist the garment, then roll the shawl in a towel and press to remove even more water - the shawl should just be damp. If you have used another yarn from yarn group A, read SHAPING above. Lay the shawl on a floor rug or mattress - pull it gently into shape and use pins to fasten it down. Allow the shawl to dry. Repeat the process each time the shawl is washed. |
|||||||||||||||||||||||||
Diagram explanations |
|||||||||||||||||||||||||
|
|||||||||||||||||||||||||
 |
|||||||||||||||||||||||||
 |
|||||||||||||||||||||||||
 |
|||||||||||||||||||||||||
 |
|||||||||||||||||||||||||
 |
|||||||||||||||||||||||||
Have you finished this pattern?Tag your pictures with #dropspattern #hightideshawl or submit them to the #dropsfan gallery. Do you need help with this pattern?You'll find 17 tutorial videos, a Comments/Questions area and more by visiting the pattern on garnstudio.com. © 1982-2025 DROPS Design A/S. We reserve all rights. This document, including all its sub-sections, has copyrights. Read more about what you can do with our patterns at the bottom of each pattern on our site. |
|||||||||||||||||||||||||










Post a comment to pattern DROPS 186-26
We would love to hear what you have to say about this pattern!
If you want to leave a question, please make sure you select the correct category in the form below, to speed up the answering process. Required fields are marked *.