
Popular categories
Looking for a yarn?


Comments / Questions (45)
![]() Giovanna wrote:
Giovanna wrote:
Grazie mille.
16.10.2025 - 07:45
![]() Giovanna wrote:
Giovanna wrote:
Scusate di nuovo ma lo schema mostra solo i ferri diritti oppure anche quelli a rovescio, perché se cosi fosse anche sul rovescio vengono fatti i gettati e gli aumenti? grazie ancora.
15.10.2025 - 11:11DROPS Design answered:
Buonasera Giovanna, il diagramma mostra tutti i ferri del lavoro e la legenda indica come lavorarli sul diritto e sul rovescio. Buon lavoro!
15.10.2025 - 16:26
![]() Giovanna wrote:
Giovanna wrote:
Vorrei realizzare questo bellissimo scialle ma non capisco dove dice 54 aumenti per passare a 333 maglie sul ferro, capisco che devo continuare con il motivo A1 A2 e che devono esserci almeno 5 maglie rasate vicino alla centrale ma scendo i conti dei 54 aumenti non mi ridanno i conti potrei avere un aiuto? grazie.
15.10.2025 - 10:42DROPS Design answered:
Buonasera Giovanna, gli aumenti sono incorporati nel diagramma, deve lavorare fino a quando gli aumenti sono stati lavorati per 54 volte. Buon lavoro!
15.10.2025 - 16:25
![]() Maibrit Christiansen wrote:
Maibrit Christiansen wrote:
Ja, jeg har lige endnu engang kontrolleret maskeantallet. Og ja alle omslagene er der.
10.05.2021 - 13:36DROPS Design answered:
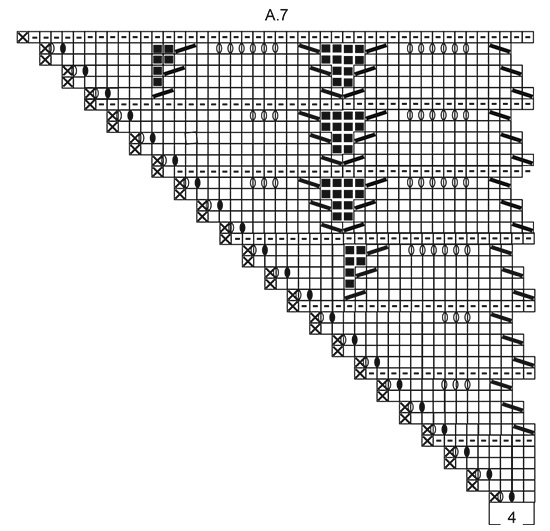
Hei Majbrit. Usikker på hvor det blir feil hos deg, men i diagram A.7 i rad 18 skal du ha 22 masker, i rad 19 strikker du 2 steder 2 masker sammen og øker med 2 masker = fremdeles 22 masker. Når du da strikker rad 20 skal du da også ha 22 masker. Du skriver at det skal være 21 masker, men i rad 20 skal det være 22. Kan det være noe tellefeil der? mvh DROPS design
10.05.2021 - 14:23
![]() Maibrit Christiansen wrote:
Maibrit Christiansen wrote:
Efter jeg har fået god hjælp tidligere er jeg nu desværre gået i stå igen så tæt på målet. I diagram 7 kan jeg ikke få maskeantallet til at passe på pind nr. 20 (vrangpind). Iflg. diagrammet skal der være 21 masker efter den førstemaske (ret) men jeg har kun 18 masker. Har talt alle pindene efter og så vidt jeg kan se stemmer det hele vejes. Kan I regne ud hvor det er gået galt for mig??
10.05.2021 - 09:06DROPS Design answered:
Hei Maibrit Husket du kastene på begge steder på pinne 19 i A.7? Både dobbeltkastet og enkelt kastet? Diagram A.7 og A.4 går litt over hverandre. Har du riktig maskeantall på de andre diagrammene, kan være fort gjort å overse et kast? mvh DROPS design
10.05.2021 - 13:22
![]() Lelletta wrote:
Lelletta wrote:
Non era più semplice spiegare come avete scritto voi ora? Spiegazioni sempre perfette ma machiavelliche! 2 maglie...54 aumenti..ecc...Vi seguo molto, ma spesso mi trovo in difficoltà, come tante altre, leggendo i vari commenti di quasi tutti i modelli! Semplificate! Scusate lo sfogo, ma il mio vuole essere solo un consiglio, una critica spero costruttiva! Comunque sempre grazie e buon lavoro! :)
25.04.2021 - 00:13
![]() Lelletta wrote:
Lelletta wrote:
Buonasera, sono ancora io, scusate!! Sono ferma alla fine delle 81 maglie perché nn capisco come è dove aumentare per arrivare ad avere 333 maglie.se capisco bene sono 6 in tutto 4 ai lati e 2 al centro per 54, quindi per 9 volte. Ma, a parte che non mi torna il conto, ogni quanti ferri devo aumentare? Cosa sbaglio? Spero di essere stata chiara! Potete spiegare un po\' più semplicemente per favore? Ringrazio come al solito per la vostra disponibilità!
24.04.2021 - 19:08DROPS Design answered:
Buonasera Lelletta, la sezione spiega semplicemente come si svolgerà il lavoro: deve continuare a lavorare A.1 e A.2 come indicato fino ad avere 166 maglie a ogni lato della maglia centrale. Buon lavoro!
24.04.2021 - 22:19
![]() Lelletta wrote:
Lelletta wrote:
Buonasera. sto lavorando questo scialle che dalla foto sembra completamente diverso... A me risulta molto compatto, mentre nella foto il bordo è molto più traforato e si intravedono dei giri a rovescio che non sono menzionati nelle spiegazioni! Forse avete messo la foto di un altro scialle? O manca qualche altra spiegazione/diagramma? Spero in una rapida risposta, ho il lavoro in sospeso...Grazie mille!
22.04.2021 - 22:06DROPS Design answered:
Buonasera Lelletta, la lavorazione si aprirà dopo il bloccaggio. Buon lavoro!
22.04.2021 - 22:58
![]() Elsemarie wrote:
Elsemarie wrote:
Jag får inte ihop varv 5 i diagram A3. JAg får det inte att stämma så de dubbla omslagen kommer över varandra som det ser ut i diagrammet. Ska det vara över varandra?
04.03.2021 - 11:40DROPS Design answered:
Hej Elsemarie, A3 strikkes i den ene side og de dobbelte omslag skal strikkes inden for retmasken på hver 2.pind. Da det er udtagninger kommer de ikke nøjagtig over hinanden men de vil altid være næst yderst. God fornøjelse!
05.03.2021 - 08:58
![]() Maibrit Christiansen wrote:
Maibrit Christiansen wrote:
Tak for det hurtige svar. Nu har jeg lige prøvet igen men kan stadig ikke få det til at passe, Efter 1. pind efter diagram A! + 1 midtermaske + A2 har jeg ganske vist 15 masker men når jeg på 2. pind skal lade det ene omslag falde uden at strikke det må der nødvendigvis blive 2 masker mindre efter denne pind. Eller har jeg helt misforstået opskriften??
03.02.2021 - 16:33DROPS Design answered:
Hej Maibrit, Jo når du laver 2 omslag og slipper det ene ned så har du 1 ny maske på næste p, det gør du 2 gange + 1 almindeligt omslag = 3 nye masker i både A.1 og A.2. Du kan se på næste pind hvor mange masker du skal have :)
04.02.2021 - 14:44
|
|||||||||||||||||||||||||
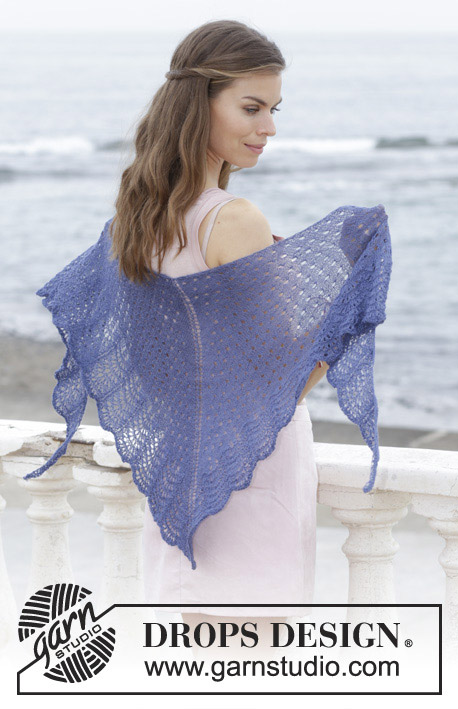
High Tide#hightideshawl |
|||||||||||||||||||||||||
 |
 |
||||||||||||||||||||||||
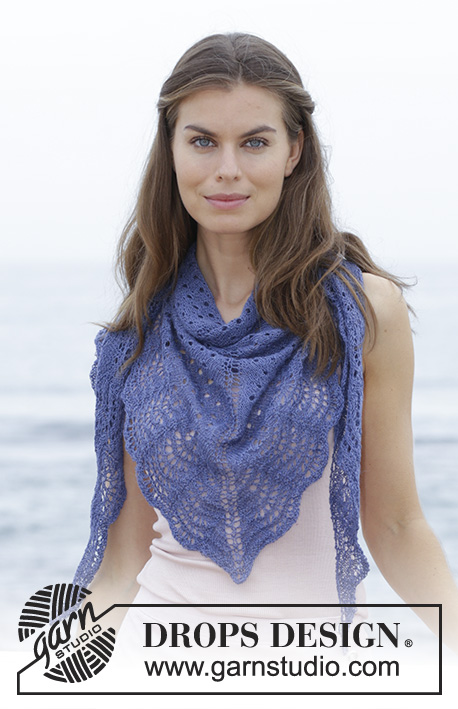
Knitted shawl with lace and wave pattern. The piece is worked top down in DROPS Lace.
DROPS 186-26 |
|||||||||||||||||||||||||
|
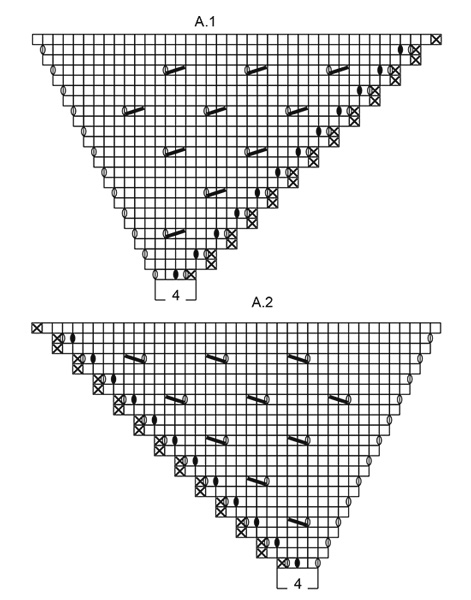
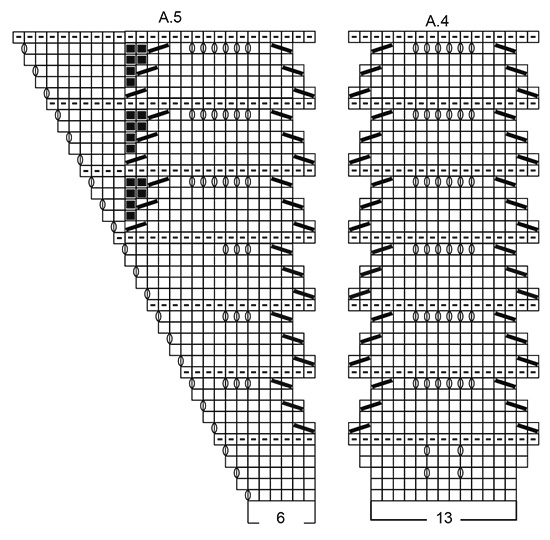
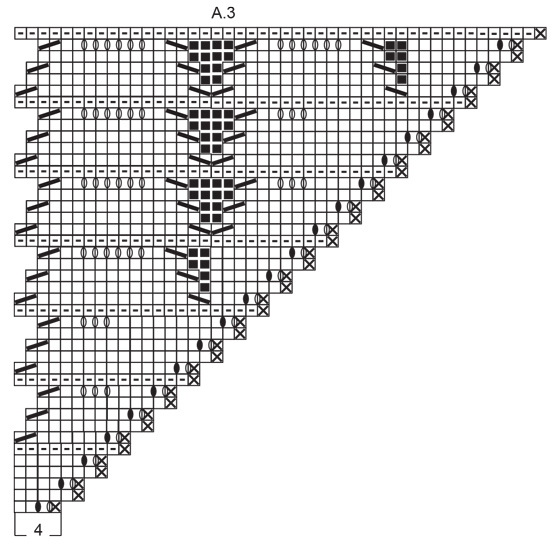
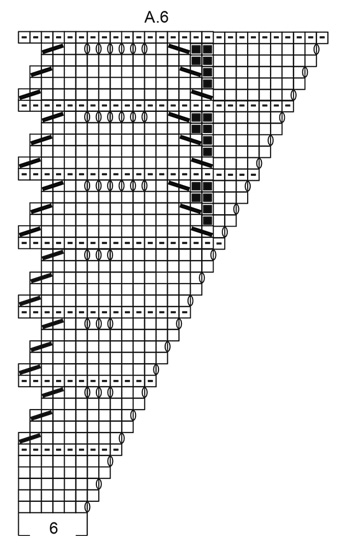
INFORMATION FOR THE PATTERN: RIDGE/GARTER STITCH (worked back and forth): 1 ridge = Knit 2 rows. PATTERN: See diagrams A.1 to A.7. The diagrams show all the rows in the pattern seen from the right side. CASTING OFF TIP To avoid the cast-off edge being tight you can make yarn overs at the same time as you cast off. Make yarn overs above all the yarn overs from the previous row with yarn overs; the yarn overs are then cast off as normal stitches. Make sure you do not tighten the strand. If the cast-off edge is still tight, you can use a larger needle size to cast off. SHAPING: If you are using another yarn from yarn group A, the shawl will not need to be stretched when finished; but dampen it and lay it flat in the right shape. Allow it to dry. Repeat this process each time the shawl is washed. ---------------------------------------------------------- SHAWL: The piece is worked back and forth with circular needle to give enough room for all the stitches. It is worked top down. Cast on 5 stitches with circular needle size 3 mm and Lace. Now work the next 2 rows as follows: ROW 1 (= right side): Work 1 edge stitch in GARTER STITCH - see description above, 1 yarn over, 1 stitch in stocking stitch, 1 yarn over, 1 stitch in stocking stitch, 1 yarn over, 1 stitch in stocking stitch, 1 yarn over and 1 edge stitch in garter stitch. ROW 2 (= wrong side): 2 edge stitches in garter stitch, purl until there are 2 stitches left and 2 edge stitches in garter stitch = 9 stitches on the needle. Then work according to diagrams A.1 and A.2 as follows: Work diagram A.1 over the first 4 stitches, 1 stitch in stocking stitch (= mid-stitch - this is worked in stocking stitch throughout the whole piece), work A.2 over the last 4 stitches. Continue working like this according to A.1 and A.2 until the diagrams have been worked 1 time in height = 81 stitches on the needle. READ THE WHOLE OF THE NEXT SECTION BEFORE CONTINUING! Now you will continue with pattern and increases in the same way as in A1 and A.2. You are increasing 2 stitches at the beginning and end of the row and increasing on each side of the mid-stitch. The row of holes is worked in the same way; it is important to make sure the rows of holes are above each other (as before) and that there are at least 5 stitches stocking stitch on each side of the mid-stitch. Work like this until you have increased a total of 54 times and there are 333 stitches on the needle (= 166 stitches on each side of the mid-stitch). Now continue as follows on the next row from the right side: Work diagram A.3 over 4 stitches, repeat diagram A.4 over the next 156 stitches (= 12 repeats in width), work A.5 over 6 stitches, 1 stitch in stocking stitch (= mid-stitch), A.6 over 6 stitches, repeat diagram A.4 over the next 156 stitches (= 12 repeats in width), work A.7 over the last 4 stitches. Work the diagrams like this 1 time in height = 555 stitches on the needle. Work 2 ridges. READ CASTING OFF TIP and cast off with knit on the next row. Cut and fasten the strand. STRETCHING: Place the shawl in luke-warm water until it is thoroughly wet. Press the water carefully out of the shawl - do not twist the garment, then roll the shawl in a towel and press to remove even more water - the shawl should just be damp. If you have used another yarn from yarn group A, read SHAPING above. Lay the shawl on a floor rug or mattress - pull it gently into shape and use pins to fasten it down. Allow the shawl to dry. Repeat the process each time the shawl is washed. |
|||||||||||||||||||||||||
Diagram explanations |
|||||||||||||||||||||||||
|
|||||||||||||||||||||||||
 |
|||||||||||||||||||||||||
 |
|||||||||||||||||||||||||
 |
|||||||||||||||||||||||||
 |
|||||||||||||||||||||||||
 |
|||||||||||||||||||||||||
Have you finished this pattern?Tag your pictures with #dropspattern #hightideshawl or submit them to the #dropsfan gallery. Do you need help with this pattern?You'll find 17 tutorial videos, a Comments/Questions area and more by visiting the pattern on garnstudio.com. © 1982-2026 DROPS Design A/S. We reserve all rights. This document, including all its sub-sections, has copyrights. Read more about what you can do with our patterns at the bottom of each pattern on our site. |
|||||||||||||||||||||||||


With over 40 years in knitting and crochet design, DROPS Design offers one of the most extensive collections of free patterns on the internet - translated to 17 languages. As of today we count 324 catalogues and 12290 patterns translated into English (UK/cm). 12290
We work hard to bring you the best knitting and crochet have to offer, inspiration and advice as well as great quality yarns at incredible prices! Would you like to use our patterns for other than personal use? You can read what you are allowed to do in the Copyright text at the bottom of all our patterns. Happy crafting!
Post a comment to pattern DROPS 186-26
We would love to hear what you have to say about this pattern!
If you want to leave a question, please make sure you select the correct category in the form below, to speed up the answering process. Required fields are marked *.