The yarn cost is calculated from the pattern’s smallest size and the yarn’s cheapest product type. Looking for an even better price? You might find it on the DROPS Deals!
Why Not / DROPS 182-13
Change language:
English (UK/cm), Bulgaria#whynotshorts
DROPS Design: Pattern no fl-018
-------------------------------------------------------
Alternative Yarn – See how to change yarns here
Yarn Groups A to F – Use the same pattern and change the yarn here
Yarn usage using an alternative yarn – Use our yarn converter here
-------------------------------------------------------
The yarn cost is calculated from the pattern’s smallest size and the yarn’s cheapest product type. Looking for an even better price? You might find it on the DROPS Deals!
Each of our patterns has specific tutorial videos to help you.
These step-by-step tutorials might also help you:
Why is the knitting/crochet tension so important?
Knitting tension is what determines the final measurements of your work, and is usually measured per 10 x 10 cm. It is provided like so: number of stitches in width x number of rows in height - eg: 19 stitches x 26 rows = 10 x 10 cm.
The knitting tension is very individual; some people knit/crochet loosely while others work tightly. You adjust the knitting tension with the needle size, which is why the suggested needle size is only meant as a guide! You need to adjust this (up or down) to ensure that YOUR knitting tension matches the knitting tension provided in the pattern. If you work with a different knitting tension than provided you will have a different yarn consumption, and your work will have different measurements than what the pattern suggests.
The knitting tension also determines which yarns can replace each other. As long as you achieve the same knitting tension you can replace one yarn with another.
See DROPS lesson: How to measure your tension/gauge
See DROPS video: How to make a gauge tension swatch
How do I know how many balls of yarn I need?
The required amount of yarn is provided in grams, eg: 450 g. To calculate how many balls you’ll need you first need to know how many grams are in 1 ball (25g, 50g or 100g). This information is available if you click on the individual yarn quality on our pages. Divide the amount required with the amount of each ball. For example, if each ball is 50g (the most common amount), the calculation will be as follows: 450 / 50 = 9 balls.
Can I use a different yarn than what the pattern suggests?
The important thing when changing from one yarn to another is that the knitting/crochet tension remains the same. This is so that the measurements of the finished piece will be the same as on the sketch provided. It is easier to achieve the same knitting tension using yarns from the same yarn group. It is also possible to work with multiple strands of a thinner yarn to achieve the knitting tension of a thicker one. Please try our yarn converter. We recommend you to always work a test swatch.
Please NOTE: when changing yarn the garment might have a different look and feel to the garment in the photo, due to individual properties and qualities of each yarn.
See DROPS lesson: Can I use a different yarn than the one mentioned in the pattern?
What are the yarn groups?
All our yarns are categorised into yarn groups (from A to F) according to thickness and knitting tension – group A contains the thinnest yarns and group F the thickest. This makes it easier for you to find alternative yarns to our patterns, should you wish to switch yarn. All yarns within the same group have a similar knitting tension and can easily replace each other. However, different yarn qualities have different structures and properties which will give the finished work a unique look and feel.
How do I use the yarn calculator?
At the top of all our patterns you’ll find a link to our yarn calculator, which is a helpful tool should you wish to use a different yarn than suggested. By filling in the yarn quality you wish to replace, the amount (in your size) and number of strands, the calculator will present good alternative yarns with the same knitting tension. Additionally it will tell you how much you’ll require in the new qualities and whether you’ll need to work with multiple strands. Most skeins are 50g (some are 25g or 100g).
If the pattern is worked with multiple colours, every colour will have to be calculated separately. Similarly, if the pattern is worked with several strands of different yarns (for example 1 strand Alpaca and 1 strand Kid-Silk) you will have to find alternatives for each, individually.
Why do you show discontinued yarns in the patterns?
Since different yarns have different qualities and textures we have chosen to keep the original yarn in our patterns. However, you can easily find options among our available qualities by using our yarn calculator, or simply pick a yarn from the same yarn group.
It is possible that some retailers still have discontinued yarns in stock, or that someone has a few skeins at home that they would like to find patterns for.
The yarn calculator will provide both alternative yarn as well as required amount in the new quality.
What size should I knit?
If you think it's hard to decide what size to make, it can be a good idea to measure a garment you own already and like the size of. Then you can pick the size by comparing those measures with the ones available in the pattern's size chart.
You'll find the size chart at the bottom of the pattern.
See DROPS lesson: How to read size chart
Why do I get the wrong knitting tension with the suggested needle size?
The needle size provided in the pattern serves only as a guide, the important thing is to follow the knitting tension. And since knitting tension is very individual, you will have to adjust the needle size to ensure that YOUR tension is the same as in the pattern – maybe you’ll have to adjust 1, or even 2 needle sizes, up or down to achieve the correct tension. For this, we recommend that you work test swatches.
Should you work with a different knitting tension than the one provided, the measurements of the finished garment might deviate from the measurement sketch.
See DROPS lesson: How to measure your tension/gauge
See DROPS video: How to make a tension/gauge swatch
Why is the pattern worked top-down?
Working a garment top-down provides more flexibility and room for personal adjustment. For example it is easier to try the garment on while working, as well as making adjustments to length of yoke and shoulder caps.
The instructions are carefully explaining every step, in the correct order. Diagrams are adjusted to the knitting direction and are worked as usual.
How do I work according to a knitting diagram?
The diagram depicts all rows/rounds, and every stitch seen from the right side. It is read from bottom to top, from right to left. 1 square = 1 stitch.
When working back and forth, every other row is worked from the right side and every other row is worked from the wrong side. When working from the wrong side, the diagram will have to be worked reversed: from left to right, knit stitches are purled, purl stitches are knit etc.
When working in the round every round is worked from the right side and the diagram are worked from right to left on all rounds.
See DROPS lesson: How to read knitting diagrams
How do I work according to a crochet diagram?
The diagram depicts all rows/rounds, and every stitch seen from the right side. It is worked from bottom to top, from right to left.
When working back and forth every other row is worked from the right side: from right to left and every other row is worked from the wrong side: from left to right.
When working in the round, every row in the diagram are worked from the right side, from right to left.
When working a circular diagram you start in the middle and work your way outwards, counter clockwise, row by row.
The rows usually start with a given number of chain stitches (equivalent to the height of the following stitch), this will either be depicted in the diagram or explained in the pattern.
See DROPS lesson: How to read crochet diagrams
How do I work several diagrams simultaneously on the same row/round?
Instructions for working several diagrams after each other on the same row/round, will often be written like so: “work A.1, A.2, A.3 a total of 0-0-2-3-4 times". This means you work A.1 once, then A.2 is worked once, and A.3 is repeated (in width) the number of times provided for your size – in this case like so: S = 0 times, M = 0 times, L=2 times, XL= 3 times and XXL = 4 times.
The diagrams are worked as usual: begin with the first row in A.1, then work the first row in A.2 etc.
See DROPS lesson: How to read knitting diagrams
See DROPS lesson: How to read crochet diagrams
Why are the sleeves shorter in larger sizes?
The total width of the garment (from wrist-to-wrist) will be larger in the larger sizes, despite the actual sleeves being shorter. The larger sizes have longer sleeve caps and wider shoulders, so there will be a good fit in all sizes.
Where on the garment is the length measured?
The measurement sketch/schematic drawing provides information regarding the full length of the garment. If it’s a jumper or a jacket the length is measured from the highest point on the shoulder closest to the neckline, and straight down to the bottom of the garment. It is NOT measured from the tip of shoulder. Similarly, the length of yoke is measured from the highest point on the shoulder and down to where yoke is split into body and sleeves.
On a jacket measures are never taken along bands, unless specifically stated. Always measure inside band stitches when measuring the length.
See DROPS lesson: How to read a schematic drawing
What is a repeat?
Diagrams are often repeated on the round or in height. 1 repeat is the diagram the way it appears in the pattern. If it says to work 5 repeats of A.1 in the round, then you work A.1 a total of 5 times after/next to each other in the round. If it says to work 2 repeats of A.1 vertically/in height you work the entire diagram once, then begin again at the start and work the entire diagram one more time.
Why does the piece start with more chain stitches than it’s worked with?
Chain stitches are slightly narrower than other stitches and to avoid working the cast-on edge too tight, we simply chain more stitches to begin with. The stitch count will be adjusted on the following row to fit the pattern and measurement sketch.
Why increase before the rib edge when the piece is worked top-down?
The rib edge is more elastic and will contract slightly compared to, for example, stocking stitch. By increasing before the rib edge, you avoid a visible difference in width between the rib edge and the rest of the body.
Why increase in the cast-off edge?
It’s very easy to cast off too tightly, and by making yarn overs while casting off (and simultaneously casting these off) you avoid a too tight cast off edge.
See DROPS video: How to bind off with yarn overs (yo)
How do I increase/decrease on every 3rd and 4th row/round alternately?
To achieve an even increase (or decrease) you can increase on, for example: every 3rd and 4th row alternately, like so: work 2 rows and increase on the 3rd row, work 3 rows and increase on the 4th. Repeat this until the increase is complete.
See DROPS lesson: Increase or decrease 1 st on every 3rd and 4th row alternately
How can I work a jacket in the round instead of back and forth?
Should you prefer to work in the round instead of back and forth, you may of course adjust the pattern. You’ll need to add steeks mid-front (usually 5 stitches), and follow the instructions. When you would normally turn and work from the wrong side, simply work across the steek and continue in the round. At the end you’ll cut the piece open, pick up stitches to work bands, and cover the cut edges.
See DROPS video: How to knit steeks and cut open
Can I work a jumper back and forth instead of in the round?
Should you prefer to work back and forth instead of in the round, you may of course adjust the pattern so you work the pieces separately and then assemble them at the end. Divide the stitches for the body in 2, add 1 edge stitch in each side (for sewing) and work the front and back pieces separately.
See DROPS lesson: Can I adapt a pattern for circular needles into straight needles?
Why is the pattern slightly different than what I see in the photo?
Pattern repeats can vary slightly in the different sizes, in order to get the correct proportions. If you’re not working the exact same size as the garment in the photo, yours might deviate slightly. This has been carefully developed and adjusted so that the complete impression of the garment is the same in all sizes.
Make sure to follow instructions and diagrams for your size!
How do I make a women’s size garment into a men’s size one?
If you have found a pattern you like which is available in women’s size it’s not very difficult to convert it to men’s size. The biggest difference will be the length of sleeves and body. Start working on the women size that you think would fit across the chest. The additional length will be worked right before you cast off for the armhole/sleeve cap. If the pattern is worked top-down you can add the length right after the armhole or before the first decrease on sleeve.
Regarding additional yarn amount, this will depend on how much length you add, but it is better with a skein too many than too few.
How do I prevent a hairy garment from shedding?
All yarns will have excess fibres (from production) that might come off as lint or shedding. Brushed yarns (ie hairier yarns) have more of these loose, excess fibres, causing more shedding.
Shedding also depends on what is worn under or over the garment, and whether this pulls at the yarn fibres. It’s therefore not possible to guarantee that there will be no shedding
Below are some tips on how to get the best result when working with hairier yarns:
1. When the garment is finished (before you wash it) shake it vigorously so the looser hairs come off. NOTE: do NOT use a lint roller, brush or any method that pulls at the yarn.
2. Place the garment in a plastic bag and put it in your freezer - the temperature will cause the fibres to become less attached to each other, and excess fibres will come off easier.
3. Leave in the freezer for a few hours before taking it out and shaking it again.
4. Wash the garment according to the instructions on the yarn label.
Why does my garment pill?
Pilling is a natural process that happens to even the most exclusive of fibers. It's a natural sign of wear and tear that is hard to avoid, and that is most visible in high friction areas of your garment like a sweater's arms and cuffs.
You can make your garment look as new by removing the pilling, using a fabric comb or a pill/lint remover.
Maria Leister wrote:
Er den liten i størrelsen? Savner mål eller tegning.
07.02.2018 - 13:05DROPS Design answered:
Hei Maria. Vi har dessverre ingen målskisse på denne modellen, men ditt ønske er formidlet videre til design avdelingen for fremtidige lignende modeller. I denne modellen er det både vrangbord opp, i sidene og nede, så den er svært tøyelig. Bruker du vanligvis str S, vil str S i dene modellen helt sikkert passe fint. God Fornøyelse!
09.02.2018 - 10:52
Elin Bäckstrand wrote:
Hej! Undrar om jag ska mäta på framsidan eller den förhöjda bak när jag är färdig med resåren i midjan?
09.01.2018 - 18:41DROPS Design answered:
Hej Elin, du skall mäta på framsidan. Lycka till!
22.01.2018 - 16:35
Maria Eriksson wrote:
Hej, på mönstret står det att man ska sticka tills arbetet mäter 20 cm, men ska man då mäta fram eller bak? På alla efter följande mätningar står bak eller fram men inte första gången. Hjälp snabbt tack!
01.01.2018 - 10:28DROPS Design answered:
Hej Maria, du mäter fram första gången. Lycka till :)
11.01.2018 - 08:32
Lina wrote:
Ok! Fina!
31.10.2017 - 19:14
M. Lúcia Borrões wrote:
Vou tentar fazer estes calções para uma menina de 12 anos. Na apresentação diz que encontrarei as medidas (em cm) da peça terminada no fundo das explicações do modelo. A verdade é que não as encontro e seria para mim muito importante, para perceber se o tamanho XS poderia ser adequado. Existe essa informação? Obrigada
27.10.2017 - 12:16DROPS Design answered:
Veja o gráfico do modelo (desenho da camisola). Tem as medidas em cm para todos os tamanhos.
06.11.2017 - 13:26
Johanna wrote:
Fint
24.10.2017 - 23:27
Gaëlle wrote:
I don't find the graphic with the measurements of the finished garment at the bottom of the pattern. Can you help me find it?
19.10.2017 - 17:18
Why Not#whynotshorts |
|
![]() |
![]() |
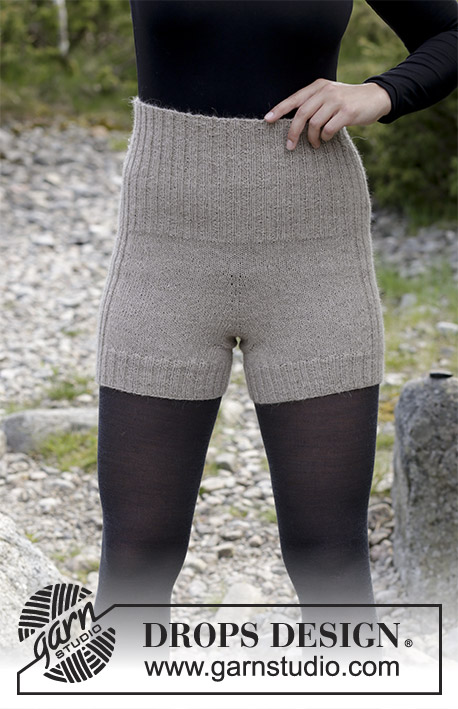
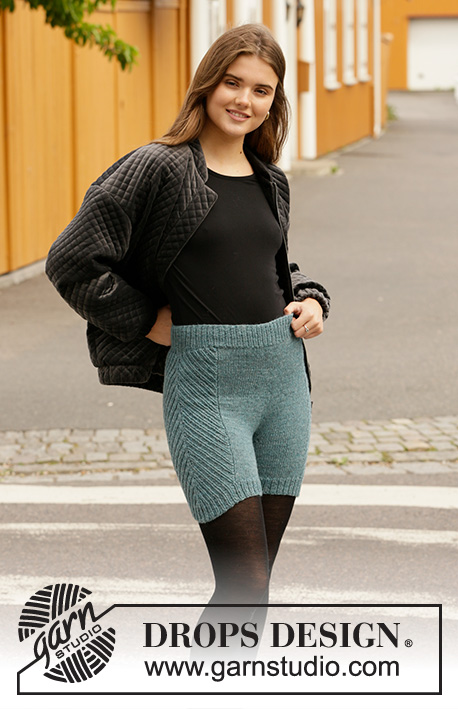
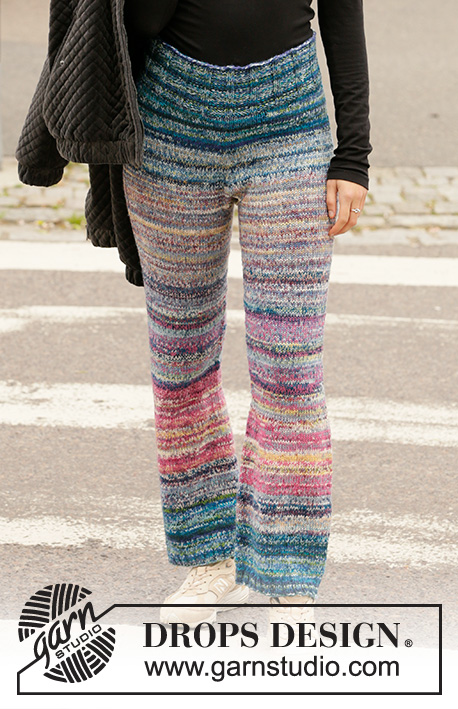
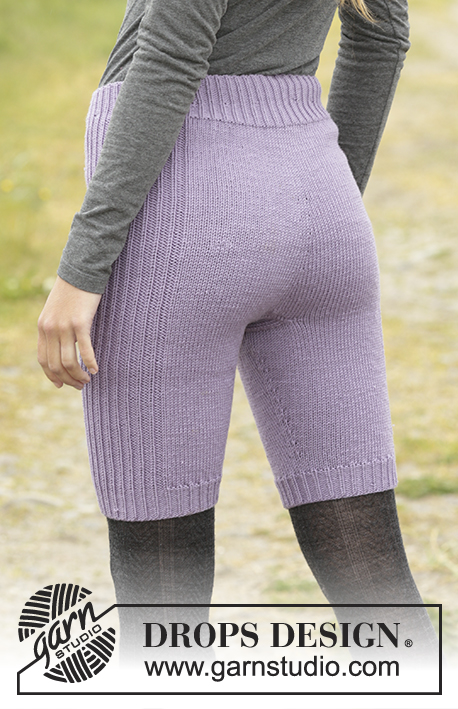
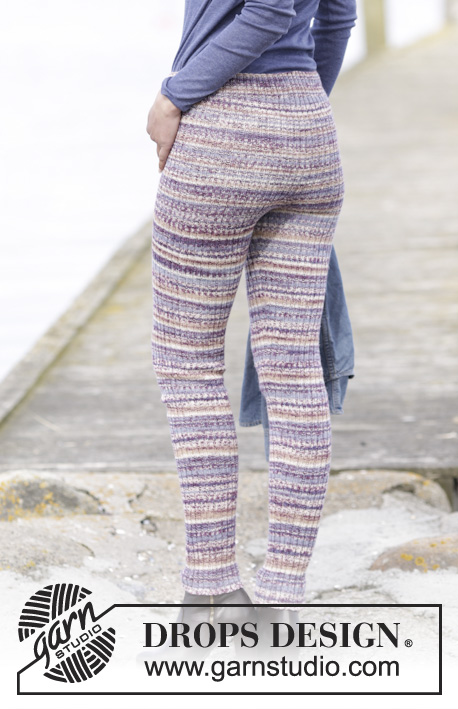
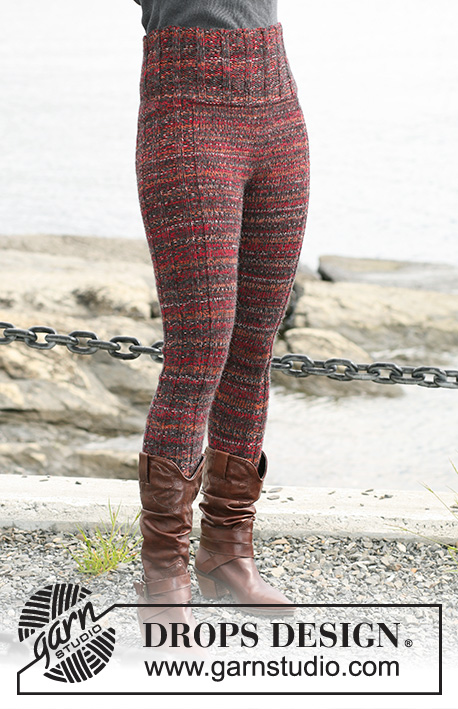
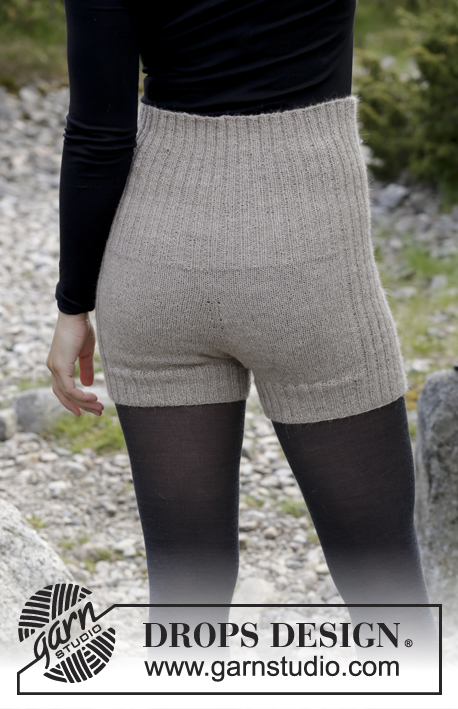
Knitted shorts with rib, worked top down. Sizes S - XXXL. The piece is worked in DROPS Flora.
DROPS 182-13 |
|
INFORMATION FOR THE PATTERN: INCREASE TIP: Increase 1 stitch on each side of each marker as follows: Work until there is 1 stitch left before the marker, make 1 yarn over, knit 2 (the marker sits in the middle of these 2 stitches), make 1 yarn over. On the next round knit the yarn overs twisted (i.e. in the back loop of the stitch instead of the front) to avoid holes. -------------------------------------------------------- SHORTS: The piece is worked in the round with circular needle, top down. Cast on 168-192-216-240 stitches with circular needle size 2.5 mm and Flora. Insert 1 marker at the beginning of the round (= mid back) and 1 marker after 84-96-108-120 stitches (= mid front). Work rib as follows from mid back: Sizes XS/S and L/XL: Purl 1, * knit 2, purl 2 *, repeat from *-* until there are 3 stitches left, finish with knit 2 and purl 1. Sizes M and XXL/XXXL: Knit 1, * purl 2, knit 2 *, repeat from *-* until there are 3 stitches left, finish with purl 2, knit 1. When the piece measures 5 cm, work an elevation at the back as follows: Work 11 stitches rib, turn, tighten strand, work 22 stitches rib back, turn, tighten strand, work 32 stitches rib. Continue in this way by working 10 more stitches each time you turn until you have worked over a total of 122-122-142-142 stitches. Turn one last time to be on the right side of the piece. Work to the marker mid back = beginning of the round. Continue in the round with rib until the piece measures 20-22-24-26 cm mid front. Change to circular needle size 3 mm and work as follows: 27-33-39-45 stitches stocking stitch, 30 stitches rib as before, 54-66-78-90 stitches stocking stitch, 30 stitches rib as before and 27-33-39-45 stitches stocking stitch. When the piece measures 24-26-28-30 cm mid front, increase 2 stitches front and back – READ INCREASE TIP. Repeat the increases every 4th round a total of 10 times – the increased stitches are worked in stocking stitch = 208-232-256-280 stitches. REMEMBER THE KNITTING TENSION! When the piece measures 35-37-39-41 cm mid front, cast off the first 8-8-10-10 stitches after the marker mid back, work the next 88-100-108-120 stitches and then place them on 1 thread (= leg), work the next 16-16-20-20 stitches and leave them on the needle (= gusset), work the next 88-100-108-120 stitches and then place them on 1 thread (= leg), cast off the remaining 8-8-10-10 stitches, cut the strand. Then work 11-12-13-14 cm stocking stitch back and forth over the 16-16-20-20 stitches on the needle, cast off and sew the gusset to the 16-16-20-20 stitches which were cast off mid back. RIGHT LEG: Place the 88-100-108-120 stitches from the thread in the right side on short circular needle size 3 mm, in addition knit up 24-28-32-32 stitches along the one side of the gusset = 112-128-140-152 stitches. Continue by working rib over 30 stitches in the side as before, the other stitches are worked in stocking stitch. Work as this until leg measures 3 cm. Change to short circular needle size 2.5 mm and work rib, knit 2 / purl 2 over all stitches, make sure the rib is worked as before over the 30 stitches in the side. Work rib for 6 cm, cast off with knit over knit and purl over purl. LEFT LEG: Place the stitches from the other thread back on the needle and work as for the first leg. |
|
Have you finished this pattern?Tag your pictures with #dropspattern #whynotshorts or submit them to the #dropsfan gallery. Do you need help with this pattern?You'll find 22 tutorial videos, a Comments/Questions area and more by visiting the pattern on garnstudio.com. © 1982-2025 DROPS Design A/S. We reserve all rights. This document, including all its sub-sections, has copyrights. Read more about what you can do with our patterns at the bottom of each pattern on our site. |
With over 40 years in knitting and crochet design, DROPS Design offers one of the most extensive collections of free patterns on the internet - translated to 17 languages. As of today we count 314 catalogues and 11824 patterns translated into English (UK/cm). 11824
We work hard to bring you the best knitting and crochet have to offer, inspiration and advice as well as great quality yarns at incredible prices! Would you like to use our patterns for other than personal use? You can read what you are allowed to do in the Copyright text at the bottom of all our patterns. Happy crafting!
Post a comment to pattern DROPS 182-13
We would love to hear what you have to say about this pattern!
If you want to leave a question, please make sure you select the correct category in the form below, to speed up the answering process. Required fields are marked *.