
Popular categories
Looking for a yarn?


Comments / Questions (49)
![]() Sharon wrote:
Sharon wrote:
Dear all. You can finish these socks by making a purl row after the last braid and then continuing with stockinette with smaller needles for some rows before casting off. Fold the stockinette inside the sock and either sew loosely , joining to the lower braid or simply sew/attach down the sides. It makes a lovely and pristine top edge. Better still is to decrease by 2 stitches on the purl row, as well as using a half size smaller needles.
21.07.2021 - 10:09
![]() Su wrote:
Su wrote:
Hi! the pattern describes (= recht met koraal ) 'knit with coral' twice. When looking at the english page the second was 'purl with coral', which might need to be corrected :) Also, when doing the last row of the mittens, do you cast off with purl stitches? or knit?
17.02.2021 - 09:11DROPS Design answered:
Dear Sue, thanks for noticing, diagram text has been now updated in dutch - you can cast off with knit stitches at the end of the mittens - just make sure cast off edge is not too tight. happy knitting!
17.02.2021 - 14:40
![]() Ann-Christine Hanselmann wrote:
Ann-Christine Hanselmann wrote:
Hej , jag undrar om man kan sticka vanten nerifrån och upp, som en vanlig vante, alltså jag börjar med 52 maskor. Hälsningar Ann-Christine
07.02.2021 - 16:31DROPS Design answered:
Hei Ann-Christine. Mulig det blir litt vrient med den Latviske fletten. Du vil ikke få den fine avslutningen du ser på bildet. Men om ikke det spiller stor rolle, så les gjerne godt igjennom oppskriften og tilpass den for å strikke andre vei. Vi har dessverre ikke mulighet til å omskrive den. mvh DROPS design
08.02.2021 - 14:05
![]() Elisabet Lind wrote:
Elisabet Lind wrote:
Hej! Jag undrar om man får sticka vante Modell nr u-789 för hand i sitt hem och sedan sälja den som kommissionsvara i en liten hantverksbutik?
02.02.2021 - 15:00DROPS Design answered:
Hej Elisabet. Så här står det på vår våra mönster: " Försäljning av plagg/produkter baserade på DROPS design är tillåtet så länge det sker enskilt/på beställning, kommersiell försäljning utöver detta är inte tillåtet. Det skall tydligt framgå att plagget är tillverkat med utgångspunkt i design från DROPS DESIGN." Så länge det är ett fåtal plagg går det alltså bra. Mvh DROPS Design
03.02.2021 - 08:02
![]() Hæge Aas wrote:
Hæge Aas wrote:
Er det riktig at foten kun har 48 m i alle størrelser? Det virker ulogisk at str 35 til 43 har samme fotvidde. Finner ikke diagram i oppskriften som viser noe annet. Har jeg misforstått noe? Har benyttet meg av gratis oppskrift, men det er en smule «urettferdig» hvis oppskrift er gratis bare for små størrelser. 😢.
03.01.2021 - 21:22DROPS Design answered:
Hei Hæge. På denne oppskriften er fotvidden den samme på alle størrelsene. Mens andre mål på sokken er forskjellige. mvh DROPS design
13.01.2021 - 13:58
![]() Danielle wrote:
Danielle wrote:
Bonjour, il me semble qu'il y a une erreur dans l'explication du TALON (taille 38/40) : "Rang 3 et 4 = Tricoter jusqu'à ce qu'il reste - 10 m" --> c'est 9 m en fait, n'est-ce pas ?
05.03.2019 - 13:36DROPS Design answered:
Bonjour Danielle, tout à fait, merci pour votre retour, la correction va être faite. Bon tricot!
11.03.2019 - 11:23
![]() Andrea wrote:
Andrea wrote:
Liebes Garnstudio-Team, auch ich verzweifel am Daumenloch. Wie wird weitergestrickt, wenn die drei Maschen abgekettet sind? Aus 3 abgeketteten Maschen 13 Maschen aufnehmen geht nach meinem Verständnis gar nicht. Danke und viele Grüße
07.12.2018 - 23:26DROPS Design answered:
Liebe Andrea, eine Korrektur wurde am 16/11 dieses Jahr gemacht - siehe am Ende der schriftlichen Anleitung. Die 3 Maschen werden abgekettet und die 13 neuen Maschen werden mit den Farben der 1. Reihe in A.2 bei der nächsten Runde angschlagen, dann stricken Sie A.2 über diese 13 M. A.2 wurde auch korrigiert. Viel Spaß beim stricken!
10.12.2018 - 08:27
![]() Nora wrote:
Nora wrote:
I also thought that logically i have to cast on 13 on a next row after cast off 3 stitches for a thumb opening to work, but then on A.2 diagram i see i have to work 13 rows in total and on A.1 diagram i am left with 12 rows for a thumb opening, because that first row out of 13 i already used for casting off 😕 So either i have to eliminate the bottom row from A.2 diagram or figure out how to cast on on the same row the cast off is. Could there be a mistake in diagrams?
15.11.2018 - 11:17DROPS Design answered:
Dear Nora, we are checking this part and will hopefully be back as soon as possible, thanks in advance for your patience.
15.11.2018 - 13:46
![]() Maria wrote:
Maria wrote:
Hur gör man tumöppningen på vanten? Vilken färg avmaskar man med och vilken färg använder man när man lägger upp de nya 13 maskorna? Var kommer de här maskorna att ligga? Efter avmaskningen eller före det? Väldigt otydligt.
14.11.2018 - 19:40DROPS Design answered:
Hei Maria. Etter en gjennomgang av oppskriften har vi nå rettet den slik at tommelåpningen stemmer. Du feller på omgangen etter den med sort pil i diagrammet, og legger opp 13 masker på neste omgang. Du legger opp med 2 farger, som om du strikker førset rad i A.2. Dette er nå rettet i teksten og diagrammene. Om diagrammet ikke er synlig på den svenske siden enda kan du se på den norske i mellomtiden. God fornøyelse
16.11.2018 - 09:36
![]() Nora wrote:
Nora wrote:
About mitten thumb opening. When i cast off 3 stitches do i immediately after that cast on 13 new stitches or do i first work in a round and then cast on 13 new stitches at the beginning of cast off stitches? What color yarn do i use for cast off and cast on stitches?
14.11.2018 - 09:54DROPS Design answered:
Hi Nora, You cast on 13 new stitches on the next row after casting off 3 stitches. Use off white yarn for the casting off and on. Happy knitting!
15.11.2018 - 09:37
|
|||||||||||||||||||||||||||||||||||||||||||
Hokey Pokey#hokeypokeyset |
|||||||||||||||||||||||||||||||||||||||||||
 |
 |
||||||||||||||||||||||||||||||||||||||||||
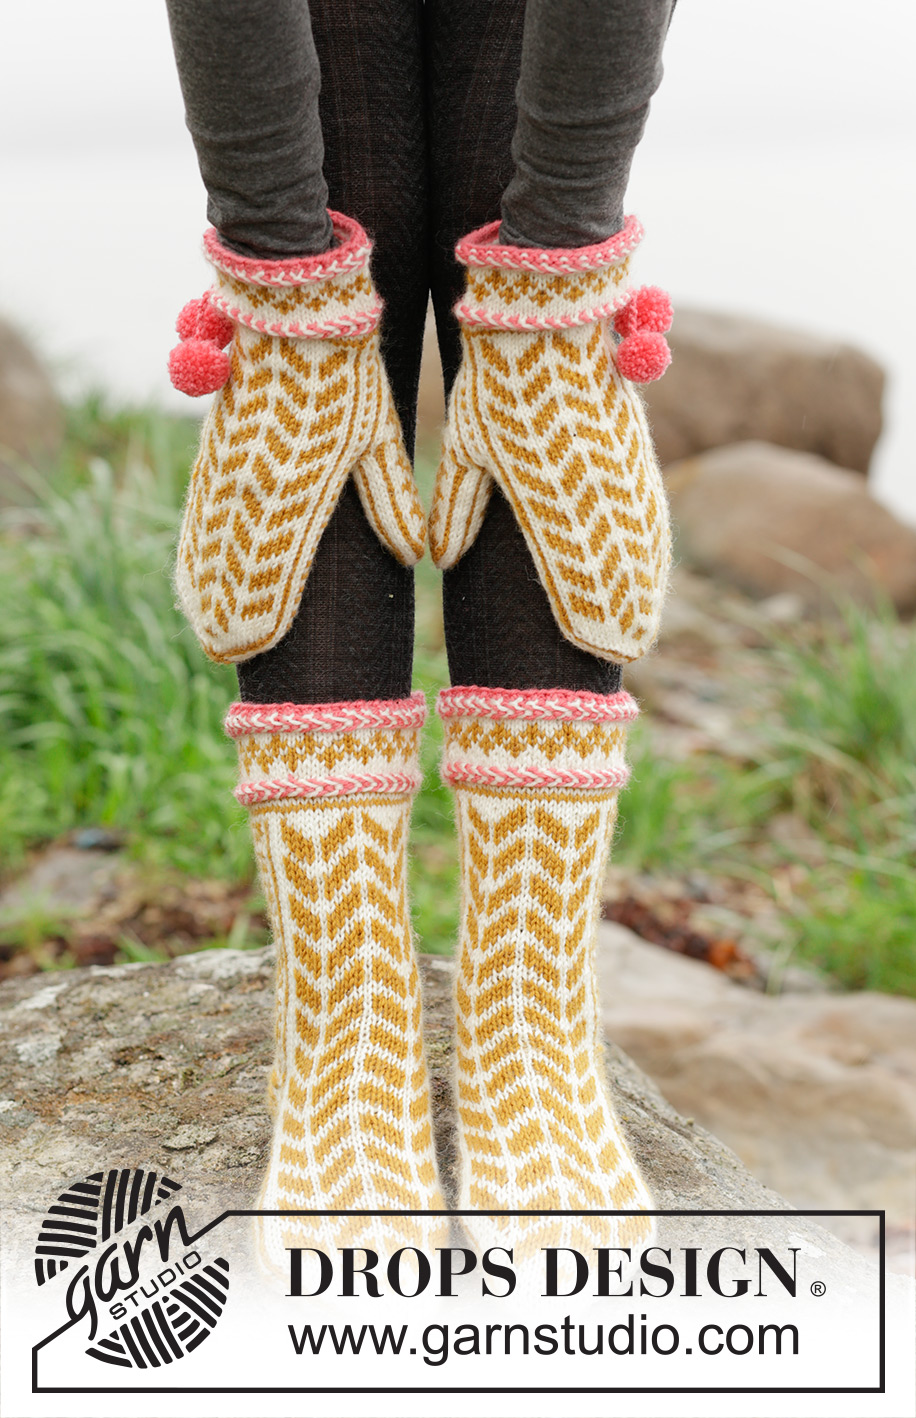
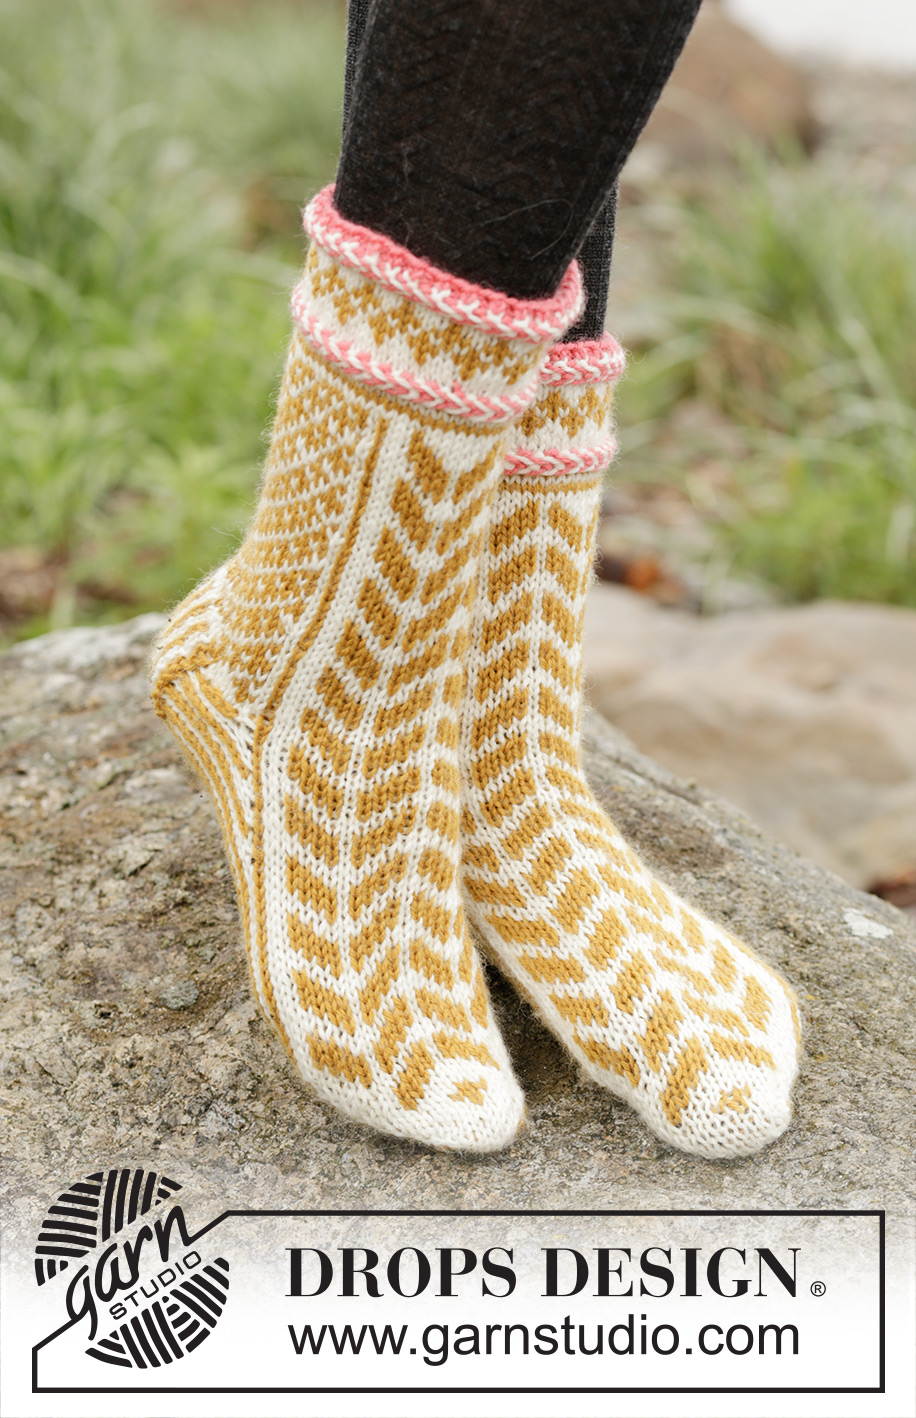
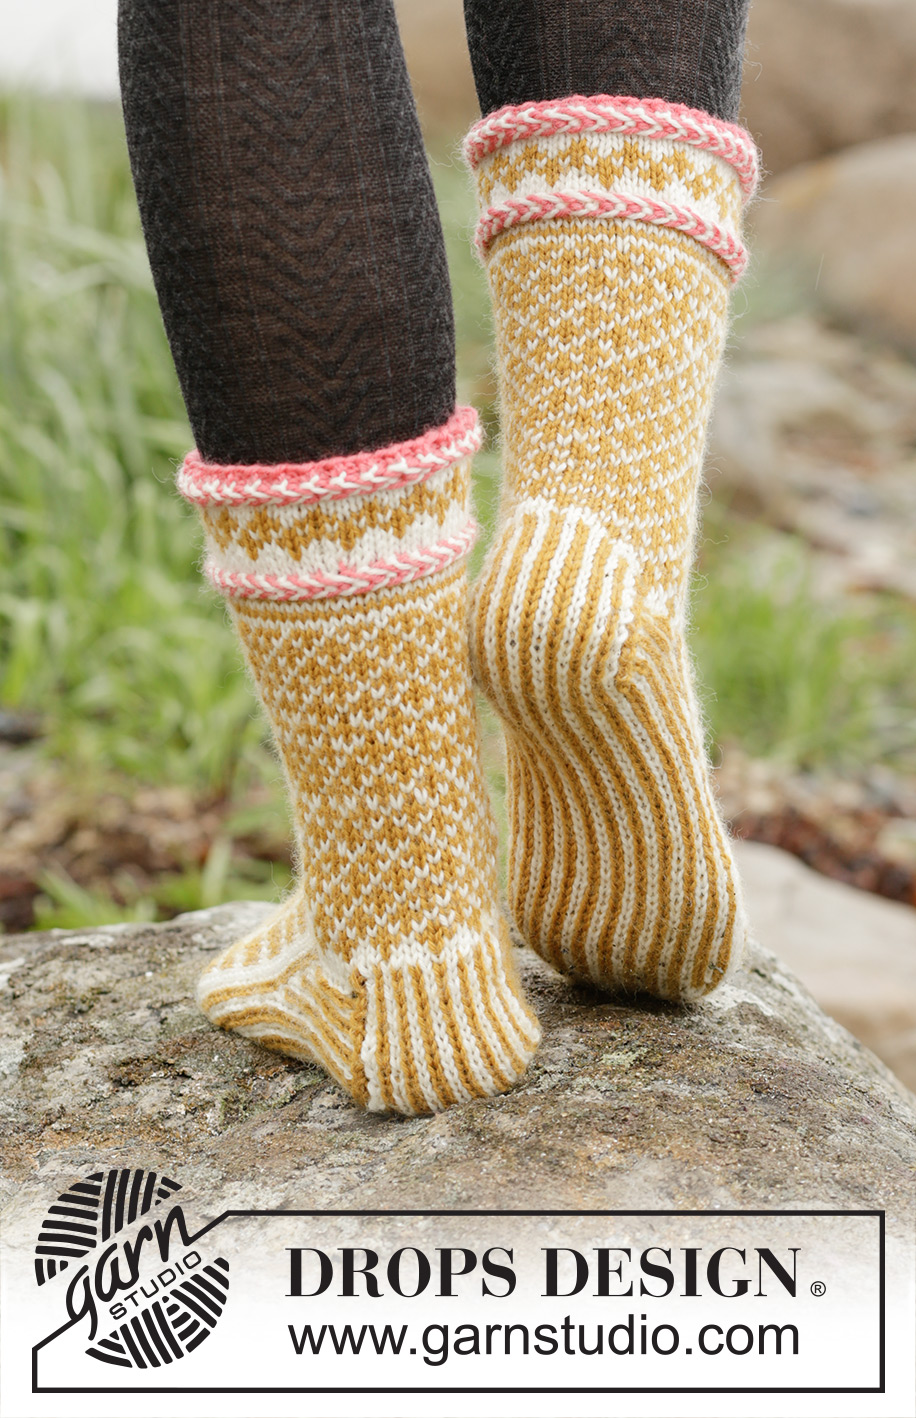
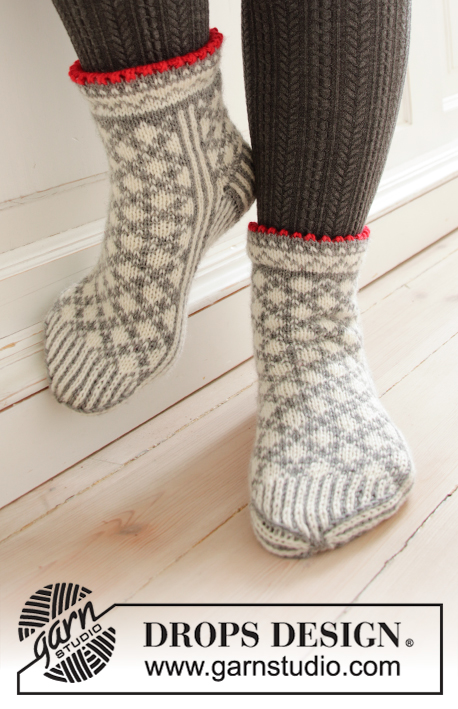
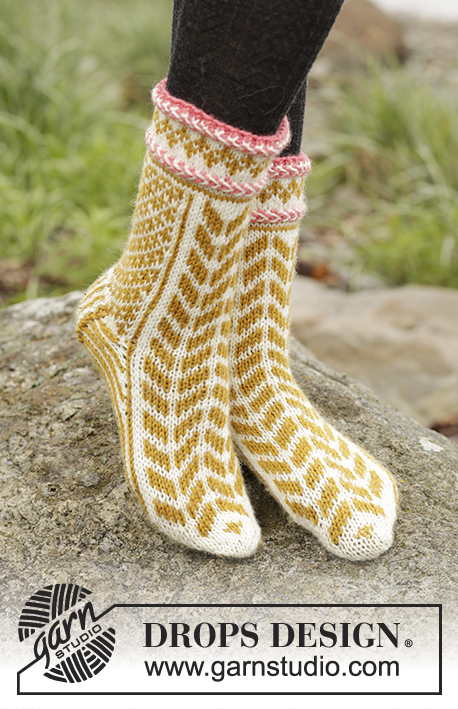
Set consists of: Knitted DROPS mittens and toe-up socks with Nordic pattern, Latvian braid and pompom in ”Karisma”.
DROPS 173-42 |
|||||||||||||||||||||||||||||||||||||||||||
|
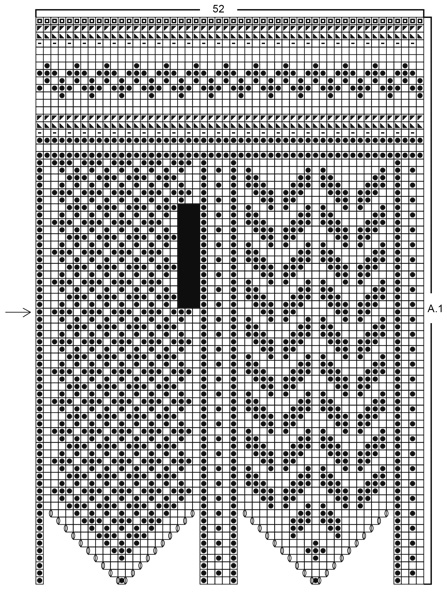
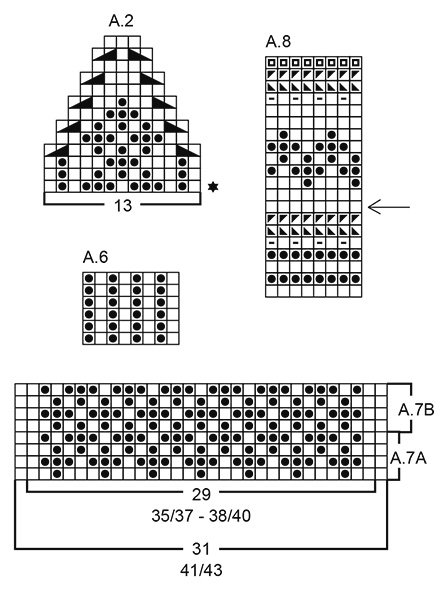
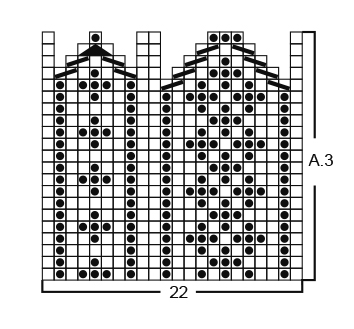
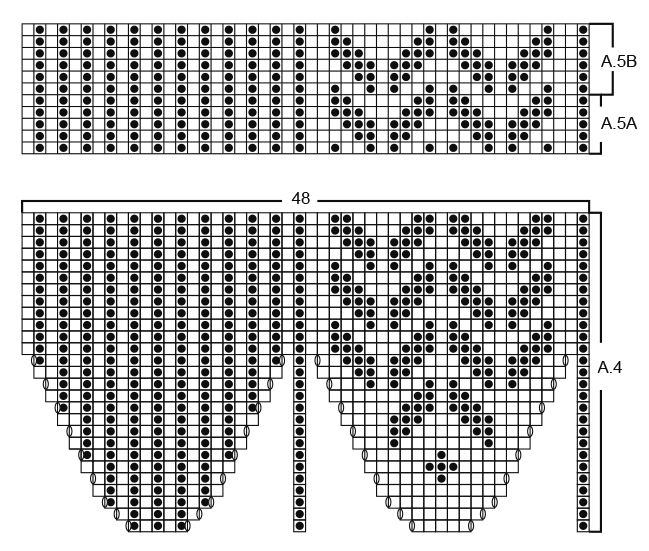
MITTENS: MAGIC CIRCLE: To avoid hole in the middle beg with this technique: Hold yarn end in the left hand and make a loop around left index finger (from left to right). Hold the loop with left thumb and index finger. Insert needle through loop, get yarn from ball (i.e. place yarn 1 time over needle from you), pull yarn back through loop, 1 YO (now place yarn from the back and towards you) and pull YO through sts on needle, * insert needle through loop, 1 YO (place yarn from the back and towards you), pull YO through loop, 1 YO (from the back and towards you) and pull YO through outermost st on right needle (i.e. the last st made) *, repeat from *-* until there are 12 sts on needle. Distribute sts on 4 double pointed needles size 3 mm as explained in pattern. Then work as explained in pattern – AT THE SAME TIME pull yarn end so that loop is tighten tog and the hole disappears. PATTERN: See diagrams A.1 to A.3. Work entire pattern in stocking st. LATVIAN BRAID: Braid consists of 3 rounds - all rounds are shown in diagram and worked as follows: ROUND 1: * K 1 with off white, K 1 with coral *, repeat from *-* the entire round. ROUND 2: Place both strands in the front of piece (towards you). Then move the off white strand to the back, P 1 and move the strand to the front again. Pull the coral strand underneath the off white strand and then move the coral to the back, P 1 and move the strand to the front again. Continue like this with P alternately with off white and coral but always place the strand underneath the strand from the last st worked. ROUND 3: Work as 2nd round but now place strand always OVER strand from the last st worked. ---------------------------------------------------------- LEFT MITTEN: Worked in the round on double pointed needles and work from fingertip to wrist. Start with mustard and MAGIC CIRCLE - see explanation above = 12 sts distributed on 4 double pointed needles 3 mm - NOTE: If you do not want to start with a magic circle cast on 12 sts with mustard distributed over 4 double pointed needles size 3 mm (when mitten is done baste a yarn up and down through sts around hole at the top and tighten tog). Then work pattern in the round according to diagram A.1 and inc as shown in diagram = 52 sts on needle. REMEMBER THE KNITTING TENSION When piece measures 12 cm from the tip (i.e. after round marked with arrow in diagram), cast off 3 sts over the 3 black squares in diagram for thumb opening (try the mitten and work to desired length). On next round: cast on 13 new sts over these = 62 sts on needle. NOTE: cast on as if working first row of diagram A.2, ie: cast on with 2 colours. See black star in diagram. Continue A.2 over these 13 sts, and A.1 as over the remaining sts. When A.2 has been worked, there are 52 sts on needle and continue A.1 in the round over all sts again. When A.1 has been worked, loosely cast off with coral. The entire mitten measures approx. 24 cm. THUMB: Pick up 1 st in each of the 13 sts cast on for thumb opening and pick in addition up 9 sts around thumb opening = 22 sts. Distribute sts on double pointed needles size 3 mm and work pattern in the round according to diagram A.3. Dec as shown in diagram. When A.3 has been worked, 8 sts remain on needle. Cut the yarns and pull them through the remaining sts, tighten tog and fasten. POMPOM: Make 1 small pompom with coral with an approx. diameter of 3 cm. When tying the yarn around the pompom leave approx. 20 cm of yarn at the end. Now use the yarn ends and make knots after each other in a row until this tie is approx. 3 cm. Then fasten tie with pompom in the side on mitten (see picture). There should be 2 pompom with ties in the side on mitten. RIGHT MITTEN: Cast on and work as left mitten but reversed, i.e. the 3 black squares for thumb are worked in 2nd, 3rd and 4th st from the left in the diagram. ---------------------------------------------------------- SOCKS: PATTERN: See diagrams A.4 to A.8 – choose diagram for correct size. INCREASE TIP: Inc 1 st by making 1 YO, on next round work YO twisted to avoid holes. HEEL: ROW 1 (= RS): Work until 10-10-11 sts remain, slip 1 st as if to K, K 1, psso, turn piece. ROW 2 (= WS): Work until 10-10-11 sts remain, slip 1 st as if to P, P 1, psso, turn piece. ROW 3 (= RS): Work until 9-9-10 sts remain, slip 1 st as if to K, K 1, psso, turn piece. ROW 4 (= WS): Work until 9-9-10 sts remain, slip 1 st as if to P, P 1, psso, turn piece. Continue dec like this with 1 less st before each dec until there are 17-17-19 sts on needle. LATVIAN BRAID: Braid consists of 3 rounds - all rounds are shown in diagram and worked as follows: ROUND 1: * K 1 with off white, K 1 with coral *, repeat from *-* the entire round. ROUND 2: Place both strands in the front of piece (towards you). Then move the off white strand to the back, P 1 and move the strand to the front again. Pull the coral strand underneath the off white strand and then move the coral to the back, P 1 and move the strand to the front again. Continue like this with P alternately with off white and coral but always place the strand underneath the strand from the last st worked. ROUND 3: Work as 2nd round but now place strand always OVER strand from the last st worked. ---------------------------------------------------------- SOCK: Worked in the round on double pointed needles and work from the toes and up. Cast on 12 sts on double pointed needles size 3.5 mm with off white. Work pattern in the round according to diagram A.4 and inc as shown in diagram = 48 sts on needle. REMEMBER THE KNITTING TENSION When A.4 is done, continue pattern in the round according to diagram A.5A. When piece measures 15-17-18 cm from toe (approx. 7-7-9 cm remain until full foot length – try the sock and work to desired length) insert 1 marker in 1st st on round and 1 marker in 25th st on round (both markers are in a mustard st on sock). Now inc 1 st before first marker and 1 st after 2nd marker - READ INCREASE TIP (= 2 sts inc). Inc like this every other round a total of 6-6-8 times = 60-60-64 sts on needle –NOTE: Work the inc sts in stripes under foot. After last inc keep the first 25 sts on needle and continue with stripes back and forth according to diagram A.6 over the remaining 35-35-39 sts for 3½-3½-4 cm (sock measures 22-24-27 cm from the toe). Then work HEEL - see explanation above, over the 35-35-39 sts (continue stripes in A.6 as before). After heel work next round as follows: Work with off white over the 17-17-19 sts on heel, pick up 8-8-9 sts (with off white) along edge on the 3½-3½-4 cm worked back and forth, continue A.5A over the next 25 sts and pick up 8-8-9 sts along edge on the 3½-3½-4 cm in the other side = 58-58-62 sts on needle. Insert 1 marker, NOW MEASURE PIECE FROM HERE! Work next round as follows: Work pattern according to diagram A.7A over the first 33-33-37 sts (= behind sock) and dec AT THE SAME TIME 4-4-6 sts evenly over these sts on first round, so that pattern continues over 29-29-31 sts, continue A.5A as before over the next 25 sts (= at the front of sock) = 54-54-56 sts on needle. When A.7A has been worked one time vertically, repeat A.7B over these 29-29-31 sts (continue A.5A as before at the front of sock). AT THE SAME TIME when piece measures 4 cm, inc 1 st inside outermost st in each side of A.7B - READ INCREASE TIP (= 2 sts inc). Inc like this every 4 cm a total of 4 times = 60-60-62 sts - NOTE: Work the inc sts in A.7B but the outermost 1-1-2 sts in each side should always be in off white. When piece measures approx. 13-14-15 cm from marker – adjust after one whole repetition in A.5A and finish as shown on last round in A.5B K 1 round over all sts with off white. Then continue pattern in the round according to diagram A.8. AT THE SAME TIME on round marked with arrow inc 4-4-6 sts evenly = 64-64-68 sts. When A.8 has been worked, loosely cast off with coral. Sock measures approx. 19-20-21 cm from marker. ASSEMBLY: Sew opening at the front of toe tog with grafting/kitchener sts in mustard. Knit another sock the same way. |
|||||||||||||||||||||||||||||||||||||||||||
Diagram explanations |
|||||||||||||||||||||||||||||||||||||||||||
|
|||||||||||||||||||||||||||||||||||||||||||
 |
|||||||||||||||||||||||||||||||||||||||||||
 |
|||||||||||||||||||||||||||||||||||||||||||
 |
|||||||||||||||||||||||||||||||||||||||||||
 |
|||||||||||||||||||||||||||||||||||||||||||
Have you finished this pattern?Tag your pictures with #dropspattern #hokeypokeyset or submit them to the #dropsfan gallery. Do you need help with this pattern?You'll find 20 tutorial videos, a Comments/Questions area and more by visiting the pattern on garnstudio.com. © 1982-2026 DROPS Design A/S. We reserve all rights. This document, including all its sub-sections, has copyrights. Read more about what you can do with our patterns at the bottom of each pattern on our site. |
|||||||||||||||||||||||||||||||||||||||||||


With over 40 years in knitting and crochet design, DROPS Design offers one of the most extensive collections of free patterns on the internet - translated to 17 languages. As of today we count 324 catalogues and 12290 patterns translated into English (UK/cm). 12290
We work hard to bring you the best knitting and crochet have to offer, inspiration and advice as well as great quality yarns at incredible prices! Would you like to use our patterns for other than personal use? You can read what you are allowed to do in the Copyright text at the bottom of all our patterns. Happy crafting!
Post a comment to pattern DROPS 173-42
We would love to hear what you have to say about this pattern!
If you want to leave a question, please make sure you select the correct category in the form below, to speed up the answering process. Required fields are marked *.