


Komentáře / Otázky (43)
![]() Jensen napsala:
Jensen napsala:
Ups, så fandt jeg ud af hvad der var galt, havde ikke lige læst 1. line i opskriften - start fra fingerspids :-) En vigtig detalje ,,,,
03.02.2025 - 08:51
![]() Jensen napsala:
Jensen napsala:
Altså jeg strikker jo fra håndled og op, ved jo ikke hvornår vanten måler 12 cm fra spidsen ? Er I sikre på at pilen er placeret korrekt ? Der jo 14 omgange med 3 sorte felter inden jeg kommer til pilen ?
25.01.2025 - 17:20Odpověď DROPS Design :
Hei Jensen. Oppskriften er skrevet fra fingertupp til håndledd, slik at da skal det stemme slik det står i oppskriften. mvh DROPS Design
27.01.2025 - 11:04
![]() Jensen napsala:
Jensen napsala:
Mange tak - Men jeg forstår ikke hvad jeg skal med de 3 masker inden jeg når til pilen ? Hvor de lukkes af, Ialt 14 omg ? Der står hop over ?
20.01.2025 - 17:39Odpověď DROPS Design :
Hej Jensen, de 3 masker strikkes på samme måde som alle de andre masker til du bliver lukket af. På pinden efter at de er lukket af, slår du 13 nye masker op, disse masker skal strikkes ifølge A.2 og alle de andre strikkes videre ifølge A.1 som tidligere (men de 3 masker er jo lukket af, så derfor er de markeret som sort i diagrammet) :)
23.01.2025 - 14:14
![]() Jensen napsala:
Jensen napsala:
Hej, har lige brug for hjælp til tommel. I opskriften står der ved de grå felter spring over disse masker, men hvordan forstår man det ? Skal de strikkes, lukkes af, sættes på en hvilepind eller ?
18.01.2025 - 09:42Odpověď DROPS Design :
Hei Jensen. Under VENSTRE VANTE og når arb måler 12 cm fra spidsen (dvs efter omg markeret med pil i diag) lukkes der 3 m af til tommelfingeråbning over de 3 sorte ruder i diagrammet, altså de lukkes af. mvh DROPS Design
20.01.2025 - 11:04
![]() Susanna napsala:
Susanna napsala:
Finns det någon video på hur man stickar häl av den här typen?
19.09.2024 - 09:57Odpověď DROPS Design :
Hei Susanna. Ta en titt på hjelpevideoen til hæl på denne oppskriften (generell video/maskeantallet vil ikke stemme med oppskriften). Klikk på VIDEOR til høyre eller under bildet. mvh DROPS Design
19.09.2024 - 10:48
![]() Helle Pia Friis Nielsen napsala:
Helle Pia Friis Nielsen napsala:
Mangler en vidio med hvordan man starter op på disse vanter. Har købt masse af garn m.m. Fandt en vidio med strikket magisk cirkel på YouTube. Med kan ikke finde hvordan man følger et diagram hvor der bliver lavet laver udtagning og farveskift. Kan godt strikke vanter op fra og ned. Kan også følge et diagram uden ind og udtagning. Håber på hurtig hjælp, please.
08.08.2023 - 14:45Odpověď DROPS Design :
Hej Helle, du starter på selve vanten der hvor der står VENSTRE VANTE med at slå 12 masker op på 4 strømpepinde (du behøver ikke starte med magisk cirkel) og så strikker du rundt ifølge diagram A.1 og nu er det bare at følge diagrammet, her er også udtagningerne tegnet ind :)
16.08.2023 - 10:20
![]() Marion Soidriddine napsala:
Marion Soidriddine napsala:
Bonjour, je me lance pour la première fois dans la confection de moufles et je ne comprends pas comment faire pour tricoter le pouce. J'ai cherché un tuto en vain (celui que j'ai trouvé correspond à la moufle que l'on tricote à partir du bas et non par la pointe). Je ne sais à quel moment tricoter les 13 mailles de A2 et sur quoi relever les 9 mailles supplémentaires. Merci beaucoup Marion
21.02.2023 - 15:52Odpověď DROPS Design :
Bonjour Mme Soidriddine, pour tricoter le pouce, relevez 1 maille dans chacune des 13 mailles montées en faisant la moufle + 9 mailles autour de l'ouverture du pouce (= les 3 mailles rabattues + de chaque côté de ces 3 mailles). Bon tricot!
21.02.2023 - 18:12
![]() Cécile Rousseau napsala:
Cécile Rousseau napsala:
Mitaines : Dans votre document PDF en français, la Légende diagramme(s) est incomplète. Il faut se référer sur le site en ligne pour avoir la description complète. Mittens: In your PDF document in French, the Legend diagram(s) is incomplete. You must refer to the online site for the complete description.
19.11.2022 - 16:26
![]() Cécile Rousseau napsala:
Cécile Rousseau napsala:
Mitaine - Pouce Je crois que vous devriez ajouter la phrase suivante au tout début du paragraphe pour le pouce : 'EN PARTANT DE LA PREMIÈRE MAILLE DES 13 MAILLES RELEVÉES AUPARAVANT, relever 1 m dans chacune des 13 m montées pour l'ouverture du pouce et relever en plus 9 m autour de l'ouverture =22 m.
18.11.2022 - 18:40
![]() Ingrid Krohn-Hansen napsala:
Ingrid Krohn-Hansen napsala:
Har diagram A-2 falt ut av oppskriften? Jeg har strikket en vott, da lå A-2 inne. Nå finner jeg det ikke.
26.07.2022 - 17:57Odpověď DROPS Design :
Hej Ingrid, A.2 ligger nedenfor A.1 :)
04.08.2022 - 08:25
|
|||||||||||||||||||||||||||||||||||||||||||
Hokey Pokey#hokeypokeyset |
|||||||||||||||||||||||||||||||||||||||||||
 |
 |
||||||||||||||||||||||||||||||||||||||||||
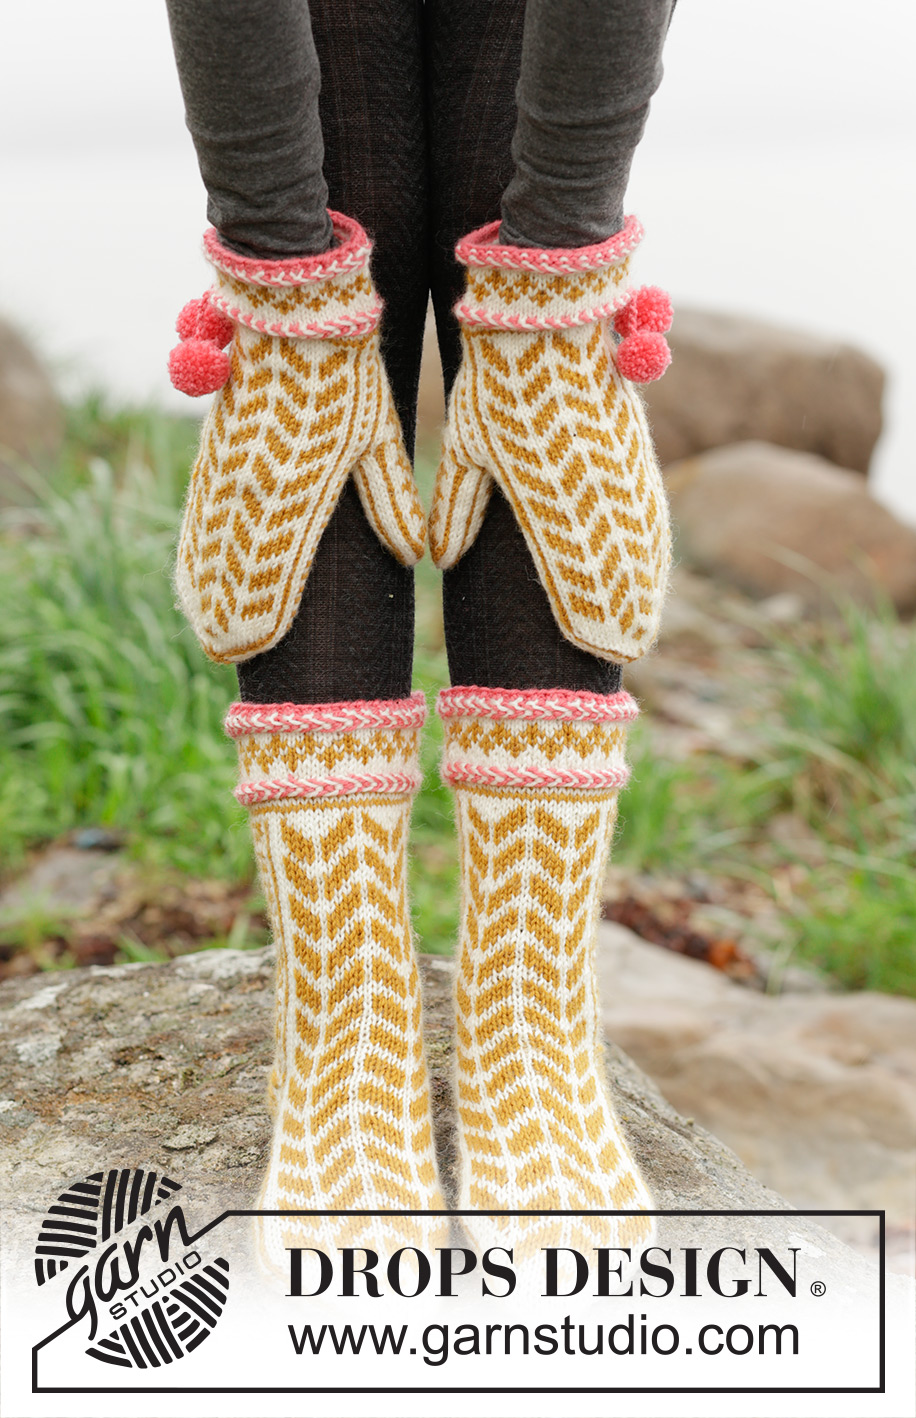
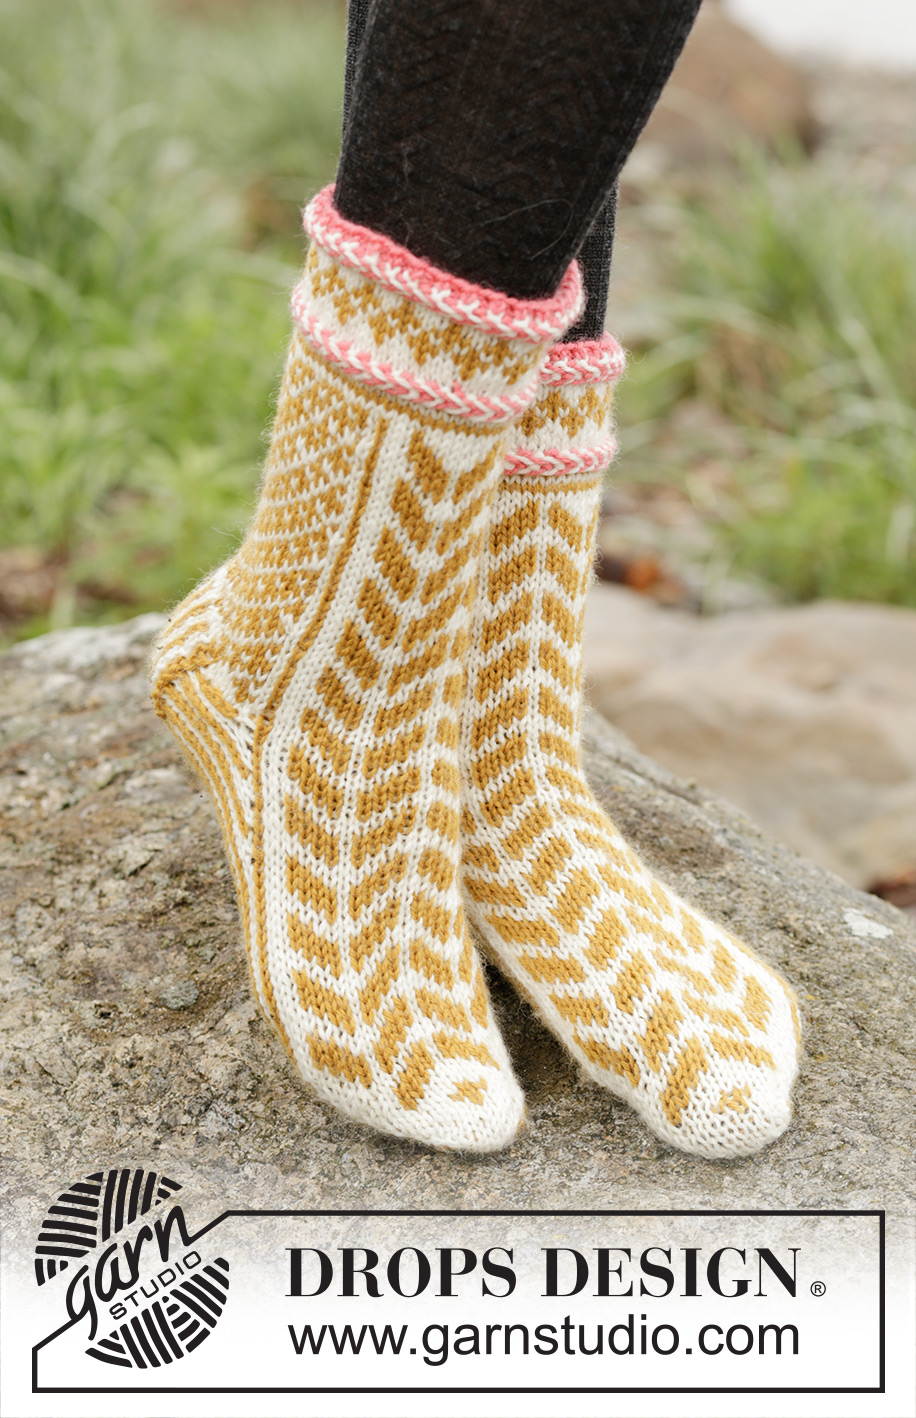
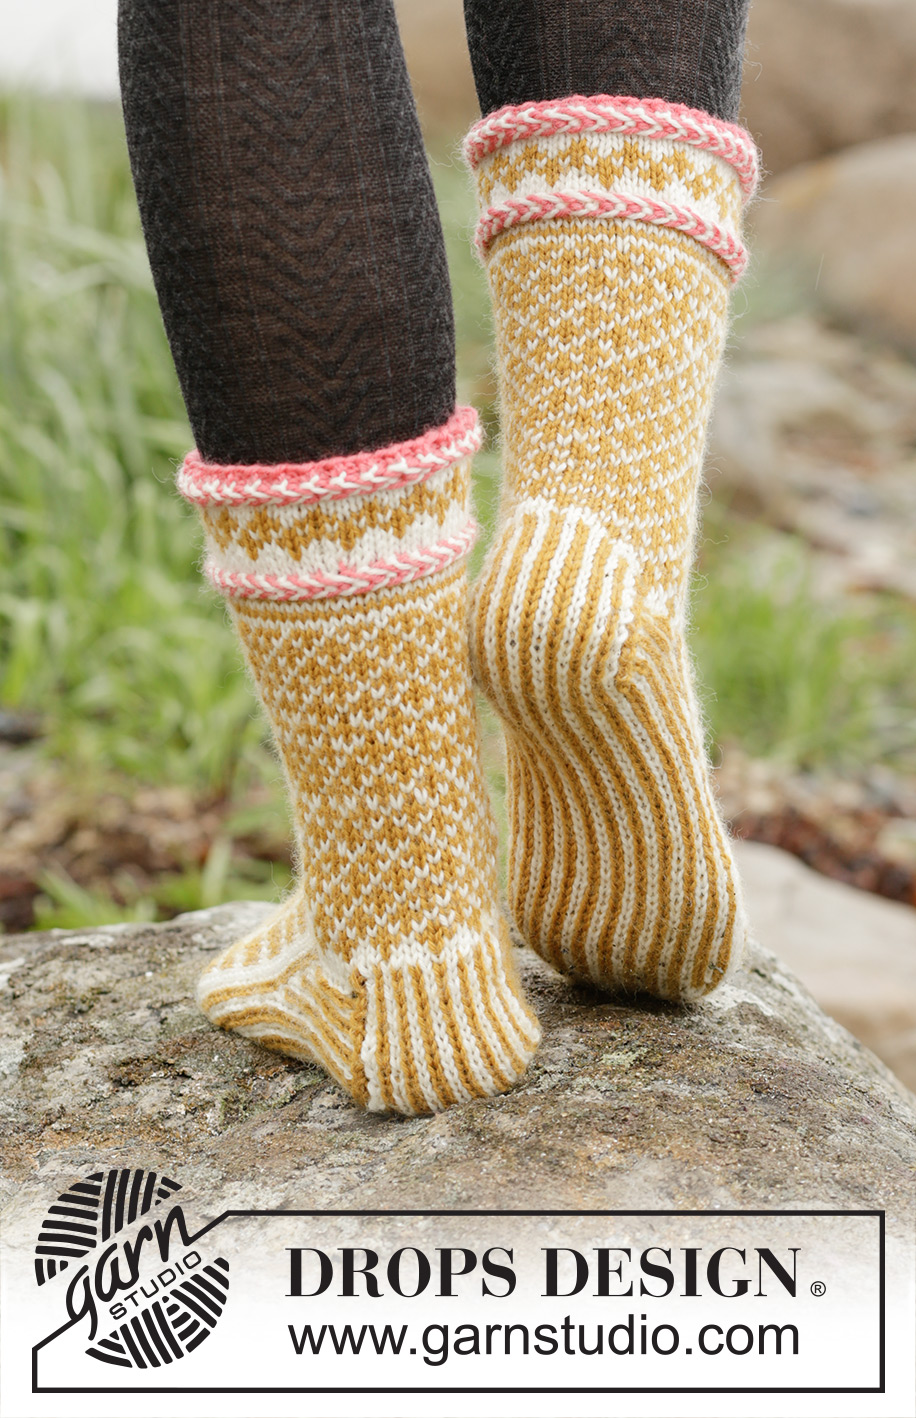
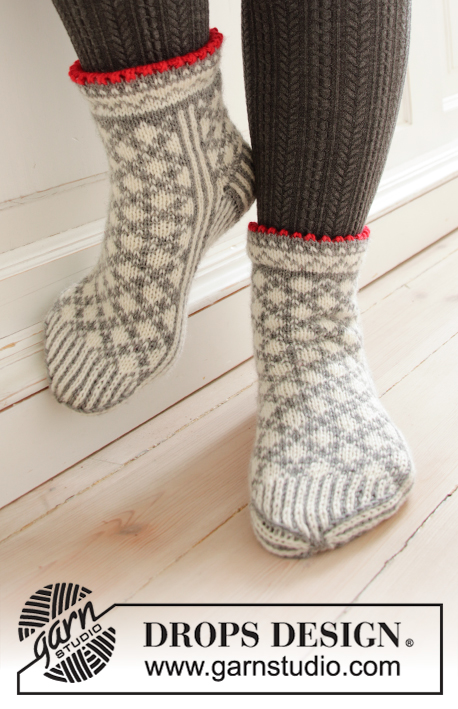
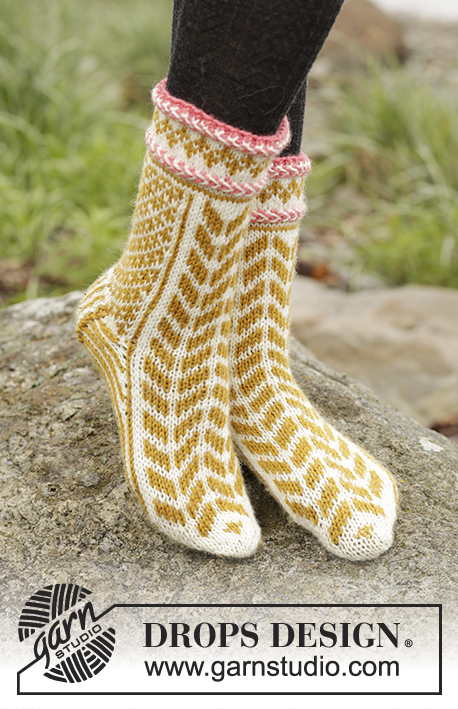
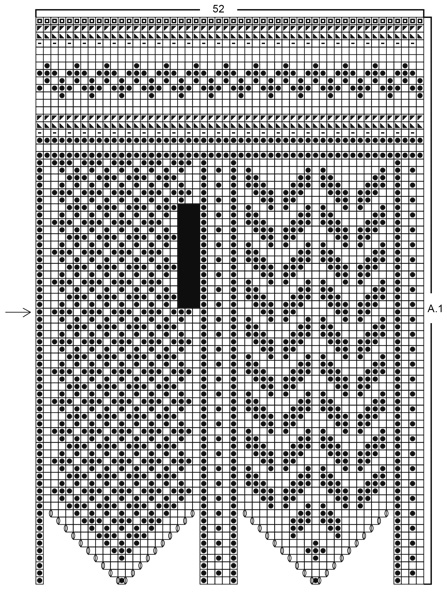
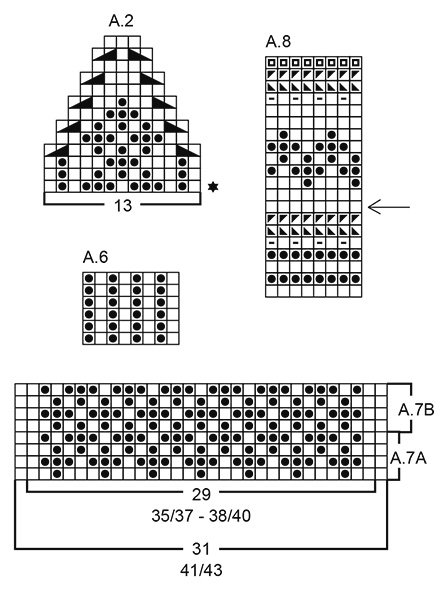
Souprava: rukavice palčáky a ponožky pletené od špičky s norským vzorem, litevským copánkem a bambulemi pletené z příze DROPS Karisma.
DROPS 173-42 |
|||||||||||||||||||||||||||||||||||||||||||
|
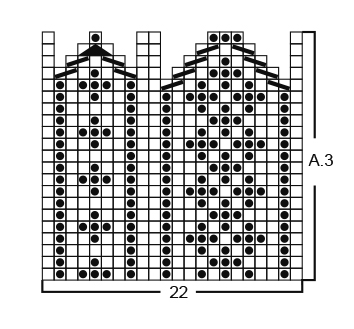
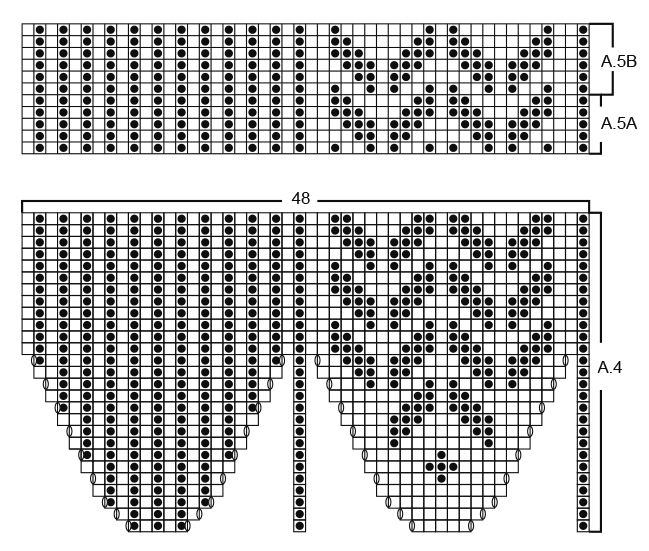
RUKAVICE: STAHOVACÍ SMYČKA, KOUZELNÝ KROUŽEK: Abychom zabránili vzniku velké dírky ve špičce rukavice, začínáme touto stahovací smyčkou – je pohyblivá a tak díky ní můžeme upravit velikost dírky ve středu dílu: uchopíme konec příze a obtočíme ji kolem ukazováku levé ruky (zleva doprava), čímž vytvoříme smyčku. Smyčku stáhneme z prstu a podržíme ji palcem a ukazovákem levé ruky. Pak do smyčky vsuneme jehlici, nabereme přízi a protáhneme ji smyčkou (= na jehlici nám vznikne oko), 1x nahodíme (přízi vedeme zezadu dopředu přes jehlici) a nahození protáhneme okem na jehlici, *jehlici vpíchneme do smyčky, nabereme přízi a protáhneme ji smyčkou, 1x nahodíme a protáhneme nahození okem na jehlici*, *-* opakujeme až do chvíle, kdy máme na jehlici 12 ok. Oka rozdělíme na 4 ponožkové jehlice č.3 a pleteme dle popisu v návodu. SOUČASNĚ zatáhneme za konec příze a smyčku stáhneme. VZOR: Viz schémata A.1 až A.3. Celý vzor pleteme lícovým žerzejem. LITEVSKÝ COPÁNEK: Copánek tvoří 3 kruhové řady – všechny jsou zakreslené ve schématu a pleteme je takto: 1. KRUHOVÁ ŘADA: *1 oko hladce smetanovou přízí, 1 oko hladce korálovou přízí*, *-* opakujeme v průběhu celé kruhové řady. 2. KRUHOVÁ ŘADA: vlákna obou přízí položíme před práci (směrem k nám). Pak přesuneme smetanovou přízi dozadu, upleteme 1 oko obrace a přízi dáme opět dopředu. Korálovou přízi podvlečeme pod vláknem smetanové příze a přesuneme korálovou dozadu za práci, upleteme 1 oko obrace a přízi dáme opět dopředu. Takto pleteme obrace střídavě smetanovou a korálovou přízí, ale vlákna přízí vedeme vždy POD vláknem od posledního upleteného oka. 3. KRUHOVÁ ŘADA: pleteme stejně jako 2. kruhovou řadu, ale přízi teď vedeme vždy PŘES vlákno od posledního upleteného oka. ---------------------------------------------------------- LEVÁ RUKAVICE: Pleteme v kruhových řadách na ponožkových jehlicích od špičky k zápěstí. Začínáme tmavě hořčicovou přízí a KOUZELNÝM KROUŽKEM – viz výše = 12 ok rozdělených na 4 ponožkové jehlice č.3 – POZN.: pokud nechcete začínat kouzelným kroužkem, nahoďte tmavě hořčicovou přízí 12 ok a rozdělte je na 4 ponožkové jehlice č.3 (po dokončení rukavice provlečte konec příze kolem počátečního otvoru a stáhněte). Pleteme v kruhových řadách vzor a přidáváme podle schématu A.1 = na jehlicích máme 52 ok. Ve výši 12 cm od špičky (tj. po kruhové řadě označené ve schématu šipkou) uzavřeme oka pro otvor pro palec, takto (rukavici si můžete vyzkoušet a naměřit správnou výši): uzavřeme 3 oka, která jsou ve schématu znázorněna 3 černými čtverečky, a nad nimi nahodíme 13 ok nových = na jehlicích máme 62 ok. Pokračujeme vzorem A.1 jako dosud, jen nad 13 novými oky pleteme vzor A.2. Po dokončení celé sekvence vzoru A.2 (na výšku) máme na jehlicích 52 ok a dál pleteme v kruhových řadách vzor A.1 nad všemi oky. Po dokončení celé sekvence vzoru A.1 (na výšku) všechna oka volně uzavřeme korálovou přízí. Rukavice měří asi 24 cm. PALEC: Z každého ze 13 ok nahozených pro otvor pro palec nabereme 1 oko a navíc k nim nabereme 9 ok kolem otvoru = 22 ok. Oka rozdělíme na ponožkové jehlice č.3 a pleteme v kruhových řadách vzor A.3. Ujímáme podle schématu. Po dokončení celé sekvence vzoru A.3 (na výšku) zbývá na jehlicích 8 ok. Přízi odstřihneme, protáhneme zbylými oky, stáhneme a zapošijeme. BAMBULE: Z korálové příze vyrobíme bambulku o průměru asi 3 cm. Při jejím svazování ponecháme konce příze dlouhé asi 20 cm. Tyto konce pak svážeme na řadu uzlů – jeden uzel za druhým – až je z nich šňůrka dlouhá asi 3 cm. Tuto šňůrku s bambulí pak připevníme na bok rukavice (viz foto). Na boku každé rukavice máme 2 takového bambulky se šňůrkami z uzlíků. PRAVÁ RUKAVICE: Nahodíme a pleteme stejně jako levou rukavici, jen zrcadlově převrácenou, tj. 3 černé čtverečky pro palec tvoří ve schématu 2., 3. a 4 oko zleva. ---------------------------------------------------------- PONOŽKY: VZOR: Viz schémata A.4 až A.8 – zvolte si schéma pro požadovanou velikost. TIP - PŘIDÁVÁNÍ: Přidáváme nahozením; v následující kruhové řadě pleteme nahození za zadní nit, aby se v pletenině netvořily dírky. TVAROVÁNÍ PATY: 1. ŘADA (= lícová): pleteme po posledních 10-10-11 ok, následující oko sejmeme hladce, 1 oko upleteme hladce a sejmuté přes ně přetáhneme, práci otočíme. 2. ŘADA (= rubová): pleteme po posledních 10-10-11 ok, následující oko sejmeme obrace, 1 oko upleteme obrace a sejmuté přes ně přetáhneme, práci otočíme. 3. ŘADA (= lícová): pleteme po posledních 9-10-10 ok, následující oko sejmeme hladce, 1 oko upleteme hladce a sejmuté přes ně přetáhneme, práci otočíme. 4. ŘADA (= rubová): pleteme po posledních 9-10-10 ok, následující oko sejmeme obrace, 1 oko upleteme obrace a sejmuté přes ně přetáhneme, práci otočíme. Tímto způsobem pokračujeme v ujímání (vždy o 1 oko snížíme počet ok zbylých v řadě) dokud nám na jehlicích nezůstane 17-17-19 ok. LITEVSKÝ COPÁNEK: Copánek tvoří 3 kruhové řady – všechny jsou zakreslené ve schématu a pleteme je takto: 1. KRUHOVÁ ŘADA: *1 oko hladce smetanovou přízí, 1 oko hladce korálovou přízí*, *-* opakujeme v průběhu celé kruhové řady. 2. KRUHOVÁ ŘADA: vlákna obou přízí položíme před práci (směrem k nám). Pak přesuneme smetanovou přízi dozadu, upleteme 1 oko obrace a přízi dáme opět dopředu. Korálovou přízi podvlečeme pod vláknem smetanové příze a přesuneme korálovou dozadu za práci, upleteme 1 oko obrace a přízi dáme opět dopředu. Takto pleteme obrace střídavě smetanovou a korálovou přízí, ale vlákna přízí vedeme vždy POD vláknem od posledního upleteného oka. 3. KRUHOVÁ ŘADA: pleteme stejně jako 2. kruhovou řadu, ale přízi teď vedeme vždy PŘES vlákno od posledního upleteného oka. ---------------------------------------------------------- PONOŽKA: Pleteme v kruhových řadách na ponožkových jehlicích od špičky k hornímu okraji. Na ponožkové jehlice č.3,5 nahodíme smetanovou přízí 12 ok a pleteme v kruhových řadách vzor A.4 – přidáváme podle schématu = na jehlicích máme 48 ok. Po dokončení celé sekvence vzoru A.4 pleteme v kruhových řadách vzor A.5A. Ve výši 15-17-18 cm od špičky (do plné délky chodidla zbývá doplést asi 7-7-9 cm – ponožku si můžete vyzkoušet a naměřit správnou délku) si označíme 1. oko v kruhové řadě a druhou značkou označíme 25. oko v kruhové řadě (obě označená oka jsou hořčicová). Nyní přidáme 1 oko před první značkou a 1 oko za druhou značkou - viz TIP - PŘIDÁVÁNÍ (= přidáme 2 oka). Takto přidáváme v každé 2. kruhové řadě, celkem 6-6-8x = na jehlicích máme 60-60-64 ok – POZN.: přidaná oka zapracujeme do pruhů na chodidle. Po posledním přidávání ponecháme prvních 25 ok na jehlici a nad zbylými 35-35-39 oky dál pleteme v řadách pruhy podle schématu A.6 – takto upleteme 3,5-3,5-4 cm výšky (ponožka měří 22-24-27 cm od špičky). Pak nad 35-35-39 oky TVARUJEME PATU – viz výše (pokračujeme při tom v pletení pruhů dle vzoru A.6). Po vytvarování paty pleteme následující kruhovou řadu takto: 17-17-19 ok paty upleteme smetanovou přízí, podél okraje 3,5-3,5-4 cm, které jsme pletli v řadách, nabereme smetanovou přízí 8-8-9 ok, následujících 25 ok pleteme dál vzorem A.5A a podél okraje na druhé straně 3,5-3,5-4 cm, které jsme pletli v řadách, nabereme 8-8-9 ok = na jehlicích máme 58-58-62 ok. Do pleteniny vložíme značku - NYNÍ MĚŘÍME DÍL OD TOHOTO MÍSTA! Následující kruhovou řadu pleteme takto: prvních 33-33-37 ok pleteme vzorem A.7A (= zadní strana ponožky) a SOUČASNĚ nad těmito oky ujmeme v 1. kruhové řadě rovnoměrně 4-4-6 oka, takže vzor pokračuje nad 29-29-31 oky, zbylých 25 ok pleteme dál vzorem A.5A (= přední strana ponožky) = na jehlicích máme 54-54-56 ok. Po dokončení 1 celé sekvence vzoru A.7A (na výšku) opakujeme nad těmito 29-29-31 oky sekvenci vzoru A.7B (na přední straně ponožky pleteme dál vzor A.5A jako dosud). SOUČASNĚ ve výši 4 cm přidáme 1 oko vedle krajního oka na každé straně vzoru A.7B – viz TIP - PŘIDÁVÁNÍ (= přidáme 2 oka). Takto přidáváme vždy po 4 cm výšky, celkem 3x = 60-60-62 ok – POZN.: přidaná oka zapracujeme do vzoru A.7B, ale krajní 1-1-2 oka na každé straně by měla být vždy smetanová. Ve výši asi 13-14-15 cm od značky – měli bychom mít dokončenou 1 celou sekvenci vzoru A.5A a končíme poslední kruhovou řadou vzoru A.5B – upleteme hladce 1 kruhovou řadu smetanovou přízí nad všemi oky. Pak pleteme v kruhových řadách vzor A.8. SOUČASNĚ v kruhové řadě označené šipkou přidáme rovnoměrně 4-4-6 oka = 64-64-68 ok. Po dokončení celé sekvence vzoru A.8 (na výšku) všechna oka volně uzavřeme korálovou přízí. Ponožka je vysoká asi 19-20-21 cm (od značky). DOKONČENÍ: Hořčicovou přízí sešijeme otvor ve špičce, nejlépe pletacím stehem. Stejným způsobem upleteme i druhou ponožku. |
|||||||||||||||||||||||||||||||||||||||||||
Vysvětlivky ke schématu |
|||||||||||||||||||||||||||||||||||||||||||
|
|||||||||||||||||||||||||||||||||||||||||||
|
|||||||||||||||||||||||||||||||||||||||||||
|
|||||||||||||||||||||||||||||||||||||||||||
|
|||||||||||||||||||||||||||||||||||||||||||
|
|||||||||||||||||||||||||||||||||||||||||||
Dokončili jste tento model?Pak označte své fotky tagem #dropspattern #hokeypokeyset nebo je pošlete do galerie #dropsfan. Potřebujete s tímto návodem poradit?Otevřete-li si návod na stránce garnstudio.com, najdete tam 19 výukových video-ukázek, Komentáře/Dotazy a další užitečné informace. © 1982-2025 DROPS Design A/S. Vyhrazujeme si veškerá práva. Tento dokument, včetně všech jeho dílčích částí, podléhá autorským právům. Podrobnější komentář k možnostem užití našich návodů najdete dole pod každým návodem na našich stránkách. |
|||||||||||||||||||||||||||||||||||||||||||


V oblasti pletené a háčkované módy působí DROPS Design více než 40 let. Díky tomu vám můžeme nabídnout jednu z nejrozsáhlejších kolekcí modelů s bezplatnými návody dostupnými na internetu - navíc v 17 jazycích. K dnešnímu dni máme na 314 katalogů a 11822 návodů celkem - z nich je už 7048 dostupných v [češtině].
Přidejte komentář k návodu DROPS 173-42
Rádi bychom věděli, co si o tomto modelu myslíte!
Pokud se chcete na něco zeptat, dbejte prosím na to, abyste ve formuláři níže vybrali správnou kategorii - díky tomu se dříve dozvíte, co potřebujete vědět. Povinná pole jsou označena *.