
Popular categories
Looking for a yarn?


Comments / Questions (54)
![]() Sylvia Dreiser-Farnsworth wrote:
Sylvia Dreiser-Farnsworth wrote:
Die Photos und die Beschreibung sind verschieden. Das Muster das die Anleitung der Arme ergibt entspricht in keinster Weise dem Muster, das das Photo zeigt.
12.03.2025 - 00:22DROPS Design answered:
Liebe Frau Dreiser-Farnsworth, Diagramme passt zum Modell, könnte vielleicht diese Lektion helfen? Dort wird erklärt, wie man Diagramme liest. Gerne können Sie sonnst hier genauch beschreiben, wo Sie Problemen haben, so können wir mal versuchen, Ihnen weiterzuhelfen. Danke im voraus Für Ihr Verständnis.
12.03.2025 - 10:21
![]() Sylvia Dreiser-Farnsworth wrote:
Sylvia Dreiser-Farnsworth wrote:
Die Photos entsprechen nicht dem Pullover. Das Muster der Arme beispielsweise ist vollkommen anders in der Beschreibung - entgegen den Photos. - The photos don't show the pullover that you get when you follow the instructions. The pattern of the arms are completely different from the photo.
12.03.2025 - 00:22
![]() Susan wrote:
Susan wrote:
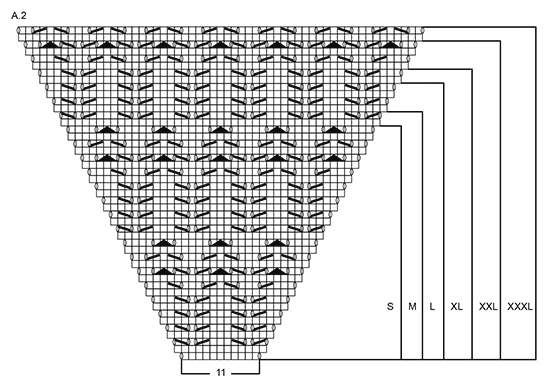
Sea Nymph Cardigan:I am just about to start working on the A2 graph but the pattern (4th row of text) says A2(=11sts). I have no idea what to do here. At the bottom of the A2 graph there is an indicator for 11 stitches. Do I use the 11stitches in the same area for my size and then work outward from those 11? I’m very confused because if I do that the 11 th stitch is half of a ‘slip 1 knitways, K1, psso.. Please help. 😩
06.06.2024 - 22:06DROPS Design answered:
Dear Susan, you work the first row in A.2 just as shown in diagram over the 11 stitches stated in the pattern, on the first row in A.2 you will work (YO (increase for raglan), work the 11 sts A.2 = K11, YO (increase for raglan)) there are now 13 sts in both A.2 for sleeves. Happy knitting!
07.06.2024 - 07:52
![]() Teri wrote:
Teri wrote:
Follow up on my previous question- I now am on the k2tog, yo row of A1. When I set aside 5 first and 5 last st for garter st, there are 87 st left to do the k2tog which leaves 1 odd st at the end. What do I do with it?
02.04.2021 - 06:00DROPS Design answered:
Dear Teri, leave the very last stitch before the garter stitch band as a knit stitch, thus the two sides will be almost symmetric (have a stitch beside the garter stitch band before the "hole" created by the pattern). Happy Knitting!
02.04.2021 - 09:56
![]() Teri wrote:
Teri wrote:
Hi, What are the “band st” mentioned at the start of the jacket instruction? Also, I have knitted 4 rows of A1 and so far no differences between the 5 st at either ends and the rest of the work. Am I reading the chart correctly ? Thank you
02.04.2021 - 05:13DROPS Design answered:
Dear Teri, the band stotches are the first and last 5 stitches on the rows, these will form the button- and buttonhole bands later. You are right, in the first rows of A.1, there is no difference between the band and the pattern, the fifference will show up in the 5th row. Happy Knitting!
02.04.2021 - 09:53
![]() Karin Hansen wrote:
Karin Hansen wrote:
Bluse model 689 str 36 Jeg har hele tiden 4ekstra masker når jeg strikker raglan , håber du kan give mig en forklaring Jeg tager 4masker ud som der står men de 2m til ærmet er jo i mønsteret jeg tror det er der jeg gør forkert . Med venlig hilsen
24.01.2021 - 16:41DROPS Design answered:
Hej Karin, vi er ikke helt sikker på at vi forstår dit spørgsmål, vi har ikke den model eller størrelse du henviser til. Men i denne opskrift DROPS 169-5 på nettet er alle udtagninger til raglan er tegnet ind i diagrammet. Læs også gerne stykket "RAGLAN" igen, det kan være du får svar på dit spørgsmål her.
29.01.2021 - 13:16
![]() Maja wrote:
Maja wrote:
Hallo. Ich verstehe die 5. Reihe in A.1 leider nicht. In meiner Größe L habe ich 105 Maschen angeschlagen, Minus die zweimal 5 Maschen für die Blenden, ergibt das 95 Maschen für das Muster. Dafür braucht man doch aber eigentlich eine gerade Anzahl von Maschen oder? So sind jetzt 6 Maschen in meiner Blende am Ende der Reihe. Da wäre das muster auch nicht symmetrisch zur Blende.
11.06.2020 - 22:30DROPS Design answered:
Liebe Maja, A.1 beginnt mit 2 M re zusammen, und wird dann mit 1 Masche recht enden, so dass das Muster symetrisch wird: 5 Blende Maschen, 47 Mal (2 M re zs, 1 Umschlag), 1 M re, 5 Blende Maschen = 105 - und so haben Sie 5 Blendemaschen + 1 M recht innenfor den 1. Umschlag beidseitig. Viel Spaß beim stricken!
12.06.2020 - 07:55
![]() Eva wrote:
Eva wrote:
Bei den Raglan-Zunahmen sollen Markierer angebracht werden... Habe ich gemacht. Okay. In der nächsten Hinreihe schon stimmen die Markierer nicht mehr, da im Muster doch zugenommen wird. Wofür braucht man dann die Markierer? Schon in der 1. Musterreihe (Lochmuster über 13 M)komme ich mit den Angaben nicht mehr klar.
03.03.2019 - 11:35DROPS Design answered:
Liebe Eva, die Markierer werden in den Raglanmaschen eingesetzt - siehe RAGLANZUNAHMEN. Viel Spaß beim stricken!
04.03.2019 - 10:05
![]() Eva wrote:
Eva wrote:
Ich habe eine Frage zu den "Raglanzunahmen": Muss ich am Rücken- und Vorderteil noch zusätzlich zu den Umschlägen zunehmen? Nach meiner "Rechnung" müsste ich so in jeder 2. Reihe im Rückenteil 2 Maschen und im Vorderteil je 1 Masche zunehmen, damit die Zunahme 12 Maschen beträgt. Ich bitte dringend um Hilfe und bedanke mich für Ihre Mühe.
01.03.2019 - 13:57DROPS Design answered:
Liebe Eva, je nach der Größe sollen Sie zuerst 4 M am Rückenteil + je 2 M an jedem Vorderteil + 2 M an jedem Ärmel (=12 M) 1-3-4-8-11-15 x insgesamt zunehmen und dann 2 M am Rückenteil + 1 M an jedem Vorderteil + 2 M an jedem Ärmel (= 8 M) insgesamt 16-15-16-13-12-9 x zunehmen. Viel Spaß beim stricken!
01.03.2019 - 14:56
![]() Eija wrote:
Eija wrote:
Kysymys raglan lisäyksistä: "Aloita 3 s:n päässä piirroksen A.2 jokaisesta mallikerrasta ja neulo näin: 1 langankierto, 1 o, 1 langankierto, 2 s oikein (merkkilanka on näiden silmukoiden keskellä), A.2, 2 o (merkkilanka on näiden silmukoiden keskellä), 1 langankierto, 1 o, 1 langankierto. " Onko tässä virhe, kun eihän tässä muodostu lisäykset samalla tavalla kuin kuvassa, eli silmukan molemmin puolin reijät?
27.07.2018 - 14:20
|
|||||||||||||||||||
Sea Nymph Cardigan#seanymphcardigan |
|||||||||||||||||||
|
|
|||||||||||||||||||
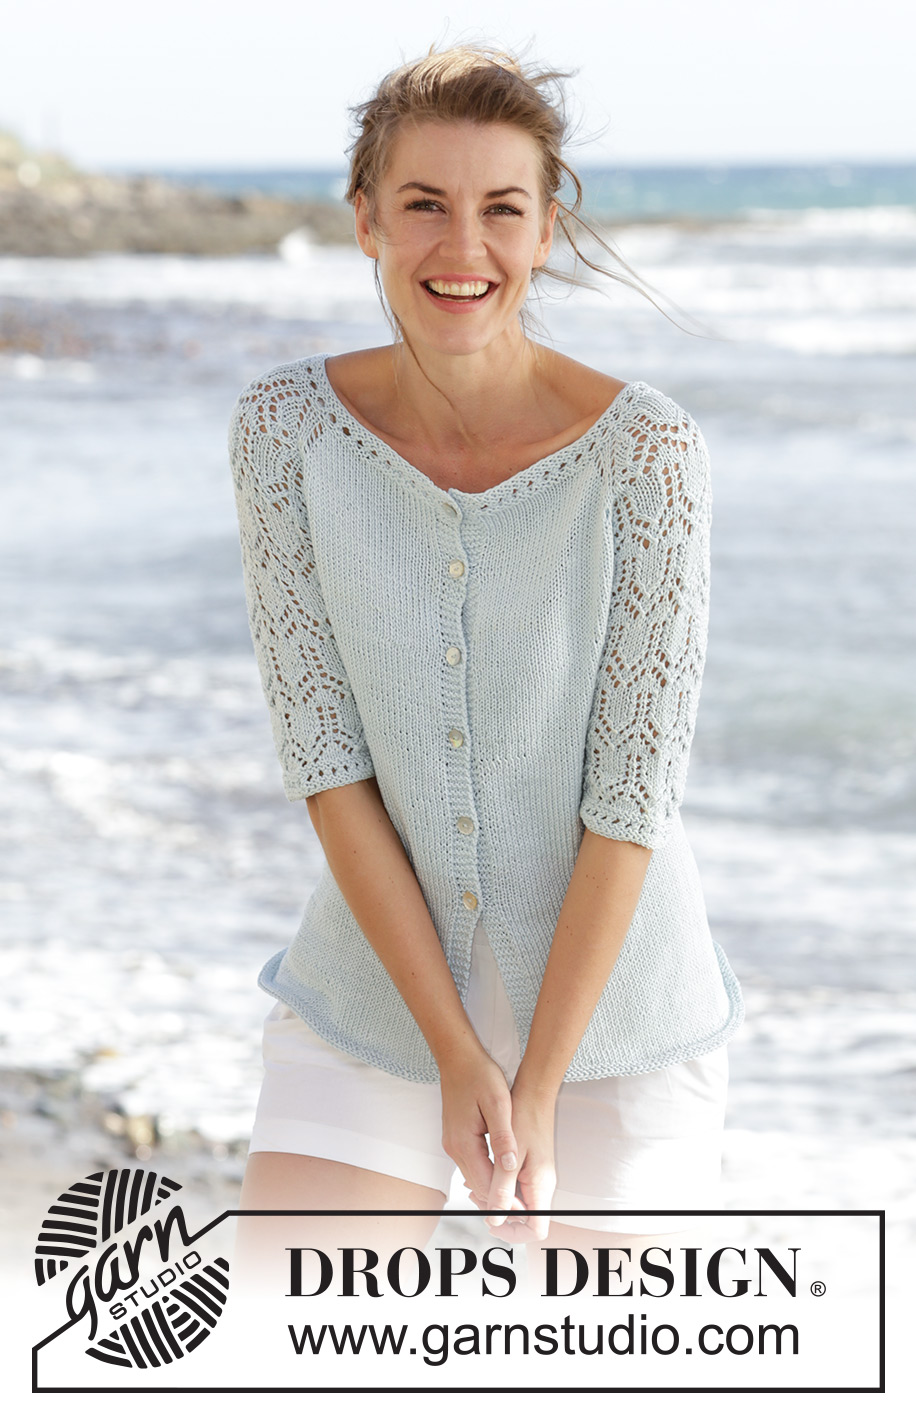
Knitted DROPS jacket with raglan, lace pattern and ¾ sleeves in "Muskat". Worked top down. Size: S - XXXL.
DROPS 169-5 |
|||||||||||||||||||
|
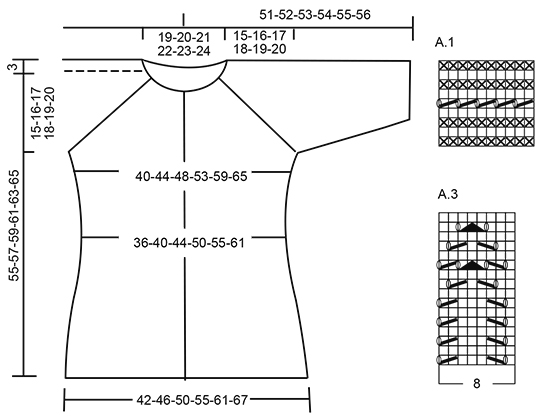
GARTER ST (back and forth): K all rows. 1 ridge = 2 rows K. PATTERN: See diagrams A.1 to A.3. The diagrams show all rows in pattern seen from RS. Choose diagram for your size. RAGLAN: Inc on every row from RS (= every other row) as follows: Inc 4 sts on back piece, 2 sts on each front piece and 2 sts on each sleeve (= 12 sts inc, inc on sleeve are drawn in pattern) – beg 3 sts before each A.2 and work as follows: 1 YO, K 1, 1 YO, K 2 (marker is in the middle of these sts), A.2, K 2 (marker is in the middle of these sts), 1 YO, K 1, 1 YO. P the YOs closest to markers on next round to make holes, P YOs towards back/front piece twisted to avoid holes. Inc 12 sts this way 0-2-3-7-10-14 times more (= 1-3-4-8-11-15 times in total, first inc is explained in the text). Then inc on every row from RS (= every other row) as follows: Inc 2 sts on back piece, 1 sts on each front piece and 2 sts on each sleeve (= 8 sts inc, inc on sleeve are drawn in pattern) – beg 2 sts before each A.2 and work as follows: 1 YO, K 2 (marker is in the middle of these sts), A.2, K 2 (marker is in the middle of these sts), 1 YO. P YOs on next row to make holes. Inc 8 sts this way 16-15-16-13-12-9 times in total. BUTTONHOLES: Dec for buttonholes on right band. 1 buttonhole = K tog second and third st from edge and make 1 YO. Dec for buttonholes when piece measures (measured from cast-on edge): SIZE S-M-L: 2, 9, 16, 23, 30 and 37 cm. SIZE XL-XXL-XXXL: 2, 9, 16, 23, 30, 37 and 44 cm ---------------------------------------------------------- JACKET: Work back and forth on circular needle from mid front, work top down. Cast on 97-101-105-109-113-117 sts (incl 5 band sts in each side towards mid front) on circular needle size 4 mm with Muskat. K 1 row from RS, then work A.1 (1st row = from WS) with 5 sts in garter st in each side, on last row in A.1 inc 15 sts evenly = 112-116-120-124-128-132 sts. Then work as follows from mid front and from RS: 5 sts in garter st, work 17-18-19-20-21-22 sts in stocking st, 1 YO, 1 st in stocking st, 1 YO, 2 sts in stocking st (insert a marker between these sts), A.2 (= 11 sts), 2 sts in stocking st (insert a marker between these sts), 1 YO, 1 st in stocking st, 1 YO, 34-36-38-40-42-44 sts in stocking st, 1 YO, 1 st in stocking st, 1 YO, 2 sts in stocking st (insert a marker between these sts), A.2, 2 sts in stocking st (insert a marker between these sts), 1 YO, 1 st in stocking st, 1 YO, 17-18-19-20-21-22 sts in stocking st, 5 sts in garter st. Continue this pattern, and inc for RAGLAN as explained above, first inc is now done. REMEMBER THE KNITTING TENSION. When A.2 has been worked vertically - see marking for your size, there are 252-272-296-324-356-384 sts on needle, inc are now done. Work next row as follows from WS: Work 43-47-51-57-63-69 sts (= right front piece), slip the next 45-47-51-53-57-59 sts on a stitch holder (= sleeve), cast on 8 sts under sleeve, work the next 76-84-92-104-116-128 sts (= back piece), slip the next 45-47-51-53-57-59 sts on a stitch holder (= sleeve), cast on 8 new sts under sleeve, work the last 43-47-51-57-63-69 sts (= left front piece). BODY: There are now 178-194-210-234-258-282 sts on body. Continue in stocking st and garter st as before. Insert a marker in each side, in the middle of the 8 new sts that were cast on. NOW MEASURE PIECE FROM HERE. When piece measures 4 cm, dec 1 st on each side of markers (= 4 sts dec), repeat dec every 4-4-4-5-5-5 cm 3 times in total = 162-178-194-218-242-266 sts. When piece measures 22-23-24-25-26-27 cm, inc 1 st on each side of each marker (= 4 sts inc), repeat inc every 2 cm 5 more times = 186-202-218-242-266-290 sts. When piece measures 36-37-38-39-40-41 cm, work 2 ridges over all sts. Cast off K 1/P 1 (to avoid a wavy cast-off edge), piece measures approx. 55-57-59-61-63-65 cm from cast-on edge. SLEEVE: Worked in the round. Slip sts from sleeve back on double pointed needles size 4 mm, pick up 1 st in each of the 8 sts under sleeve = 53-55-59-61-65-67 sts. Insert 1 marker mid under sleeve = beg of round. NOW MEASURE PIECE FROM HERE! Then work as follows: 6-7-1-2-4-6 sts in stocking st, A.3 over the next 40-40-56-56-56-56 sts (beg A.3 where A.2 ends for your size), 7-8-2-3-5-7 sts in stocking st. When piece measures 4 cm, dec 1 st on each side of marker. Work the sts that do not fit the pattern in stocking st, make sure that no of dec and inc in pattern is correct. Repeat dec every 7-7-5-5-3-3 cm 2-2-3-3-4-4 more times = 47-49-51-53-55-57 sts. When piece measures 24-23-23-22-22-21 cm, work A.1 over all sts, then cast off. Work the other sleeve the same way. Sew the buttons on to left front piece. |
|||||||||||||||||||
Diagram explanations |
|||||||||||||||||||
|
|||||||||||||||||||
 |
|||||||||||||||||||
 |
|||||||||||||||||||
Have you finished this pattern?Tag your pictures with #dropspattern #seanymphcardigan or submit them to the #dropsfan gallery. Do you need help with this pattern?You'll find 23 tutorial videos, a Comments/Questions area and more by visiting the pattern on garnstudio.com. © 1982-2026 DROPS Design A/S. We reserve all rights. This document, including all its sub-sections, has copyrights. Read more about what you can do with our patterns at the bottom of each pattern on our site. |
|||||||||||||||||||


With over 40 years in knitting and crochet design, DROPS Design offers one of the most extensive collections of free patterns on the internet - translated to 17 languages. As of today we count 324 catalogues and 12290 patterns translated into English (UK/cm). 12290
We work hard to bring you the best knitting and crochet have to offer, inspiration and advice as well as great quality yarns at incredible prices! Would you like to use our patterns for other than personal use? You can read what you are allowed to do in the Copyright text at the bottom of all our patterns. Happy crafting!
Post a comment to pattern DROPS 169-5
We would love to hear what you have to say about this pattern!
If you want to leave a question, please make sure you select the correct category in the form below, to speed up the answering process. Required fields are marked *.