
Popular categories
Looking for a yarn?


Comments / Questions (168)
![]() Birgit wrote:
Birgit wrote:
Hi, bin bei Reihe 3 bei der Passe und habe 6 Stb gehäkelt und bin verunsichert wie es weitergeht im Muster. Können Die diese Reihe bitte genauer erklären, also wieviele Stb übersprungen werden und wann feste Maschen bzw. Stab gehäkelt werden? Danke!
28.11.2018 - 02:24DROPS Design answered:
Liebe Birgit, bei der 3. Reihe der Passe häkeln Sie die Diagramme wie in der schriftlichen Anleitung für Ihre Größe beschrieben. Hier wird die 1. Reihe (= Hinreihe) alle Diagramme gehäkelt: beginnen Sie mit der Reihe mit den Schwarzen Quadrat rechts nach links. Bei der nächste Reihe (Rückreihe) lesen Sie dann die Diagramme links nach rechts. Viel Spaß beim häkeln!
28.11.2018 - 08:49
![]() Aubrey Ernst wrote:
Aubrey Ernst wrote:
I am on the first row of the charts, I am concerned about how to do the transition between A4 and A1. I am reading it that I should do 4 DC, 1 SC then start the chains, but that creates a SC on only one side of the A4 chart and seems unsymmetrical. Is this correct or am I reading it wrong?
14.11.2018 - 20:53DROPS Design answered:
Dear Mrs Ernst, A.1 is worked as follows: 4-6 dc (depending on the size), skip 1-2 st, 3 ch - then work A.4: *41 sc in next st, 3 ch, skip next st, 1 dc in next st, 3 ch, skip next st, after A.4 you then work A.2 which starts also with 1 sc = 1 sc in next st, skip 2 st, 1 dc in next st, 3 ch, skip 2 sts. Happy crocheting!
15.11.2018 - 08:55Jacqueline wrote:
Let me try this another way, the row I am on, the pasted section previously, when you count out the stitches, it is 159, yet I have 215 stitches from the row below. I am missing something in the count.
23.08.2018 - 15:58DROPS Design answered:
Dear Jacqueline, do not forget to count the stitches in A.4: 21 stitches worked on 4 places, maybe you missed them? Happy crocheting!
05.09.2018 - 13:46Jacqueline wrote:
Hello, thank you for your prompt response. I am sorry I wasn't clearer. I have just completed row 6, the increase row for size large. I have the exact number of stitches required, 215, the next row indicates: Work next row as follows from RS: Work A.1 over the first 5-5-8-8-5-8 tr as before, A.5 over the next 0-3-3-3-0-0 tr, repeat A.2 over the next 18-18-18-18-30-30 tr (= 3-3-3-3-5-5 times in width), A.4 as before, repeat A.2 etc. When following this I am left with 56 unworked stitches.
23.08.2018 - 15:02DROPS Design answered:
Dear Jaqueline, when you work A.4 you gradually increase a lot sts (56 sts at the end) and A.4 is repeated 4 times on the row. Happy crocheting!
23.08.2018 - 15:50Jacqueline wrote:
I am trying to figure out the first row after the increase row. I have the 215 stitches evenly spaced. When I follow the pattern set up, I am left with 56 unworked stitched, obviously I don't get to the end of the row with stitches. When the stitches are added up there are 159, not 215. I can't figure out what am I missing. Help please.
23.08.2018 - 04:49DROPS Design answered:
Dear Jacqueline, can you be more precise and tell us which size are you crocheting and which is the exact point are you working on? Are you at the very beginning of the pattern, so at first increase or what? Happy crocheting!
23.08.2018 - 08:52
![]() Dorien wrote:
Dorien wrote:
Het patroon is vanaf het begin niet duidelijk. Volgens mij als ik de 3e toer haak kom ik ook niet uit met het patroon volgens telpatroon. En dan dit telpatroon en dan weer die. Ik vind het onoverzichtelijk.
06.07.2018 - 09:21
![]() Dorien wrote:
Dorien wrote:
Hallo, dit is een heel leuk vestje, alleen ik snap er helemaal niks van. Niet van het geschreven patroon maar ook niet van de tekening. Ik heb al heel wat afgehaakt. Ik hoop dat u mij hiermee kunt helpen. Alvast bedankt. Groetjes
01.07.2018 - 23:09DROPS Design answered:
Dag Dorien,
Kun je wat specifieker aangeven waar je precies tegenaan loopt? Dan kunnen we je hopelijk wat beter helpen :)
Je kunt ook altijd hulp vragen bij de winkel waar je het garen gekocht hebt.
05.07.2018 - 15:07
![]() Lenka wrote:
Lenka wrote:
U českého návodu je asi bug - nezobrazuje se schéma, ani ve verzi pro tisk (otevírala jsem přes android).
10.10.2017 - 21:04DROPS Design answered:
Dobrý den, Lenko, díky za upozornění - opraveno. Hana
11.10.2017 - 12:32Doris Ouellet wrote:
I have taken the yoke apart about six times and I finally got it right up to where I start the body. My problem is, I now have eight markers instead of four. Could you please tell me how many STITCHES FOR FRONT, SLEEVES AND BACK, ill be very greartful. I'm doing size large and I finally have the right amount of stitches. I really like the looks, but if I have to do it over
17.08.2017 - 00:18DROPS Design answered:
Dear Doris! As for markers, on yoke (see all sizes): on last row in A.4 (= from WS) insert 1 new marker in the middle of every A.4 (i.e. 18 tr on each side of marker in A.4 = 4 markers). Remove the old markers (= 4 markers remain in piece). You have now 4 markers. In size L: Sts between markers are for sleeves (= 54 tr on each sleeve). When A.4 has been worked 1 time vertically, there are 287 tr on row. Happy crocheting!
23.08.2017 - 11:33
![]() Linn wrote:
Linn wrote:
Hej! Har en fråga som gäller fram- och bakstycket i stlk M. När man har gjort de 8 luftmaskorna under ärmhålen ska man fortsätta med A2a. A2a börjar ju varje repetition med 2 lm enligt pilen för M. Stämmer det att det totala antalet lm alltså blir 10, men att de två sista virkas som en del av A.2a och de 8 första som "1:a m i A.6" följande varv?
15.08.2017 - 10:50DROPS Design answered:
Hej Linn, Ja, det som er vigtigt er at det kommer til at stemme med mønsteret på ryg og forstykke.
05.09.2017 - 15:31
|
||||||||||||||||||||||||||||
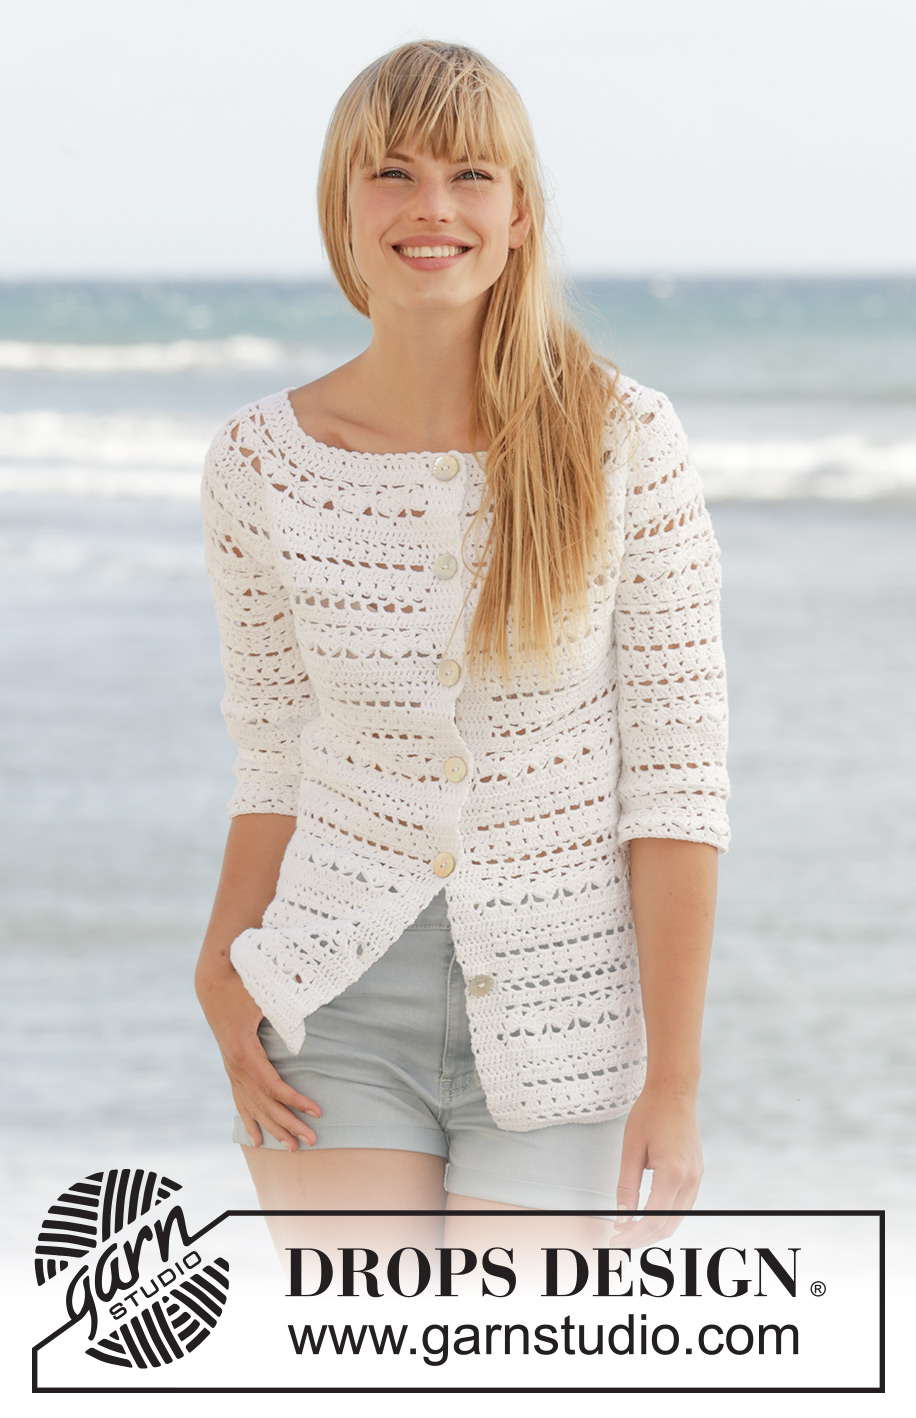
Seashore Bliss Cardigan#seashoreblisscardigan |
||||||||||||||||||||||||||||
|
|
||||||||||||||||||||||||||||
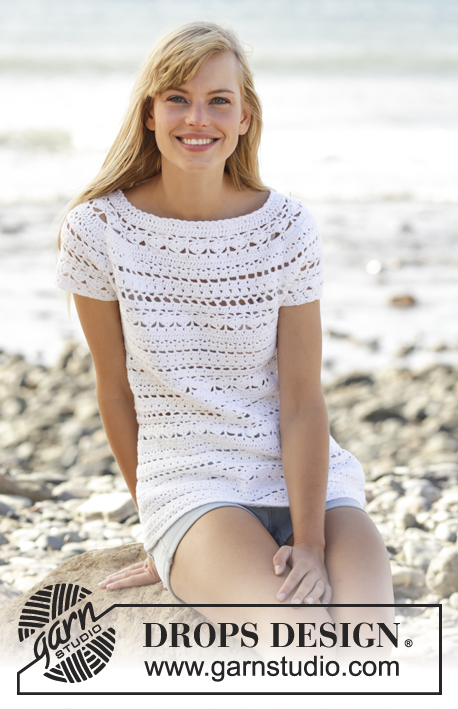
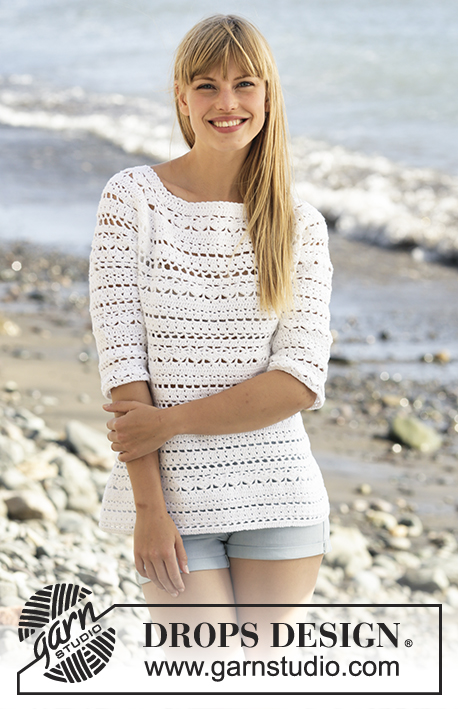
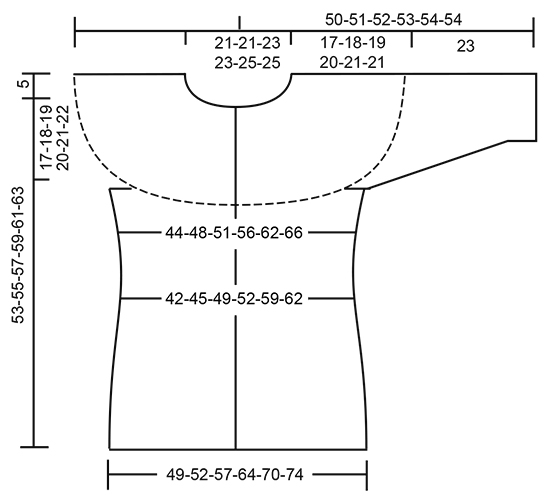
Crochet DROPS jacket with lace pattern and round yoke in ”Cotton Light”. The piece is worked top down. Size: S - XXXL.
DROPS 169-16 |
||||||||||||||||||||||||||||
|
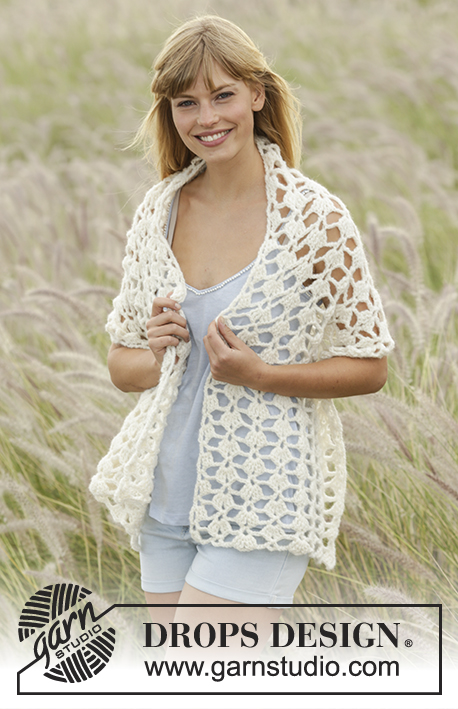
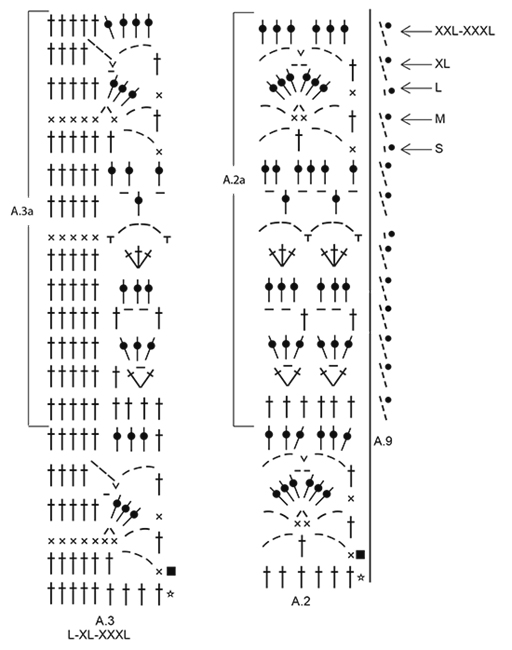
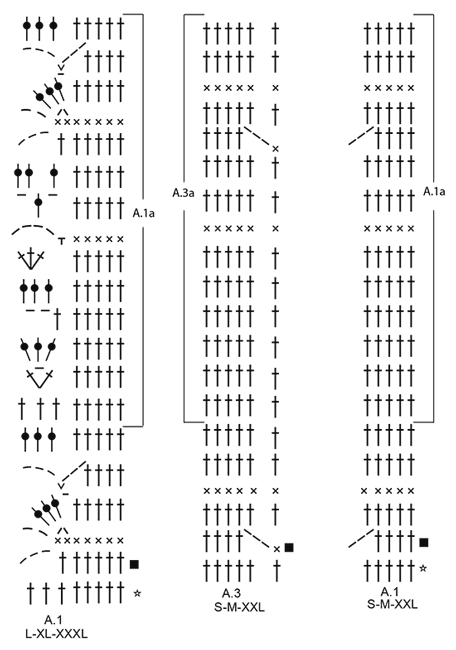
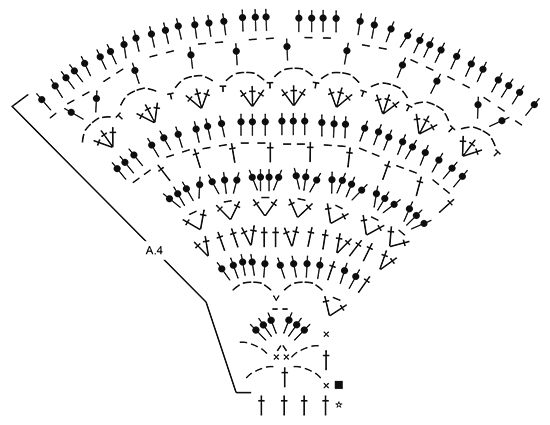
PATTERN: See diagrams A.1 to A.9. Choose diagram for correct size. Diagram A.9 show how to start and end when working in the round. CROCHET INFO: Replace first tr at beg of every tr row with 3 ch. Replace first dc at beg of every dc row with 1 ch. Replace first tr at beg of every tr round with 3 ch, finish the round with 1 sl st in 3rd ch from beg of round. At beg of every dc round, replace first dc with 1 ch and finish round with 1 sl st in 1st ch from beg of round. INCREASE TIP: Inc 1 tr by working 2 tr in same tr. DECREASE TIP: Dec 1 tr by working 2 tr tog as follows: Work 1 tr but wait with last pull through (= 2 sts on hook), then work next tr but on last pull through, pull yarn through all 3 sts on hook. TIP ARMHOLE: Size S, M and XL: In the last repeat of A.2 before marker 1 and marker 3 (= beginning of armhole), replace the last chain stitch with a treble crochet in the last stitch of the same repeat on previous row. ---------------------------------------------------------- JACKET: Worked back and forth, top down. NOTE: It is important to keep the crochet tension vertically so that the measurements on yoke will be correct. YOKE: Work 123-123-134-134-138-140 ch on hook size 4 mm with Cotton Light. Work 1 tr in 4th ch from hook (= 2 tr) - READ CROCHET INFO, 1 tr in each of the next 0-0-4-4-1-3 ch, * skip 1 ch, 1 tr in each of the next 6 ch *, repeat from *-* the entire row = 104-104-114-114-117-119 tr. Work 1 row with 1 tr in every tr and inc 19-19-21-21-30-40 tr evenly - READ INCREASE TIP = 123-123-135-135-147-159 tr. Work next row and insert 8 markers in the piece as follows: Work A.1 (= 5-5-8-8-5-8 sts), repeat A.2 over the next 18-18-18-18-24-24 tr (= 3-3-3-3-4-4 times in width), insert 1st marker, A.4 over the first 4 tr, insert 2nd marker, A.2 over the next 12 tr (= 2 times in width), insert 3rd marker, A.4 over the next 4 tr, insert 4th marker, work A.2 over the next 36-36-42-42-48-54 tr (= 6-6-7-7-8-9 times in width), insert 5th marker, A.4 over the next 4 tr, insert 6th marker, A.2 over the next 12 tr (= 2 times in width), insert 7th marker, A.4 over the next 4 tr, insert 8th marker, A.2 over the next 18-18-18-18-24-24 tr (= 3-3-3-3-4-4 times in width), finish with A.3 (= 6-6-9-9-6-9 tr). REMEMBER THE CROCHET TENSION! SIZE XXL-XXXL: On 5th row (row with tr from RS) in A.2 inc evenly as follows: Between 2nd and 3rd marker and 6th and 7th marker: Inc 6-6 tr. 12-12 tr have been inc in total on row (= 18-18 tr between 2nd and 3rd marker and 6th and 7th marker). Repeat A.2 3-3 times between 2nd and 3rd marker and between 6th and 7th marker: ALL SIZES: On 6th row (row with tr from WS) in A.2 inc evenly as follows: Before 8th marker: Inc 0-3-3-3-6-6 tr (= 24-27-30-30-36-39 tr before 8th marker). Between 7th and 6th marker and 3rd and 2nd marker: Inc 0-0-6-6-6-6 tr (= 12-12-18-18-24-24 tr between these markers). Between 5th and 4th marker: Inc 0-6-6-6-12-12 tr (= 36-42-48-48-60-66 tr between each of these markers). After 1st marker: Inc 0-3-3-3-6-6 tr (= 23-26-29-29-35-38 tr after 1st marker). There are now 179-191-215-215-251-263 tr in total on row. Work next row as follows from RS: Work A.1 over the first 5-5-8-8-5-8 tr as before, A.5 over the next 0-3-3-3-0-0 tr, repeat A.2 over the next 18-18-18-18-30-30 tr (= 3-3-3-3-5-5 times in width), A.4 as before, repeat A.2 over the next 12-12-18-18-24-24 tr (= 2-2-3-3-4-4 times in width), A.4 as before, repeat A.2 over the next 36-42-48-48-60-66 tr (= 6-7-8-8-10-11 times in width), A.4 as before, repeat A.2 over the next 12-12-18-18-24-24 tr (= 2-2-3-3-4-4 times in width), A.4 as before, repeat A.2 over the next 18-18-18-18-30-30 tr as before (= 3-3-3-3-5-5 times in width), A.5 over the next 0-3-3-3-0-0 tr, finish with A.3 over the last 6-6-9-9-6-9 tr as before. SIZE XL-XXL-XXXL: On 8th row (row with tr from WS) in A.2 inc evenly as follows: Before 8th marker: Inc 3-3-3 tr (= 33-39-42 tr before 8th marker). Between 4th and 5th marker: Inc 6-6-6 tr (= 54-66-72 tr between 4th and 5th marker). After 1st marker: Inc 3-3-3 tr (= 32-38-41 tr after 1st marker). Work next row as follows from RS: Work A.1 over the first 8-5-8 tr as before, A.5 over the next 0-3-3 tr, repeat A.2 over the next 24-30-30 tr (= 4-5-5 times in width), A.4 as before, repeat A.2 over the next 18-24-24 tr (= 3-4-4 times in width), A.4 as before, repeat A.2 over the next 54-66-72 tr (= 9-11-12 times in width), A.4 as before, repeat A.2 over the next 18-24-24 tr (= 3-4-4 times in width), A.4 as before, repeat A.2 over the next 24-30-30 tr as before (= 4-5-5 times in width), A.5 over the next 0-3-3 tr, finish with A.3 over the first 9-6-9 tr as before. ALL SIZES: On last row in A.4 (= from WS) insert 1 new marker in the middle of every A.4 (i.e. 18 tr on each side of marker in A.4 = 4 markers). Remove the old markers (= 4 markers remain in piece). Sts between markers are for sleeves (= 48-48-54-54-60-60 tr on each sleeve). When A.4 has been worked 1 time vertically, there are 251-263-287-299-335-347 tr on row. Yoke is now done in size S. SIZE M-L-XL-XXL-XXXL: Work next row from RS as follows: Work A.6 over the first 8-5-8-8-5 tr, continue with A.2 over the next 18-24-24-30-36 tr (= 3-4-4-5-6 times in width), * A.7 over the next 36 tr (= 2 times in width, marker is in the middle of these repetitions), A.2 over the next 12-18-18-24-24 tr (= 2-3-3-4-4 times in width), A.7 over the next 36 tr (= 2 times in width, marker is in the middle of these repetitions) *, A.2 over the next 42-48-54-66-72 tr as before, repeat from *-*, A.2 over the next 18-24-24-30-36 tr (= 3-4-4-5-6 times in width), finish with A.8 over the last 9-6-9-9-6 tr. Work 1-2-3-4-4 rows of A.7 ALL SIZES: Piece now measures 17-18-19-20-21-21 cm vertically. BODY: SIZE M-XL: Work as follows from WS: Work A.8 as before, repeat A.2a (see arrow on where pattern beg in the different sizes) 6-7 times in total in width until 1st marker (= right front piece) - SEE ARMHOLE TIP, work 8-10 ch, skip sts between 1st and 2nd marker (= sleeve), work A.2a 13-15 times in total in width until next marker (= back piece), work 8-10 ch, skip sts between 3rd and 4th marker (= sleeve), work A.2a 6-7 times in total in width, finish with A.6. Insert 1 marker in piece, NOW MEASURE PIECE FROM HERE. SIZE S-L-XXL-XXXL: Work as follows from RS: Work A.6, repeat A.2a (see arrow on where pattern beg in the different sizes) 6-7-8-9 times in total in width until 1st marker (= left front piece) - SEE ARMHOLE TIP, work 8-8-10-10 ch, skip sts between 1st and 2nd marker (= sleeve), work A.2a 12-14-17-18 times in total in width until 3rd marker (= back piece), work 8-8-10-10 ch, skip sts between 3rd and 4th marker (= sleeve), work A.2a 6-7-8-9 times in total in width, finish with A.8. Insert 1 marker in piece, NOW MEASURE PIECE FROM HERE. SIZE S-M-L-XL: Work A.6/A.2a/A.8 as before, work the 8-8-8-10 sts under each sleeve as 1st st in A.6. On last row in A.6 and A.8 (row with tr) dec 4-4-4-2 tr evenly on entire row – READ DECREASE TIP = 167-179-191-209 tr. When A.6 and A.8 have been worked 1 time vertically, work next row as follows from WS: Work A.3a over the first 6-6-9-9 tr, repeat A.2a 26-28-29-32 times in total in width, finish with A.1a over the last 5-5-8-8 tr. SIZE XXL-XXXL: Work from WS: A.3a over the first 6-9 tr, repeat A.2a 37-38 times in total AT THE SAME TIME dec 2-2 tr evenly – READ DECREASE TIP, finish with A.1a over the last 5-8 tr = 233-245 tr. ALL SIZES: Repeat A.1a to A.3a vertically. When piece measures 12 cm, adjust so that next row is with tr, dec 6 tr evenly = 161-173-185-203-227-239 tr. Now repeat A.2a 25-27-28-31-36-37 times in width. SIZE XL-XXL-XXXL: Repeat dec when piece measures 16 cm from marker = 197-221-233 tr. Now repeat A.2a 30-35-36 times in width. ALL SIZES: When piece measures 20-21-22-23-24-25 cm from marker – adjust so that next row is with tr, inc 6 tr evenly. Repeat inc every 3½-3½-2½-2-2-2 cm 3-3-4-6-6-6 more times = 185-197-215-239-263-275 tr. Repeat A.2a 1 more in width on every inc. When all inc are done, repeat A.2a 29-31-33-37-42-43 times in width. Work until piece measures 36-37-38-39-40-41 cm from marker, adjust to finish nicely according to pattern. Fasten off. SLEEVE: SIZE S: Worked in the round. Beg by working mid under armhole as follows: Work 1 sl st in 4th ch of the 8 ch worked in armhole on body. Work 1 ch (= 1 dc). Then work 1 dc in each of the next 4 ch, work A.7 over the next 18 tr, work A.2a (adjust pattern according to A.7) 2 times in total in width, work A.7 over the next 18 tr, finish with 1 dc in each of the last 3 ch. Work the 8 sts under sleeve as 1st st in A.7. When A.7 has been worked 1 time vertically, there are 56 tr on last round. SIZE M-XL-XXL-XXXL: Worked in the round. Beg by working mid under sleeve as follows: Work 1 sl st in 4th ch of the 8-10-10-10 ch worked in armhole on body. Work 3 ch (= 1 tr). Then work 1 tr in each of the next 4-6-6-6 ch, work A.7 as before, work A.2a (adjust pattern according to A.7) 2-3-4-4 times in total in width as before, work A.7, finish with 1 tr in each of the last 3 ch. Work the 8-10-10-10 sts under sleeve as 1st st in A.7. When A.7 has been worked 1 time vertically, there are 56-64-70-70 tr on last round. SIZE L: Worked in the round. Beg by working mid under sleeve as follows: Work 1 sl st in 4th ch of the 8 ch worked in armhole on body. Work 1 ch (= 1 dc). Then work 1 dc in each of the next 4 ch, work A.7 as before, work A.2a (adjust pattern according to A.7) 3 times in total in width as before, work A.7, finish with 1 dc in each of the last 3 ch. Work the 8 sts under sleeve as 1st st in A.7. When A.7 has been worked 1 time vertically, there are 62 tr on last round. ALL SIZES: = 56-56-62-64-70-70 tr. Repeat A.2a 9-9-10-10-11-11 times in total in width while AT THE SAME TIME on first round with tr dec 2-2-2-4-4-4 tr evenly = 54-54-60-60-66-66 tr. When piece measures 10 cm, adjust so that next round is with tr, dec 6 tr evenly = 48-48-54-54-60-60 tr. Then repeat A.2a 8-8-9-9-10-10 times in width. When piece measures 23 cm, adjust to finish nicely according to pattern, fasten off. Work another sleeve the same way. NECK EDGE: Crochet an edge around the neck. Beg mid front. Work * 1 dc in first tr, 3 ch, skip approx. 1 cm *, repeat from *-* around the entire neck. Make sure to avoid a tight neck edge, adjust to finish with 1 dc in last tr on row. Fasten off. ASSEMBLY: Fasten the buttons on left front piece, fasten the top button approx. 2 cm from neck edge, fasten the remaining buttons approx. 8-9-9-8-8-9 cm apart. Button between 2 tr on right front piece. |
||||||||||||||||||||||||||||
Diagram explanations |
||||||||||||||||||||||||||||
|
||||||||||||||||||||||||||||
 |
||||||||||||||||||||||||||||
 |
||||||||||||||||||||||||||||
 |
||||||||||||||||||||||||||||
 |
||||||||||||||||||||||||||||
 |
||||||||||||||||||||||||||||
Have you finished this pattern?Tag your pictures with #dropspattern #seashoreblisscardigan or submit them to the #dropsfan gallery. Do you need help with this pattern?You'll find 14 tutorial videos, a Comments/Questions area and more by visiting the pattern on garnstudio.com. © 1982-2026 DROPS Design A/S. We reserve all rights. This document, including all its sub-sections, has copyrights. Read more about what you can do with our patterns at the bottom of each pattern on our site. |
||||||||||||||||||||||||||||


With over 40 years in knitting and crochet design, DROPS Design offers one of the most extensive collections of free patterns on the internet - translated to 17 languages. As of today we count 324 catalogues and 12291 patterns translated into English (UK/cm). 12291
We work hard to bring you the best knitting and crochet have to offer, inspiration and advice as well as great quality yarns at incredible prices! Would you like to use our patterns for other than personal use? You can read what you are allowed to do in the Copyright text at the bottom of all our patterns. Happy crafting!
Post a comment to pattern DROPS 169-16
We would love to hear what you have to say about this pattern!
If you want to leave a question, please make sure you select the correct category in the form below, to speed up the answering process. Required fields are marked *.