
Popular categories
Looking for a yarn?


Comments / Questions (30)
![]() Dorothee wrote:
Dorothee wrote:
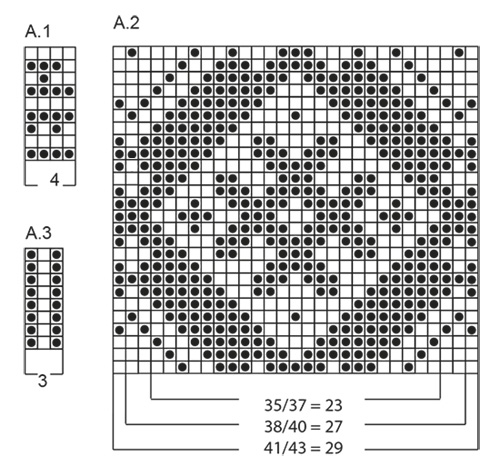
Ik zie de telpatroontekening van A1, A2, A3 en A7 er niet bij staan, terwijl de beschrijving er wel naar verwijst. Kunnen die nog toegevoegd worden?
19.06.2023 - 14:02DROPS Design answered:
Dag Dorothee,
A.7 staat helemaal links onderaan (naast A.6), A.1, A.2 en A.3 staan helemaal bovenaan bij de telpatronen. Misschien dat de pagina tijdelijk niet goed laadde.
21.06.2023 - 20:57
![]() Norsk wrote:
Norsk wrote:
Bonjour, Merci pour la vidéo pour réaliser le rond magique au tricot (elle est très utile !). Avez-vous à présent une vidéo pour réaliser le talon de cette chaussette ? Je n'ai jamais réalisé une chaussette à partir de la pointe et je ne comprends pas les explications. En outre, la vidéo pour le talon ne correspond pas à la technique utilisée pour cette chaussette. Merci !
26.12.2022 - 17:23DROPS Design answered:
Bonjour Mme Norsk, le talon se tricote comme dans cette vidéo (même si le modèle est de haut en bas dans la vidéo), autrement dit, on tricote des rangs raccourcis en laissant 1 maille à la fin de chaque rang jusqu'à ce qu'il reste 15 m (4 dans la vidéo) puis on tricote 1 m en plus à la fin de chaque rang jusqu'à ce que toutes les mailles du talon aient été tricotées (2ème partie du talon à partir de 4:59 dans la vidéo). Bon tricot!
02.01.2023 - 09:28
![]() Norsk wrote:
Norsk wrote:
Avez-vous une vidéo pour réaliser le rond magique au tricot ? Je ne trouve un tuto que pour le crochet. Merci !
17.12.2022 - 17:16DROPS Design answered:
Bonjour Mme Norsk, tout à fait, vous la retrouverez ici. Bon tricot!
19.12.2022 - 08:55
![]() Pia Johansson wrote:
Pia Johansson wrote:
Förstår inte hur jag ska sticka hälen...
22.11.2022 - 21:24DROPS Design answered:
Hei Pia. Hvordan hælen strikkes står beskrevet under HÄL, øverst i oppskriften. Hva er det du ikke helt skjønner med hva som står der? mvh DROPS Design
28.11.2022 - 09:56
![]() Pia Johansson wrote:
Pia Johansson wrote:
Stickar strumpor 170-11, förstår inte alla hur jag ska sticka hälen. Har stickat många strumpor förut, men då börjat från skaftet och ned.
22.11.2022 - 21:22
![]() My wrote:
My wrote:
Sidan bara laddar och laddar utan att några bilder eller diagram visas, spelar ingen roll om jag byter browser heller. :(
13.01.2022 - 14:55
![]() Pia Johansson wrote:
Pia Johansson wrote:
20 maskor på stickorna , ska sätta ett märke i var sida , med 9 maskor emellan...? Borde vara 10 maskor mellan ....,?
02.01.2022 - 21:53DROPS Design answered:
Hej Pia. Du sätter markörer i maskorna (inte mellan maskor) på varje sida så då blir det 9 maskor mellan maskorna med markörer i. Mvh DROPS Design
03.01.2022 - 09:48
![]() Myriam wrote:
Myriam wrote:
Bonjour et merci pour ce très beau modèle. Mais je sèche sur le talon. Où faut-il commencer le « en même temps » ! Est-ce après tous les rangs raccourcis ? Merci pour votre aide.
27.12.2021 - 17:06DROPS Design answered:
Bonjour Myriam, vous le faites après tous les rangs raccourcis. Bon tricot!
28.12.2021 - 09:57
![]() Cathis wrote:
Cathis wrote:
Är det inte ett litet fel på A2, mönsterbildens vänstersida straxt ovanför mitten? Det är inte symmetriskt.
30.10.2020 - 21:31DROPS Design answered:
Hei Cathis. Hvilken størrelse mener du da? Man strikker forskjellige utsnitt av A.2 ved de ulike størrelsene. mvh DROPS design
02.11.2020 - 12:46
![]() Lisbeth Lund wrote:
Lisbeth Lund wrote:
Går det å start fra kruset på disse sokkene ?
11.01.2020 - 23:52DROPS Design answered:
Hej Lisbeth, de her strikkes fra tåen og opp, næsten alle vore andre sokker strikkes fra skaftet og ned, så du finder sikkert et mønster som passer dig :)
15.01.2020 - 15:37
|
||||||||||||||||
Mexican Sunset#mexicansunsetsocks |
||||||||||||||||
 |
 |
|||||||||||||||
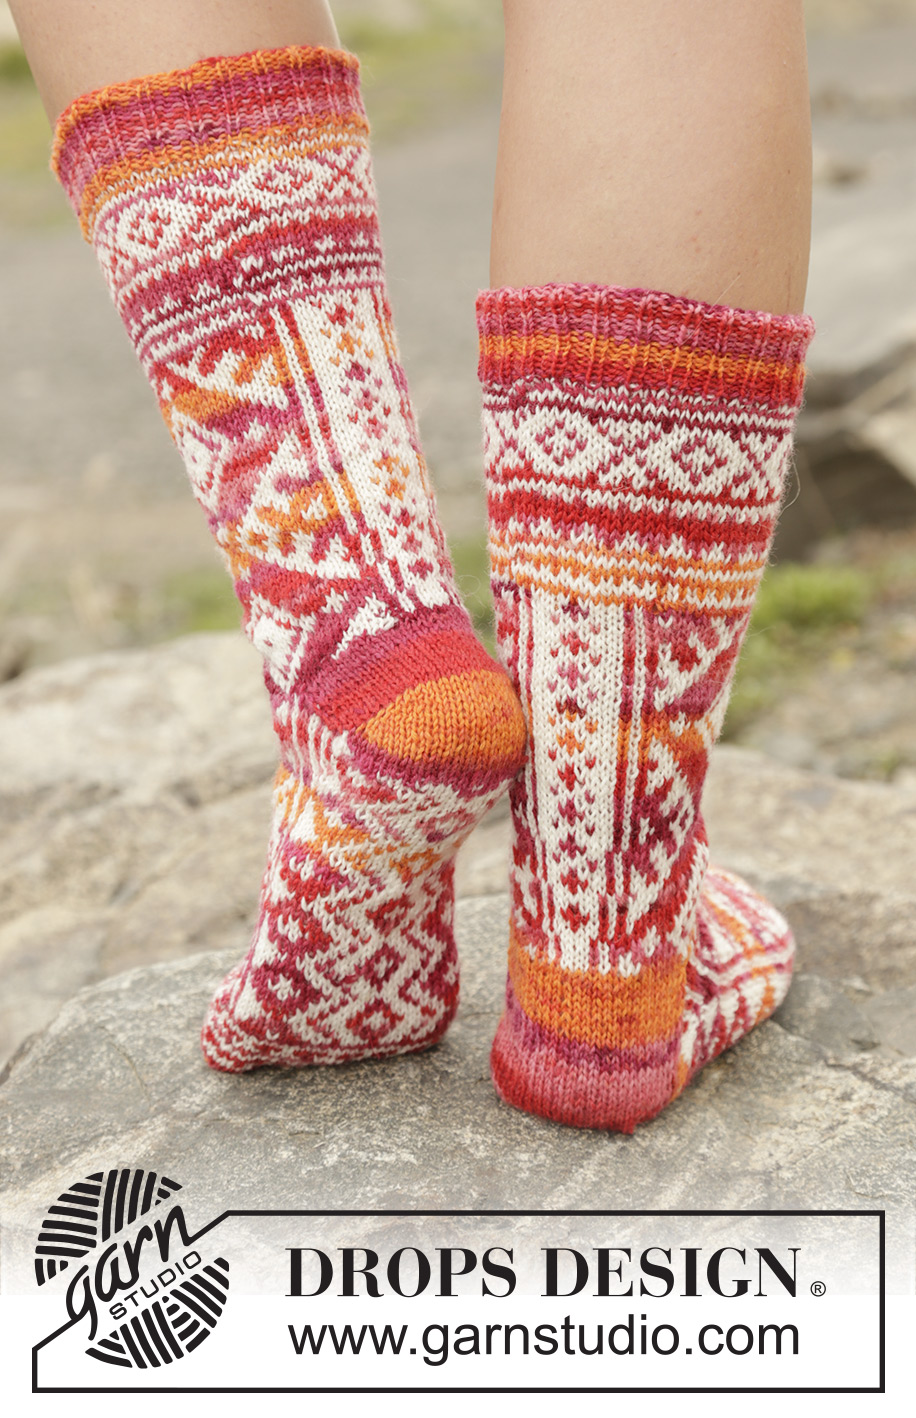
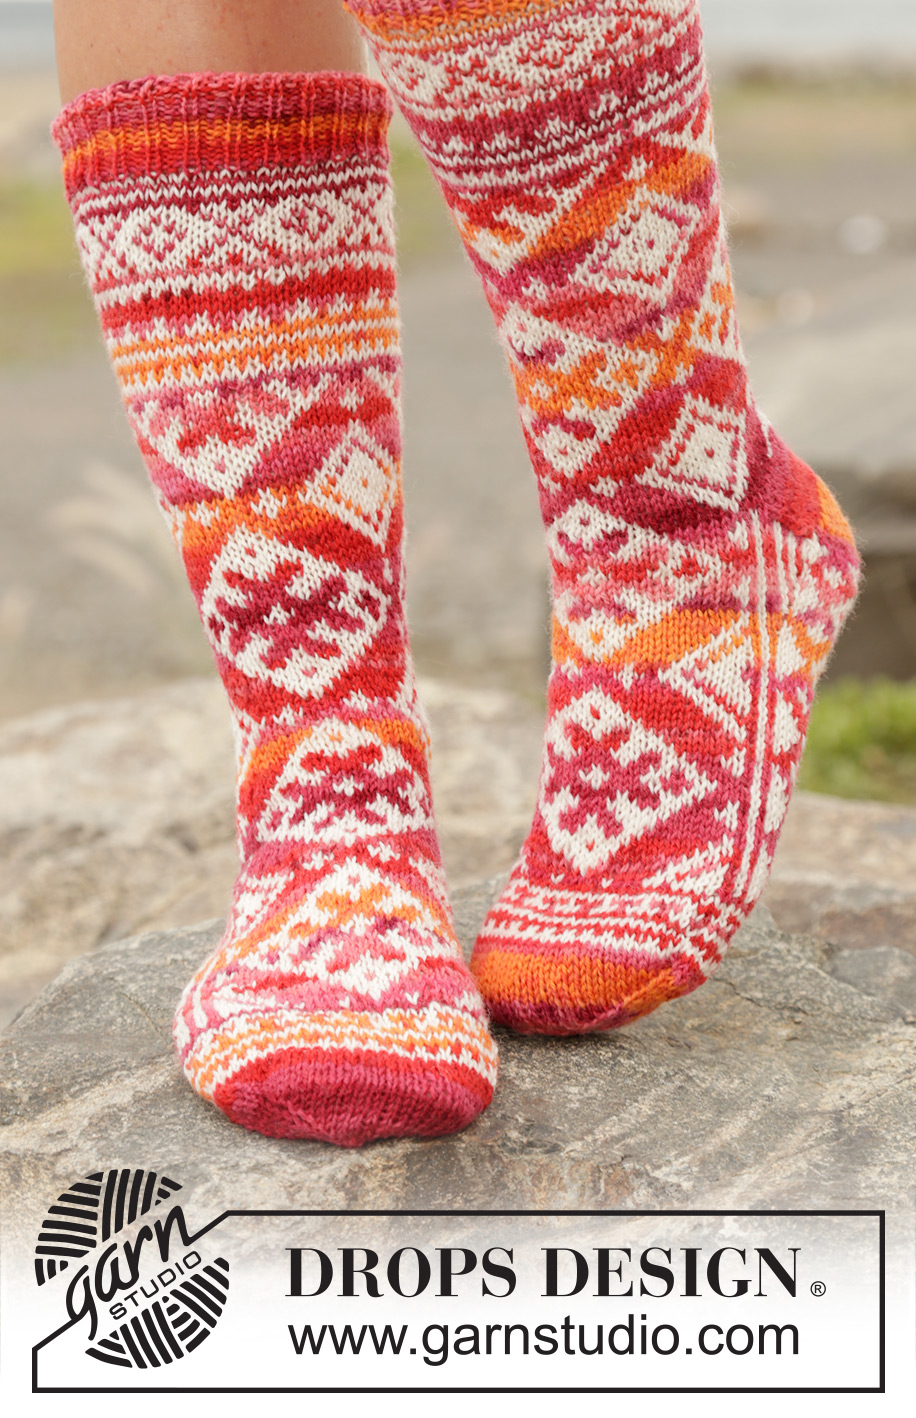
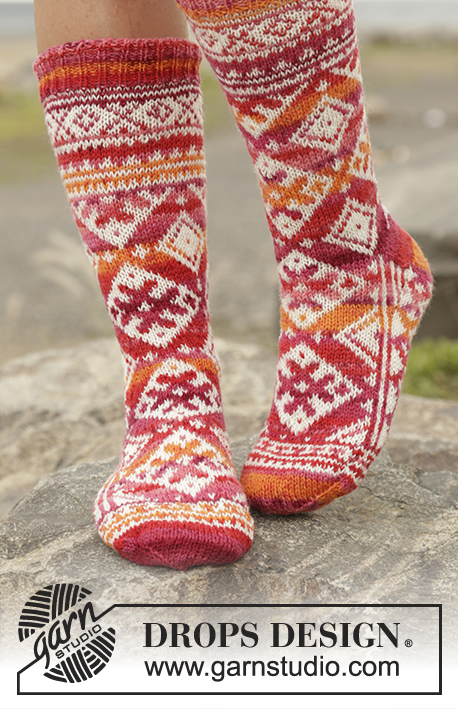
Knitted DROPS socks with Nordic pattern worked from toe up in ”Fabel”. Size 35 - 43
DROPS 170-11 |
||||||||||||||||
|
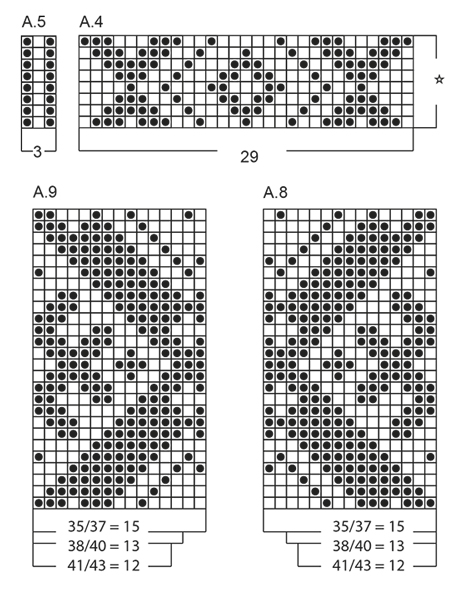
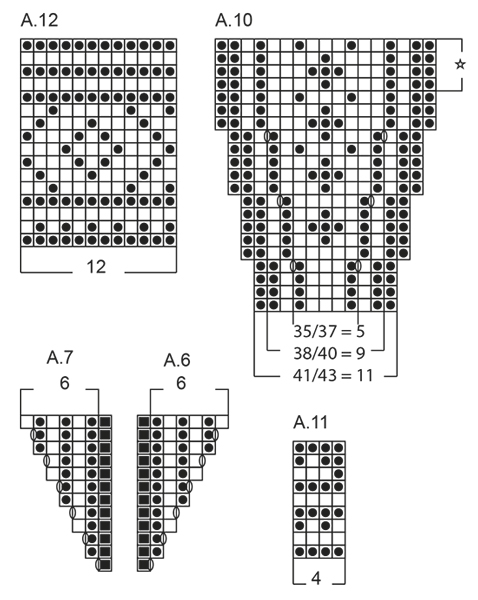
MAGIC CIRCLE: To avoid hole in the middle beg with this technique: Hold yarn end in the left hand and make a loop around left index finger (from left to right). Hold the loop with left thumb and index finger. Insert needle through loop, get yarn from ball, pull yarn back through loop, 1 YO (place yarn from the back and towards you) and pull YO through sts on needle, * insert needle through loop, 1 YO, pull YO through loop, 1 YO and pull YO through outermost st on right needle (i.e. the last st made) *, repeat from *-* until there are 10-10-12 sts on needle. Distribute sts on double pointed needles size 2.5 mm. Then work as explained in pattern – AT THE SAME TIME pull yarn end so that loop is tighten tog and the hole disappears. PATTERN: See diagrams A.1 to A.12 – choose diagram for correct size. Work entire pattern in stocking st. HEEL: Work back and forth. ROW 1 (= RS): Work until 1 sts remain, turn piece. ROW 2 (= WS): Slip first st as if to P, tighten yarn and work until 1 st remains, turn piece. ROW 3 (= RS): Slip first st as if to K, tighten yarn and work until 2 sts remain, turn piece. ROW 4 (= WS): Slip first st as if to P, tighten yarn and work until 2 sts remain, turn piece. Continue short rows the same way until 15 sts remain in the middle of row. Insert 1 marker. Continue back and forth but now work 1 st more for every row over heel. To avoid holes in the transitions, lift the horizontal yarn before the st to be knitted up and slip it twisted on the needle. Work strand tog with next st (from RS K strand and st tog and from WS P strand and st tog). Work like this until all heel sts have been worked. ---------------------------------------------------------- SOCK: Worked from the toe and up. Start with sunset and MAGIC CIRCLE - see explanation above - on double pointed needles 2.5 mm. On next round work as follows: * K 1, YO *, repeat from *-* entire round (K YO twisted on next round) = 20-20-24 sts. Insert 1 marker in a st in each side, 9-9-11 sts between each marker. Inc in each side of every marker as follows: * Work until 1 st remains before st with marker, 1 YO, K 3 (marker is in the 2nd st), 1 YO *, repeat from *-* 2 times in total (= 4 sts inc) - NOTE: On next round K YO twisted to avoid holes. Repeat inc every round a total of 5-3-3 times and then every other round a total of 4-7-7 times = 56-60-64 sts. REMEMBER THE KNITTING TENSION K 1 round. Now work pattern according to diagram A.1 (= 14-15-16 repetitions on round). When A.1 has been worked, K 1 round with sunset while inc 2-2-0 sts evenly = 58-62-64 sts. Work next round as follows: A.2 (= 23-27-29 sts on top of foot), A.3 (= 3 sts), A.4 (= 29 sts under foot) and A.5 (= 3 sts). Continue like this until piece measures approx. 13-15-18 cm from toe. Continue as before but now work A.6 between A.3 and A.4 and A.7 between A.4 and A.5. Continue like this until A.6 and A.7 have been worked vertically = 70-74-76 sts. Work A.2 as before (= 23-27-29 sts), change to sunset and work rest of round. Cut the yarn. Piece measures approx. 17-19-22 cm from toe. Slip the 41-45-47 sts mid top on foot on a stitch holder (i.e. A.7, A.5, A.2, A.3 and A.6) = 29 sts on needle for heel (= A.4). Work HEEL - see explanation above, work entire heel in sunset. After the short rows over heel, continue in stocking st and with sunset over the 29 sts on heel - AT THE SAME TIME at the end of every row (both from RS and WS), work last st on needle tog with outermost st from stitch holder (from RS K the 2 sts twisted tog and from WS P the 2 sts tog). Continue back and forth like this until the 6 outermost sts in each side on stitch holder have been worked tog with sts on heel. Slip the other 29-33-35 sts from stitch holder back on needle = 58-62-64 sts. Cut the yarn. NOW MEASURE PIECE FROM HERE! Start new round in the side, i.e. 15-13-12 sts before first st in A.2 and work next round as follows: Work A.8 (= 15-13-12 sts) - NOTE: Beg on same row as next row in A.2 - continue A.2 as before, work A.9 (15-13-12 sts), finish round with A.10 (= 5-9-11 sts at the back of foot). Continue pattern until piece measures approx. 16- cm - adjust after a half or whole repetition of A.8/A.9 vertically = 64-68-70 sts. Now work A.11 (= 4 sts) over all sts - AT THE SAME TIME on first row inc 4-0-2 sts evenly = 68-68-72 sts. When A.11 has been worked, work A.12 (= 12 sts) over all sts - AT THE SAME TIME on first row inc 4-4-0 sts evenly = 72 sts. When A.12 is done, switch to double pointed needle size 2 mm and work rib (= K 1/P 2) with sunset until rib measures approx. 4 cm. Cast off with K over K and P over P. Fasten off. Knit another sock the same way. |
||||||||||||||||
Diagram explanations |
||||||||||||||||
|
||||||||||||||||
 |
||||||||||||||||
 |
||||||||||||||||
 |
||||||||||||||||
Have you finished this pattern?Tag your pictures with #dropspattern #mexicansunsetsocks or submit them to the #dropsfan gallery. Do you need help with this pattern?You'll find 16 tutorial videos, a Comments/Questions area and more by visiting the pattern on garnstudio.com. © 1982-2026 DROPS Design A/S. We reserve all rights. This document, including all its sub-sections, has copyrights. Read more about what you can do with our patterns at the bottom of each pattern on our site. |
||||||||||||||||


With over 40 years in knitting and crochet design, DROPS Design offers one of the most extensive collections of free patterns on the internet - translated to 17 languages. As of today we count 324 catalogues and 12290 patterns translated into English (UK/cm). 12290
We work hard to bring you the best knitting and crochet have to offer, inspiration and advice as well as great quality yarns at incredible prices! Would you like to use our patterns for other than personal use? You can read what you are allowed to do in the Copyright text at the bottom of all our patterns. Happy crafting!
Post a comment to pattern DROPS 170-11
We would love to hear what you have to say about this pattern!
If you want to leave a question, please make sure you select the correct category in the form below, to speed up the answering process. Required fields are marked *.