
Popular categories
Looking for a yarn?


Comments / Questions (30)
![]() Lisa wrote:
Lisa wrote:
Can you please explain the solid vertical columns on charts 6 and 7. Are these the first and last stitches of charts 3 and 5? Thank you!
29.09.2024 - 01:10DROPS Design answered:
Dear Lisa, these stitches are explained in the diagram explanations above: shows first/last st in A.4. So they aren't worked when you work A.6/A.7, because they are part of A.4. Happy knitting!
29.09.2024 - 21:04
![]() Lisa wrote:
Lisa wrote:
Can you please explain the solid vertical columns on charts 6 and 7. Are these the first and last stitches of charts 3 and 5? Thank you!
28.09.2024 - 22:37DROPS Design answered:
Dear Lisa, these stitches are explained in the diagram explanations above: shows first/last st in A.4. So they aren't worked when you work A.6/A.7, because they are part of A.4. Happy knitting!
29.09.2024 - 21:03
![]() Marja wrote:
Marja wrote:
Hei! Paljon kiitoksia nopeista vastauksista. Olivat todella tarpeen. Olipa haasteelliset sukat neuloa, mutta kyllä tuli kauniit. Kohti uusia haasteita. Kiitos.
17.07.2024 - 11:05
![]() Marja wrote:
Marja wrote:
Hei! Miksi kysymysosio väittää usein, että kommentissa tai kysymylsessä on jokin linkki tai kielletty sana? Vaikka todellakaan ei ole kumpaakaan.
14.07.2024 - 12:16
![]() Marja wrote:
Marja wrote:
Hei! Miksi kysymysosio väittää usein, että kommentissa tai kysymylsessä on jokin linkki tai kielletty sana? Vaikka todellakaan ei ole kumpaakaan.
14.07.2024 - 12:14
![]() Marja wrote:
Marja wrote:
..jatko..Vai neulonko ensin tasona ottamalla yksi kerrallaan silmukoita takaisin työhön kunnes niitä on taas 29 ja aloitan tuon yhteen neulomisen vasta kun otan mukaan 6+6 s apulangalta?
14.07.2024 - 09:56
![]() Marja wrote:
Marja wrote:
Hei. Lisäkysymys."Jatka tasoneuletta, mutta neulo nyt aina 1 s enemmän ennen kuin käännyt. Nosta aina kääntymiskohdan silmukoiden välinen vaakasuora lankalenkki kiertäen puikolle. Neulo tämä lenkki seuraavan s:n kanssa yhteen (oikealta puolelta lenkki ja s neulotaan oikein yhteen, nurjalta puolelta lenkki ja s neulotaan nurin yhteen). Tällä tavoin kääntymiskohtiin ei muodostu reikiä. .."Alkaako tämä heti kun kaikki lyhenn. krs.t on tehty?
14.07.2024 - 09:52DROPS Design answered:
Tämä alkaa heti, kun lyhennetyt kerrokset on tehty. Tällä tavoin kantapäästä tulee symmetrinen.
15.07.2024 - 17:35
![]() Marja wrote:
Marja wrote:
Hei. En ymmärrä kantapäätä. Alkaako kantapään teko heti lyhennetyillä kerroksilla kun A6 ja A7 on neulottu loppuun? Kun lyhennetyt kerrokset on tehty(=15s keskellä ja yht 8krs) alkaako heti silmikoiden takaisin ottaminen ? Näyttäisi että kantapää jää pieneksi. En ymmärrä ohjeita ollenkaan. Auttaisi ehkä jos tietäisin kuinka monta krs kantapään keskellä on lopussa, ... hirmun vaikeaa
14.07.2024 - 00:14DROPS Design answered:
Kyllä, kantapää alkaa kun olet neulonut piirrokset A.6 ja A.7 loppuun (työn pituus on n. 17-19-22 cm). Silmukat otetaan takaisin työhön, kun työn keskellä on jäljellä 15 s.
15.07.2024 - 17:30
![]() Marja wrote:
Marja wrote:
Hei. Ilmeisesti olen kerroksen vaihtumiskohdan asettanut alussa väärin. Kuuluuko se olla jommassa kummassa sivussa?
11.07.2024 - 13:46DROPS Design answered:
Hei, kerroksen vaihtumiskohta on ensimmäisen ja neljännen puikon välissä, eli keskellä takana.
11.07.2024 - 17:42
![]() Inge Vab Erkel wrote:
Inge Vab Erkel wrote:
Ik zie de patronen voor de scandinavische sokken. Kunnen deze ook met een andere hiel gebreid worden, dus zonder spie en bijvoorbeeld wel met een shadowwrap hiel?
30.04.2024 - 14:14DROPS Design answered:
Dag Inge,
Je bent natuurlijk vrij om het patroon aan te passen naar eigen wensen en je kunt er inderdaad een andere hak in breien.
30.04.2024 - 21:00
|
||||||||||||||||
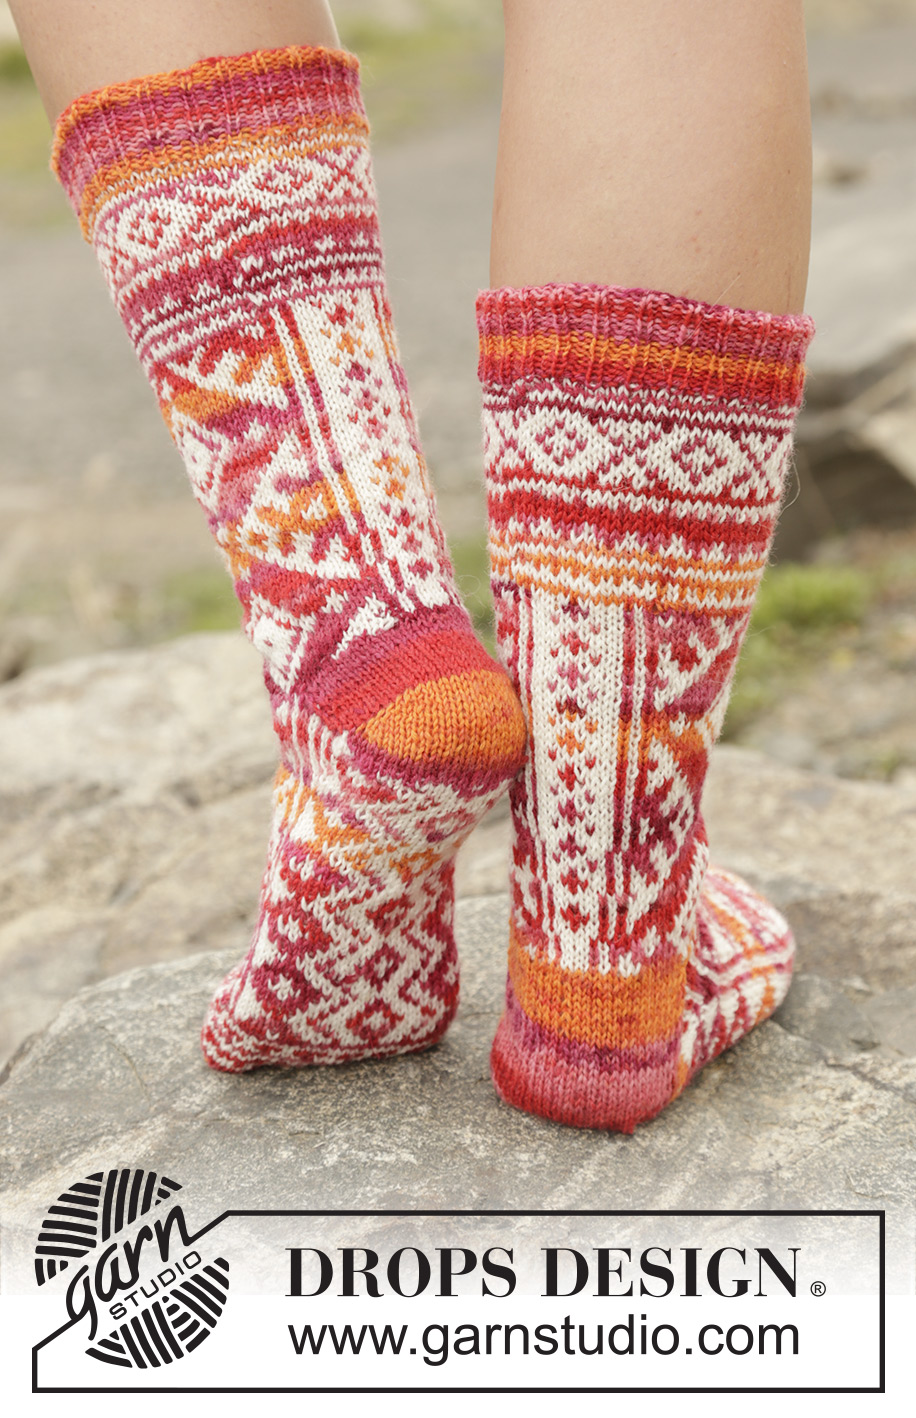
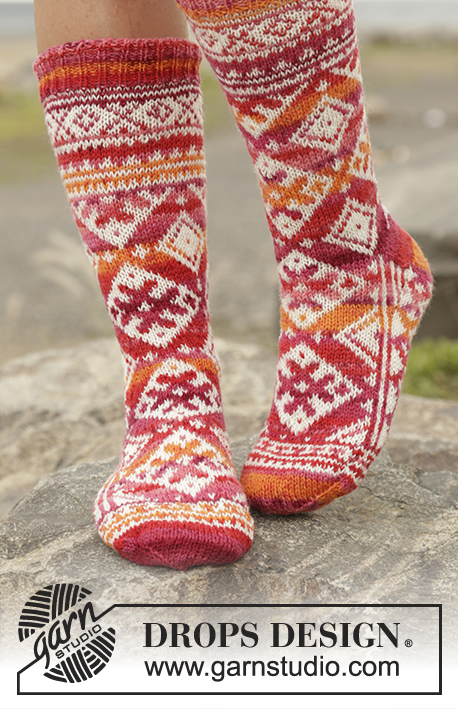
Mexican Sunset#mexicansunsetsocks |
||||||||||||||||
 |
 |
|||||||||||||||
Knitted DROPS socks with Nordic pattern worked from toe up in ”Fabel”. Size 35 - 43
DROPS 170-11 |
||||||||||||||||
|
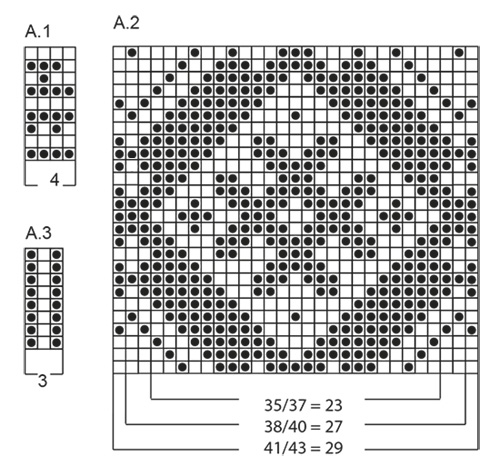
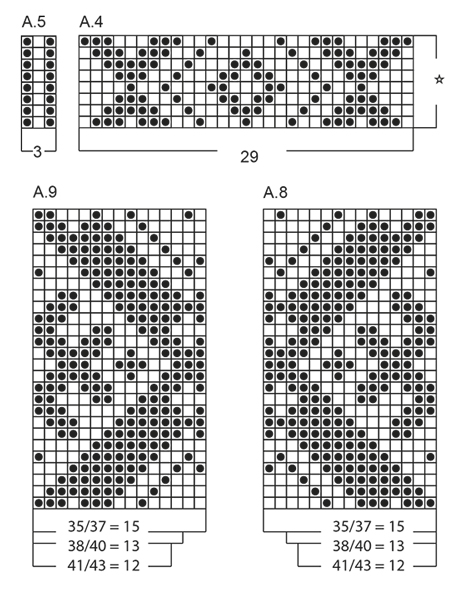
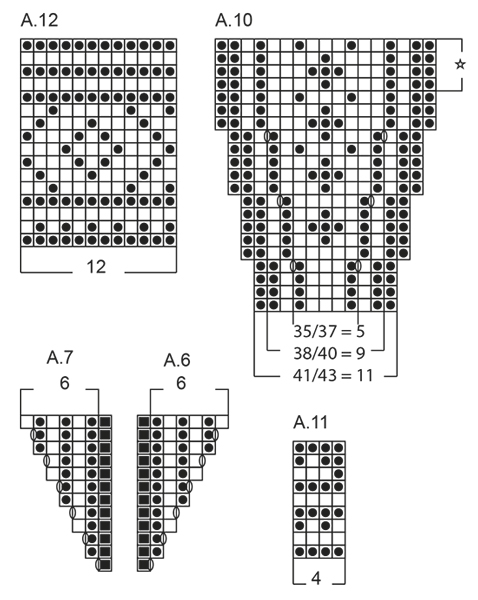
MAGIC CIRCLE: To avoid hole in the middle beg with this technique: Hold yarn end in the left hand and make a loop around left index finger (from left to right). Hold the loop with left thumb and index finger. Insert needle through loop, get yarn from ball, pull yarn back through loop, 1 YO (place yarn from the back and towards you) and pull YO through sts on needle, * insert needle through loop, 1 YO, pull YO through loop, 1 YO and pull YO through outermost st on right needle (i.e. the last st made) *, repeat from *-* until there are 10-10-12 sts on needle. Distribute sts on double pointed needles size 2.5 mm. Then work as explained in pattern – AT THE SAME TIME pull yarn end so that loop is tighten tog and the hole disappears. PATTERN: See diagrams A.1 to A.12 – choose diagram for correct size. Work entire pattern in stocking st. HEEL: Work back and forth. ROW 1 (= RS): Work until 1 sts remain, turn piece. ROW 2 (= WS): Slip first st as if to P, tighten yarn and work until 1 st remains, turn piece. ROW 3 (= RS): Slip first st as if to K, tighten yarn and work until 2 sts remain, turn piece. ROW 4 (= WS): Slip first st as if to P, tighten yarn and work until 2 sts remain, turn piece. Continue short rows the same way until 15 sts remain in the middle of row. Insert 1 marker. Continue back and forth but now work 1 st more for every row over heel. To avoid holes in the transitions, lift the horizontal yarn before the st to be knitted up and slip it twisted on the needle. Work strand tog with next st (from RS K strand and st tog and from WS P strand and st tog). Work like this until all heel sts have been worked. ---------------------------------------------------------- SOCK: Worked from the toe and up. Start with sunset and MAGIC CIRCLE - see explanation above - on double pointed needles 2.5 mm. On next round work as follows: * K 1, YO *, repeat from *-* entire round (K YO twisted on next round) = 20-20-24 sts. Insert 1 marker in a st in each side, 9-9-11 sts between each marker. Inc in each side of every marker as follows: * Work until 1 st remains before st with marker, 1 YO, K 3 (marker is in the 2nd st), 1 YO *, repeat from *-* 2 times in total (= 4 sts inc) - NOTE: On next round K YO twisted to avoid holes. Repeat inc every round a total of 5-3-3 times and then every other round a total of 4-7-7 times = 56-60-64 sts. REMEMBER THE KNITTING TENSION K 1 round. Now work pattern according to diagram A.1 (= 14-15-16 repetitions on round). When A.1 has been worked, K 1 round with sunset while inc 2-2-0 sts evenly = 58-62-64 sts. Work next round as follows: A.2 (= 23-27-29 sts on top of foot), A.3 (= 3 sts), A.4 (= 29 sts under foot) and A.5 (= 3 sts). Continue like this until piece measures approx. 13-15-18 cm from toe. Continue as before but now work A.6 between A.3 and A.4 and A.7 between A.4 and A.5. Continue like this until A.6 and A.7 have been worked vertically = 70-74-76 sts. Work A.2 as before (= 23-27-29 sts), change to sunset and work rest of round. Cut the yarn. Piece measures approx. 17-19-22 cm from toe. Slip the 41-45-47 sts mid top on foot on a stitch holder (i.e. A.7, A.5, A.2, A.3 and A.6) = 29 sts on needle for heel (= A.4). Work HEEL - see explanation above, work entire heel in sunset. After the short rows over heel, continue in stocking st and with sunset over the 29 sts on heel - AT THE SAME TIME at the end of every row (both from RS and WS), work last st on needle tog with outermost st from stitch holder (from RS K the 2 sts twisted tog and from WS P the 2 sts tog). Continue back and forth like this until the 6 outermost sts in each side on stitch holder have been worked tog with sts on heel. Slip the other 29-33-35 sts from stitch holder back on needle = 58-62-64 sts. Cut the yarn. NOW MEASURE PIECE FROM HERE! Start new round in the side, i.e. 15-13-12 sts before first st in A.2 and work next round as follows: Work A.8 (= 15-13-12 sts) - NOTE: Beg on same row as next row in A.2 - continue A.2 as before, work A.9 (15-13-12 sts), finish round with A.10 (= 5-9-11 sts at the back of foot). Continue pattern until piece measures approx. 16- cm - adjust after a half or whole repetition of A.8/A.9 vertically = 64-68-70 sts. Now work A.11 (= 4 sts) over all sts - AT THE SAME TIME on first row inc 4-0-2 sts evenly = 68-68-72 sts. When A.11 has been worked, work A.12 (= 12 sts) over all sts - AT THE SAME TIME on first row inc 4-4-0 sts evenly = 72 sts. When A.12 is done, switch to double pointed needle size 2 mm and work rib (= K 1/P 2) with sunset until rib measures approx. 4 cm. Cast off with K over K and P over P. Fasten off. Knit another sock the same way. |
||||||||||||||||
Diagram explanations |
||||||||||||||||
|
||||||||||||||||
 |
||||||||||||||||
 |
||||||||||||||||
 |
||||||||||||||||
Have you finished this pattern?Tag your pictures with #dropspattern #mexicansunsetsocks or submit them to the #dropsfan gallery. Do you need help with this pattern?You'll find 16 tutorial videos, a Comments/Questions area and more by visiting the pattern on garnstudio.com. © 1982-2026 DROPS Design A/S. We reserve all rights. This document, including all its sub-sections, has copyrights. Read more about what you can do with our patterns at the bottom of each pattern on our site. |
||||||||||||||||


With over 40 years in knitting and crochet design, DROPS Design offers one of the most extensive collections of free patterns on the internet - translated to 17 languages. As of today we count 324 catalogues and 12290 patterns translated into English (UK/cm). 12290
We work hard to bring you the best knitting and crochet have to offer, inspiration and advice as well as great quality yarns at incredible prices! Would you like to use our patterns for other than personal use? You can read what you are allowed to do in the Copyright text at the bottom of all our patterns. Happy crafting!
Post a comment to pattern DROPS 170-11
We would love to hear what you have to say about this pattern!
If you want to leave a question, please make sure you select the correct category in the form below, to speed up the answering process. Required fields are marked *.