
Popular categories
Looking for a yarn?


Comments / Questions (6)
![]() Barbara Kamm wrote:
Barbara Kamm wrote:
Thanks you for those latest instructions. So the cable is not really a cable but I. Your last instructions I still don’t see the pattern for the o dented cable like pattern but I guess I can try to figure it out. Are there only 3 stitches in the cable like pattern?
05.09.2023 - 04:41DROPS Design answered:
Dear Mrs Kamm, the cable is a real cable but you will either cross the first 6 sts or the last 6 sts - work 3rd row A.1 as follows: slip 3 sts on cable needle behind piece, K 3, K 3 from cable needle, K3, and work 11th row as follows: K3, slip 3 sts on cable needle behind piece, K 3, K 3 from cable needle. Happy knitting!
05.09.2023 - 13:35
![]() Barbara Kamm wrote:
Barbara Kamm wrote:
Wow, that I do not understand. I’m going to have to look for an American pattern. I don’t know how to read diagrams. It’s greek to me. So frustrating
03.09.2023 - 22:39
![]() Barbara Kamm wrote:
Barbara Kamm wrote:
I have 46 stitches on my needles, 4 stitches in garter, purl 1, 29 stitches in stocking knit, that 34 stitches than plus 3 at the end of the row =37, the other nine must be for the cable pattern. Which is on a diagonal. I don’t see any instructions on how to work the cable and the other stitches ?
02.09.2023 - 04:21DROPS Design answered:
Dear Mrs Kamm, on right front piece in larger size, work the 46 sts as follows from right side: 4 front band stitches in garter stitch, work the 9 sts A.1 (= knit on 1st row, cable on 3rd row), then purl 1 and knit to the end of the row. from wrong side, work: K3, P29, K1, P9, K4. In A.1 as well as in A.2 all the stitches will not be crossed for the cable; in A.1 cross the first 6 sts and knit the last 3; then knit the first 3 and cross the last 6. Happy knitting!
04.09.2023 - 09:20
![]() Barbara Kamm wrote:
Barbara Kamm wrote:
I am sorry to keep bothering you. But I don’t see in The instructions how to do the cable pattern. I am totally lost
02.09.2023 - 03:57DROPS Design answered:
Dear Barbara, the instructions for the cable pattern are in the charts A.1 and A.2, where, on specific rows, you will slip 3 stitches to the cable needle, knit 3 and place the stitches back onto the main needle. So you will have 1 stitch in garter stitch before the cable in A.2 and purl 1 after A.2. On the other front piece you will have A.1 instead of A.2 and 1 purl before the cable and the edge stitch after the cable. Happy knitting!
03.09.2023 - 20:08
![]() Barbara Kamm wrote:
Barbara Kamm wrote:
Hi: I am starting the right front and I am confused with the instructions. I am making the 3X size. I have knitted the first 4 stitches that you call Band. Then it states A.2, P1 which I assume is for pearl 1. That confuses me. Then it states 29 stitches in stocking knit. If I am looking at the picture and the right side is on the left, I am not sure what kind of stitch you do before and after the cable? I would think I would do pearl stitches bebore the cable and the cable is zig zag about
29.08.2023 - 05:39DROPS Design answered:
Dear Mrs Kamm, on right front piece, work from RS as follows: 4 sts in garter stitch (K them on every row), then work A.2 (see diagram, read from right towards the left from RS and from the left towards the right from WS), purl 1 (this stitch will be knitted from WS), and work the next 29 sts in stocking stitch (= these stitches will be knitted from RS and purled from WS), end with 3 sts in garter stitch (knit them on every row). Happy knitting!
29.08.2023 - 09:27
![]() Barbara Kamm wrote:
Barbara Kamm wrote:
It confuses me that on the back piece of this sweater it say to do garter stitch on 3 stitches on each side and I interpret that at the beginning and end of the back ?? Why is that? I understand using it on the front pieces
19.08.2023 - 18:05DROPS Design answered:
Dear Barbara, the 3 stitches in garter stitch in each side of the back form a small border for the vent at the lower part of the jacket. After finishing the vent, you will have a single edge stitch in garter stitch, which will be used for the seam. Happy knitting!
20.08.2023 - 17:19
|
||||||||||
Winter Sparkle Cardigan |
||||||||||
|
|
||||||||||
Knitted DROPS jacket with cables in 1 thread Cloud or 2 thread Air Size: S - XXXL.
DROPS Extra 0-1188 |
||||||||||
|
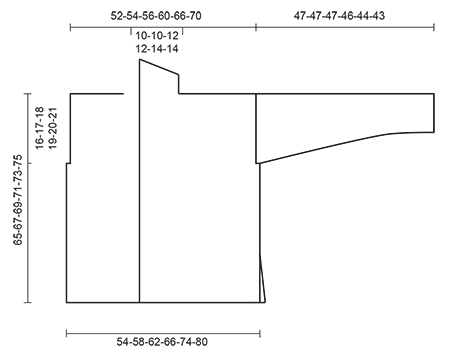
GARTER ST (back and forth): K all rows. 1 ridge = 2 rows K. PATTERN: See diagrams A.1-A.2. The diagrams show all rows in pattern seen from RS. BUTTONHOLES: Dec from RS for 4 buttonholes on right band. 1 BUTTONHOLE = work 2 sts from mid front, make 1 YO, K the next 2 tog. On next row K the YO. Dec for buttonholes when piece measures approx.: SIZE S: 20, 29, 38 and 47 cm SIZE M: 20, 29, 38 and 47 cm SIZE L: 24, 33, 42 and 51 cm SIZE XL: 24, 33, 42 and 51 cm SIZE XXL: 25, 35, 45 and 55 cm SIZE XXXL: 25, 35, 45 and 55 cm ---------------------------------------------------------- BACK PIECE: Worked back and forth on circular needle. Cast on 54-58-62-66-74-80 sts on circular needle size 8 mm with 1 thread Cloud or 2 thread Air. Work 2 ridges in GARTER ST - see explanation above. Switch to circular needle size 9 mm. Work in stocking st with 3 sts in garter st in each side. When piece measures 14 cm (= vent), work the 3 sts in garter st in each side of piece in stocking st AT THE SAME TIME cast on 1 edge st in each side of piece at the end of the next 2 rows = 56-60-64-68-76-82 sts. Work edge sts in garter st. REMEMBER THE KNITTING TENSION When piece measures 49-50-51-52-53-54 cm, cast off 2-3-4-4-5-6 sts in each side of piece for armholes at beg of the next 2 rows = 52-54-56-60-66-70 sts. When piece measures 63-65-67-69-71-73 cm, cast off the middle 10-10-12-12-14-14 sts for neck = 21-22-22-24-26-28 sts remain for shoulder. Work in stocking st until piece measures 64-66-68-70-72-74 cm. Work 1 ridge. Cast off. Work the other shoulder the same way. RIGHT FRONT PIECE: Cast on 31-33-35-37-41-44 sts (incl 4 band st in garter st) on circular needle size 8 mm with 1 thread Cloud or 2 thread Air. Work 2 ridges - AT THE SAME TIME on last row inc 2 sts evenly = 33-35-37-39-43-46 sts. Switch to circular needle size 9 mm. Work as follows from RS: 4 band sts in garter st, A.2, P 1, 16-18-20-22-26-29 sts in stocking st, 3 sts in garter st. When piece measures 14 cm, work the 3 sts in garter st at the end of row from RS in stocking st AT THE SAME TIME cast on 1 edge st at the end of row from RS = 34-36-38-40-44-47 sts. Work edge sts in garter st. Remember BUTTONHOLES - see explanation above. When piece measures 49-50-51-52-53-54 cm, cast off 2-3-4-4-5-6 sts for armhole at beg of next row from WS =32-33-34-36-39-41 sts. When piece measures 64-66-68-70-72-74 cm, adjust so that next row is from WS, work 1 ridge over all sts. Then cast off the first 21-22-22-24-26-28 sts for shoulder = 11-11-12-12-13-13 sts remain for shawl collar. Continue in garter st over these sts - AT THE SAME TIME work short rows, beg from the neck (RS) as follows: * Work 1 ridge over all sts (= 2 rows K). On next row from RS K 9, turn and K back *, repeat from *-* until piece measures 7-7-8-8-9-9 cm from cast off for shoulder (short side). Loosely cast off all sts. LEFT FRONT PIECE: Work as right front piece but reversed, work A.1 instead of A.2. Cast on edge sts at the end of row from WS. Cast off for armhole at beg of row from RS. Cast off for shoulder at beg of row from RS. SLEEVE: Worked back and forth on circular needle. Cast on 24-24-24-26-26-26 sts on circular needle size 8 mm with 1 thread Cloud or 2 thread Air. Work 2 ridges. Switch to circular needle size 9 mm. Work in stocking st with 1 edge st in garter st in each side. When piece measures 9 cm, inc 1 st inside 1 edge st in each side of piece, repeat inc every 9-7-6-5½-4½-4 cm 4-5-6-6-7-8 more times = 34-36-38-40-42-44 sts. Cast off when piece measures 47-47-47-46-44-43 cm. NOTE! Shorter measurements in the larger sizes because of wider shoulders. Knit another sleeve. ASSEMBLY: Sew the shoulder seams. Sew in sleeves. Sew sleeve and side seams in one inside 1 edge st to where edge sts were cast on (i.e. approx. 14 cm vent). Sew collar tog mid back. Sew collar to neck line mid back of neck, sew edge to edge to avoid a chunky seam. Sew the buttons on to left front piece. |
||||||||||
Diagram explanations |
||||||||||
|
||||||||||
 |
||||||||||
 |
||||||||||
Have you finished this pattern?Tag your pictures with #dropspattern or submit them to the #dropsfan gallery. Do you need help with this pattern?You'll find 26 tutorial videos, a Comments/Questions area and more by visiting the pattern on garnstudio.com. © 1982-2026 DROPS Design A/S. We reserve all rights. This document, including all its sub-sections, has copyrights. Read more about what you can do with our patterns at the bottom of each pattern on our site. |
||||||||||


With over 40 years in knitting and crochet design, DROPS Design offers one of the most extensive collections of free patterns on the internet - translated to 17 languages. As of today we count 324 catalogues and 12291 patterns translated into English (UK/cm). 12291
We work hard to bring you the best knitting and crochet have to offer, inspiration and advice as well as great quality yarns at incredible prices! Would you like to use our patterns for other than personal use? You can read what you are allowed to do in the Copyright text at the bottom of all our patterns. Happy crafting!
Post a comment to pattern DROPS Extra 0-1188
We would love to hear what you have to say about this pattern!
If you want to leave a question, please make sure you select the correct category in the form below, to speed up the answering process. Required fields are marked *.