
Popular categories
Looking for a yarn?


Comments / Questions (44)
![]() Linda Hvid wrote:
Linda Hvid wrote:
Hej Jeg prøver forgæves at finde ud af brystvidden i de forskellige størrelser. Kan du oplyse målene? Mvh Linda
07.01.2016 - 11:26DROPS Design answered:
Hej Linda. Se nederst paa mönstret. Her staar alle maal i cm per störrelse.
07.01.2016 - 12:01
![]() Sheena wrote:
Sheena wrote:
Beginning this pattern. Cast on 429 stitches. Work as follows from RS: 4 band sts in GARTER ST - see explanation above, (((((work last st in A.1, ))))) A.1 (= 20 sts) 21-24-26-27 times in width, 4 band sts in garter st. REMEMBER THE KNITTING GAUGE Work the 4 band sts in garter st until finished measurements. Understand all this except the part in ((((()))))) Does this refer to the 1 stitch just after the fires 4 band stitches? Help
16.12.2015 - 01:44DROPS Design answered:
Dear Sheena, when starting pattern from RS work the first st after the 4 band sts as the last st in diagram A.1, ie K from RS on 1st row. That way both front piece will be symetrical (= there will be 1 st before the YO at the right side and 1 st after the YO as in diagram on the left side in row 9). Happy knitting!
16.12.2015 - 09:31
![]() Lis Enevoldsen wrote:
Lis Enevoldsen wrote:
Hej denne model strikkes frem og tilbage på rundpind. Det jeg gerne vil er at lukke ponchoen og dermed strikke rundt så ponchoen bliver lukket (ingen knapper) venlig hilsen Lis
22.11.2015 - 21:05DROPS Design answered:
Hej Lis, du kan strikke det første stykke rundt op til der hvor du lukker de 77-91-100-102 m af i hver side. Men vi kan ikke hjælpe dig med at skrive opskriften om. God fornøjelse!
25.11.2015 - 14:22
![]() Lis.enevoldsen wrote:
Lis.enevoldsen wrote:
Hej jeg vil prøve og strikke denne model på rundpind hvilket volder mig noget besvær er der evt noget der skal ændres jeg har prøvet og følge mønstret hvilket ikke kommer til og passe med de runde prikker i forhold til hvor man strikker masker sammen på forhånd tak
18.11.2015 - 19:07DROPS Design answered:
Hej Lis. Hvis du vil aendre mönstret til at strikke rundt, saa kan du laese mere her hvordan du kan göre det (Det er her beskrevet fra frem og tilbage til rundpind, men det er saa omvendt naar du vil fra frem og tilbage til rundt). Hvis det ikke er det du mener saa giv lidt mere info, hvor det er det gaar galt og hvilken str du strikker :)
20.11.2015 - 15:40
![]() Catherine wrote:
Catherine wrote:
I don't understand increases before 4 sts in garter stitch collar. Pattern says to increase 1 st before 4 sts with markers to equal a total of 4 sts increased but there are only 2 markers before 4sts which would only make 2 increases. Thank you
20.09.2015 - 22:00DROPS Design answered:
Dear Catherine, you should have inserted 4 markers:Work the first 45-48 sts, insert 1 marker in next st, work 4-4 sts, insert a marker in next st, work 7-8 sts, insert a marker in next st, work 4-4 sts, insert a marker in next st, work the next 45-48 sts (= 4 markers). Happy knitting!
21.09.2015 - 09:26
![]() Hanne wrote:
Hanne wrote:
Hej jeg bøvler . Pind 10 i A.1 er der en fejl?mv Hanne
12.08.2015 - 19:22DROPS Design answered:
Hei Hanne. Nej, det skulle der ikke vaere. Dit antal masker forbliver konstant: I pind 9 har du taget 2 masker ind (den sorte trekant i midten), men du har ogsaa lavet to gange slaa om (för den förste maske og efter den 15e maske, saa du skal have 16 m per gentagelse.
14.08.2015 - 12:52Su Brown wrote:
Hi I want to make this with a group c yarn how much do I need to buy. Many thanks Su
28.07.2015 - 13:34DROPS Design answered:
Hello Su! Just follow the tip here: How to use a different yarn than the one mentioned in the pattern.
28.07.2015 - 15:55Gloria Elena Ortiz wrote:
La prenda queda muy larga con las indicaciones de AX, tuve que volver a tejer con filas sencillas para no exceder la longitud de la prenda... continuo y comentaré si quedó bien... Gracia por compartir tan bello modelo... Saludos desde México :)
28.07.2015 - 06:30
![]() Marie-Louise Veber Paustian wrote:
Marie-Louise Veber Paustian wrote:
Der må være en fejl i opskriften der, hvor man skal strikke A.X hhv. 11-10-9-9 gange. På billedet er A.X strikket ca. 15 gange, hvorved jakken får længde. Stykket er altså angivet for kort i opskriften og bør vel blive en smule længere ved de større størrelser? 15-16-17-17 ville nok være mere korrekt... Mvh. Marie-Louise, abcgarn.dk
27.07.2015 - 09:15DROPS Design answered:
Hej Marie-Louise, hvis du gentager de 2 sidste p 11-x-x-x gange som der står i opskriften og din strikkefasthed stemmer, så får du nøjagtig målet som står i opskriften, så det skal stemme. God fornøjelse!
28.07.2015 - 11:35
![]() Betty wrote:
Betty wrote:
Tolles Teil zum kombinieren,hoffe Anleitung wird bald freigeschaltet und ich kann losstricken
23.06.2015 - 21:23
|
||||||||||||||||||||||||||||
Lothlorien#lothloriencardigan |
||||||||||||||||||||||||||||
 |
 |
|||||||||||||||||||||||||||
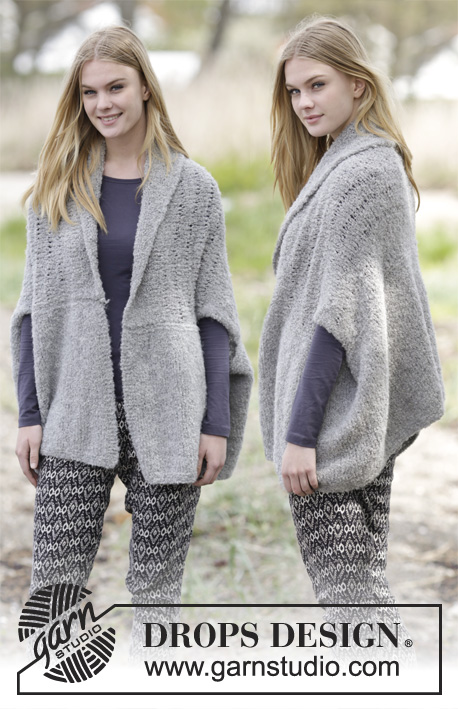
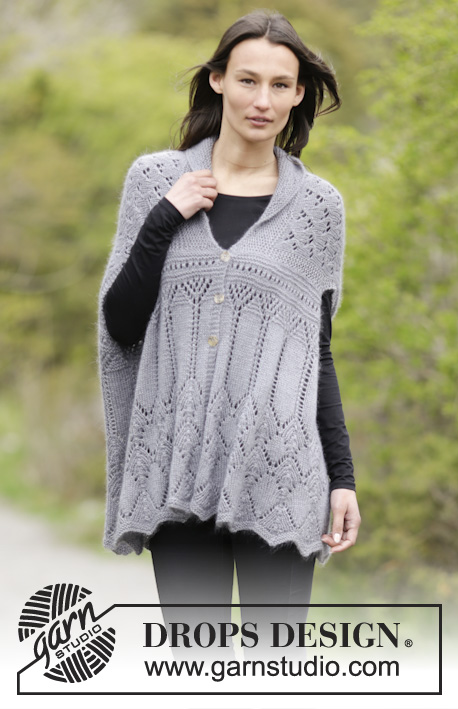
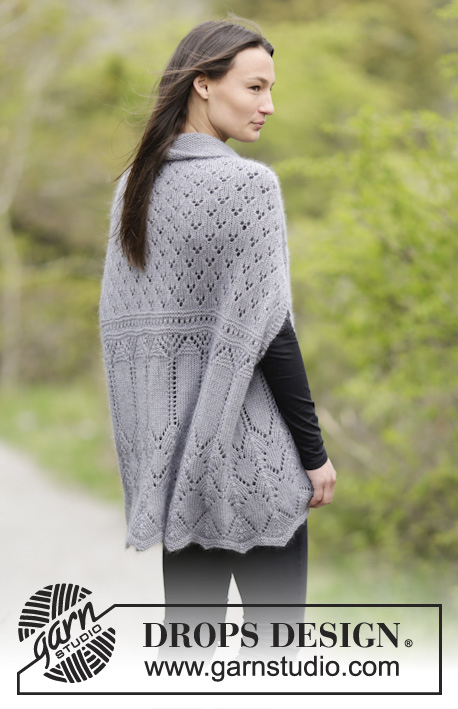
Knitted DROPS jacket in garter st with lace pattern and shawl collar in "BabyAlpaca Silk" and "Kid-Silk". Size S-XXXL.
DROPS 166-43 |
||||||||||||||||||||||||||||
|
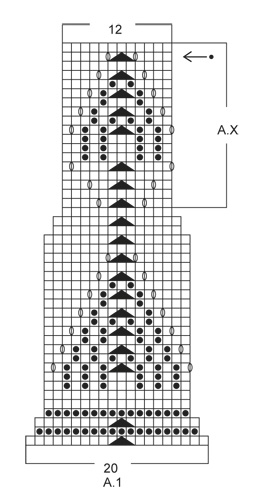
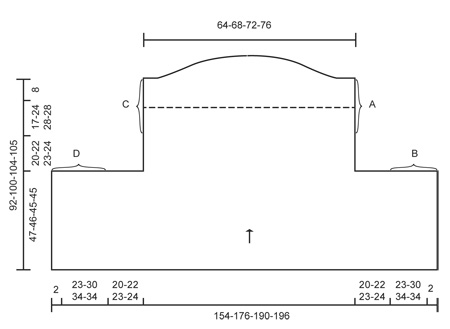
GARTER ST (back and forth): K all rows. 1 ridge = 2 rows K. PATTERN: See diagrams A.1 to A.8. The diagrams show all rows in pattern seen from RS. INCREASE TIP: Inc 1 st by making 1 YO, on next row K YO twisted (i.e. work in the back loop of st instead front) to avoid holes. BUTTONHOLES: Dec for buttonholes on right band (i.e. the first 4 sts seen from RS). 1 buttonhole = K tog second and third st from edge and make 1 YO. Dec for buttonholes when piece measures: SIZE S/M: 29, 37 and 45 cm SIZE L/XL: 28, 36 and 44 cm SIZE XXL: 27, 35 and 43 cm SIZE XXXL: 27, 35 and 43 cm ---------------------------------------------------------- JACKET: Worked back and forth on circular needle. work on 2 circular needle size 80 cm to make room for all sts at beg of piece. Beg at the bottom of back piece and front piece, then cast off sts in each side, continue on back piece, then work shawl collar before sewing piece tog. Cast on 429-489-529-549 sts on circular needle size 5 mm with 1 strand BabyAlpaca Silk and 1 strand Kid-Silk (= 2 strands). Work pattern as follows from RS: 4 band sts in GARTER ST - see explanation above, work last st in A.1, A.1 (= 20 sts) 21-24-26-27 times in width, 4 band sts in garter st. REMEMBER THE KNITTING TENSION Work the 4 band sts in garter st until finished measurements. When entire A.1 has been worked 1 time vertically, there are 261-297-321-333 sts on needle. Repeat A.X 1 more time vertically. Remember BUTTONHOLES - see explanation above. Then repeat the 2 last rows in A.X 11-10-9-9 more times vertically. Piece measures approx. 38-37-36-36 cm from cast-on edge. Now work as follows: 4 band sts in garter st, A.2 (= 6 sts), A.3 (= 12 sts) 20-23-25-26 times in width, A.4 (= 7 sts), 4 band sts in garter st. When A.2-A.4 have been worked 1 time vertically, continue with A.5 inside band sts in each side. NOTE: On 7th row work last st before band sts K, and on 10th row inc 2-1-2-1 sts = 263-298-323-334 sts. When entire A.5 has been worked 1 time vertically, work 2 rows in stocking st, AT THE SAME TIME at beg of these 2 rows cast off 77-91-100-102 sts = 109-116-123-130 sts. Now continue as follows: 4 sts in garter st, A.6 (= 6 sts), A.7 (= 7 sts) until 8 sts remain, A.8 (= 4 sts), 4 sts in garter st. When piece measures 84-92-96-97 cm - adjust to finish after 6th or 12th row in A.6-A.8 - switch to circular needle size 4.5 mm and continue in garter st until finished measurements. Work the first 45-48-50-53 sts, insert 1 marker in next st, work 4-4-5-5 sts, insert a marker in next st, work 7-8-9-10 sts, insert a marker in next st, work 4-4-5-5 sts, insert a marker in next st, work the next 45-48-50-53 sts (= 4 markers). On next row from RS, inc 1 st before the 4 sts with markers – READ INCREASE TIP (= 4 sts inc). Repeat inc alternately on right and left side of each marker every 4th row 4 more times (= 20 sts inc) = 129-136-143-150 sts. On next ridge do not work the outermost 10-14-16-18 sts in each side, then on the next 8 ridges work over 4 sts less on every row. Work 2 ridges over all sts, AT THE SAME TIME on first row inc 12-16-20-24 sts evenly = 141-152-163-174 sts. Loosely cast off. ASSEMBLY: Sew seam A and B tog (see chart). Sew in outer loops of edge sts to avoid a chunky seam. Armhole = 20-22-23-24 cm Repeat in the other side. I.e. sew seam C and D tog the same way. Fasten off. |
||||||||||||||||||||||||||||
Diagram explanations |
||||||||||||||||||||||||||||
|
||||||||||||||||||||||||||||
 |
||||||||||||||||||||||||||||
 |
||||||||||||||||||||||||||||
 |
||||||||||||||||||||||||||||
Have you finished this pattern?Tag your pictures with #dropspattern #lothloriencardigan or submit them to the #dropsfan gallery. Do you need help with this pattern?You'll find 19 tutorial videos, a Comments/Questions area and more by visiting the pattern on garnstudio.com. © 1982-2026 DROPS Design A/S. We reserve all rights. This document, including all its sub-sections, has copyrights. Read more about what you can do with our patterns at the bottom of each pattern on our site. |
||||||||||||||||||||||||||||


With over 40 years in knitting and crochet design, DROPS Design offers one of the most extensive collections of free patterns on the internet - translated to 17 languages. As of today we count 324 catalogues and 12290 patterns translated into English (UK/cm). 12290
We work hard to bring you the best knitting and crochet have to offer, inspiration and advice as well as great quality yarns at incredible prices! Would you like to use our patterns for other than personal use? You can read what you are allowed to do in the Copyright text at the bottom of all our patterns. Happy crafting!
Post a comment to pattern DROPS 166-43
We would love to hear what you have to say about this pattern!
If you want to leave a question, please make sure you select the correct category in the form below, to speed up the answering process. Required fields are marked *.