
Popular categories
Looking for a yarn?


Comments / Questions (37)
![]() Sandra Peña wrote:
Sandra Peña wrote:
Hola, no veo descripción de la puntada del cuerpo. Por favor podrías enseñarme como se realiza. Abrazos bendiciones. Mil gracias
06.11.2022 - 16:47DROPS Design answered:
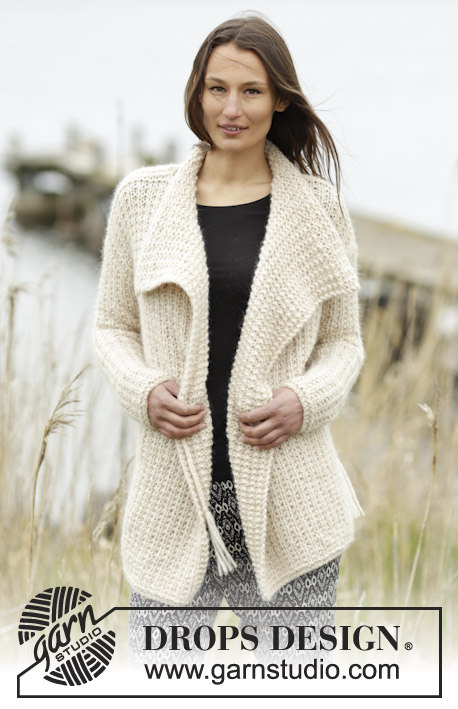
Hola Sandra, el patrón del cuerpo es el diagrama A.1 (un cuadrado 2x2 que puedes encontrar justo antes del diagrama de medidas). Puedes ver cómo leer el diagrama en la siguiente lección: https://www.garnstudio.com/lesson.php?id=68&cid=23
06.11.2022 - 23:30
![]() Elisabeth wrote:
Elisabeth wrote:
Hej När man ökar maskor i ärmen skall man först sticka 2 maskor och öka en. Stickar man kantmaskan plus en maska och ökar en eller stickar man kantmaskan plus 2 maskor och ökar en? Bästa hälsningar Elisabeth
02.11.2022 - 17:05DROPS Design answered:
Hej Elisabeth, du øker med et omslag indenfor 2 masker i hver side :)
03.11.2022 - 14:25
![]() Elisabeth wrote:
Elisabeth wrote:
På framstycket, när man minskar för halsen, först 2 maskor 1 gång sedan 1 maska 2 gånger. Maskar man av eller minskar man innanför kantmaskan? Om man minskar innanför kantmaskan, hur gör man för att det skall se snyggt ut? Tacksam för svar
13.07.2022 - 21:55DROPS Design answered:
Hej Elisabeth. Du har inga kantmaskor mot halsen (de är på sidorna mot ärmarna) så du minskar bara de yttersta maskorna mot halsen. Mvh DROPS Design
14.07.2022 - 13:08
![]() Elisabeth wrote:
Elisabeth wrote:
Hade en fråga till, är det första varvet efter uppläggningsvarvet avigsidan? Tackar på förhand för svar
25.05.2022 - 22:28DROPS Design answered:
Hej Elisabeth. Första varvet efter uppläggningsvarvet blir från rätsidan. Mvh DROPS Design
27.05.2022 - 10:04
![]() Elisabeth wrote:
Elisabeth wrote:
Hej Har börjat på bakstycket på denna fina tröja. Har en fråga om uppläggningsvarvet. Räknas det in i de 4 varv rätsticknig som görs sedan. Får inte riktigt ihop det annars Med vänliga hälsningar
25.05.2022 - 14:36DROPS Design answered:
Hej Elisabeth. Nej upplägganingsvarvet räknas inte med i de 4 varven rätstickning. Mvh DROPS Design
27.05.2022 - 10:03
![]() Jutta Tanirgan wrote:
Jutta Tanirgan wrote:
Wo finde ich denn das Diagramm?
17.02.2022 - 17:39DROPS Design answered:
Liebe Frau Tanirgan, Diagram A.1 finden Sie zwischen Diagram Text und Maßskizze, nach der schriftlichen Anleitung, es handelt sich um ein kleines Diagram über 2 Maschen und 2 Reihen. Viel Spaß beim stricken!
18.02.2022 - 07:55
![]() Jette Mørk Hauberg wrote:
Jette Mørk Hauberg wrote:
Jeg har forstået at denne sweater har en løs rullekrave! Jeg vil gerne lave en fast rullekrave. Ville det være en ide at tage masker op som til halskant (med maskeantal som til den løse krave) og blot strikke rullekraven til den ønskede længde? På forhånd tak for hjælpen. De bedste hilsner Jette
02.02.2021 - 14:09DROPS Design answered:
Hej Jette, ja det stemmer, så får du en fin rullekrave på din trøje. God fornøjelse!
03.02.2021 - 15:30
![]() Shirley wrote:
Shirley wrote:
For the front piece - I can’t understand if I’m just binding off and decreasing from the neck or if there are indents for arm holes too as there was with the back. New knitter and I don’t understand what the ‘onetime’ means - is that just the next row so I’m decreasing both sides of the shoulder? So confused. Can you explain in plainer English for a newbie? Thanks.
02.01.2021 - 00:33DROPS Design answered:
Dear Shirley, for front piece cast on as for back piece and work the 2 ridges just as on back piece, then work the pattern as explained under FRONT PIECE - cast off for armhole as you did on back piece (= bind off 5 sts on each side), then bind off the neck at desired length: 9 middle stitches then bind off at the beg of row from neck: 2 sts 1 time (= on next row from neck), then 1 stitch 2-3 times (see size) at the beg of the next 2-3 rows from neck. Happy knitting!
04.01.2021 - 14:48
![]() Lola wrote:
Lola wrote:
Hola me llamo Lola. Tengo una duda, cuando se empieza la prenda hay que hacer 2 pliegues en punto musgo, después es mi duda, se teje diagrama A1, pero como se hace la primera hilera, todo punto derecho o alternando un derecho y un revés??? Gracias.
26.11.2020 - 21:00DROPS Design answered:
Hola Lola. Primero se trabajan 4 filas de derecho (= 2 pliegues). En la fila 1 del diagrama A.1 se trabajan todos los puntos de derecho. En la fila 2 trabajamos 1 punto de derecho, 1 punto de revés, y lo repetimos a lo largo de toda la fila.
26.11.2020 - 22:34
![]() Manon wrote:
Manon wrote:
Bonjour J’ai un problème au niveau de l’encolure de la taille S. J’ai 57 mailles - 9 Mailles centrales donc il me reste 48 mailles - chaque côté a donc 24 mailles - rabattre 1 fois 2 mailles =>il reste donc 22 mailles - rabattre 2 fois 1 maille => il me reste 20 mailles Comment je peux avoir les 15 mailles comme indiqué dans vos instructions ??? Merci pour l’aide
03.12.2019 - 22:38DROPS Design answered:
Bonjour Manon, il semble que vous avez oublié les mailles rabattues pour les emmanchures: vous commencez par 57 m, rabattez 5 m au début des 2 rangs suivants pour les emmanchures (comme pour le dos) = 47 m -9m d'encolure = 19 m pour chaque épaule - 3 m rabattues pour l'encolure = il reste 15 m pour chaque épaule. Bon tricot!
04.12.2019 - 08:49
|
|||||||
Winter Greeting#wintergreetingsweater |
|||||||
|
|
|||||||
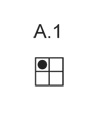
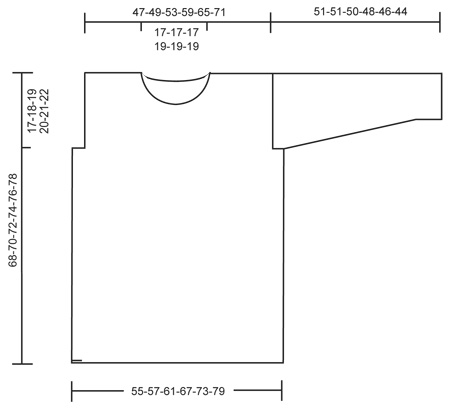
Knitted DROPS jumper and detachable collar with textured pattern in 1 thread Cloud or 2 threads Air. Size: S - XXXL.
DROPS 166-4 |
|||||||
|
GARTER ST (back and forth): K all rows. 1 ridge = 2 rows K. PATTERN: See diagram A.1. The diagram shows all rows in pattern seen from RS. MEASURING TIP: All measurements must be done when holding the piece up on needle. INCREASE TIP: Inc with 1 YO, work YO twisted on next row to avoid holes. Work the inc sts in to pattern. ---------------------------------------------------------- BACK PIECE: Worked back and forth on circular needle. Cast on 57-59-63-69-75-81 sts (incl 1 edge st in each side) on circular needle size 8 mm with 1 thread Cloud or 2 threads Air. Work 2 ridges in GARTER ST - see explanation above. Switch to circular needle size 9 mm. Then work as follows from RS: 1 edge sts in garter st, A.1 (= 2 sts) until 2 sts remain, K 1, 1 edge sts in garter st. REMEMBER THE KNITTING TENSION When piece measures 51-52-53-54-55-56 cm – READ MEASURING TIP – cast off 5 sts for armholes at beg of the next 2 rows = 47-49-53-59-65-71 sts. Work A.1 as before until piece measures 66-68-70-72-74-76 cm. Then cast off the middle 15-15-15-17-17-17 sts for neck and finish each shoulder separately. On next row from the neck, cast off 1 st = 15-16-18-20-23-26 sts. When piece measures 67-69-71-73-75-77 cm, work 1 ridge over all sts. Cast off. Work the other shoulder the same way. FRONT PIECE: Cast on and work as back piece but work pattern as follows from RS: 1 edge st in garter st, 1 st in garter st, A.1 until 1 st remains, 1 edge st in garter st. When piece measures 58-60-62-64-66-68 cm, cast off the middle 9 sts for neck and finish each shoulder separately. Then cast off on every row from neck as follows: Cast off 2 sts 1 time, then 1 st 2-2-2-3-3-3 times = 15-16-18-20-23-26 sts. When piece measures 67-69-71-73-75-77 cm, work 1 ridge over all sts. Cast off. Work the other shoulder the same way. SLEEVE: Worked back and forth on needle. Cast on 26-26-28-28-30-30 sts (incl 1 edge st in each side) on circular needle size 8 mm with 1 thread Cloud or 2 threads Air. Work 2 ridges. Switch to circular needle size 9 mm. Work A.1 with 1 edge st in garter st in each side of piece. Continue like this. When piece measures 8 cm, inc 1 st inside 2 sts in each side of piece - READ INCREASE TIP! Repeat inc every 9½-8-8-6-6-4½ cm 4-5-5-6-6-7 more times = 36-38-40-42-44-46 sts. Cast off when piece measures 51-51-50-48-46-44 cm (shorter measurements in the larger sizes because of longer sleeve cap and wider shoulders). Knit another sleeve the same way. ASSEMBLY: Sew right shoulder seam. NECK EDGE: Work back and forth on circular needle. Pick up from RS approx. 46 - 54 sts along the neck on circular needle size 8 mm with 1 thread Cloud or 2 threads Air. Work 2 ridges. Cast off with K from WS. ASSEMBLY: Sew left shoulder seam and neck edge. Sew in sleeves. Sew the sleeve and side seams inside 1 edge st. DETACHABLE COLLAR: Work back and forth on circular needle. Cast on 64-64-64-68-68-68 sts on circular needle size 8 mm with 1 thread Cloud or 2 threads Air. Work 2 ridges. Switch to circular needle size 9 mm. Work A.1 with 1 edge st in garter st in each side of piece. When piece measures 18 cm (adjust so that next row is from RS), switch to circular needle size 8 mm and work 2 ridges. Cast off with K from RS. Sew the side seam inside 1 edge st. |
|||||||
Diagram explanations |
|||||||
|
|||||||
 |
|||||||
 |
|||||||
Have you finished this pattern?Tag your pictures with #dropspattern #wintergreetingsweater or submit them to the #dropsfan gallery. Do you need help with this pattern?You'll find 18 tutorial videos, a Comments/Questions area and more by visiting the pattern on garnstudio.com. © 1982-2026 DROPS Design A/S. We reserve all rights. This document, including all its sub-sections, has copyrights. Read more about what you can do with our patterns at the bottom of each pattern on our site. |
|||||||


With over 40 years in knitting and crochet design, DROPS Design offers one of the most extensive collections of free patterns on the internet - translated to 17 languages. As of today we count 324 catalogues and 12290 patterns translated into English (UK/cm). 12290
We work hard to bring you the best knitting and crochet have to offer, inspiration and advice as well as great quality yarns at incredible prices! Would you like to use our patterns for other than personal use? You can read what you are allowed to do in the Copyright text at the bottom of all our patterns. Happy crafting!
Post a comment to pattern DROPS 166-4
We would love to hear what you have to say about this pattern!
If you want to leave a question, please make sure you select the correct category in the form below, to speed up the answering process. Required fields are marked *.