
Popular categories
Looking for a yarn?


Comments / Questions (37)
![]() Malin L wrote:
Malin L wrote:
Kanonfin och användbar!! Den vill jag sticka!
01.01.2015 - 13:07
![]() Hinke wrote:
Hinke wrote:
Mooi model, zou hem zelf met lange mouw maken.
28.12.2014 - 19:42
![]() Urizar wrote:
Urizar wrote:
J'aime bien ce modele, simple, passe partout et super beau !
21.12.2014 - 19:52
![]() Randi wrote:
Randi wrote:
Denne håper jeg virkelig kommer! Nydelig jakke, og nydelig garn!
19.12.2014 - 19:16
![]() Randi wrote:
Randi wrote:
Denne håper jeg virkelig kommer! Nydelig jakke, og nydelig garn!
19.12.2014 - 19:16
![]() Szilvia wrote:
Szilvia wrote:
I like it
13.12.2014 - 19:40
![]() Domi Muze wrote:
Domi Muze wrote:
Élégance et simplicité avec une touche de féminité. Tout ce que je cherche. Merci
12.12.2014 - 10:22
|
|||||||||||||||||||
After Eight#aftereightcardigan |
|||||||||||||||||||
 |
 |
||||||||||||||||||
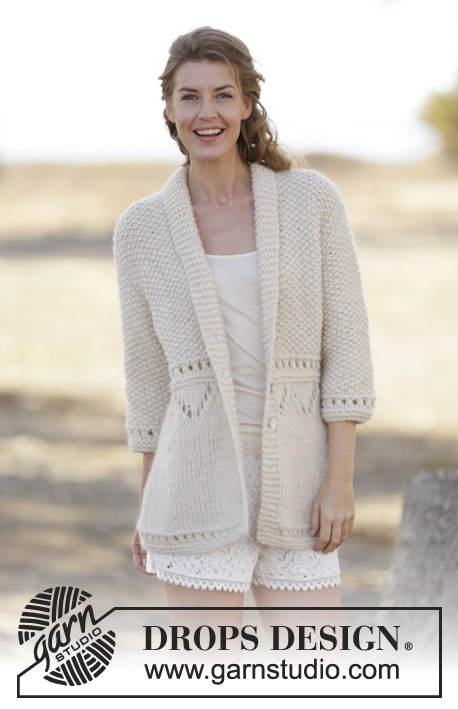
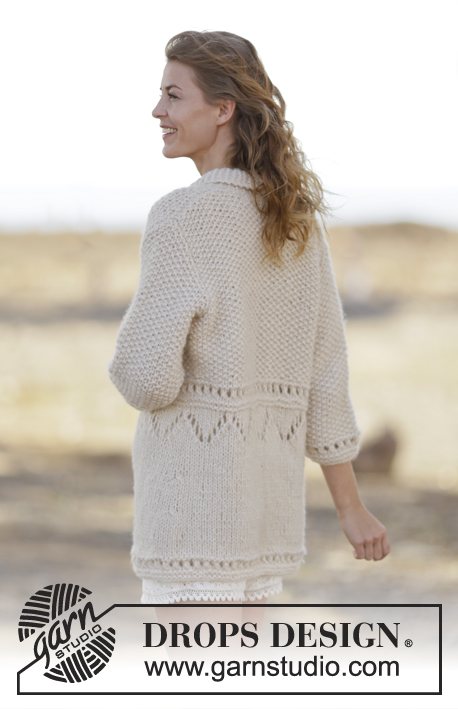
Knitted DROPS jacket in moss st with lace pattern and shawl collar in 1 thread Cloud or 2 threads Air. Size: S - XXXL.
DROPS 159-21 |
|||||||||||||||||||
|
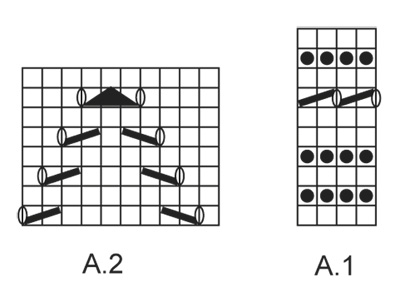
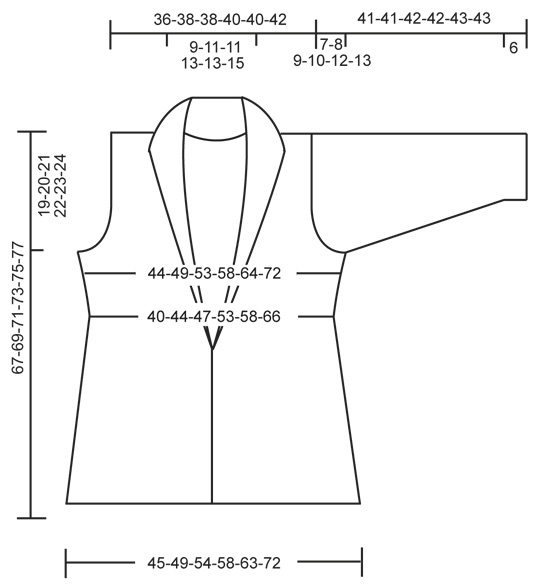
GARTER ST (back and forth on needle): K all rows. 1 ridge = 2 rows K. MOSS ST: Row 1: * K 1, P 1 *, repeat from *-*. Row 2: K over P and P over K. Repeat 2nd row. PATTERN: See diagrams A.1 and A.2. In diagram A.1 make sure not to work more YOs than sts worked tog, otherwise the no of sts will not fit. BUTTONHOLES: Dec for buttonholes on right band: 1 buttonhole = K tog 3rd and 4th st and make a YO, K YO on next row. Dec for buttonholes in all sizes when piece measures: approx. 26, 32 and 38 cm INCREASE TIP (applies to collar): Inc inside 1 band st as follows: Make 1 YO, on next row K YO twisted (work st twisted by working in back loop of st instead of front loop). Work all the inc sts in garter st. ---------------------------------------------------------- BODY: Worked back and forth on circular needle. Cast on 109-119-129-139-149-169 sts (incl 5 band sts in each side) on circular needle size 8 mm with 1 thread Cloud or 2 threads Air. Work diagram A.1 with 5 band sts in GARTER ST - see explanation above, in each side, work diagram 1 time vertically. REMEMBER THE KNITTING TENSION Then work in stocking st but work the outermost 5 sts in each side (= band) in garter st until finished measurements. AT THE SAME TIME time insert 2 markers in the piece as follows: 1 marker after 30-32-35-37-40-45 sts (= 1st front piece) and 1 after the next 49-55-59-65-67-79 sts (= back piece), there is 30-32-35-37-40-45 sts left for 2nd front piece. When piece measures 15 cm, dec 1 st on each side of each marker, repeat dec when piece measures 22 cm = 101-111-121-131-141-161 sts. When piece measures approx. 26 cm, work according to diagram A.2 with 5 band sts in garter st as before, AT THE SAME TIME beg dec for BUTTONHOLES - see explanation above. After diagram A.2 work diagram A.1. Then work in MOSS ST - see explanation above - continue band in GARTER ST - AT THE SAME TIME dec on first row from RS 3-5-7-5-3-5 sts evenly = 98-106-114-126-138-156 sts. Move the markers in the side so that there are 27-29-31-34-37-41 sts on each front piece and 44-48-52-58-64-74 sts on back piece. READ ALL OF THE FOLLOWING SECTION BEFORE CONTINUING! COLLAR INC: When piece measures 34-35-36-37-38-39 cm, inc for collar - read INCREASE TIP - in each side, inc 1 st every 7-10-10-18-18-18 cm 4-3-3-2-2-2 times in total. At the same time when piece measures 34-35-36-37-38-39 cm, work 1 st in garter st into band (i.e. no of sts stays the same but no of sts in garter st inc while no of sts in moss st dec) every 7-6-6-5-5-5 cm 5-6-6-7-7-7 times in total. SIDE INC: When piece measures 37 cm, inc 1 st on each side of each marker every 5-3-3-3-3-3 cm 2-3-3-3-3-3 times in total. When piece measures 48-49-50-51-52-53 cm, cast off 3 sts on each side of each marker for armhole and finish each part separately. BACK PIECE: = 42-48-52-58-64-74 sts. Cast off for armholes in each side on every other row as follows: 2 sts 0-1-1-2-3-5 times and 1 st 1-1-3-3-4-4 times = 40-42-42-44-44-46 sts. When piece measures 65-67-69-71-73-75 cm, cast off the middle 8-10-10-12-12-14 sts for neck. Then cast off 1 st on next row towards the neck = 15 sts remain on each shoulder. Cast off when piece measures 67-69-71-73-75-77 cm. RIGHT FRONT PIECE: Continue inc for collar. Cast off for armholes as on back piece. After all inc and dec, 29 sts remain on needle. When piece measures 67-69-71-73-75-77 cm, cast off the outermost 15 sts for shoulder = 14 sts for collar. Insert 1 marker. Continue to work in garter st over collar as follows: * 1 ridge over all sts, 1 ridge over the outermost 7 sts towards mid front *, repeat from *-* until collar measures 4½-5½-5½-6½-6½-7½ cm from marker on the shortest side. Loosely cast off. LEFT FRONT PIECE: Work as right but reversed. SLEEVE: Worked back and forth on circular needle. Cast on 30-30-32-32-34-34 sts (incl 1 edge st each side) on needle size 8 mm with 1 thread Cloud or 2 threads Air. Then work pattern A.1 1 time vertically. Then work in moss st. READ ALL OF THE FOLLOWING SECTION BEFORE CONTINUING! AT THE SAME TIME when piece measures 6 cm, inc 1 st in each side every 8-5½-4½-3½-3-2½ cm 4-5-6-7-8-9 times in total = 38-40-44-46-50-52 sts. When piece measures 34-33-33-32-31-30 cm, cast off for sleeve cap in each side on every other row: 3 sts 1 time, 2 sts 1 time, 1 st 1-2-3-4-5-6 times, then cast off 2 sts in each side until piece measures approx. 40-40-41-41-42-42 cm, then cast off 3 sts 1 time in each side. Cast off the remaining sts, piece measures approx. 41-41-42-42-43-43 cm. ASSEMBLY: Sew the shoulder seams. Sew sleeve seams and sew in sleeves. Sew collar tog mid back. Sew collar along the back of the neck, sew edge to edge to avoid a chunky seam. Sew the buttons on to left front piece. |
|||||||||||||||||||
Diagram explanations |
|||||||||||||||||||
|
|||||||||||||||||||
 |
|||||||||||||||||||
 |
|||||||||||||||||||
Have you finished this pattern?Tag your pictures with #dropspattern #aftereightcardigan or submit them to the #dropsfan gallery. Do you need help with this pattern?You'll find 24 tutorial videos, a Comments/Questions area and more by visiting the pattern on garnstudio.com. © 1982-2026 DROPS Design A/S. We reserve all rights. This document, including all its sub-sections, has copyrights. Read more about what you can do with our patterns at the bottom of each pattern on our site. |
|||||||||||||||||||


With over 40 years in knitting and crochet design, DROPS Design offers one of the most extensive collections of free patterns on the internet - translated to 17 languages. As of today we count 324 catalogues and 12290 patterns translated into English (UK/cm). 12290
We work hard to bring you the best knitting and crochet have to offer, inspiration and advice as well as great quality yarns at incredible prices! Would you like to use our patterns for other than personal use? You can read what you are allowed to do in the Copyright text at the bottom of all our patterns. Happy crafting!
Post a comment to pattern DROPS 159-21
We would love to hear what you have to say about this pattern!
If you want to leave a question, please make sure you select the correct category in the form below, to speed up the answering process. Required fields are marked *.