
Popular categories
Looking for a yarn?


Comments / Questions (51)
![]() Lorna MacGregor wrote:
Lorna MacGregor wrote:
Question about the measurement for the yoke. For size L the pattern instructions provide 100 rows for the yoke and says it will "measure approx. 21cm". This measure reflects a tension of 24 sts X 48 rows in garter st = 10 cm X 10 cm. with a size 3 mm needle. However the pattern instructs to use a 2.5 mm needle for the yoke, so of course it measures only 18 cm. Would I better to use a 3 mm needle for the yoke also? My tension with the 3 mm needle is perfect.
28.09.2020 - 18:04DROPS Design answered:
Dear Mrs MacGregor, feel free to use the larger needle, or to continue to given measurements. Happy knitting!
29.09.2020 - 14:47
![]() Lorna MacGregor wrote:
Lorna MacGregor wrote:
A question regarding tension -- the pattern gives the tension for a 3 mm needle as 24 sts X 32 Rows in stockinette st, or 24 sts X 48 rows in garter st = 10 cm X 10 cm. But the yoke is knit with a 2.5 mm needle with garter st. What should the tension be for the smaller needle in garter st? Thank you very much.
26.09.2020 - 02:00DROPS Design answered:
Dear Mrs MacGregor, we do not have any tension for the smaller needle, check your gauge with the larger needle, should it be right, then your tension with smaller needle should match with same tension - read more about tension here. Happy knitting!
28.09.2020 - 08:48
![]() Patricia Bischof wrote:
Patricia Bischof wrote:
Can I download this pattern or do I always have to go thru your website
11.07.2020 - 22:17DROPS Design answered:
Dear Patricia, you can not download our patterns, but you can print it directly from our website or you can use virtual printer in your pc and save it as .pdf. Happy knitting!
11.07.2020 - 23:10
![]() Angela Brandt wrote:
Angela Brandt wrote:
Liebe Lorenza Vielen Dank, ich habe meinen Fehler bemerkt. Ich hatte die 6 Maschen für die Blenden nicht mitgerechnet, deswegen bin ich nur auf 9 Marker gekommen. Liebe Grüße Angela
21.01.2020 - 03:41
![]() Angela Brandt wrote:
Angela Brandt wrote:
Ich stricke in Grösse M und habe 180 Maschen Wenn ich die Markierst setze komme ich aber nur auf 9 Markierst. Ich setze den ersten Markierst nach 18 Maschen und dann immer nach 16 Maschen, also kann ich nur 9 Markierst setzen. Kann da etwas nicht stimmen ? Es bleiben am Ende auch nicht 18 sondern 22 Maschen . Irgendetwas stimmt hier nicht. Bitte prüfen Sie das für mich. Ich habe schon mehrere Jacken nach Ihren Mustern gestrickt. Liebe Grüsse Angela
20.01.2020 - 14:52DROPS Design answered:
Liebe Frau Brandt, so setzen Sie die Markierer ein: 18 Maschen, 1 Markierer, (16 Maschen 1 Markierer) x 9, 18 Maschen bleiben nach dem letzten Markierer: 18 + 16x9 + 18= 180. Viel Spaß beim stricken!
20.01.2020 - 16:05
![]() Lorenza wrote:
Lorenza wrote:
E' possibile eseguire questo capo con i ferri diritti?
14.01.2020 - 11:51DROPS Design answered:
Buongiorno Lorenza. Le spiegazioni sono date per lavorare in ferri di andata e ritorno. Può usare i ferri dritti senza cambiare le indicazioni. Vengono consigliati i ferri circolari perchè più comodi per lavorare con un numero alto di maglie. Buon lavoro!
14.01.2020 - 12:44
![]() Ulli Kweta wrote:
Ulli Kweta wrote:
Darf ich fragen, welche Randmaschen hier verstrickt sind? Vielen Dank für die wunderbare Anleitung.
26.07.2019 - 18:14DROPS Design answered:
Liebe Ulli, die Randmaschen sind in den Blenden-Maschen enthalten und werden auch kraus rechts gestrickt. Viel Spaß beim Stricken!
27.07.2019 - 09:03
![]() Melody wrote:
Melody wrote:
May I use a 50/50% merino and silk yarn for this cardigan?
02.03.2018 - 08:57DROPS Design answered:
Dear Melanie, yes, you can use a different yarn, that is similar weight, but please do a gauge swatch and check if it has the same stitch count as given in the pattern. Happy Knitting!
04.03.2018 - 18:40Miriam Rocio wrote:
Buenas tardes. Estoy tejiendo la chaqueta en talla S, empecé con 133 y ahora debo seguir con el patrón A.1 que tiene 6 puntos y en los bordes 6 puntos musgo a cada lado, 133-12= 121 puntos, y 121/6=20.17. Tejiendo 20 veces el patrón A.1 me sobra 1 punto, cómo tejo este punto que sobra? o debo empezar con 132 puntos?
23.12.2017 - 22:14DROPS Design answered:
Hola Miriam, el punto que sobra se trabaja como el primer punto de A.1, pero en la fila 9 este punto se trabaja de derecho.
30.12.2017 - 12:59Patricia Bischof wrote:
Like others my friend and I had difficulty matching the gauge indicated. However, my question is why do you list the gauge for the garter stitch on a 3.00 mm. when the yoke is worked on a 2.5 mm. Why is there no gauge indicated for the needle that is recommended? By the way it still turned out beautifully all 4 times!
03.11.2017 - 20:32DROPS Design answered:
Dear Mrs Bischof, if you get the correct tension with larger needle, your tension will be right with the smaller needles. Happy knitting!
06.11.2017 - 08:46
|
|||||||||||||||||||
Timeless Beauty Cardigan#timelessbeautycardigan |
|||||||||||||||||||
 |
 |
||||||||||||||||||
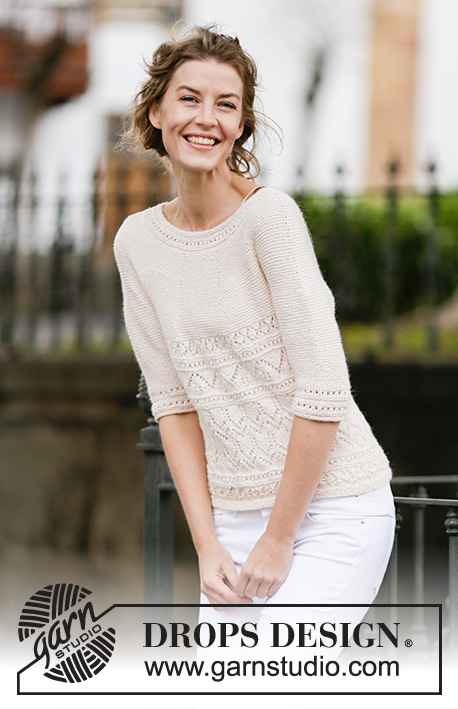
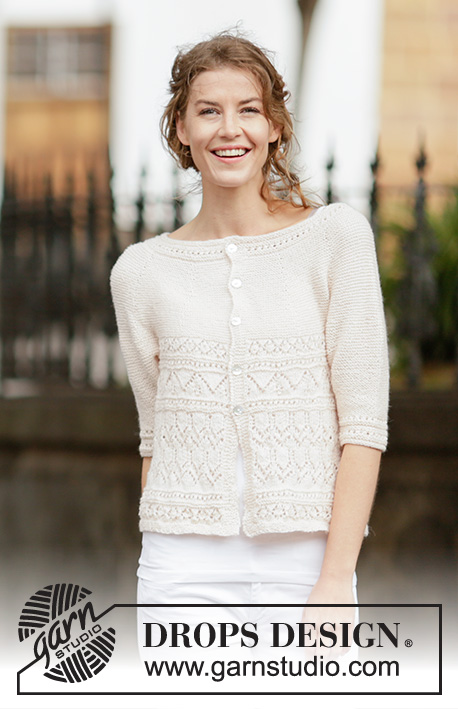
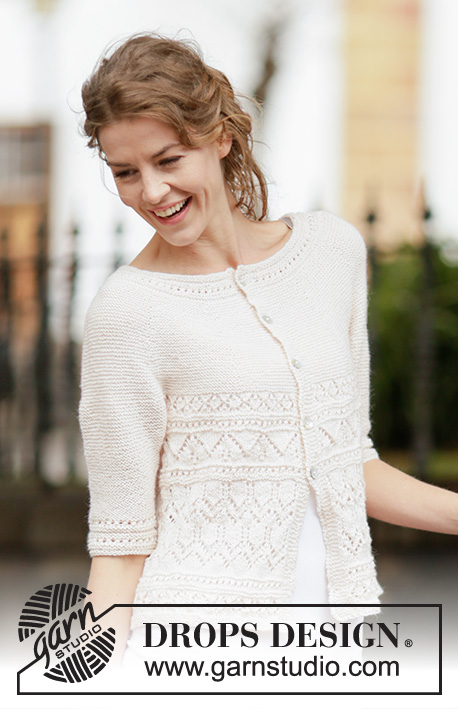
Knitted DROPS jacket in garter st with lace pattern and round yoke, worked top down in ”BabyAlpaca Silk”. Size: S - XXXL.
DROPS 160-8 |
|||||||||||||||||||
|
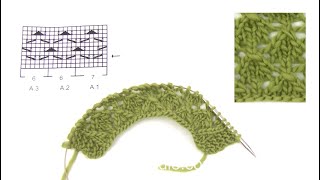
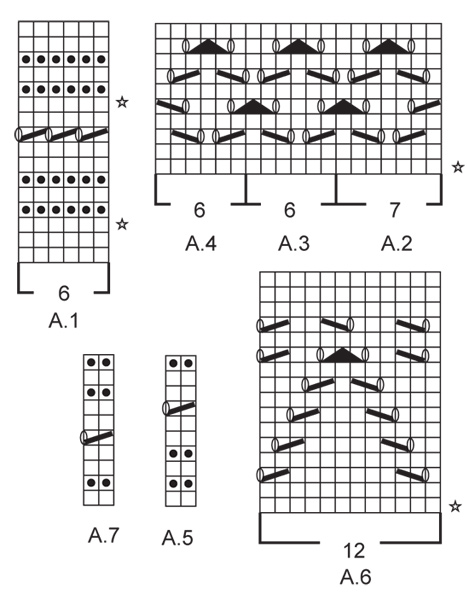
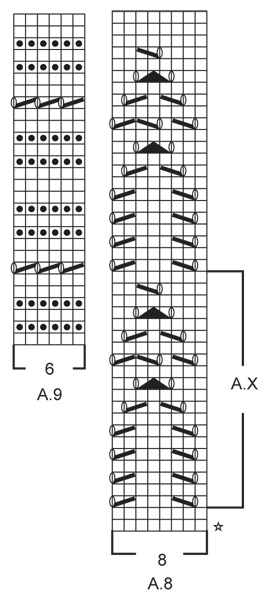
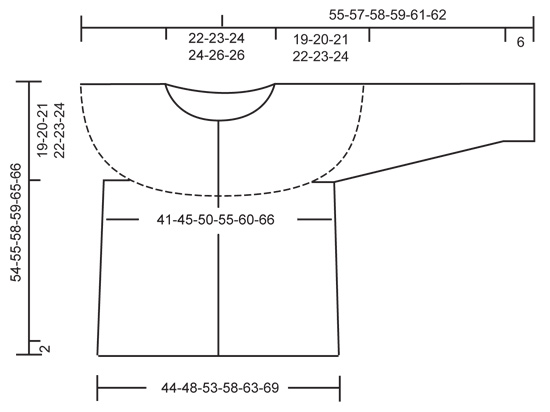
GARTER ST (back and forth): K all rows. 1 ridge = 2 rows K. PATTERN: See diagrams A.1 to A.9. The diagrams show all rows in pattern seen from RS. INCREASE TIP: Inc 1 st by making 1 YO, on next row K YO twisted (i.e. work in the back loop of st instead front) to avoid holes. BUTTONHOLES: Dec for buttonholes on right band, i.e. in right side of piece seen from RS (i.e. seen from knitting direction). 1 buttonhole = K tog third and fourth st from edge and make 1 YO. Dec for buttonholes when piece measures: SIZE S: 2, 9, 16, 23 and 30 cm SIZE M: 2, 9, 16, 23 and 30 cm SIZE L: 2, 10, 18, 26 and 34 cm SIZE XL: 2, 10, 18, 26 and 34 cm SIZE XXL: 2, 9, 16, 23, 30 and 37 cm. SIZE XXXL: 2, 9, 16, 23, 30 and 37 cm. ---------------------------------------------------------- JACKET: Worked top down, back and forth on circular needle. YOKE: Cast on 133-141-157-161-161-177 sts (incl 6 band sts in each side) on circular needle size 2,5 mm with BabyAlpaca Silk. K 1 row from WS. Work 2 ridges in GARTER ST back and forth - see explanation above! Remember BUTTONHOLES on right band - see explanation above. Now work PATTERN A.1 with 6 band sts in garter st in each side (on 9th row K last st before band), AT THE SAME TIME on 3rd row in diagram inc 18-20-30-32-32-34 sts evenly - READ INCREASE TIP, and on 11th row inc 15-19-29-29-29-33 sts evenly = 166-180-216-222-222-244 sts. REMEMBER THE KNITTING TENSION When A.1 has been worked vertically, continue in garter st and insert 10 markers in the piece as follows: Work the first 16-18-18-21-21-23 sts, insert a marker, then insert a marker 15-16-20-20-20-22 sts apart, after last marker there are 15-18-18-21-21-23 sts. On next row from RS beg inc. Inc alternately on right and left side of markers (= 10 inc). Inc every other row 0-2-0-3-7-7 times, every 4th row 10-10-9-9-8-8 times and every 6th row 5-5-7-7-7-8 times = 316-350-376-412-442-474 sts. On next row from RS, inc 7-3-9-1-3-9 sts evenly = 323-353-385-413-445-483 sts. Piece measures approx. 19-20-21-22-23-24 cm. On next row (= from WS) work as follows: K the first 51-55-61-66-72-80 (= front piece), slip the next 66-72-76-80-84-88 sts on a stitch holder (= sleeve), cast on 10-10-10-12-12-12 sts under sleeve, work the next 89-99-111-121-133-147 sts (= back piece), slip the next 66-72-76-80-84-88 sts on a stitch holder (= sleeve), cast on 10-10-10-12-12-12 sts under sleeve, work the remaining 51-55-61-66-72-80 sts (= front piece). BODY: There are now 211-229-253-277-301-331 sts for body. Now switch to circular needle size 3 mm. Then Work as follows: 6 band sts in garter st, A.2, repeat A.3 until 12 sts remain, A.4, 6 band sts in garter st. NOTE: Work the 6 band sts in each side in garter st until finished measurements. When A.2-A.4 have been worked vertically, continue with A.5 (on 7th row K the last st before band). Then work A.6, inc 6-0-0-0-0-6 sts evenly on 1st row (K last st before band) = 217-229-253-277-301-337 sts. When A.6 has been worked vertically, continue with A.7 1 time vertically (on 5th row K the last st before band). Then work A.8, inc 4-8-8-8-8-4 sts evenly on 1st row (K last st before band) = 221-237-261-285-309-341 sts. When A.X has been worked 1 time vertically, repeat A.X 0-0-0-0-1-1 more time before continuing with the rest of diagram. Now continue with A.7 (K last st before band). Then work as follows: A.2, A.3 until 6 sts remain before band, AT THE SAME TIME inc 2-4-4-4-4-2 sts evenly on 1st row in A.3, A.4 = 223-241-265-289-313-343 sts. Finish with A.7 0-0-1-1-0-0 times vertically (on 5th row K last st before band). When entire diagram has been worked vertically, work 2 row in stocking st inside band sts while AT THE SAME TIME on row from RS inc 17-20-23-25-27-27 sts evenly = 240-261-288-314-340-370 sts. Switch to circular needle size 2.5 mm and work in garter st back and forth for 2 cm. Cast off alternately with K 1 and P 1. Piece measures approx. 54-55-58-59-65-66 cm. SLEEVE: Worked in garter st back and forth on circular needle. There are 66-72-76-80-84-88 sts for each sleeve. NOW MEASURE THE PIECE FROM HERE. Slip sts from stitch holder back on circular needle size 2.5 mm and cast on 6-6-6-7-7-7 new sts at the end of the next 2 rows = 78-84-88-94-98-102 sts. When sleeve measures 4 cm, dec 1 st inside 1 edge st in each side of piece by K 2 tog. Repeat dec every 1½-2-2½-3-3½-3½ cm 7-6-5-4-3-3 more times = 62-70-76-84-90-94 sts. When piece measures 19 cm in all sizes, work as follows: 1 edge st in garter st, A.9 until 1 st remains, 1 edge st in garter st. When entire A.9 have been worked vertically, work 1 ridge. Loosely cast off. Knit another sleeve the same way. ASSEMBLY: Sew underarm seams in outer loops of edge sts. Sew the openings under the sleeves. Sew the buttons on to the left band. |
|||||||||||||||||||
Diagram explanations |
|||||||||||||||||||
|
|||||||||||||||||||
 |
|||||||||||||||||||
 |
|||||||||||||||||||
 |
|||||||||||||||||||
Have you finished this pattern?Tag your pictures with #dropspattern #timelessbeautycardigan or submit them to the #dropsfan gallery. Do you need help with this pattern?You'll find 24 tutorial videos, a Comments/Questions area and more by visiting the pattern on garnstudio.com. © 1982-2026 DROPS Design A/S. We reserve all rights. This document, including all its sub-sections, has copyrights. Read more about what you can do with our patterns at the bottom of each pattern on our site. |
|||||||||||||||||||


With over 40 years in knitting and crochet design, DROPS Design offers one of the most extensive collections of free patterns on the internet - translated to 17 languages. As of today we count 324 catalogues and 12290 patterns translated into English (UK/cm). 12290
We work hard to bring you the best knitting and crochet have to offer, inspiration and advice as well as great quality yarns at incredible prices! Would you like to use our patterns for other than personal use? You can read what you are allowed to do in the Copyright text at the bottom of all our patterns. Happy crafting!
Post a comment to pattern DROPS 160-8
We would love to hear what you have to say about this pattern!
If you want to leave a question, please make sure you select the correct category in the form below, to speed up the answering process. Required fields are marked *.