
Popular categories
Looking for a yarn?


Comments / Questions (20)
![]() Rosemarie Lucht wrote:
Rosemarie Lucht wrote:
Vielen Dank für die super Anleitung. Habe diese Jacke gestrickt und es passt einfach alles und sieht klasse aus.
19.11.2015 - 19:22
![]() Giesen Brigitte wrote:
Giesen Brigitte wrote:
Stricke dieses Modell gerade ich denke die Zunahmen für die Ärmel sind verkehrt geschrieben den plötzlich 13 Maschen dazu anschlagen sieht seltsam aus. l.G. Giesen Brigitte
17.04.2015 - 12:18DROPS Design answered:
Die Anleitung ist korrekt, die Ärmel werden auf diese Weise angestrickt. Sie schlagen beim Rückenteil beidseitig in jeder 2. R (also am Ende jeder R) die genannte Anzahl M an, um die Ärmel zu bilden. Im Video "Seitlich neue M anschlagen" (im Kopf neben dem Foto zu finden) können Sie sich noch einmal anschauen, wie das funktioniert, falls Sie nicht sicher sind.
20.04.2015 - 11:23Liisa Salonen wrote:
Vasemmassa etukappaleessa pitäisi nurjan puolen lisäys olla reunuksen seitsemän silmukan jälkeen, eikä ennen seitsemää viimeistä, kun kerran aloitetaan 3 silmukkaa plus 7 reunusilmukkaa oikealla puolella.
02.04.2015 - 07:50DROPS Design answered:
Kiitos! Ohje on korjattu.
18.01.2016 - 17:37
![]() Liisa Salonen wrote:
Liisa Salonen wrote:
Alku näytti vaikealle, en osannut hahmottaa, miten vasemman takakappaleen sivuista (y) voi muodustua oikein mittaiset mutta nyt molemmat takaosat valmiina, juuri oikeissa mitoissaan. Mutta neulomaan jouduin pöyröpuikolla 2.5 cm, muuten ei onnistunut.
29.03.2015 - 08:01
![]() Renate Guhse wrote:
Renate Guhse wrote:
Ich habe jetzt das Rückenteil fertig gestrickt. Auf dem Bild sieht es auf der Vorderseite so aus, als ob die Kante in der Mitte unten gerundet ist. In der Beschreibung steht dazu nichts, es soll wie das Rückenteil gestrickt werden. Wie bekomme ich die Ecken rund?
27.03.2015 - 22:09DROPS Design answered:
Es gibt keine andere Rundung als die vom Rückenteil. Durch die Blenden, die diagonale Art des Strickens und dadurch, dass Sie die Vorderteile in der Mitte ja nicht zusammennähen, fällt die Jacke so wie auf dem Foto, also etwas "rund", eine wirkliche Rundung ist jedoch nicht vorhanden.
28.03.2015 - 10:31
![]() Liisa Salonen wrote:
Liisa Salonen wrote:
Koossa L alareunan x lisäykset loppuvat ennen takakeskiosan y lisäyksiä, onko se oikein? Aloitanko heti kun alareuna on 30 cm pitkä kavennukset, vaiko vasta, kun takakeski on 38 cm pituinen? Ihana malli muuten!
24.03.2015 - 07:14DROPS Design answered:
Olet neulonut aivan oikein. Nyt kun alareunan lisäykset on tehty, voit aloittaa kavennukset.
05.06.2015 - 14:06
![]() CLAREDICK wrote:
CLAREDICK wrote:
Great pattern
02.02.2015 - 09:28
![]() Lena Malmström wrote:
Lena Malmström wrote:
Riktigt snygg
23.01.2015 - 19:39
![]() Brotteaux wrote:
Brotteaux wrote:
Super le jeu des rayure.j'adore.
13.01.2015 - 05:00
![]() Gabriele wrote:
Gabriele wrote:
Super!!!!
06.01.2015 - 14:04
|
||||||||||||||||
Deep Sea#deepseacardigan |
||||||||||||||||
 |
 |
|||||||||||||||
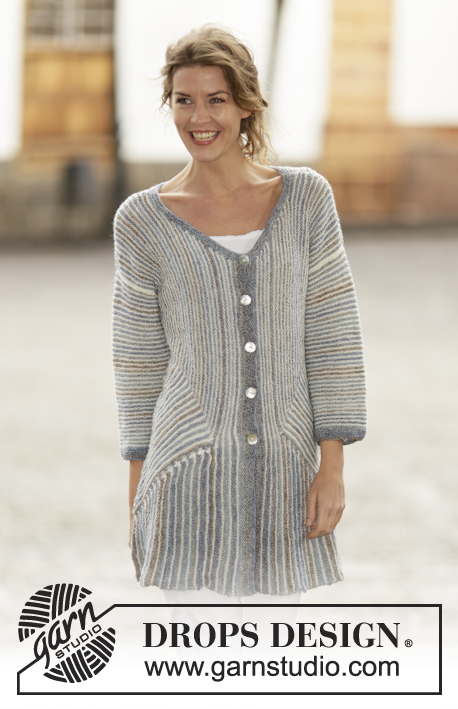
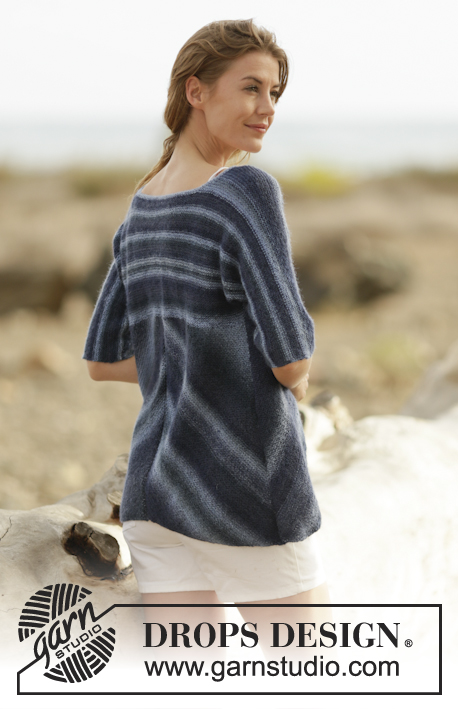
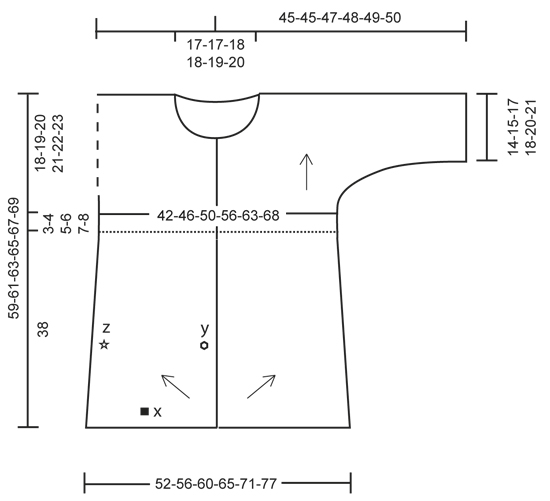
Knitted DROPS jacket in garter st in ”Delight”. Size: S - XXXL.
DROPS 161-26 |
||||||||||||||||
|
GARTER ST (back and forth): K all rows. 1 ridge = 2 rows K. DECREASE TIP: Dec 1 st as follows: K 2 tog. INCREASE TIP: Inc by working 2 sts in first st, but when inc at x, inc as follows: Inc 1 st by making 1 YO after 1 sts, on next round K YO to make hole. BUTTONHOLES: Cast off for buttonholes on right band. 1 buttonhole = cast off fourth st from mid front and cast on 1 new st on next row over this st. Cast off for buttonholes when piece measures (measured from bottom edge of band): SIZE S: 20, 27, 34, 41 and 48 cm SIZE M: 20, 27, 35, 42 and 50 cm SIZE L: 20, 27, 35, 42 and 50 cm SIZE XL: 20, 26, 33, 39, 46 and 52 cm. SIZE XXL: 20, 26, 33, 39, 46 and 52 cm. SIZE XXXL: 20, 27, 34, 41, 48 and 54 cm. ---------------------------------------------------------- JACKET: The jacket is worked in parts in different directions. Arrows on chart show the knitting direction. Work entire jacket in GARTER ST - see explanation above, back and forth on circular needle to make room for all the sts. BACK PIECE: The back piece is worked in 2 parts that are sewn tog mid back. Then work yoke from here. LEFT BACK PIECE: Cast on 3 sts on circular needle size 3.5 mm with Delight. READ ALL OF THE FOLLOWING SECTION BEFORE CONTINUING! INC ON EVERY ROW IN EACH SIDE OF PIECE WHILE DEC. INCREASE: Inc 1 st at beg of every row from RS (= y – see chart) and at beg of every row from WS (= x) - READ INCREASE TIP. Repeat inc mid back (= y) until piece measures 38 cm in all sizes (measured along y). Repeat inc in bottom edge (= x) until piece measures 26-28-30-32½-35½-38½ cm measured along x. NOTE! In size XXXL inc mid back (= y) are done before inc in bottom edge (= x). REMEMBER THE KNITTING TENSION DECREASE IN THE SIDE: When inc in bottom edge (= x) is done, dec in the side (= z) as follows: Dec 1 st – READ DECREASE TIP - at beg of every row from WS. Repeat dec on every row from WS until finished measurements. AT THE SAME TIME when piece measures 3 cm along z - dec 1 st at beg of next row from WS inside 4 sts (after dec). Repeat dec every 3½ cm 10 times in total. DECREASE MID BACK: When inc mid back (= y) is done, dec 1 st at beg of next row from RS. Repeat dec at beg of every row from RS until 3 sts remain. Cast off. RIGHT BACK PIECE: Work as left back piece but reversed. I.e. all dec/inc explained at beg of row from RS are now done at the beg of row from WS and vice versa. ASSEMBLY BACK PIECE: Sew tog left and right back piece mid back in outer loops of edge sts. YOKE AT THE BACK: The piece is worked back and forth in garter st until finished measurements. Pick up (from RS) 1 st in every ridge on back piece - see dotted line on chart (same as on front piece). On next row adjust no of sts to 96-106-116-128-142-156. Cast on 1 st at the end of the next 2 rows (= edge st) = 98-108-118-130-144-158 sts. Continue to work until piece measures 3-4-5-6-7-8 cm from where sts were picked up. Cast on 6-2-11-7-13-9 new sts in each side for sleeve. Then cast on in each side on every other row: 5 sts 7-7-5-5-3-3 times and 12 sts 1 time = 204-206-214-218-224-230 sts. When piece measures 17-19-21-23-25-27 cm from where sts were picked up, cast off the middle 36-38-40-40-42-46 sts for neck. Finish each shoulder separately. On next row, cast off 1 st towards the neck = 83-83-86-88-90-91 sts on each shoulder/sleeve. Work until piece measures 21-23-25-27-29-31 cm from edge where sts were picked up. Sleeve opening measures approx. 14-15-17-18-20-21 cm - loosely cast off. LEFT FRONT PIECE: Work front piece diagonally (as right back piece + band), i.e. work as follows: Cast on 10-10-10-10-11-11 sts (= 3 sts + 7-7-7-7-8-8 band sts) on circular needle size 3.5 with Delight. Work as RIGHT BACK PIECE, but inc before the last 7-7-7-7-8-8 sts from WS (= band). NOTE! When dec from RS beg, cast off these 7-7-7-7-8-8 band sts. YOKE (LEFT FRONT PIECE): Worked back and forth in garter st. Pick up (from RS) 1 st in every ridge and 1 st in every band st in waist – see dotted line on chart. On next row adjust no of sts to 55-61-65-71-79-86. On next row cast on 1 new st in the side (= edge st) = 56-62-66-72-80-87 sts. Continue to work until piece measures 3-4-5-6-7-8 cm from where sts were picked up. Cast on 6-2-11-7-13-9 new sts at the end of next row from WS for sleeve. Then cast on in the side on every other row: 5 sts 7-7-5-5-3-3 times and 12 sts 1 time = 109-111-114-116-120-123 sts. Continue to work until piece measures 11-13-13-15-15-17 cm from where sts were picked up. Now cast off 18-18-18-18-20-22 sts towards mid front for neck. Then cast off on every other row towards the neck 2 sts 4-5-5-5-5-5 times = 83-83-86-88-90-91 sts remain on row for shoulder/sleeve. Work until piece measures 21-23-25-27-29-31 cm from where sts were picked up, adjust according to back piece. Loosely cast off. RIGHT FRONT PIECE: Work front piece diagonally (same as left back piece + band), i.e. work as follows: Cast on 10-10-10-10-11-11 sts (= 7-7-7-7-8-8 band sts + 3 sts) on circular needle size 3.5 with Delight. Work as LEFT BACK PIECE - NB! The inc are now made after the first 7-7-7-7-8-8 sts from RS (= band). Remember BUTTONHOLES - see explanation above. YOKE (RIGHT FRONT PIECE): Work as LEFT YOKE but reversed - i.e. cast on sts for sleeve at the end of row from RS. ASSEMBLY: Sew shoulder/overarm seams edge to edge to avoid a chunky seam. Sew side and underarm seams in one inside 1 edge st. Sew on the buttons approx. 1 cm from edge on left band. NECK EDGE: Pick up from RS approx. 106 to 129 sts around the neck on circular needle size 3.5 mm with Delight. Work 3 ridges back and forth and then loosely cast off with K from WS. |
||||||||||||||||
Diagram explanations |
||||||||||||||||
|
||||||||||||||||
 |
||||||||||||||||
Have you finished this pattern?Tag your pictures with #dropspattern #deepseacardigan or submit them to the #dropsfan gallery. Do you need help with this pattern?You'll find 17 tutorial videos, a Comments/Questions area and more by visiting the pattern on garnstudio.com. © 1982-2026 DROPS Design A/S. We reserve all rights. This document, including all its sub-sections, has copyrights. Read more about what you can do with our patterns at the bottom of each pattern on our site. |
||||||||||||||||


With over 40 years in knitting and crochet design, DROPS Design offers one of the most extensive collections of free patterns on the internet - translated to 17 languages. As of today we count 324 catalogues and 12290 patterns translated into English (UK/cm). 12290
We work hard to bring you the best knitting and crochet have to offer, inspiration and advice as well as great quality yarns at incredible prices! Would you like to use our patterns for other than personal use? You can read what you are allowed to do in the Copyright text at the bottom of all our patterns. Happy crafting!
Post a comment to pattern DROPS 161-26
We would love to hear what you have to say about this pattern!
If you want to leave a question, please make sure you select the correct category in the form below, to speed up the answering process. Required fields are marked *.