
Popular categories
Looking for a yarn?


Comments / Questions (83)
![]() Delphine Dandois wrote:
Delphine Dandois wrote:
Et j'ai une autre questions, les marqueurs, on les place au premier rang pour qu'il soit sur l'endroit?
19.09.2016 - 21:48DROPS Design answered:
Bonjour Mme Dandois, vous pouvez effectivement les placer dès le 1r rang en tricotant les mailles, ou bien après les 2 premiers rangs, mais cette fois sans tricoter les mailles, ils doivent être placés dans l'ordre indiqué, vu sur l'endroit. Bon tricot!
20.09.2016 - 10:12
![]() Delphine Dandois wrote:
Delphine Dandois wrote:
Bonjour, je tente de réaliser ce pull mais je ne comprends pas les cotes mousse : que faut il faire exactement après avoir monté les mailles au tout début? tricoter une cote au point mousse? Bien à vous
19.09.2016 - 21:46DROPS Design answered:
Bonjour Mme Dandois, après avoir monté les mailles, vous tricotez 1 côte au point mousse, soit 2 rangs endroit car on tricote ici en allers et retours. Bon tricot!
20.09.2016 - 09:45
![]() Kody Doisy wrote:
Kody Doisy wrote:
Ok et merci pour votre réponse précédente et pour les augmentations dos , devant et manches au fur et a mesure de l'avancé du travail ces augmentations sont décalées d'une maille a chaque augmentation si je comprend bien . Désolée du dérangement
18.08.2016 - 12:29DROPS Design answered:
Bonjour Kody Doisy, les marqueurs vont toujours rester en place et on va garder 5 m entre les marqueurs (ou 6 m au début/à la fin du rang), donc on aura effectivement plus de mailles à chaque augmentation pour les manches, le dos et le devant. Bon tricot!
18.08.2016 - 13:30
![]() Kody Doisy wrote:
Kody Doisy wrote:
Bien le bonjour . Me voila encore perdue avec les augmentations de ce modèle . Je comprend le principe mais sur certains rangs je dois faire les 2 augmentations en même temps et la je suis perdue et pourquoi avoir monte 1 maille en moins sur le devant ? Est ce que les augmentations se retrouvent toujours au même endroit ou en décalé. Merci de votre réponse et de votre aide . Bonne journée .
18.08.2016 - 09:41DROPS Design answered:
Bonjour Kody Doisy, vous augmentez 8 m par rang: 1 m après les 6 premières m (marqueur 1) + 1 m avant et après les 5 m espacées par un marqueur soit avant le marqueur 2 et après le marqueur 3 + avant le marqueur 4 et après le marqueur 5 et après le marqueur 7 + avant le marqueur 8 et en fin de rang avant les 6 dernières m (marqueur 8)- vous devez toujours avoir 5 m entre les marqueurs séparant manche/dos, dos/manche et dos/devant. Bon tricot!
18.08.2016 - 10:27
![]() Amiee Newsome wrote:
Amiee Newsome wrote:
How many ridges before you begin buttonholes? I am so confused.
10.08.2016 - 15:08DROPS Design answered:
Dear Mrs Newsome, first buttonhole has to be worked when piece measures 1 cm from cast-on edge, then dec for buttonholes for your size as explained under "BUTTONHOLES" at the beg of written pattern. Happy knitting!
10.08.2016 - 16:15
![]() Nathalie wrote:
Nathalie wrote:
Hallo, ich möchte mir diesen Pullover stricken. Allerdings nehme ich nach dem Bild an, dass er mir zu weit ausgeschnitten sein wird (vor allem im Nacken mag ich das nicht). Wieviele Maschen weniger sollte ich aufnehmen und wie zunehmen, um den Ausschnitt ca. 2-3cm "enger" zu stricken? Vielen Dank!
11.07.2016 - 10:32DROPS Design answered:
Liebe Nathalie, wir bitten um Verständnis, dass wir Anleitungen nicht auf individuellen Wunsch umrechnen können. Sicher finden Sie in unserer umfassenden Musterdatenbank einen Schnitt, der Ihnen gefällt.
11.07.2016 - 16:40
![]() Rebecka wrote:
Rebecka wrote:
Hej! Jag stickar i storlek S och ska börja öka 1 maska på varje ärm och 4 på framstycket och 4 på bakstycket på oket. Men jag har samma problem som Cristina tror jag, och har svårt att utläsa vad som är fram- och bakstycket. Ärmarna är mellan 1 och 2 markören och mellan 5 och 6 markören? Bakstycket mellan 3 och 4 markören? Och framstycket låter för mig som om det bara är de sista maskorna efter markör 8, men det låter fel det också. Tacksam för hjälp :)
30.03.2016 - 20:26DROPS Design answered:
Jo men de 5/6 rm skall vara i varje övergång mellan ärm och fram- och bakstycke. De första 6 rm är där knapparna skall vara på vänster framstyke. Kom ihåg att du stickar uppifrån och ned. Lycka till!
31.03.2016 - 09:11
![]() Patricia wrote:
Patricia wrote:
Bonjour, j'aimerais savoir où trouver les mesures pour les différents grandeurs. Merci
24.03.2016 - 13:47DROPS Design answered:
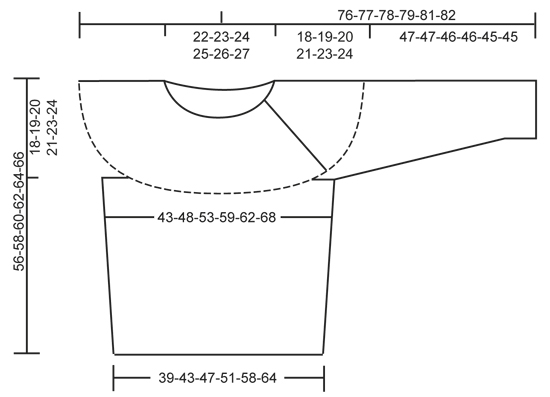
Bonjour Patricia, vous trouverez en bas de page un schéma avec toutes les mesures pour chaque taille, prises à plat, d'un côté à l'autre. Comparez ces mesures à celles d'un ouvrage similaire dont vous aimez la forme pour trouver la taille à suivre. Plus d'infos ici. Bon tricot!
24.03.2016 - 15:14
![]() Gitte wrote:
Gitte wrote:
Jeg har strikket denne i størrelse M, i Alpaca blå/turkis, den blev MEGET flot, ville gerne have kunne ligge foto op herinde. Nu strikker jeg lige en mere. SUPER opskrift :-)
19.12.2015 - 15:16
![]() Cristina wrote:
Cristina wrote:
Hej! Jag sticker storlek L och har lite funderingar på den andra ökningen som man gör samtidigt på oket. Du skriver att man ska öka 4m för bakst och famst och 1 för varje arm. Jag har svårt att läsa vilka maskor /hur många de är. För storlek L är det 20 m för arm, 28 m för bakst och 27 m för framst ?
11.11.2015 - 19:23DROPS Design answered:
Hej. På oket har du 122 m från början. Sen ökar du 8 m totalt 24 gånger (8x24=192m). Sen ökar du samtidigt 1 m på vaje ärm, 4 m på framstycket och 4 m på bakstycket totalt 8 gånger (10 m per varv x 8 =80m). (Du ökar alltså totalt 8 m per arm, 32 m på framstycket och 32 m på bakstycket i den andra ökningen). 122+192+80=394 m. Lycka till!
19.11.2015 - 14:04
|
|
Take It Easy#takeiteasysweater |
|
 |
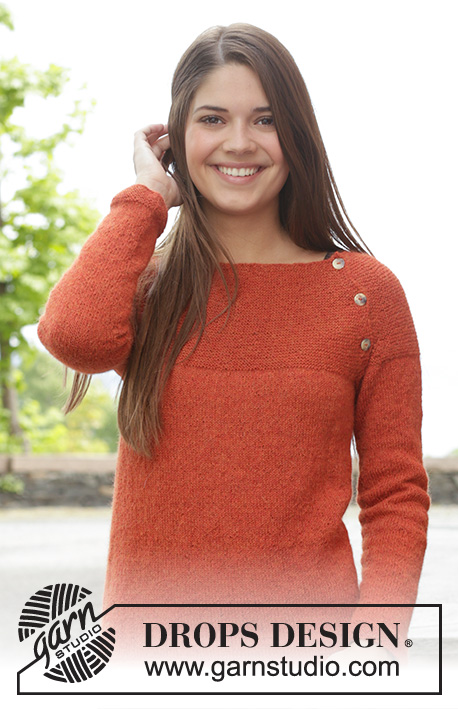 |
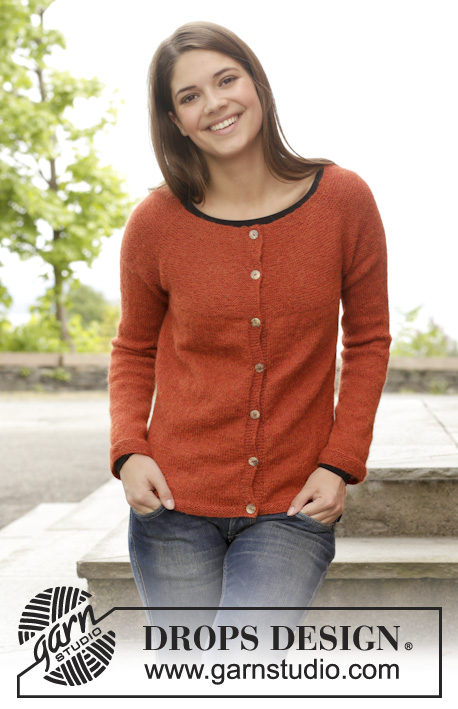
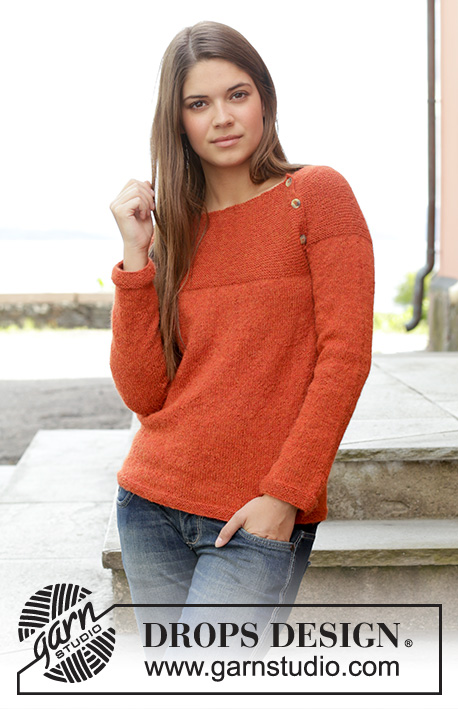
Knitted DROPS jumper in garter st with round yoke, worked top down in "Alpaca". Size: S - XXXL.
DROPS 158-3 |
|
|
GARTER ST (back and forth on needle): K all rows. 1 ridge = 2 rows K. GARTER ST (in the round on circular needle/double pointed needles): * K 1 round and P 1 round *, repeat from *-*. 1 ridge = 2 rounds. INCREASE TIP: Inc 1 st by making a YO. On next row K YO twisted (i.e. work in back loop of st instead of front) to avoid holes. DECREASE TIP: Dec 1 st before marker as follows: Work until 2 sts remain before marker, slip 1 st as if to K, K 1, psso. Dec 1 st after marker as follows: K 2 tog. BUTTONHOLES: Dec for buttonholes in band sts on left shoulder. 1 buttonhole = K tog third and fourth st from edge and make 1 YO. Dec for buttonholes when piece measures (measured from cast-on edge): SIZE S: 1, 8 and 15 cm SIZE M: 1, 9 and 17 cm SIZE L: 1, 9 and 17 cm SIZE XL: 1, 7, 13 and 19 cm SIZE XXL: 1, 8, 15 and 22 cm SIZE XXXL: 1, 8, 15 and 22 cm ---------------------------------------------------------- JUMPER: The piece is worked top down. YOKE: Worked back and forth on circular needle. Cast on 114-118-122-126-130-134 sts (incl 6 band sts in one side of piece) on circular needle size 3 mm with Alpaca. Work 1 ridge in GARTER ST - see explanation above. Insert 8 markers in piece from RS as follows: K 6, insert 1st marker, K 20 (= sleeve), insert 2nd marker, K 5, insert 3rd marker, K 24-26-28-30-32-34 (= back piece), insert 4th marker, K 5, insert 5th marker, K 20 (= sleeve), insert 6th marker, K 5, insert 7th marker, K 23-25-27-29-31-33, insert 8th marker, finish with K 6 band sts (= front piece). REMEMBER THE KNITTING TENSION! Now work piece in garter st. Remember BUTTONHOLES - see explanation above. Then inc 1 st – READ INCREASE TIP, after 1st-3rd-5th and 7th marker and before 2nd-4th-6th and 8th marker (= 8 sts inc). Repeat inc every 4th row 20-22-23-24-26-28 more times. AT THE SAME TIME when piece measures 4-3-2-2-2-1½ cm, inc as follows: Inc 4 sts evenly on back piece, 1 st on each sleeve and 4 sts evenly on front piece (= 10 sts inc). Repeat inc every 4-3-2-2-2-1½ cm 3-5-7-9-9-11 more times. When all inc are done there are 322-362-394-426-446-486 sts on needle. Piece measures approx. 18-19-20-21-23-24 cm. Work next row as follows from RS: Cast off the first 6 sts, slip the next 66-72-76-80-84-90 sts on a stitch holder for sleeve, cast on 10-10-10-12-12-12 new sts, insert 1 marker in the middle of the new sts, K 92-106-118-130-136-150 sts, slip the next 66-72-76-80-84-90 sts on a stitch holder for sleeve, cast on 10-10-10-12-12-12 new sts, insert 1 marker in the middle of the new sts, work the next 92-106-118-130-136-150 sts = 204-232-256-284-296-324 sts. NOW MEASURE PIECE FROM HERE! BODY: Work piece in the round on circular needle in stocking st. When piece measures 4 cm, dec 1 st on each side of markers in the side - READ DECREASE TIP (= 4 sts dec). Repeat dec every 8-4-4-3-7-10 cm 3-6-7-9-4-3 more times = 188-204-224-244-276-308 sts. When piece measures 36-37-38-39-39-40 cm, switch to circular needle size 2.5 mm. Work 5 ridges –see explanations above. Cast off. SLEEVE: Worked in the round on double pointed needles. Slip the 66-72-76-80-84-90 sts from stitch holder back on double pointed needles size 3 mm. Cast on 10-10-10-12-12-12 new sts under sleeve, insert 1 marker in the middle of the new sts = 76-82-86-92-96-102 sts. Work in stocking st. When piece measures 4 cm, dec 1 st on each side of marker. Repeat dec every 4-3-2½-2-2-1½ cm 9-12-13-15-16-18 more times = 56-56-58-60-62-64 sts. Work in stocking st until piece measures 44-44-43-43-42-42 cm. Switch to double pointed needles size 2.5 mm. Work in garter st. Cast off when piece measures 47-47-46-46-45-45 cm (shorter measurements in the larger sizes because of wider shoulders). Work the other sleeve the same way. ASSEMBLY: Sew tog under sleeves. Place band on the back of yoke and fasten. Sew on buttons. |
|
 |
|
Have you finished this pattern?Tag your pictures with #dropspattern #takeiteasysweater or submit them to the #dropsfan gallery. Do you need help with this pattern?You'll find 24 tutorial videos, a Comments/Questions area and more by visiting the pattern on garnstudio.com. © 1982-2026 DROPS Design A/S. We reserve all rights. This document, including all its sub-sections, has copyrights. Read more about what you can do with our patterns at the bottom of each pattern on our site. |
|


With over 40 years in knitting and crochet design, DROPS Design offers one of the most extensive collections of free patterns on the internet - translated to 17 languages. As of today we count 324 catalogues and 12290 patterns translated into English (UK/cm). 12290
We work hard to bring you the best knitting and crochet have to offer, inspiration and advice as well as great quality yarns at incredible prices! Would you like to use our patterns for other than personal use? You can read what you are allowed to do in the Copyright text at the bottom of all our patterns. Happy crafting!
Post a comment to pattern DROPS 158-3
We would love to hear what you have to say about this pattern!
If you want to leave a question, please make sure you select the correct category in the form below, to speed up the answering process. Required fields are marked *.