
Popular categories
Looking for a yarn?


Comments / Questions (36)
![]() Corinne Van Balen wrote:
Corinne Van Balen wrote:
Ik wil u bedanken voor de uitleg die u mij hebt geprobeerd te geven. Elk patroon die ik van drops heb gemaakt ben ik uitgekomen, maar deze wil me niet lukken. Wat ik probeer, op een gegeven moment verschuiven de stokjes toch iets t.o.v. elkaar. Ik ga over op een ander patroon...
28.03.2014 - 10:03
![]() Corinne Van Balen wrote:
Corinne Van Balen wrote:
Toch nog een vraagje: de bedoeling is dus dat de v en de st moeten dus zó gehaakt worden als in jullie instr. video van dstk? Dan komen ze (redelijk) recht boven elkaar?
18.03.2014 - 18:06DROPS Design answered:
Hoi Corinne. Haak je de v of stk in de stk/v van de vorige toer, dan komen ze boven elkaar.
19.03.2014 - 11:42
![]() Corinne Van Balen wrote:
Corinne Van Balen wrote:
Laat u maar! Excuses! Ben er al uit
11.03.2014 - 17:06
![]() Corinne Van Balen wrote:
Corinne Van Balen wrote:
Het zal ongetwijfeld heel logisch zijn, maar is er nog een andere manier om het uit te leggen. Ik haak zowel vasten als stokjes in de steek (zoals bij instr. video dubb. stokjes) maar de stokjes komen niet aanrecht boven elkaar...
11.03.2014 - 15:28
![]() Corinne Van Balen wrote:
Corinne Van Balen wrote:
Ik begrijp de extra zin bij uitleg structuurpatroon niet... haak in de vorige vaste/stokje en niet ertussen. Kan dat misschien nog iets meer uitgelegd worden? Alvast hartelijk dank!
07.03.2014 - 15:39DROPS Design answered:
Hoi Corinne. Het betekent dat je steeds IN de vaste of het stokje van de vorige toer moet haken - en niet ertussen - de v/stk moeten recht boven elkaar komen.
07.03.2014 - 16:21
![]() Lily wrote:
Lily wrote:
Ammmmmmmazing
16.01.2014 - 21:56
![]() Barbara wrote:
Barbara wrote:
Love this one. Will be on my to do list this year!
25.06.2013 - 12:59
![]() Joolie wrote:
Joolie wrote:
J'ai voté pour celui ci.Il me plait beaucoup
18.06.2013 - 12:07
![]() Hedwig wrote:
Hedwig wrote:
Sehr schöne Jacke.
10.06.2013 - 10:45Svetlana wrote:
Klasse! Einfach und elegant.
09.06.2013 - 13:18
|
||||||||||
Otus#otuscardigan |
||||||||||
|
|
||||||||||
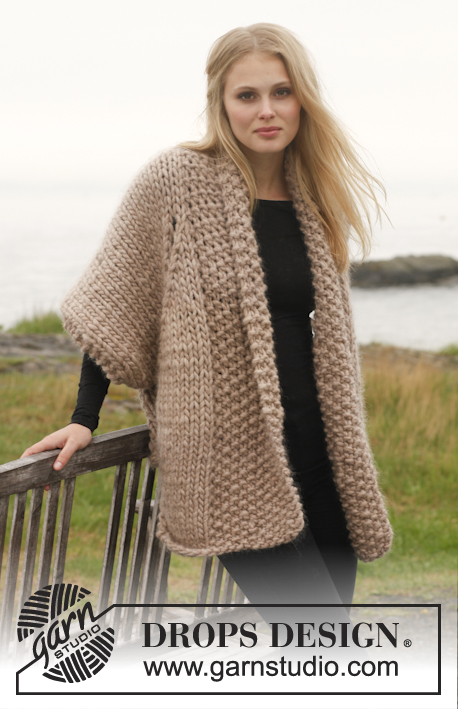
Crochet DROPS jacket with bands in fan pattern in ”Nepal”. Size: S - XXXL.
DROPS 151-26 |
||||||||||
|
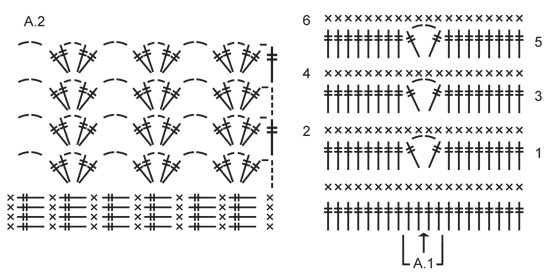
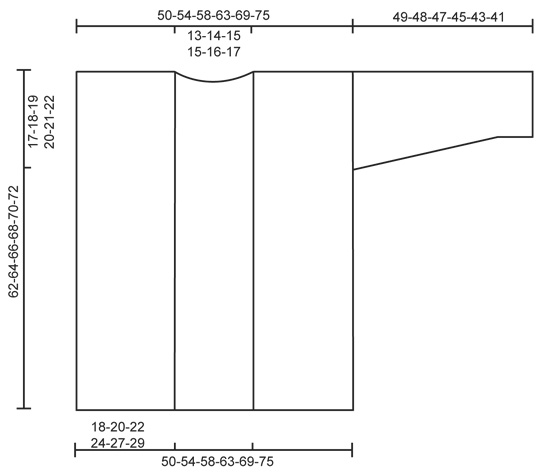
CROCHET INFO: At beg of every dc row beg with 1 ch, then work 1 dc in first st before continuing with 1 dc in every st (ch does NOT count as 1 st). Finish row with 1 dc in 4th ch from beg of previous row. At beg of every dtr row beg with 4 ch in 1st st, then work 1 dtr in every st (4 ch = 1st dtr). Finish row with 1 dtr in first dc from beg of previous row. TEXTURE ROWS: * 1 row dtr, 1 row dc *, repeat from *-* until finished measurements - NOTE: Work in every dc/dtr from previous row and not between. PATTERN: See diagram A.1 (applies to sleeve) and A.2 (applies to band). ---------------------------------------------------------- JACKET: Work 139-151-163-179-196-213 ch on hook size 5 mm with Nepal. Work first row as follows: 1 dc in 2nd ch from hook, * 1 dc in each of the 3 next ch, skip 1 ch *, repeat from *-* until 1-1-1-1-2-3 ch remain and finish with 1 dc in each of the last ch = 104-113-122-134-147-160 dc, turn piece. READ CROCHET INFO and work TEXTURE ROWS upwards – see explanation above. REMEMBER THE CROCHET TENSION! When piece measures approx. 45-46-47-48-49-50 cm, divide for armholes and finish each part separately as follows: FRONT PIECE: Continue with texture rows back and forth over the outermost 22-24-26-29-32-35 sts in one side of piece (= front piece). When piece measures approx. 62-64-66-68-70-72 cm – finish after 1 row with dc, cut the yarn. Repeat over the outermost 22-24-26-29-32-35 sts in the other side of piece. BACK PIECE: Continue with texture rows back and forth over the 60-65-70-76-83-90 sts on back piece until piece measures approx. 60-62-64-66-68-70 cm – adjust so that last row is 1 row with dc. Now work 1 texture row (i.e. 1 row dtr + 1 row dc) back and forth over the outermost 22-24-26-29-32-35 sts on shoulder. Cut the yarn and repeat over the outermost 22-24-26-29-32-35 sts in the other side (i.e. do not work over the middle 16-17-18-18-19-20 sts = neckline in the back of neck). Fasten off. SLEEVE: Work 35-37-37-40-40-43 ch on hook size 5 mm with Nepal. Work first row as follows: 1 dc in 2nd ch from hook, * 1 dc in each of the 3 next ch, skip 1 ch *, repeat from *-* until 1-3-3-2-2-1 ch remain and finish with 1 dc in each of the last ch = 26-28-28-30-30-32 dc, turn piece. Then work texture rows back and forth. READ THE REST OF SLEEVE BEFORE CONTINUING! AT THE SAME TIME on 5th row (i.e. on third row with dtr), insert 1 marker in the middle of piece. Work dtr as before until 2 sts remain before marker, work pattern according to diagram A.1 over the next 4 sts, i.e. work as follows: Skip 1 st, 1 dtr in next st, 2 ch, 1 dtr in next st, skip 1 st and continue the rest of row with dtr as before. Continue pattern as shown in A.1 (arrow in the middle of A.1 shows marker). AT THE SAME TIME on 4th-4th-4th-4th-3rd-3rd row with dtr (piece measures approx. 9-9-9-9-6-6 cm), inc 1 dtr in each side by working 2 dtr in second and next to last dtr in each side. Repeat inc every other row with dtr 6-4-3-3-2-1 more time (= 7-5-4-4-3-2 inc in total in each side) and then on every row with dtr 0-3-5-5-7-8 times in total = 40-44-46-48-50-52 sts. When piece measures 49-48-47-45-43-41 cm (shorter measurements in the larger sizes because of wider shoulders), cut the yarn. Work another sleeve the same way. ASSEMBLY: Sew the shoulder seams. Sew sleeve seams tog edge to edge in front loop of outermost sts. Sew sleeves in armhole with neat, little stitches - make sure to avoid a tight seam. BAND: Beg from RS at the bottom on right front piece and work as shown in diagram A.2, i.e. work as follows: ROW 1: 1 dc in first st, 5 ch (= 1 dtr + 1 ch), in first dtr work 2 dtr + 2 ch + 2 dtr + 2 ch, * skip 1 dtr, in next dtr work 2 dtr + 2 ch + 2 dtr + 2 ch *, repeat from *-* along right front piece, along the neckline at the back of neck and down along left front piece. Turn piece. ROW 2: 5 ch (= 1 dtr + 1 ch), then work as follows in every ch-space in the middle of every dtr-group: 2 dtr + 2 ch + 2 dtr, 2 ch. Repeat 2nd row until a total of 4-4-5-5-5-5 rows have been worked. Work last row as follows: 5 ch (= 1 dtr + 1 ch), then work as follows in every ch-space in the middle of every dtr-group: 3 dtr + 2 ch + 3 dtr + 2 ch. When row is done, cut the yarn. Fasten all strands. |
||||||||||
Diagram explanations |
||||||||||
|
||||||||||
 |
||||||||||
 |
||||||||||
Have you finished this pattern?Tag your pictures with #dropspattern #otuscardigan or submit them to the #dropsfan gallery. Do you need help with this pattern?You'll find 4 tutorial videos, a Comments/Questions area and more by visiting the pattern on garnstudio.com. © 1982-2026 DROPS Design A/S. We reserve all rights. This document, including all its sub-sections, has copyrights. Read more about what you can do with our patterns at the bottom of each pattern on our site. |
||||||||||


With over 40 years in knitting and crochet design, DROPS Design offers one of the most extensive collections of free patterns on the internet - translated to 17 languages. As of today we count 324 catalogues and 12290 patterns translated into English (UK/cm). 12290
We work hard to bring you the best knitting and crochet have to offer, inspiration and advice as well as great quality yarns at incredible prices! Would you like to use our patterns for other than personal use? You can read what you are allowed to do in the Copyright text at the bottom of all our patterns. Happy crafting!
Post a comment to pattern DROPS 151-26
We would love to hear what you have to say about this pattern!
If you want to leave a question, please make sure you select the correct category in the form below, to speed up the answering process. Required fields are marked *.