
Popular categories
Looking for a yarn?


Comments / Questions (57)
![]() Dani wrote:
Dani wrote:
Hello all at Drops Design. Love your patterns; they are fantastic and I've had a lot of fun making some of them. Please, though, one small request: would it be possible for you to print the crochet pattern diagrams with each row/round in an alternating shade? i.e. row 1 in grey, row 2 in black, row 3 in grey etc. This would greatly help both myself and, I suspect, many others in following them. I am slightly dyslexic and struggle to follow them. All the best wishes. Dani
12.02.2021 - 15:05DROPS Design answered:
Dear Dani, thanks for your comment, for technical reasons it's not that possible, but what about highligting each row with a highlighter of different colours? This might help. Happy crocheting!
12.02.2021 - 16:32
![]() Sophie wrote:
Sophie wrote:
Bonjour, Pour la partie Jupe, le point fantaisie A.2 en suivant les RAYURES est-il bien 1 rang = (1 tour de B puis 1 tour de ms) en Fabel vue sur la mer, puis la même chose en Fabel brume océane ? Si oui, comment je place chaque couleur de fil entre chaque rang ? Merci pour votre réponse.
21.12.2020 - 10:59DROPS Design answered:
Bonjour Sophie, c'est bien ça, on crochète 2 tours/rangs d'une couleur puis 2 tours/rangs de l'autre. Laissez le fil de la couleur non utilisée sur l'envers de l'ouvrage et changez de couleur lors de la dernière maille coulée du tour précédent. Quand vous reprenez la couleur de la rayure précédente, ne tirez pas trop sur le fil pour ne pas resserrer l'ouvrage à ce niveau. Bon crochet!
21.12.2020 - 14:10
![]() Sophie wrote:
Sophie wrote:
Bonsoir. J'ai fait les carrés que j'ai assemblée en rond en les positionnant envers contre envers, comme indiqué. Je suis étonnée de voir que la couture d'assemblage des carrés est en relief. Du coup je ne sais pas de quel côté doit être ce raccord en relief : à l'intérieur ou à l'extérieur de la jupe, car je crains qu'ils s'accrochent et que cela abîme la jupe. Pouvez-vous me dire si ces raccords en relief sont à l'intérieur ou à l'extérieur de la jupe please? Merci
05.11.2020 - 22:43DROPS Design answered:
Bonjour Sophie, l'assemblage des carrés se fait sur l'endroit (on pose les carrés envers contre envers). Si vous préférez une transition plate, vous pouvez les coudre si cela vous convient davantage. Bon crochet!
06.11.2020 - 08:26
![]() Elena wrote:
Elena wrote:
Hello i have started this lovely model, in round 3 of square, what means 1 dc in same leaf ? where should the hook be entered? in last stitch of petal? in the middle of petal? Many thanks
11.01.2019 - 22:39DROPS Design answered:
Dear Elena I would enter the hook into the middle of the petal. Happy Crafting!
12.01.2019 - 15:42
![]() Natasja wrote:
Natasja wrote:
Als ik het rok gedeelte begin met de stokjes en vasten boven de granny's keer ik dan ook mijn werk telkens of blijf ik in de rondte werken naar boven toe?
19.10.2018 - 22:44DROPS Design answered:
Dag Natasja,
Het staat niet duidelijk aangegeven in het patroon of je al dan niet het werk moet keren, maar als je de foto bekijkt, zie dat dit wel de bedoeling is, omdat de kleur verspringt midden achter. Het werk blijft ook beter in model als je steeds midden achter keert.
20.10.2018 - 16:53
![]() Aune wrote:
Aune wrote:
Hola, Tengo problemas al realizar la primera vuelta in la parte de ma falda (puntos vajos alrededor del aro). Como se ve en la figura A1, cada cuadrado tiene 13 puntos y dos cadenas. Las instrucciones dicenn de hacer 2 pb en la esquina + ( 1 pb en el siguiente pb + 1 pb en el siguiente pb + 2 pb en el siguiente pb) x tres veces + 2 pb en la esquina. Esto significa que solo se pone pb en 9 puntos y 2 esquinas. Qué pasa con los demas 4 puntos que tiene el cuadrado?
14.08.2018 - 03:44DROPS Design answered:
Hola Aune. Ajustamos el lado de cada cuadrado para formar el borde inferior de la falda, es decir, trabajamos en las dos esquinas y en los 9 puntos bajos centrales del cuadrado. Como trabajamos 2 puntos bajos en el mismo punto en cada 3er punto bajo, tenemos al final 16 puntos bajos sobre cada cuadrado. Los otros 4 puntos del cuadrado se saltan para no hacer el borde de la falda demasiado ancho.
18.09.2018 - 10:50Aune wrote:
Hello! I am a bit confused when starting the skirt part. Currently each side has 13 sc and 2 corner spaces so I do not get the indicated 16 sc per square. Instead I have 20 because I have to do the repeat *-* 4 times instead of 3. Where is that I am interpreting it wrongly? Do I have to skip the 2 sc that are already in the corners from previous round?
06.06.2018 - 22:27
![]() Anna wrote:
Anna wrote:
Hvor finner jeg diagram A2?
07.03.2018 - 12:57DROPS Design answered:
Hej Anna, A2 står beskrevet øverst i opskriften sammen med striberne: MØNSTER A.2 OG STRIPER: 1 rapp A.2 = 2 omg/rader. Hekle vekselvis 1 omg/rad med st og 1 omg/rad med fm. Det hekles samtidig striper i A.2 slik: * Hekle 1 rapp A.2 (= 2 omg/rad) i Fabel havutsikt, 1 rapp (= 2 omg/rad) med Fabel havbrus *, gjenta fra *-* oppover.
07.03.2018 - 16:22
![]() Liesbeth wrote:
Liesbeth wrote:
Verduidelijking op vorige vraag. toer 6 van vierkant = in 1e l-lus 2v, 3l en 2v (= hoek), * haak 3 v in elke van de volgende 3 l-lussen, haak in volgende l-lus 2v, 3l en 2v * Dat is dus een kant van het vierkant, na de eerste 3 l en tot de laatste 3l, De vasten daarvoor en daarna zijn om de hoek. Dan kom ik dus op 2v, 3x 3v en 2v = 13v per vierkant. Als ik dan de instructies van de rok opvolg heb ik teveel steken te vullen tot de hoek of ik moet de 2v in elke hoek overslaan
07.09.2014 - 19:52DROPS Design answered:
Hoi Liesbeth. Je leest het als volgt (en vergeet niet de vasten die je in de lossenlus maakt): 2 v in 1e l-lus in hoek op 1 vierkant, * 1 v in elke van de volgende 2 v, 2 v in de volgende v *, herhaal van *-* nog 2 keer (3 keer in totaal), 2 v in laatste l-lus in hoek (= 16 v per vierkant) of = 2 + 4 + 4 + 4 + 2 = 16.
09.09.2014 - 12:05
![]() Liesbeth Jacobs wrote:
Liesbeth Jacobs wrote:
Ik heb een vraag over het haken van de rok. in het patroon staat: haak 1 toer v langs de ring van vierkantjes...... (= 16 v per vierkant). als ik alle vasten tel die ik dan moet maken kom ik echter op 20. moet ik misschien de 2v in de hoeklus van de laatste toer van het vierkant niet meetellen, of moet ik niet meerderen zoals in het patroon geschreven staat?
25.08.2014 - 21:44DROPS Design answered:
Als ik de v optel, kom ik op 16 precies dus ik zie geen fout. Kunt u aangeven hoe u op 20 komt?
01.09.2014 - 17:11
|
||||||||||||||||||||||
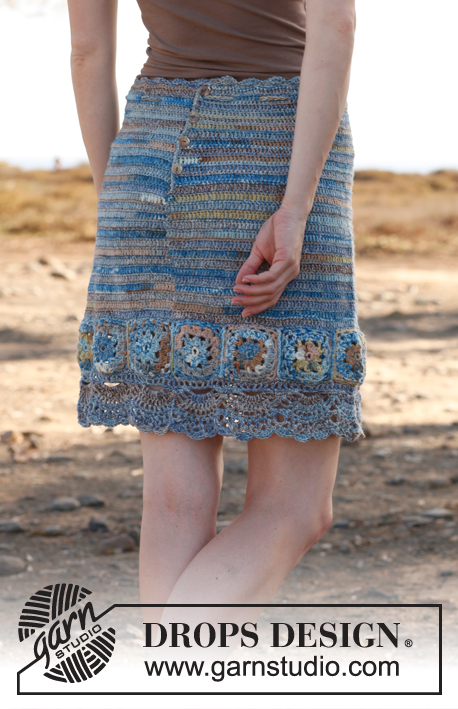
Blue dream#bluedreamskirt |
||||||||||||||||||||||
 |
 |
|||||||||||||||||||||
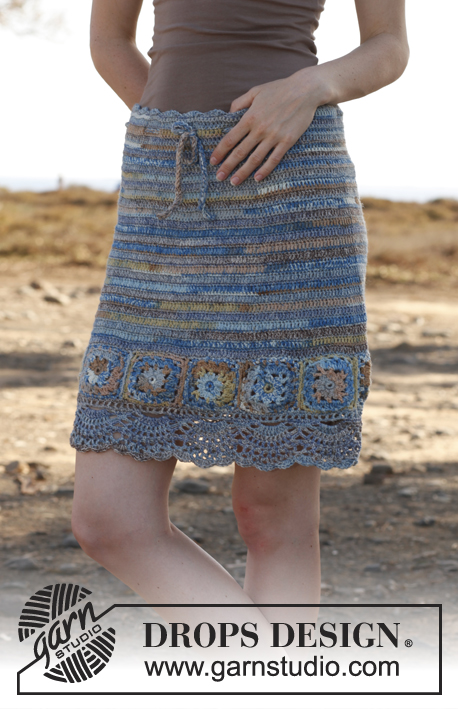
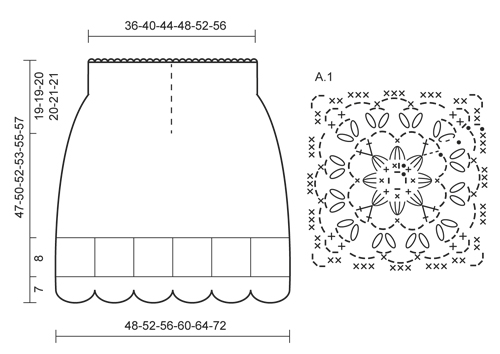
Crochet DROPS skirt with squares in ”Fabel”. Size: S - XXXL.
DROPS 145-22 |
||||||||||||||||||||||
|
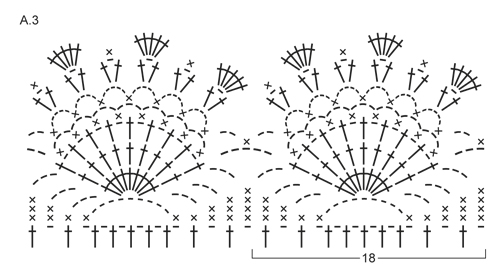
PATTERN: See diagram A.1 for square and A.3 for crochet edge at the bottom of skirt. LEAF: 1 leaf = work 3 ch, in same dc work 2 tr - but wait with last pull through on both sts, pull thread through all 3 sts on hook, 3 ch, 1 sl st in same dc, 1 sl st in next dc. BOBBLE: 1 bobble = work 2 tr in same ch-loop - but wait with last pull through on both sts, pull thread through all 3 sts on hook. BOBBLE AT BEG OF ROUND: Work 3 ch, 1 tr in 1st ch-loop. ROUNDS/ROWS WITH TR: Replace 1st tr at beg of every round/row with 3 ch, work 1 tr in every dc. Finish round with 1 sl st in 3rd ch from beg of round. ROUNDS/ROWS WITH DC: Beg every round/row with dc with 1 ch (not counted as 1st dc), work 1 dc in every tr. Finish round with 1 sl st in 1st dc from beg of round. PATTERN A.2 AND STRIPES: 1 repetition of A.2 = 2 rounds/rows. Work alternately 1 round/row with tr and 1 round/row with dc. At the same time work stripes in A.2 as follows: * Work 1 repetition of A.2 (= 2 rounds/rows) in Fabel ocean view, 1 repetition (= 2 rounds/rows) with Fabel sea mist *, repeat from *-* upwards. DECREASE TIP: Dec 1 tr by working 2 tr tog as follows: Work 1 tr in next dc but wait with last pull through, work 1 tr in next dc the same way, make 1 YO and pull thread through all 3 sts on hook. NOTE! When piece is worked back and forth do not dec at beg or end of row. Dec 1 dc by skipping 1 dc. ---------------------------------------------------------- SQUARE: Worked in the round. See diagram A.1 - Work 4 ch with Fabel sea mist on hook size 3.5 mm and form a ring with 1 sl st in 1st ch. ROUND 1: Work 1 ch, 8 dc in ch-ring, finish with 1 sl st in 1st dc from beg of round READ ROUNDS/ROWS WITH DC. ROUND 2: In every dc work 1 LEAF - read explanation above - but in last dc work as follows: 3 ch, in same dc work 3 tr - but wait with last pull through on every st, pull thread through all 4 sts on hook = 8 leaves. ROUND 3: Work 5 ch, 1 tr in same leaf (= corner), * 3 ch, 1 dc in next leaf, 3 ch, in next leaf work 1 tr, 2 ch and 1 tr (= corner) *, repeat from *-* 2 more times, 3 ch, 1 dc in last leaf, 3 ch, finish with 1 sl st in 3rd ch from beg of round = 12 ch-loops. ROUND 4: Work 3 ch, 1 tr in same loop, 3 ch, work 1 BOBBLE - read explanation above - in same loop, * in each of the next 2 ch-loops work 2 bobbles with 2 ch between, in next ch-loop work 2 bobbles with 3 ch between (= corner) *, repeat from *-* 2 more times, in each of the last 2 ch-loops work 2 bobbles with 2 ch between, finish with 1 sl st in 3rd ch from beg of round = 12 ch-loops. ROUND 5: Work 1 ch, in 1st ch-loop work 1 dc, 3 ch and 1 dc (= corner), ** * 3 ch, 1 dc in next ch-loop *, repeat from *-* 1 more time, 3 ch, in next ch-loop work 1 dc, 3 ch, 1 dc (= corner) **, repeat from **-** 2 more times, then repeat from *-* 2 more times, finish with 3 ch and 1 sl st in 1st dc from beg of round. ROUND 6: Work 1 ch, in 1st ch-loop work 2 dc, 3 ch and 2 dc (= corner), * work 3 dc in each of the next 3 ch-loops, in next ch-loop work 2 dc, 3 ch and 2 dc (= corner) *, repeat from *-* 2 more times, work 3 dc in each of the last 3 ch-loops, finish with 1 sl st in 1st dc from beg of round. Cut and fasten the thread. Work 12-13-14-15-16-18 squares in total with Fabel sea mist. ASSEMBLY: Work the squares tog along the side as follows: With Fabel sea mist and hook size 3.5 mm, place 2 and 2 squares on top of each other, WS against WS, work 1 dc in ch-loop in the corner on both squares, * 2 ch, skip 2 dc, 1 dc in next dc on both squares *, repeat from *-*, finish with 2 ch, 1 dc in ch-loop in the corner on both squares, cut and fasten the thread. Work all squares tog the same way to form a ring. SKIRT: Worked first in the round and then back and forth after vent. With Fabel ocean view and hook size 3.5 mm, work 1 round dc along one side of the ring as follows: ** 2 dc in 1st ch-loop in corner on 1 square, * 1 dc in each of the next 2 dc, 2 dc in next dc *, repeat from *-* 2 more times (3 times in total), 2 dc in last ch-loop in corner (= 16 dc per square) **, repeat from **-** on every square = 192-208-224-240-256-288 dc on round, finish with 1 sl st in 1st dc. Then work pattern A.2 and STRIPES - read explanation above = 6-6-6-6-8-6 times vertically. REMEMBER THE CROCHET TENSION! READ ALL OF THE FOLLOWING SECTION BEFORE CONTINUING. On next round (with tr) dec 8 sts - READ DECREASE TIP - evenly on round. Repeat dec every 4 repetitions of A-2 vertically - i.e. always on a round with tr - 2-3-4-4-4-4 more times, then every other repetition vertically a total of 3-2-1-1-1-3 times - AT THE SAME TIME when piece measures approx. 21-24-25-26-27-29 cm (last round = round with dc), work piece back and forth. NOTE: Insert a marker at beg of 1st row with tr. Then work every row with tr from RS and every row with dc from WS. After all dec are done, 144-160-176-192-208-224 sts remain. Continue with A.2 and stripes back and forth until piece measures approx. 39-42-43-45-47-49 cm, cut and fasten the thread. BAND: With Fabel ocean view, work along the vent mid back as follows: Beg at the marker and work from RS 36-36-38-38-40-40 dc along the entire left edge of vent. Work rows with dc back and forth until band measures approx. 4 cm, cut and fasten the thread. CROCHET EDGE (at the top of skirt): With Fabel ocean view, work from RS an edge in the waist as follows: Work 8 dc over the upper edge on band, then 1 dc in every dc at the top of skirt. On next row work dc in every dc - AT THE SAME TIME adjust no of sts - READ DECREASE TIP - to 151-169-181-199-217-229 dc (divisible by 6 + 1). Work next row as follows: 1 ch, * 1 dc in next dc, skip 2 dc, 5 tr in next dc, skip 2 dc *, repeat from *-* the entire row, finish with 1 dc in last dc, cut and fasten the thread. Edge measures approx. 1 cm vertically. CROCHET EDGE (at the bottom of skirt): Work with Fabel ocean view along the other side of ring with squares as follows: ** 3 dc in 1st ch-loop in corner on 1 square, * 1 dc in each of the next 2 dc, 2 dc in next dc *, repeat from *-* 2 more times (3 times in total), 3 dc in last ch-loop in corner (= 18 dc per square) **, repeat from **-** on every square = 216-234-252-270-288-324 dc in total, finish with 1 sl st in 1st dc. Then work pattern A.3 as follows: ROUND 1: Work 4 ch (replaces 1st tr and 1st ch), * skip 1 dc, 1 tr in next dc, 1 ch * , repeat from *-* - see diagram A.3 -, finish with 1 sl st in 3rd ch from beg of round. ROUND 2: Work 1 ch, 1 dc in 1st ch-loop, * 1 dc in next tr, 1 dc in next ch-loop *, repeat from *-* 1 more time (= 5 dc), ** 9 ch, skip the next 5 tr, 1 dc in next ch-loop, repeat from *-* 4 more times (= dc-group with 9 dc) **, repeat from **-** the entire round - but when repeating the last time work 4 dc instead of 9 dc, finish with 1 sl st in 1st dc from beg of round. ROUND 3: Work 1 ch, 1 dc in each of the first 3 dc, * 3 ch, 9 tr in next ch-loop, 3 ch, 1 dc in each of the middle 5 dc on next dc-group *, repeat from *-* the entire round - but when repeating the last time work 1 dc in each of the last 2 dc on round, finish with 1 sl st in 1st dc from beg of round. ROUND 4: Work 1 ch, 1 dc in each of the first 2 dc, * 3 ch, 1 tr in each of the next 9 tr, 3 ch, 1 dc in each of the middle 3 dc on next dc-group *, repeat from *-* the entire round - but when repeating the last time work 1 dc in last dc on round, finish with 1 sl st in 1st dc from beg of round. ROUND 5: Work 1 ch, 1 dc in 1st dc, * 3 ch, work 1 tr in each of the next 9 tr with 1 ch between every st (= 9 tr and 8 ch-loops), 3 ch, 1 dc in the middle dc on next dc-group *, repeat from *-* the entire round - but when repeating the last time work 3 ch after last tr, finish with 1 sl st in 1st dc from beg of round. ROUND 6: Work 5 ch, skip 1st ch-loop, * work 1 dc in each of the next 8 ch-loops with 3 ch between every dc (= 8 dc and 7 ch-loops), 5 ch *, repeat from *-* the entire round - but when repeating the last time work 2 ch after last dc, finish with 1 sl st in 1st ch-loop from beg of round. ROUND 7: Work 1 ch, 1 dc in 1st ch-loop, * 2 ch, work 1 dc in each of the next 7 ch-loops with 5 ch between every dc (= 7 dc and 6 ch-loops), 2 ch, 1 dc in next ch-loop *, repeat from *-* the entire round - but when repeating the last time work 2 ch after last dc, finish with 1 sl st in 1st dc from beg of round. ROUND 8: Work 3 ch, in every ch-loop on round work 1 tr, 1 ch and 1 tr, finish with 1 sl st in 1st ch-loop from beg of round. ROUND 9: Work 3 ch, 4 tr in same ch-loop, * 1 dc in next ch-loop, 5 tr in next ch-loop *, repeat from *-* the entire round, finish with 1 dc in last ch-loop and 1 sl st in 3rd ch from beg of round. Cut and fasten the thread. TIE: With 1 thread of each colour and hook size 4.5 mm, work ch for approx. 130-135-140-145-150-155 cm, turn and work 1 sl st in every ch, cut and fasten the thread. ASSEMBLY: Sew 4 buttons evenly on to band in vent, use the spaces between tr on the right edge for buttonholes. Pull the tie through tr on next to last round with tr at the top of skirt. |
||||||||||||||||||||||
Diagram explanations |
||||||||||||||||||||||
|
||||||||||||||||||||||
 |
||||||||||||||||||||||
 |
||||||||||||||||||||||
Have you finished this pattern?Tag your pictures with #dropspattern #bluedreamskirt or submit them to the #dropsfan gallery. Do you need help with this pattern?You'll find 8 tutorial videos, a Comments/Questions area and more by visiting the pattern on garnstudio.com. © 1982-2026 DROPS Design A/S. We reserve all rights. This document, including all its sub-sections, has copyrights. Read more about what you can do with our patterns at the bottom of each pattern on our site. |
||||||||||||||||||||||


With over 40 years in knitting and crochet design, DROPS Design offers one of the most extensive collections of free patterns on the internet - translated to 17 languages. As of today we count 324 catalogues and 12290 patterns translated into English (UK/cm). 12290
We work hard to bring you the best knitting and crochet have to offer, inspiration and advice as well as great quality yarns at incredible prices! Would you like to use our patterns for other than personal use? You can read what you are allowed to do in the Copyright text at the bottom of all our patterns. Happy crafting!
Post a comment to pattern DROPS 145-22
We would love to hear what you have to say about this pattern!
If you want to leave a question, please make sure you select the correct category in the form below, to speed up the answering process. Required fields are marked *.