
Popular categories
Looking for a yarn?


Comments / Questions (146)
![]() Rian wrote:
Rian wrote:
Dank je voor jr vorige antwoord, duidelijk. Maar het minderen en het antwoord hieronder ook niet (bij Au3).
23.04.2014 - 23:40DROPS Design answered:
Ja, je haakt alleen A.2 over de laatste 4 v van de toer (= linkerkant van het werk).
24.04.2014 - 17:44
![]() Rian wrote:
Rian wrote:
Ik neem aan dat de teruggaande toeren van links naar rechts gehaakt moeten worden, maar hoe zit het dan met A2? Moet dat alleen aan de linkerkant van het werk gehaakt worden, aan het einde van de heengaande toer én aan het begin van teruggaande toer? Ik krijg het patroon niet kloppend.
20.04.2014 - 14:19DROPS Design answered:
Hoi Rian. Je haakt de verkeerde kant (teruggaande toer) inderdaad van links naar rechts. Je moet de motieven boven elkaar haken. Dus op de goede kant begin je met A.1 en eindigt met A.2, de verkeerde kant begin je dan met A.2 en dan door over A.1 (lees van links naar rechts).
22.04.2014 - 17:01
![]() Ana Delgado wrote:
Ana Delgado wrote:
I well like to know were is the video tutorial. For this pattern. I well like to see,how ,this pattern is start.Thank you for attention. This pattern is beautiful.I well like to make it for my self.Sincerely. Ana Delgado
31.03.2014 - 00:48DROPS Design answered:
Dear Mrs Delgado, you crochet starting from mid back (see dotted line in measurement chart) towards the sleeve (arrow in chart). On 1st row, you work sc skipping ch as stated so that your first sc row won't be too tight. Follow then diagram (1 symbol= 1 st). Happy crocheting!
31.03.2014 - 09:38
![]() Gaby Kahlke wrote:
Gaby Kahlke wrote:
Total schön. Trag sie diesen Sommer in petrolblau. Arbeite grade die Bordüre rundherum. Die pikots wirklich mit Stäbchen gearbeitet? Wirkt mir zu groß!Auch mit kleinerer Nadelgröße.Habs mit festen Maschen probiert, so siehts dem Modell schon ähnlicher.
08.01.2014 - 16:06DROPS Design answered:
Liebe Gaby, unser Modell wurde wirklich mit Stäbchen gehäkelt, aber machen Sie es in jedem Fall so, wie es Ihnen am besten gefällt!
09.01.2014 - 18:11
![]() Christiane H wrote:
Christiane H wrote:
Bonjour, Pouvez m'expliquer plus en détail la NOTE " pendant les diminutions, crocheter seulement des B sur les mailles qui ne peuvent pas se tricoter en point fantaisie" ? D'avance merci
02.01.2014 - 21:46DROPS Design answered:
Bonjour Christiane, quand on diminue, on ne peut pas forcément continuer le motif au début et à fin de certains rangs, dans ces cas là, on fait seulement des brides au-dessus de ces mailles là. Bon crochet!
03.01.2014 - 08:46
![]() Au3 wrote:
Au3 wrote:
Ben een poos geleden vastgelopen met dit leuke vestje. Was nu van plan het met een frisse blik weer op te pakken, maar kom nog steeds niet verder. Ik begrijp niet hoe het minderen in zijn werk gaat. Er staat dat je alleen moet minderen over steken die niet in het patroon horen. Wat wordt hiermee bedoeld en wat doe je als de te minderen steken wel in het patroon horen? Ik wil het vestje graag afmaken, wie kan mij helpen?
15.09.2013 - 19:54DROPS Design answered:
Hoi. Je mindert zoals beschreven tussen de stk die geen deel uit maken van het patroon (de gaatjes). Je krijgt dan steeds minder stk tussen de patroon, maar het patroon zelf blijft hetzelfde. Is het zo duidelijker ?
17.09.2013 - 17:31
![]() Linda wrote:
Linda wrote:
Ik snap niet goed hoe de tweede kant moet. Is het de bedoeling dat je een kettingsteek maakt van 94 losse en daarna het patroon volgt? Of moet je op een of andere manier in kant 1 de 2e kant haken? Zo ja, hoe moet dit dan?
21.06.2013 - 14:54DROPS Design answered:
Hoi Linda. Je haakt eerst een ketting van 113 lossen. Keer het werk en haak 1 v in de 2e l vanaf de haak, dan 1 v in elke 3 l, dan * sla 1 l over, 1 v in elke van de volgende 5 l * (dus herhaal * - * ) tot aan het eind en je hebt 94 v op de toer.
04.07.2013 - 12:26
![]() Lieneke wrote:
Lieneke wrote:
Kunt u mij zeggen of ik de eerste toer van de eerste kant alleen in vaste haak[135] daarna met beschrijving verder ga van de eerste kant? Hierin wordt ook meteen geminderd. Is mij niet helemaal duidelijk. Gr lieneke
18.06.2013 - 17:25DROPS Design answered:
Hoi Lieneke. Je begint met 135 l, daarna haak je vasten zoals beschreven (maat L/XL): 1 v in 2e l vanaf haak, ga verder met 1 v in elke van de volgende 1 l, * sla 1 l over, 1 v in elke van de volgende 5 l *, herhaal van *-* de hele toer. Je hebt dan na deze 2e toer 112 v. Nu haak je door volgens de telpatronen zoals beschreven.
19.06.2013 - 13:19
![]() Jenny Van Der Meijde wrote:
Jenny Van Der Meijde wrote:
Ik heb cotton viscose genomen in plaats van het originele garen en nu heb ik niet genoeg aan 6 bollen. Klopt dit??? Ik heb zelfs nog een bol extra genomen volgens patroon is er voor de maat L/XL 250 gr. nodig.
12.05.2013 - 11:46DROPS Design answered:
Je moet rekening houden met de looplengte per bol. 250 gr Baby Alpaca Silk is 835 m en 250 gr Cotton Viscose is 550. Dit betekent dat je voor dit model 8 bollen C-V nodig hebt (835 m/110 m). Veel haakplezier
13.05.2013 - 20:42
![]() Corry wrote:
Corry wrote:
Prachtig patroon alleen niet het hele patroon in de mail gekregen er staan maar 7 toeren op dus de pc gestart en het nagetekent op ruitjes papier
01.05.2013 - 13:52DROPS Design answered:
Er is geen fout in het patroon hier. Dus print je het patroon vanuit onze site, dan krijg je het complete patroon. Veel haakplezier.
01.05.2013 - 15:10
|
|||||||||||||
Caroline#carolinebolero |
|||||||||||||
 |
 |
||||||||||||
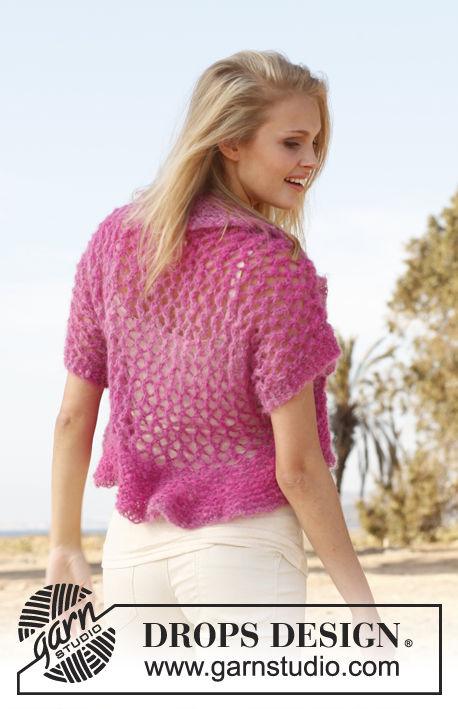
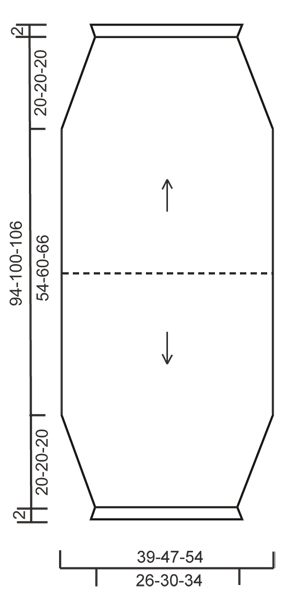
Crochet DROPS bolero with lace pattern in ”BabyAlpaca Silk”. Size: S - XXXL
DROPS 147-4 |
|||||||||||||
|
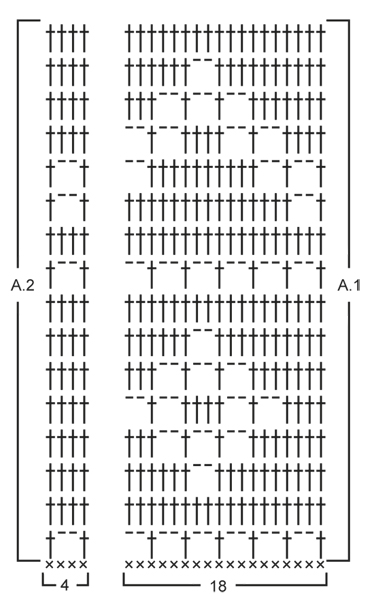
CROCHET INFO: Replace first tr on every row with 3 ch. PATTERN: See diagrams A.1 and A.2 - NOTE: The first row with dc is not in the repetition and is not repeated upwards. DECREASE TIP: Crochet 2 tr tog as follows: Work 1 tr in first st but wait with last pull through, work 1 tr in next st but on last pull through, pull thread through all 3 loops on hook. -------------------------------------------------------- BOLERO: Worked from mid back. First work one side and down to beg of sleeve, then work the other side and down to the other sleeve. Then sew the sleeve seams and work 1 flounce around the entire opening. FIRST SIDE: Work 113-135-156 ch with Baby Alpaca Silk on hook size 3 mm. Turn and work 1 dc in 2nd ch from hook, continue with 1 dc in each of the next 3-1-4 ch, * skip 1 ch, 1 dc in each of the next 5 ch *, repeat from *-* the entire row = 94-112-130 dc (first ch on row is NOT counted as one dc). Continue with diagram A.1 over the first 90-108-126 dc and diagram A.2 over the last 4 dc – READ CROCHET TIP! Repeat pattern until finished measurements. At the same time when piece measures 27-30-33 cm, insert 1 marker in the side (this marks how far up to sew the sleeve seam afterwards). On next row dec 1 tr each side by working 2nd and 3rd tr and the 2 next to last tr tog – SEE DECREASE TIP! Repeat dec on every row a total of 16-20-24 times = 62-72-82 sts remain - NOTE: When dec work only tr over the sts that do not fit the pattern. Continue with pattern until piece measures approx. 47-50-53 cm in total – finish after a row with only tr, cut the thread. SECOND SIDE: Work 1 dc in each of the 94-112-130 dc worked on 1st row on first side (i.e. mid back). Then work pattern as on first side. Make sure to finish on same row in diagram at the bottom of sleeve in both sides. ASSEMBLY: Fold the bolero double across and sew tog from bottom of each sleeve and up to where marker was inserted in each side – sew edge to edge to avoid a chunky seam. FLOUNCE AROUND OPENING: Work around the entire opening as follows (beg mid back): ROUND 1: 1 sl st in first st, * 3 ch, 1 dc in next tr *, repeat from *-* the entire round and finish with 3 ch and 1 sl st in sl st from beg of round - NOTE: Adjust so that an even number of ch-loops has been worked otherwise 5th round will not fit. ROUND 2: Work 1 sl st and 1 dc in first ch-loop, * 3 ch, 1 dc in next ch-loop *, repeat from *-* the entire round, finish with 1 sl st in first dc from beg of round. Round 3 and 4: Work as 2nd round. ROUND 5: Work 1 sl st and 1 dc in first ch-loop, * 8 ch, 1 dc in next ch-loop, 1 ch, 1 dc in next ch-loop *, repeat from *-* the entire round, finish with 1 sl st in first dc from beg of round. ROUND 6: 1 ch, 1 dc in first large ch-loop, [* 4 ch, 1 tr in the first ch made (= 1 picot), 1 dc in same ch-loop *, repeat from *-* 2 more times (i.e. so that there are 3 picots in the large ch-loop), 1 dc in the small ch-loop (the one with only 1 ch between the large ch-loops), 1 dc in next large ch-loop], repeat from [-] the entire round, instead of last dc, work 1 sl st in first dc on round. Cut and fasten the thread. FLOUNCE AT THE BOTTOM OF SLEEVE: Work a shorter edge at the bottom of sleeve, only work 1st, 5th and 6th round of the flounce around the opening – NOTE: On 1st round skip 1 tr between every ch-loop. |
|||||||||||||
Diagram explanations |
|||||||||||||
|
|||||||||||||
 |
|||||||||||||
 |
|||||||||||||
Have you finished this pattern?Tag your pictures with #dropspattern #carolinebolero or submit them to the #dropsfan gallery. Do you need help with this pattern?You'll find 7 tutorial videos, a Comments/Questions area and more by visiting the pattern on garnstudio.com. © 1982-2026 DROPS Design A/S. We reserve all rights. This document, including all its sub-sections, has copyrights. Read more about what you can do with our patterns at the bottom of each pattern on our site. |
|||||||||||||


With over 40 years in knitting and crochet design, DROPS Design offers one of the most extensive collections of free patterns on the internet - translated to 17 languages. As of today we count 324 catalogues and 12290 patterns translated into English (UK/cm). 12290
We work hard to bring you the best knitting and crochet have to offer, inspiration and advice as well as great quality yarns at incredible prices! Would you like to use our patterns for other than personal use? You can read what you are allowed to do in the Copyright text at the bottom of all our patterns. Happy crafting!
Post a comment to pattern DROPS 147-4
We would love to hear what you have to say about this pattern!
If you want to leave a question, please make sure you select the correct category in the form below, to speed up the answering process. Required fields are marked *.