
Popular categories
Looking for a yarn?


Comments / Questions (146)
Natasja wrote:
Hi there. Im wondering if im wrong, but the pattern says to crochet tr. so i do, but i think i just realized that is not tr that i should crochet, but dc ? I can read this pattern in different languages, and in danish it says that i need to crochet this in dc ? And now im confused, should this be crochet in tr. or dc ? Cause i just crochet 33 cm in tr.
28.11.2017 - 23:04DROPS Design answered:
Dear Natasja, US and UK crochet terminology are different, make sure you are selecting the correct language you are used to. Read more here. Happy crocheting!
29.11.2017 - 09:17
![]() Betina Ellegaard wrote:
Betina Ellegaard wrote:
Hej Jeg er igang med denne skønne bolero. Jeg er dog nybegynder i at hækle. Mit spørgsmål lyder på indtagningen i hver side af arbejdet. Hvordan laver man indtagningen der hvor der er 2 luft masker i mønstret, altså der hvor hullerne er i mønstret. et sted er det st m og 2 lm og det gentager sig, hvordan laver jeg så indtagningen der? På forhånd tak Kærlig hilsen Betina Ellegaard
18.08.2017 - 21:42DROPS Design answered:
Hej Betina, dem tager du ind på samme måde ved at hækle 2 st sammen. Husk at når der ikke er nok masker til en rapport, så hækles der st over de yderste masker. God fornøjelse!
21.08.2017 - 11:11Sandra Radermacher wrote:
Ich bitte um Hilfe..... was soll ich tun nach der Luftmaschenkette??? In die 2 LM ab Nadel 1 fm ist klar... aber dann??? in die nächsten 3-1-4 Lm auch fM häkeln?? 3 für die kleinste Grösse und 1 für die mittlere und dann 4 wenn man die grösste Grösse macht? unlogisch...
11.04.2017 - 22:40DROPS Design answered:
Liebe Frau Radermacher, ja genau so wird es gehäkelt, Sie fangen mit 113-135-156 Lm an, und dann je nach der Größe Lm überspringen damit es am Ende der 1. Reihe 94-112-130 fM gibt. Viel Spaß beim häkeln!
12.04.2017 - 12:26
![]() Jolanda wrote:
Jolanda wrote:
Ik heb maat XXL gehaakt met 156 lossen maar mijn werk is veel breder dan de 54 cm die op het patroon stat. Wel 10 cm breder. Klopt dit? Groeten, Jolanda
19.06.2016 - 13:12DROPS Design answered:
Hoi Jolanda. Klopt jouw stekenverhouding? 24 st per 10 cm in de breedte.
20.06.2016 - 14:14
![]() Anna wrote:
Anna wrote:
Jeg forstår ikke "fortsett med 1 fm i de 3-1-4 neste lm" under FØRSTE SIDE
03.06.2016 - 21:08DROPS Design answered:
Hej Anna. Du skal hekle 1 fm i de neste 3, 1 eller 4 lm afhaengig af hvilken str du hekler. F.eks. str S/M skal du saa hekle 1 fm i de neste 3 lm.
06.06.2016 - 15:13
![]() Anett wrote:
Anett wrote:
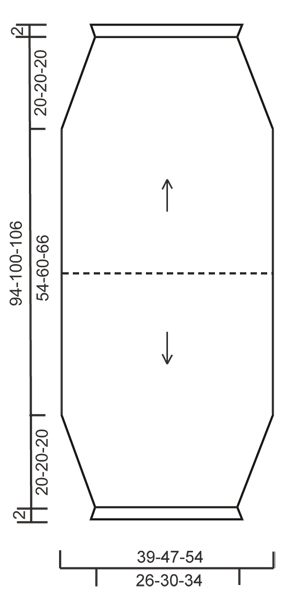
Die "Breiten"-Angabe im Diagramm (z.B. 39-47-54) cm sind die mit oder ohne Volantrand? Die Extra-2 cm an den Ärmeln würde ich nämlich für den dortigen Volantrand der Ärmel halten. Danke schon mal.
09.05.2016 - 12:08DROPS Design answered:
Liebe Anett, wenn Volantränder eingeschlossen sind, wird das jeweils auf der Skizze dargestellt (wie beim Ärmel).
10.05.2016 - 09:07Mary Freitas wrote:
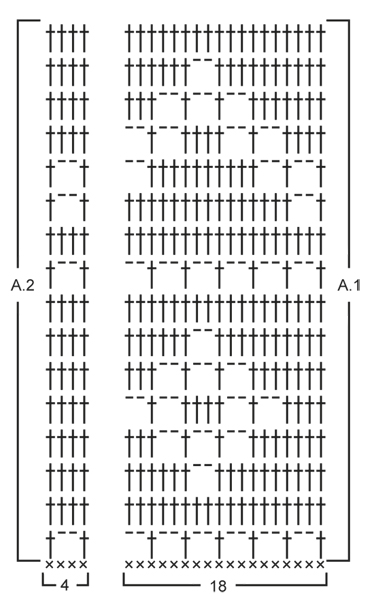
I am try to crochet your pattern 147-4. I do not understand the interpretation of your diagram. I get A2. Do not understand A1. Rows 3 and 4 on diagram is where I am stuck. Row 3 I crochet 10 doubles and 2 chains. From there I am confused. Do crochet 6 doubles or continue with 10 doubles wit the 2 chains in between till I get to the end where A2 states 4 doubles? Then when I turn and come back do I go left to right on the diagram or right to left? HELP, Mary
27.04.2016 - 22:23DROPS Design answered:
Dear Mrs Freitas, A.2 is worked only 1 time but you repeat A.1 in width, ie on row 3, work *10 dc, 2 ch, 6 dc*, and repeat from *-*, ie you will have 16 dc between the 2 ch on next repeat. Read diagram from the right towards the left from RS (or in the round) and from the left towards the right from WS - read more here. Happy crocheting!
28.04.2016 - 08:22
![]() Amparo S wrote:
Amparo S wrote:
Sigo.. Veo que tambien vendra el final de la hilera acabada con p.a 2cad,pa..¿cuando hago la disminucion?) Es que no entiendo muy bien la explicacion de hacer p.a donde no encajen los ptos del patron.He buscado en Videos y no encuentro nada. Muchas gracias
18.04.2016 - 11:25DROPS Design answered:
Hola Amparo. Como en todos los patrones al trabajar las dism o los aum, si no hay suficientes pts para trabajar una repetición del diagrama completa, estos pts que quedan fuera del diagrama y se trabajan, en tu caso por ejemplo, en p.a.
19.04.2016 - 10:21
![]() Maria Backström wrote:
Maria Backström wrote:
Hej Drops, jag skulle vilja fråga en sak om minskningarna då arbetet mäter 30 cm ( i storlek L/XL). Det står "när minskningarna pågår virkas det endast st över de m som inte går upp i mönstret". Jag förstår inte den formuleringen. Tacksam för svar. Det är annars ett roligt mönster att virka efter och jag tror att boleron kommer att passa fint till sommaren
10.03.2016 - 23:53DROPS Design answered:
Hej Maria, Du behöver ett antal m för att kunna virka diagrammet, och när du minskar har du inte samma antal som tidigare, då virkar du st över de m som inte går upp i mönstret. Lycka till!
11.03.2016 - 10:17Sophia wrote:
I have a little problem with dec.if we make dec to the 2nd and 3rd st,what hapened with ch between tr; and then we must change pattern? because the pattern doesnt look write
02.03.2016 - 12:06DROPS Design answered:
Dear Sofia, work only tr over the sts that do not fit the pattern anymore when dec on the sides. Happy crocheting!
02.03.2016 - 14:57
|
|||||||||||||
Caroline#carolinebolero |
|||||||||||||
 |
 |
||||||||||||
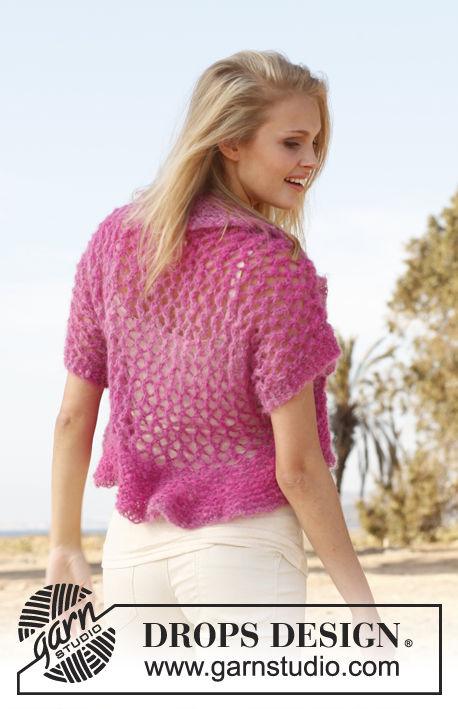
Crochet DROPS bolero with lace pattern in ”BabyAlpaca Silk”. Size: S - XXXL
DROPS 147-4 |
|||||||||||||
|
CROCHET INFO: Replace first tr on every row with 3 ch. PATTERN: See diagrams A.1 and A.2 - NOTE: The first row with dc is not in the repetition and is not repeated upwards. DECREASE TIP: Crochet 2 tr tog as follows: Work 1 tr in first st but wait with last pull through, work 1 tr in next st but on last pull through, pull thread through all 3 loops on hook. -------------------------------------------------------- BOLERO: Worked from mid back. First work one side and down to beg of sleeve, then work the other side and down to the other sleeve. Then sew the sleeve seams and work 1 flounce around the entire opening. FIRST SIDE: Work 113-135-156 ch with Baby Alpaca Silk on hook size 3 mm. Turn and work 1 dc in 2nd ch from hook, continue with 1 dc in each of the next 3-1-4 ch, * skip 1 ch, 1 dc in each of the next 5 ch *, repeat from *-* the entire row = 94-112-130 dc (first ch on row is NOT counted as one dc). Continue with diagram A.1 over the first 90-108-126 dc and diagram A.2 over the last 4 dc – READ CROCHET TIP! Repeat pattern until finished measurements. At the same time when piece measures 27-30-33 cm, insert 1 marker in the side (this marks how far up to sew the sleeve seam afterwards). On next row dec 1 tr each side by working 2nd and 3rd tr and the 2 next to last tr tog – SEE DECREASE TIP! Repeat dec on every row a total of 16-20-24 times = 62-72-82 sts remain - NOTE: When dec work only tr over the sts that do not fit the pattern. Continue with pattern until piece measures approx. 47-50-53 cm in total – finish after a row with only tr, cut the thread. SECOND SIDE: Work 1 dc in each of the 94-112-130 dc worked on 1st row on first side (i.e. mid back). Then work pattern as on first side. Make sure to finish on same row in diagram at the bottom of sleeve in both sides. ASSEMBLY: Fold the bolero double across and sew tog from bottom of each sleeve and up to where marker was inserted in each side – sew edge to edge to avoid a chunky seam. FLOUNCE AROUND OPENING: Work around the entire opening as follows (beg mid back): ROUND 1: 1 sl st in first st, * 3 ch, 1 dc in next tr *, repeat from *-* the entire round and finish with 3 ch and 1 sl st in sl st from beg of round - NOTE: Adjust so that an even number of ch-loops has been worked otherwise 5th round will not fit. ROUND 2: Work 1 sl st and 1 dc in first ch-loop, * 3 ch, 1 dc in next ch-loop *, repeat from *-* the entire round, finish with 1 sl st in first dc from beg of round. Round 3 and 4: Work as 2nd round. ROUND 5: Work 1 sl st and 1 dc in first ch-loop, * 8 ch, 1 dc in next ch-loop, 1 ch, 1 dc in next ch-loop *, repeat from *-* the entire round, finish with 1 sl st in first dc from beg of round. ROUND 6: 1 ch, 1 dc in first large ch-loop, [* 4 ch, 1 tr in the first ch made (= 1 picot), 1 dc in same ch-loop *, repeat from *-* 2 more times (i.e. so that there are 3 picots in the large ch-loop), 1 dc in the small ch-loop (the one with only 1 ch between the large ch-loops), 1 dc in next large ch-loop], repeat from [-] the entire round, instead of last dc, work 1 sl st in first dc on round. Cut and fasten the thread. FLOUNCE AT THE BOTTOM OF SLEEVE: Work a shorter edge at the bottom of sleeve, only work 1st, 5th and 6th round of the flounce around the opening – NOTE: On 1st round skip 1 tr between every ch-loop. |
|||||||||||||
Diagram explanations |
|||||||||||||
|
|||||||||||||
 |
|||||||||||||
 |
|||||||||||||
Have you finished this pattern?Tag your pictures with #dropspattern #carolinebolero or submit them to the #dropsfan gallery. Do you need help with this pattern?You'll find 7 tutorial videos, a Comments/Questions area and more by visiting the pattern on garnstudio.com. © 1982-2026 DROPS Design A/S. We reserve all rights. This document, including all its sub-sections, has copyrights. Read more about what you can do with our patterns at the bottom of each pattern on our site. |
|||||||||||||


With over 40 years in knitting and crochet design, DROPS Design offers one of the most extensive collections of free patterns on the internet - translated to 17 languages. As of today we count 324 catalogues and 12290 patterns translated into English (UK/cm). 12290
We work hard to bring you the best knitting and crochet have to offer, inspiration and advice as well as great quality yarns at incredible prices! Would you like to use our patterns for other than personal use? You can read what you are allowed to do in the Copyright text at the bottom of all our patterns. Happy crafting!
Post a comment to pattern DROPS 147-4
We would love to hear what you have to say about this pattern!
If you want to leave a question, please make sure you select the correct category in the form below, to speed up the answering process. Required fields are marked *.