
Popular categories
Looking for a yarn?


Comments / Questions (146)
![]() Isabell wrote:
Isabell wrote:
Vielen Dank für diese tolle Anleitung. Ich würde gerne wissen, ob ich bei Beginn des zweiten Teils des Rückenteils darauf achten muss, wo ich beginne, d. h. spiegelverkehrt, damit das Muster richtig fortgesetzt wird. Vielen Dank für Ihre Hilfe und schöne Grüße
08.04.2026 - 06:44DROPS Design answered:
Liee Isabell, das Muster häkeln Sie bei dem 2. Teil genauso wie beim 1. Teil. Es wird auch wie beim 1. Teil aussehen. Viel Spaß beim Häkeln!
09.04.2026 - 09:50
![]() Csőke Imola wrote:
Csőke Imola wrote:
Most tartok 27 cm-nél és fogyasztanom kellene. Az A.1 diagramm azon soránál tartok, hogy 1 erp 2 lsz, 1 erp, 2 lsz, stb. Hogy kell fogyasztani ebben az esetben, hiszen nincsen két erp egymás mellett?
24.02.2025 - 11:08
![]() Majbrit wrote:
Majbrit wrote:
Kan ikke bruge jeres opskrifter da de med diagram. Søger at der laves opskrifter der bliver beskrevet trin for trin/række for række istedet. Denne opskrift har jeg givet op på.
23.09.2022 - 00:00
![]() Maurer wrote:
Maurer wrote:
Bei mir wellt sich die letzte Reihe am Volantrand. Maschenprobe war gut. Ich habe den ganzen Volantrand schon mit einer kleineren Nadel gehäkelt, immer noch wellig. Auch habe ich die Picots mit festen Maschen gearbeitet - auch wellig. Können Sie mir bitte helfen? Was mache ich falsch? Vielen Dank.
01.06.2022 - 10:49DROPS Design answered:
Liebe Frau Maurer, bei der 5. Runde, beachten Sie, daß Sie 8 Lm nur in jede 2. Lm häkeln, dh, es ist abwechslungsweise *1 LmBogen mit 8 Lm, 1 LmBogen mit nur 1 Lm* und dazwischen immer 1 M in jedem LmBogen. Dann wird Sie die 4. Runde auch etwas wellen, aber es sollte auch nicht zu wellig sein. Vielleicht können Sie auch mal Ihr DROPS Laden zeigen (auch ein Foto per mail senden), so kann man Ihnen am besten weiterhelfen. Viel Spaß beim häkeln!
01.06.2022 - 13:33
![]() Barbora wrote:
Barbora wrote:
Hi, I don 't understand the begining of the Pattern. I made 113ch, than 1cs in 2nd, than one more sc. but than I don't know 🤦♀️ what mean next 3-1-4ch? thanks
23.06.2021 - 16:05DROPS Design answered:
Dear Barbora, it means you have now to work 1 sc in each of the next 3 chains in the first size, in the next chain in the 2nd size and in the next 4 chains in the last size. Each number refers to the size. Since the fundation chain is most often quite tight, you cast on more stitches and then you will skip chains evenly on very first row. Happy crocheting!
23.06.2021 - 16:10
![]() Roswitha Rudolph wrote:
Roswitha Rudolph wrote:
Betreff: bolero CAROLINE Siehe schreiben beim volant häkeln 3 luftmaschen UM die vorhergehende luftmasche herum einstechen , das verstehe ich nicht, ist auch nicht logisch für mich
24.04.2020 - 08:37DROPS Design answered:
Liebe Frau Rudolph, es wird bei der 3. Runde 1 fM um den nächsten Lm-bogen - dieses Video zeigt (mit einem anderen Diagram), wie man in oder um die Maschen häkelt. Viel Spaß beim häkeln!
24.04.2020 - 09:39
![]() Tone Frank Stubberud wrote:
Tone Frank Stubberud wrote:
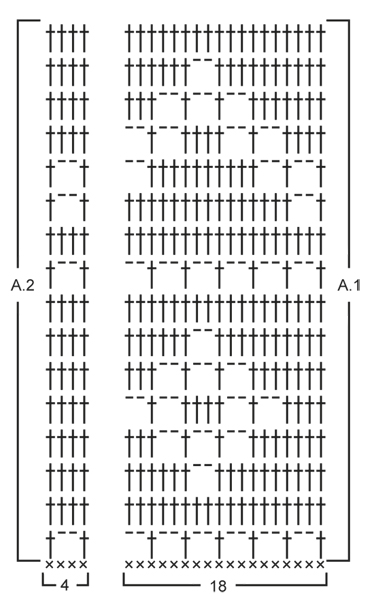
Jeg har nå printet ut denne oppskriften, men diagram A1 og diagram A2 er ikke med i oppskriften. Blir ingen bolero uten diagrammene, håper de blir lagt inn på oppskriften.
26.03.2020 - 13:25DROPS Design answered:
Hej Diagrammen finns längst ner på oppskriften så de ska komma med på utskriften. Kan det vara någon inställning på din printer som gör att de inte kommer med? Jag får med de när jag provar här.. Mvh DROPS Design
26.03.2020 - 14:02
![]() Linda wrote:
Linda wrote:
I have been crocheting for 65 years so I hope that you will consider my suggestion. I am working on this pattern now and find it very easy to use, but I wonder why you do not begin the project with foundation single crochet, rather than including extra chains which you then skip in the following row of single crochet. The obvious purpose is to avoid having the chain too tight, but foundation single crochet has much more stretch than a chain, and gives a nicer-looking result.
30.01.2020 - 08:13
![]() Donna Louk wrote:
Donna Louk wrote:
In first row does skip ch1 mean skip 1 ch or ch 1 and skip 1 ch?
13.05.2019 - 03:17DROPS Design answered:
Dear Mrs Louk, you will skip 1 chain and crochet 1 dc in each of the next 5 chains (= 5 double crochets worked over 6 chains between stars). Read more here. Happy crocheting!
13.05.2019 - 10:28Mari wrote:
Hi, I'm confused as to how to start the other SECOND SIDE of the vest. The instructions don't seem to tell me to do anything different. Do I crochet it exactly the same? If I do, won't one half be in reverse stitch? Please help out.
03.08.2018 - 08:00DROPS Design answered:
Dear Mari, 2nd side starts with 1 row with dc (UK-terminology)/sc (US-terminology), then work as first side, ie repeat A.1 and finish with A.2. Happy crocheting!
03.08.2018 - 08:26
|
|||||||||||||
Caroline#carolinebolero |
|||||||||||||
 |
 |
||||||||||||
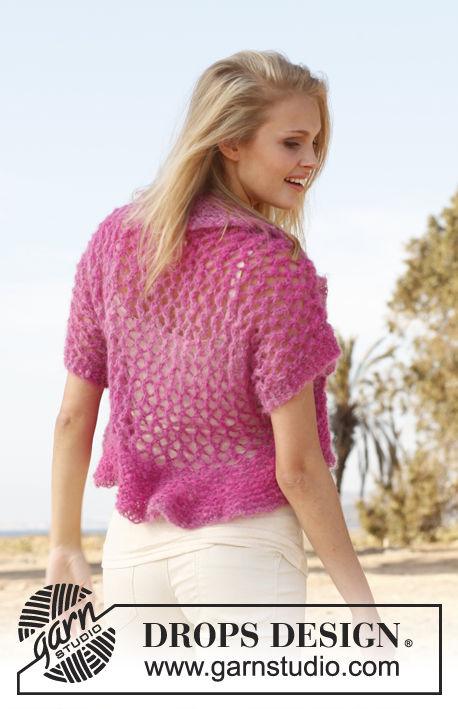
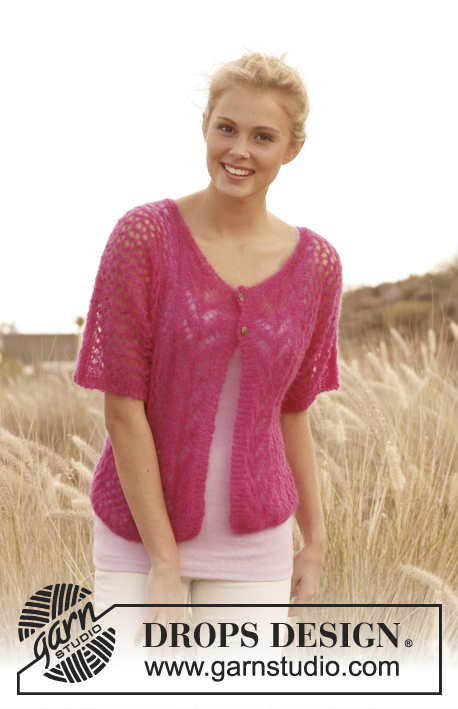
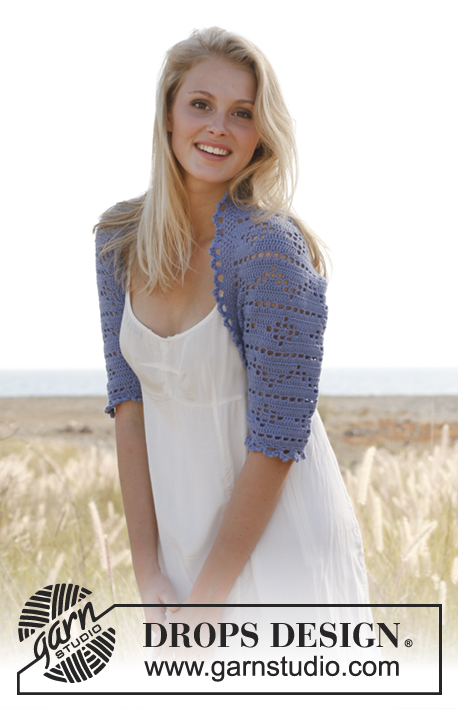
Crochet DROPS bolero with lace pattern in ”BabyAlpaca Silk”. Size: S - XXXL
DROPS 147-4 |
|||||||||||||
|
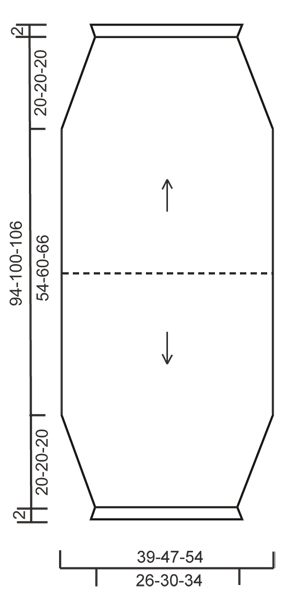
CROCHET INFO: Replace first tr on every row with 3 ch. PATTERN: See diagrams A.1 and A.2 - NOTE: The first row with dc is not in the repetition and is not repeated upwards. DECREASE TIP: Crochet 2 tr tog as follows: Work 1 tr in first st but wait with last pull through, work 1 tr in next st but on last pull through, pull thread through all 3 loops on hook. -------------------------------------------------------- BOLERO: Worked from mid back. First work one side and down to beg of sleeve, then work the other side and down to the other sleeve. Then sew the sleeve seams and work 1 flounce around the entire opening. FIRST SIDE: Work 113-135-156 ch with Baby Alpaca Silk on hook size 3 mm. Turn and work 1 dc in 2nd ch from hook, continue with 1 dc in each of the next 3-1-4 ch, * skip 1 ch, 1 dc in each of the next 5 ch *, repeat from *-* the entire row = 94-112-130 dc (first ch on row is NOT counted as one dc). Continue with diagram A.1 over the first 90-108-126 dc and diagram A.2 over the last 4 dc – READ CROCHET TIP! Repeat pattern until finished measurements. At the same time when piece measures 27-30-33 cm, insert 1 marker in the side (this marks how far up to sew the sleeve seam afterwards). On next row dec 1 tr each side by working 2nd and 3rd tr and the 2 next to last tr tog – SEE DECREASE TIP! Repeat dec on every row a total of 16-20-24 times = 62-72-82 sts remain - NOTE: When dec work only tr over the sts that do not fit the pattern. Continue with pattern until piece measures approx. 47-50-53 cm in total – finish after a row with only tr, cut the thread. SECOND SIDE: Work 1 dc in each of the 94-112-130 dc worked on 1st row on first side (i.e. mid back). Then work pattern as on first side. Make sure to finish on same row in diagram at the bottom of sleeve in both sides. ASSEMBLY: Fold the bolero double across and sew tog from bottom of each sleeve and up to where marker was inserted in each side – sew edge to edge to avoid a chunky seam. FLOUNCE AROUND OPENING: Work around the entire opening as follows (beg mid back): ROUND 1: 1 sl st in first st, * 3 ch, 1 dc in next tr *, repeat from *-* the entire round and finish with 3 ch and 1 sl st in sl st from beg of round - NOTE: Adjust so that an even number of ch-loops has been worked otherwise 5th round will not fit. ROUND 2: Work 1 sl st and 1 dc in first ch-loop, * 3 ch, 1 dc in next ch-loop *, repeat from *-* the entire round, finish with 1 sl st in first dc from beg of round. Round 3 and 4: Work as 2nd round. ROUND 5: Work 1 sl st and 1 dc in first ch-loop, * 8 ch, 1 dc in next ch-loop, 1 ch, 1 dc in next ch-loop *, repeat from *-* the entire round, finish with 1 sl st in first dc from beg of round. ROUND 6: 1 ch, 1 dc in first large ch-loop, [* 4 ch, 1 tr in the first ch made (= 1 picot), 1 dc in same ch-loop *, repeat from *-* 2 more times (i.e. so that there are 3 picots in the large ch-loop), 1 dc in the small ch-loop (the one with only 1 ch between the large ch-loops), 1 dc in next large ch-loop], repeat from [-] the entire round, instead of last dc, work 1 sl st in first dc on round. Cut and fasten the thread. FLOUNCE AT THE BOTTOM OF SLEEVE: Work a shorter edge at the bottom of sleeve, only work 1st, 5th and 6th round of the flounce around the opening – NOTE: On 1st round skip 1 tr between every ch-loop. |
|||||||||||||
Diagram explanations |
|||||||||||||
|
|||||||||||||
 |
|||||||||||||
 |
|||||||||||||
Have you finished this pattern?Tag your pictures with #dropspattern #carolinebolero or submit them to the #dropsfan gallery. Do you need help with this pattern?You'll find 7 tutorial videos, a Comments/Questions area and more by visiting the pattern on garnstudio.com. © 1982-2026 DROPS Design A/S. We reserve all rights. This document, including all its sub-sections, has copyrights. Read more about what you can do with our patterns at the bottom of each pattern on our site. |
|||||||||||||


With over 40 years in knitting and crochet design, DROPS Design offers one of the most extensive collections of free patterns on the internet - translated to 17 languages. As of today we count 324 catalogues and 12290 patterns translated into English (UK/cm). 12290
We work hard to bring you the best knitting and crochet have to offer, inspiration and advice as well as great quality yarns at incredible prices! Would you like to use our patterns for other than personal use? You can read what you are allowed to do in the Copyright text at the bottom of all our patterns. Happy crafting!
Post a comment to pattern DROPS 147-4
We would love to hear what you have to say about this pattern!
If you want to leave a question, please make sure you select the correct category in the form below, to speed up the answering process. Required fields are marked *.