
Popular categories
Looking for a yarn?


Comments / Questions (35)
![]() Viktoría wrote:
Viktoría wrote:
JAFNFRAMT er fækkað um 1 l innan við 3 l – LESIÐ ÚRTAKA 1 – þannig: Fækkið um 1 l í hvorri hlið í umf (þ.e.a.s. frá réttu og frá röngu) alls 4-4-6-6-8-10 sinnum í annarri hverri umf (þ.e.a.s. í hverri umf frá réttu) 1-2-3-4-4-5 sinnum alls = 48-52-54-58-62-64 l. Eru þetta tvö skref? Fækka frá réttu OG röngu 4 sinnum og svo bara frá réttu? Skil ekkert hvað er verið að meina hérna
12.10.2025 - 17:39DROPS Design answered:
Blessuð Viktoría. Þetta eru tvö skref. Búið er að umorða þessa setningu. Fækkið um 1 lykkju í hvorri hlið í hverri umferð (þ.e.a.s. frá réttu og frá röngu) alls 4-4-6-6-8-10 sinnum, fækkið lykkjum síðan í annarri hverri umferð (þ.e.a.s. í hverri umf frá réttu) 1-2-3-4-4-5 sinnum alls = 48-52-54-58-62-64 lykkjur. Gangi þér vel.
14.10.2025 - 12:33
![]() Kathryn Mathews wrote:
Kathryn Mathews wrote:
What is the DROPS ANGULAR BUFFELHORN BUTTON NO 538 Is it supposed to say Buffalo Horn?
01.10.2025 - 21:41DROPS Design answered:
Hi Kathryn, Yes it should be Buffalo Horn. Regards, Drops Team.
02.10.2025 - 06:15
![]() Sharon Hunt- Edward wrote:
Sharon Hunt- Edward wrote:
Have figured out the answered my is question in my earlier email. Hope I get a reply to this question. When working the left side with the buttonhole it mentioned only 1 increase. Am I supposed to follow the instructions for the other increases per instruction for the back 5,5 cm to times I believe it said. Thank you for your response.
30.09.2025 - 12:31DROPS Design answered:
Dear Sharon, yes, you increase on each side as in the back. That means that you repeat the increases every number of cm as you did in the back piece. Happy knitting!
05.10.2025 - 23:37
![]() Sharon Hunt-Edwards wrote:
Sharon Hunt-Edwards wrote:
Not sure I understand this: Work in seed st with 1 edge st in garter st in the side - AT THE SAME TIME cast on new sts towards mid front at the end of every row from WS as follows: Cast on 4 sts 3 times, 2 sts 2 times - work the inc sts in seed st. When I calculate I got 14 not 11. thanks for your help.
30.09.2025 - 09:52DROPS Design answered:
Dear Sharon, you cast on 12+4 = 16 sts. Then you work over all stitches and the first 11 stitches next to the mid-front are worked in moss stitch and the rest in stocking stitch. Happy knitting!
05.10.2025 - 23:34
![]() Connie wrote:
Connie wrote:
Hello I want to make the vest longer to reach the waist, how do i do that Thank you.
18.02.2023 - 15:15
![]() Ckrage wrote:
Ckrage wrote:
Der er som om det ikke passer med forstykket, idet der ikke er angivet at der skal lave 3perlestrik +kantmaske med glat strik, og det kan ikke passe at det skal være 11 m perlestri med det sammen det må gradvist blive 11 m
05.02.2023 - 21:22DROPS Design answered:
Hei Ckrage. Kantmasken på forstykkene strikkes kun i siden mot bakstykket. Man legger opp de fleste nye maskene innen man har strikket 3 cm og når man legger opp de siste maskene vil de 11 perlestrikkmaskene i front forskyve seg. På prøvelappen jeg har strikket og på bildet, kan det se ut som om man har strikket en kant med perlestrikk før de 11 perlestrikk maskene i front, men det er bare plagget som trekker seg noe oppover. mvh DROPS Design
06.02.2023 - 14:20
![]() Sophie wrote:
Sophie wrote:
Känner mig besvärlig, men...det finns ju ingen kantmaska om man lägger upp nya maskor fem ggr. Instruktionsvideon visar endast uppläggning en gång, inte upprepade ggr som till en sneddad kant. Tusen tack för tips och råd!!
23.12.2022 - 07:27DROPS Design answered:
Hej Sophie, åh du mener de nye masker du tager ud på forstykket. Jo men de bliver mere jævnt når du fortsætter med det perlestrikkede. Det kommer til at se ud som på billedet :)
23.12.2022 - 09:39
![]() Sophie wrote:
Sophie wrote:
Det blir verkligen inte snyggt när jag lägger upp nya maskor vartannat varv. Det blir som en trappstege. Kan man få till en jämn kant eller är det oundvikligt att det blir såhär? På bilden ser det ju jämnt och fint ut.
20.12.2022 - 17:06DROPS Design answered:
Hej Sophie, hvis du tager ud indenfor kantmasken, så bliver det jævnt :)
21.12.2022 - 14:43
![]() Caitlin wrote:
Caitlin wrote:
I’m confused by how to proceed on the armholes on the front pieces. The directions say to bind off as on the back piece, but the back decreased for the armholes, not bound off.
06.09.2020 - 22:20DROPS Design answered:
Dear Caitlin,on back piece you first cast off 6-9 sts (see size) then decrease on each side for armhole - on front piece, you will cast off the first 6-9 sts from WS (right front piece) /from RS (left front piece) and decrease on the side for armhole inside 3 sts in seed st as on back piece. Happy knitting!
07.09.2020 - 09:48
![]() Christine Petterssson wrote:
Christine Petterssson wrote:
Det stämmer inte med bilden.
17.11.2018 - 06:47
|
|
Tennessee#tennesseevest |
|
 |
 |
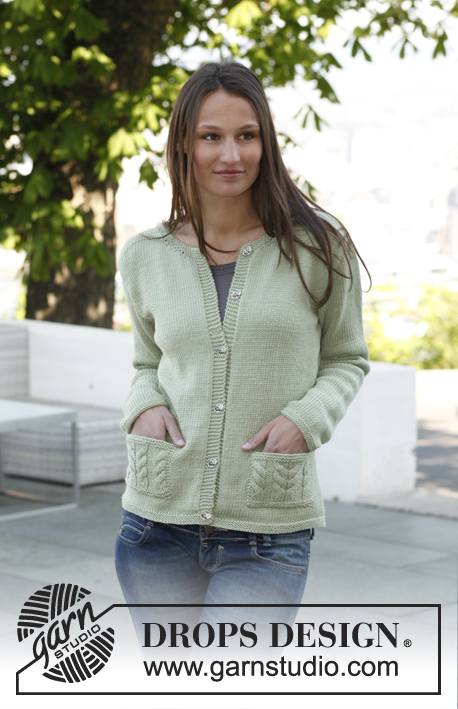
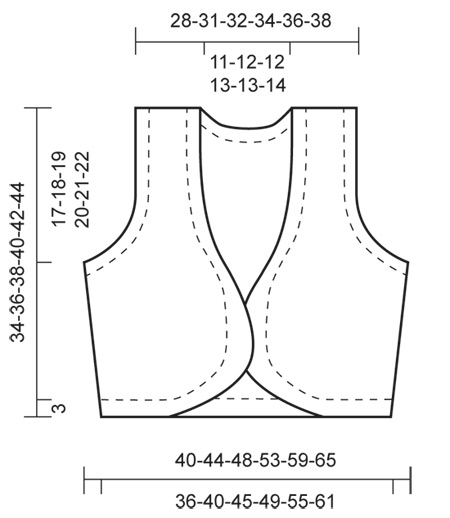
Knitted DROPS vest in ”Nepal”. Size: S - XXXL
DROPS 143-39 |
|
|
GARTER ST: K all rows. 1 ridge = 2 rows K. MOSS ST: K over P and P over K. INCREASE TIP: Inc 1 st inside 1 edge st in each side as follows: 1 edge st in garter st, make 1 YO, work until 1 st remains on needle, make 1 YO, 1 edge st in garter st. On next row work YOs twisted (i.e. work in back loop of st instead of front to avoid holes). DECREASE TIP 1 (applies to armholes): Dec for armholes inside the outermost 3 sts in moss st in each side. Dec from RS at beg of row as follows: Work 3 sts in moss st, slip next st as if to K, K 1, psso. Dec from RS at end of row as follows: Work until 5 sts remain on needle, K the next 2 sts tog, 3 sts in moss st. Dec from WS at beg of row as follows: Work 3 sts in moss st, P the next 2 sts twisted tog. Dec from WS at end of row as follows: Work until 5 sts remain on needle, P the next 2 sts tog, 3 sts in moss st. DECREASE TIP 2 (applies to front piece): Dec 1 st for neck on every row from RS by working tog the outermost 2 sts in moss st towards mid front (K if next st is P, P if next st is K) - a total of 8 times = 3 sts in moss st remain towards mid front. Then dec 1 st inside the outermost 3 sts in moss st every 4th row as follows: Dec from RS on right front piece as follows: Work 3 sts in moss st, slip next st as if to K, K 1, psso, work the rest of row. Dec from RS on left front piece as follows: Work until 5 sts remain on needle, K the next 2 sts tog, 3 sts in moss st. BUTTONHOLES: Dec for 1 buttonholes from RS on right front piece. 1 buttonhole = K tog 3rd and 4th st from mid front, then make 1 YO. ----------------------------------------------------------- BACK PIECE: Worked back and forth on needle. Cast on 64-70-78-86-96-106 sts (incl 1 edge st in each side) on needle size 5 mm with Nepal. Work 1st row (= from RS) as follows: 1 edge st in GARTER ST - see explanation above, * K 1, P 1 *, repeat from *-*, finish with 1 edge st in garter st. Then work in MOSS ST - see explanation above - with 1 edge st in garter st in each side. REMEMBER THE KNITTING TENSION! When piece measures 3 cm, work in stocking st with 1 edge st in garter st in each side. When piece measures 4-4-4-5-5-5 cm, inc 1 st in each side - Read INCREASE TIP. Repeat inc 2 more times every 4½-5-5-5-5-5½ cm (a total of 3 times) = 70-76-84-92-102-112 sts. Continue until piece measures 17-18-19-20-21-22 cm (last row = WS). At beg of the next 2 rows work in moss st over the outermost 9-9-9-10-11-12 sts in each side. At beg of the 2 following rows, cast off the first 6-6-6-7-8-9 sts for armholes in each side = 3 sts in moss st remain in each side. Then continue the outermost 3 sts in each side in moss st - AT THE SAME TIME dec 1 st inside the 3 sts - READ DECREASE TIP 1 - as follows: Dec 1 st in each side on every row (i.e. from RS and WS) a total of 4-4-6-6-8-10 times, every other row (i.e. every row from RS) a total of 1-2-3-4-4-5 times = 48-52-54-58-62-64 sts. When dec are done, continue in moss st over the outermost 3 sts until finished measurements (= band towards armhole). When piece measures 30-32-34-36-38-40 cm, work in moss st over the middle 24-26-26-28-28-30 sts until finished measurements. When piece measures 32-34-36-38-40-42 cm, cast off the middle 18-20-20-22-22-24 sts for neck = 15-16-17-18-20-20 sts remain for shoulder (3 sts in moss st remain towards neck in each side) and finish each shoulder separately. Continue in stocking st with 3 sts in moss st in each side (armhole and neck) until piece measures 34-36-38-40-42-44 cm, loosely cast off all sts. RIGHT FRONT PIECE: Worked back and forth on needle. Cast on 21-24-28-32-37-42 sts (incl 1 edge st in side) on needle size 5 mm with Nepal. Work 1st row (= from RS) as follows: * K 1, P 1 *, repeat from *-*, finish with 1 edge st in garter st. READ ALL OF THE FOLLOWING SECTIONS BEFORE CONTINUING! Work in moss st with 1 edge st in garter st in the side - AT THE SAME TIME cast on new sts towards mid front at the end of every row from WS as follows: Cast on 4 sts 3 times, 2 sts 2 times - work the inc sts in moss st. AT THE SAME TIME when piece measures 3 cm, work from RS as follows: Work the first 11 sts on row in moss st (= band towards mid front), K the rest of row. Then work in stocking st - but work the outermost 11 sts towards mid front in moss st - i.e. band with 11 sts in moss st is displaced when casting on new sts towards mid front. When piece measures 4-4-4-5-5-5 cm, inc 1 st in the side as on back piece. AT THE SAME TIME when piece measures 10-10-11-11-12-12 cm from cast on edge, work BUTTONHOLE - read explanation above. When piece measures 12-12-13-13-14-14 cm, dec from RS 1 st for neck - READ DECREASE TIP 2. Repeat dec every other row a total of 8 times (on band), then every 4th row a total of 6-7-7-8-8-9 times (inside the outermost 3 sts in moss st). When dec for neck are done, continue in moss st over the outermost 3 sts until finished measurements (= band towards mid front). AT THE SAME TIME when piece measures 17-18-19-20-21-22 cm, work in moss st over the 9-9-9-10-11-12 sts towards armhole as on back piece and cast off for armhole as on back piece. After all dec are done, 15-16-17-18-20-20 sts remain on shoulder. Continue with 3 sts in moss st in each side (armhole and neck) until piece measures 34-36-38-40-42-44 cm. Loosely cast off all sts. LEFT FRONT PIECE: Cast on and work as right front piece but reversed and without buttonholes. ASSEMBLY: Sew the shoulder seams. Sew the side seams inside 1 edge st. Sew the button on to left band. |
|
 |
|
Have you finished this pattern?Tag your pictures with #dropspattern #tennesseevest or submit them to the #dropsfan gallery. Do you need help with this pattern?You'll find 11 tutorial videos, a Comments/Questions area and more by visiting the pattern on garnstudio.com. © 1982-2026 DROPS Design A/S. We reserve all rights. This document, including all its sub-sections, has copyrights. Read more about what you can do with our patterns at the bottom of each pattern on our site. |
|


With over 40 years in knitting and crochet design, DROPS Design offers one of the most extensive collections of free patterns on the internet - translated to 17 languages. As of today we count 324 catalogues and 12290 patterns translated into English (UK/cm). 12290
We work hard to bring you the best knitting and crochet have to offer, inspiration and advice as well as great quality yarns at incredible prices! Would you like to use our patterns for other than personal use? You can read what you are allowed to do in the Copyright text at the bottom of all our patterns. Happy crafting!
Post a comment to pattern DROPS 143-39
We would love to hear what you have to say about this pattern!
If you want to leave a question, please make sure you select the correct category in the form below, to speed up the answering process. Required fields are marked *.