
Popular categories
Looking for a yarn?


Comments / Questions (169)
![]() Marlene wrote:
Marlene wrote:
När man stickar förkortade varv och mönster, visst är det tänkt att man ska sticka enligt mönstret på alla varv utom de som endast stickas till första markören? Om det stämmer, ska man sticka enligt mönstret också på dessa förkortade varv som går till första markören även om man inte räknar det som ett varv på mönstret (alltså två rätmaskor tillsammans och ett överslag)?
02.04.2015 - 22:46DROPS Design answered:
Hej Marlene, Ja du stickar enligt mönstret när du kan, också de som går till första markören. Lycka till!
15.05.2015 - 11:29
![]() Lisa wrote:
Lisa wrote:
Hallo, Welche Rundnadelstärke ist bei NR. 5 gemeint? Heißt dass, ich soll eine 5mm Rundnadel nehmen? Irgendwie komme ich nicht auf die Maschenprobe. Da kommen keine 10cm in der Breite raus. Es fehlen mindestens 3 cm.
10.01.2015 - 10:32DROPS Design answered:
Ja, Nr. 5 bedeutet eine 5mm-Nadel. Sie müssen die Nadelstärke verwenden, die Sie zum Erreichen der Maschenprobe benötigen, versuchen Sie es also mit einer dickeren Nadel. Haben Sie denn auch beide Fäden zusammengenommen? Sie stricken ja mit 1 Faden Delight und 1 Faden Kid-Silk zusammen, dadurch ergibt sich ja ein dickeres "Gesamtgarn". Achten Sie bei der Maschenprobe darauf, dass Sie sie groß genug stricken, damit das Ergebnis nicht verfälscht wird.
11.01.2015 - 15:59
![]() Lia.lansink wrote:
Lia.lansink wrote:
Geachte ben begonnen met het breien van de pas. Helaas begrijp ik het patroon nog niet. Wanneer kan ik beginnen met het telpatroon? Gr lia
28.11.2014 - 17:38DROPS Design answered:
Hoi Lia. Je begint met het patroon na dat je de 2 markeerders hebt geplaatst in het werk. In het patroon onder het gedeelte dat begint met "Plaats 2 markeerders in het werk als volgt (aan de goede kant)..." staat er: Brei dan VERKORTE TOEREN – zie uitleg boven en brei in PATROON als volgt: 10-10-13-13-16-16 st in RIBBELST – zie uitleg boven, telpatroon M.1 over de volgende 24 st en 6-6-7-7-8-8 st in ribbelst.
01.12.2014 - 14:54
![]() Teddy Hanepen wrote:
Teddy Hanepen wrote:
Tussen markeerder 1 en 2 heb ik 18 steken terwijl patroon M1 24 steken telt. Hoe moet ik dat doen? Van het filmpje word ik niet wijzer omdat dat niet patroon M1 is.
01.11.2014 - 11:30DROPS Design answered:
Hoi Teddy. Je moet keren in het motief. Dus dat betekent dat je meer naalden over het eerste gedeelte van het motief dan de rest.
06.11.2014 - 16:47
![]() Silvia wrote:
Silvia wrote:
It's such a nice dress! Delighfull! :)
28.09.2014 - 19:13Nokkie Du Toit wrote:
Hallo ,this is so beautiful , I want to knit this but I am so clueless ,don't understand this diagram at all
29.08.2014 - 06:06DROPS Design answered:
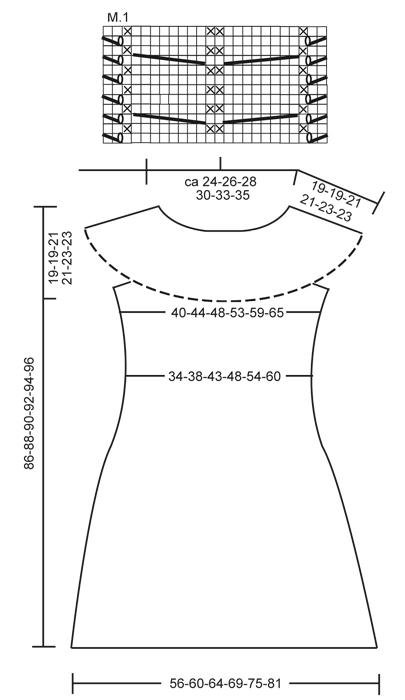
Dear Mrs Du Toit, in diagram 1 square = 1 st x 1 row. Start at the bottom corner on the right side and read towards the left from RS - from WS, read from the left towards the right. Text to diagram is described just above diagram. You will find some matching videos showing these different techniques under tab "videos". Happy knitting!
29.08.2014 - 09:34Hilary Marshall wrote:
In this pattern the sizes are given as S (small) to XXXL this does not give any indication of the bust measurements
23.08.2014 - 15:37DROPS Design answered:
Dear Mrs Marshall, you will find at the end of the pattern a measurement chart with all measures for each size in cm, taken flat from side to side. Compare these to a similar garment you like the shape to find out the matching size. Happy knitting!
25.08.2014 - 10:11
![]() Ragnhild Madsen wrote:
Ragnhild Madsen wrote:
Hei. Jeg kontaktet dere i går ang oppskrift på en tunika, men tror jeg glemte nr på oppskrift og det er 132-1. Håper få svar i dag eller i morgen.
21.08.2014 - 08:10DROPS Design answered:
Hej Ragnhild. Jeg svarede dig igaar herunder. Du behöver ikke skrive nummeret, da du har skrevet til selve mönstret. Men du kan se mit svar til dig herunder. God fornöjelse videre.
21.08.2014 - 15:54
![]() Julia wrote:
Julia wrote:
Hallo, bei den verkürzten Reihen, bei Rückreihe, wenn es heißt bis erster Markierung dann wenden, ist es gemeint die erste Markierung auf Rückseite so wie man sieht , oder die zweite , weil sie auf hinreihe die erste ist
01.06.2014 - 17:17DROPS Design answered:
Liebe Julia, Sie beginnen die verkürzten R mit einer Hin-R, daher stellt sich die Frage nicht, denn Sie stricken immer nur in Hin-R bis zu den Markierern. Sie ziehen die Markierer ein, ohne die M vorher zu stricken. Auch M.1 müssen Sie ja mit einer Hin-R beginnen.
04.06.2014 - 00:04
![]() Annamaria wrote:
Annamaria wrote:
Buonasera,facendo i ferri al rovescio li devo lavorare come si presentano o devo leggere il diagramma grazie
05.04.2014 - 19:41DROPS Design answered:
Buonasera Annamaria, il diagramma mostra tutti i f del motivo, quindi segua pure la legenda. Buon lavoro!!
05.04.2014 - 20:37
|
|||||||||||||||||||
Forest Nymph#forestnymphdress |
|||||||||||||||||||
|
|
|||||||||||||||||||
Knitted DROPS dress with yoke worked across with cables, short rows and crochet border in ”Delight” and ”Kid-Silk”. Size: S to XXXL
DROPS 132-1 |
|||||||||||||||||||
|
GARTER ST (back and forth on needle): K all rows. GARTER ST (in the round on circular needle): 1 ridge = 2 rounds: * K 1 round and P 1 round *, repeat from *-*. SHORT ROWS: To make the yoke wider at the bottom, work more rows over the bottom sts than the upper sts. This is done as follows: * Work 2 rows over all sts, work until 2nd marker, turn, tighten thread and work back, work until 1st marker, turn, tighten thread and work back, work 2 rows over all sts, work until 2nd marker, turn, tighten thread and work back, work 2 rows over all sts, work until 1st marker, turn, tighten thread and work back *, repeat from *-*, i.e. 1 repetition = 6 rows at the top and 14 rows at the bottom. PATTERN: See diagram M.1. Diagram shows 1 repetition of pattern in breadth (= 24 sts), the diagram shows pattern from RS. MEASURING TIP: Measure when piece is flat, it is important not to stretch the piece when measuring. DECREASE TIP: Work until 2 sts remain before marker, K 2 tog, slip 1 st as if to K, K 1, psso. INCREASE TIP: Work until 1 st remains before marker, make 1 YO, work 2 sts (marker is between these 2 sts), make 1 more YO. On next round K YOs twisted (i.e. work in back loop of st instead of front) to avoid holes . -------------------------------------------------------- -------------------------------------------------------- YOKE: Worked back and forth on circular needle, worked sideways from mid back. LOOSELY cast on 32-32-36-36-40-40 sts on circular needle size 5 mm with 1 thread Delight and 1 thread Kid-Silk. K 2 rows over all sts (1st row beg from bottom edge from RS). Work next row as follows (from RS): K 10-10-13-13-16-16, K 2 tog, 1 YO, K 1, K 2 sts in each of the next 4 sts (= K 8), K 2, K 2 in each of the next 4 sts (= K 8), K 1, 1 YO, slip 1 st as if to K, K 1, psso, K 6-6-7-7-8-8 = 40-40-44-44-48-48 sts. Work next row as follows (from WS): K 6-6-7-7-8-8, P 2, K 1, P 8, K 2, P 8, K 1, P 2 and K 10-10-13-13-16-16. Insert 2 markers in the piece as follows (from RS): 1st marker after 13-13-16-16-19-19 sts and 2nd marker after a total of 31-31-34-34-37-37 sts = 9-9-10-10-11-11 sts remain at the top after 2nd marker. Then work SHORT ROWS – see explanation above and PATTERN as follows: 10-10-13-13-16-16 sts in GARTER ST – see explanation above, diagram M.1 over the next 24 sts and 6-6-7-7-8-8 sts in garter st. Work until piece measures approx. 112-120-128-140-152-164 cm at bottom edge – SEE MEASURING TIP – finish after 2 rows have been worked on all sts. Work next row as follows (from RS): K 13-13-16-16-19-19, K the next 8 sts tog 2 by 2, K 2, K the next 8 sts tog 2 by 2, K 9-9-10-10-11-11 = 32-32-36-36-40-40 sts. K 1 row over all sts, then cast off all sts with K from RS. Piece measures approx. 114-122-130-142-154-166 cm at bottom edge. INSERTING MARKERS: Remove the markers in the piece and insert 4 new markers as follows: Place piece flat on a table and measure along the longest side. First find centre of piece – measure 18-20-21½-24-26½-29½ cm from centre out to each side – insert a marker in each side (i.e. there are 36-40-43-48-53-59 cm between markers on front piece), then measure 18-20-21½-24-26½-29½ cm in from cast off edge and cast on edge (= back piece) – insert markers here. There are now approx. 21-21-22-23-24-24 cm in each side between markers on front and back piece (= armholes). Sew yoke tog, sew edge to edge mid back to avoid a chunky seam. BODY: Worked in the round on circular needle. Knit up sts along bottom edge of yoke with 1 thread Delight and 1 thread Kid-Silk on circular needle size 5 mm – start round at marker in transition between left sleeve and back piece. Knit up 1 st in front loop of st in every ridge (1 ridge = 2 rows in garter st) between markers on back piece (approx. 60 to 98 sts), cast on 6-6-8-8-10-10 new sts (= under sleeve), skip to first marker on front piece and knit up 1 st in front loop of sts in every ridge on front piece (= approx. 60 to 98 sts), cast on 6-6-8-8-10-10 new sts (= under the other sleeve). NOW MEASURE PIECE FROM HERE! P 1 round while at the same time adjusting the no of sts to 136-148-162-180-200-220. Remove markers and insert 4 new markers as follows: K 14-15-16-18-20-22 sts, insert a marker, K 34-38-41-46-50-56 sts, insert a marker (these 2 markers marks where waistline should be worked on back piece), K 34-36-40-44-50-54 sts, insert a marker, K 34-38-41-46-50-56 sts, insert a marker (these 2 markers marks where waistline should be worked on front piece), K rest of round (= 20-21-24-26-30-32 sts). On next round, P 10-10-12-12-14-14 sts under each sleeve, K the remaining sts. Continue in stocking st over all sts. REMEMBER THE KNITTING TENSION! When piece measures 10 cm, dec 1 st on each side of the 4 markers - READ DECREASE TIP! Repeat dec when piece measures 15 cm = 120-132-146-164-184-204 sts. When piece measures 20-21-21-22-22-23 cm, inc 1 st on each side of the 4 markers – see INCREASE TIP. Repeat inc every 8 rounds a total of 9 times = 192-204-218-236-256-276 sts. When piece measures 63-65-65-67-67-69 cm, K 1 round while at the same time dec 12 sts evenly. Then work 4 cm in garter st. LOOSELY cast off. CROCHET LACE EDGE: Crochet an edge in bottom st in garter st along yoke (i.e. in same st that was knit up on body). Hold piece with neck opening towards you, work with 1 thread Kid-Silk on hook size 3.5 mm as follows – start mid back as follows: ROUND 1: 1 dc in first ridge (1 ridge = 2 rounds in garter st), * 3 ch, 1 dc in next ridge *, repeat from *-* the entire round, finish with 3 ch and 1 sl st in first dc on round (adjust so that there is an even number of ch-loops). ROUND 2: 2 ch, 1 dc in first ch-loop, * 5 ch, 1 dc in next ch-loop, 1 ch, 1 dc in next ch-loop *, repeat from *-*, finish with 1 sl st (instead of 1 dc) in first dc on round. ROUND 3: Work as follows in each of the large ch-loops (= 5 ch): 1 dc, 5 tr, 1 dc and work 1 dc in each of the small ch-loops (= 1 ch), finish with 1 sl st at beg of round, cut and fasten the thread. Steam the lace edge well to make it fold nicely downwards. |
|||||||||||||||||||
Diagram explanations |
|||||||||||||||||||
|
|||||||||||||||||||
 |
|||||||||||||||||||
Have you finished this pattern?Tag your pictures with #dropspattern #forestnymphdress or submit them to the #dropsfan gallery. Do you need help with this pattern?You'll find 17 tutorial videos, a Comments/Questions area and more by visiting the pattern on garnstudio.com. © 1982-2026 DROPS Design A/S. We reserve all rights. This document, including all its sub-sections, has copyrights. Read more about what you can do with our patterns at the bottom of each pattern on our site. |
|||||||||||||||||||


With over 40 years in knitting and crochet design, DROPS Design offers one of the most extensive collections of free patterns on the internet - translated to 17 languages. As of today we count 324 catalogues and 12290 patterns translated into English (UK/cm). 12290
We work hard to bring you the best knitting and crochet have to offer, inspiration and advice as well as great quality yarns at incredible prices! Would you like to use our patterns for other than personal use? You can read what you are allowed to do in the Copyright text at the bottom of all our patterns. Happy crafting!
Post a comment to pattern DROPS 132-1
We would love to hear what you have to say about this pattern!
If you want to leave a question, please make sure you select the correct category in the form below, to speed up the answering process. Required fields are marked *.