
Popular categories
Looking for a yarn?


Comments / Questions (169)
![]() Zohreh wrote:
Zohreh wrote:
Hej hvor mange pinde er der imellem de 2 snoninger, når de forkortede pinde er tegnet ind i M1? M.v.h zohreh
01.03.2016 - 19:35
![]() W.snoeyer wrote:
W.snoeyer wrote:
Hallo, moet met het lijf beginnen. Lees dat ik 6 steken voor onderkant mouw moet opnemen (maat S). Wordt dat in totaal 2 x 6 = 12 (6 links & 6 rechts) of 24 (12l &12r) steken? 6 steken voor een onderkant mouw lijkt me zo weinig. Of moet ik in de eerste naald av. meerderen naar 136? Zo ja, gelijk verdeeld over de pas of specifiek onder armsgat?
07.02.2016 - 12:40DROPS Design answered:
Hoi W. 6 st voor elk armsgat in totaal. Je breit dan 1 nld av en meerdert hier gelijkmatig over de hele nld naar 136 st
10.02.2016 - 15:40
![]() R.peeters wrote:
R.peeters wrote:
Ben halverwege de pas: onderkant plm 68, hals 32 cm. Als ik naar vorm kijk denk ik dat ik geen ronde pas krijg maar ovale, nogal wijde boothals. Patroon lijkt op foto, hou me aan verkorte toeren en M1. Doe ik iets fout? Hoe kan ik hals ronder krijgen?
02.01.2016 - 11:27DROPS Design answered:
Hoi. Is je stekenverhouding correct of heb je misschien de verkorte toeren te weinig gebreid? Je kan de ronding scherper krijgen door meer verkorte toeren te breien langs de bovenkant (de eerste steken)
05.01.2016 - 15:40
![]() Antonella Criscione wrote:
Antonella Criscione wrote:
Non ho mai lavorato i feri accorciati, vorrei sapere se il risultato (lavoro) cambia aspetto se lavoro i ferri accorciati con un ordine diverso rispetto a quello descritto nel pattern. E ancora come posso fare per ricordare dove sono arrivata quando riprendo il lavoro dopo un pò di tempo?
28.11.2015 - 23:03DROPS Design answered:
Buongiorno Antonella, i ferri accorciati servono per modellare meglio il modello adattandolo alla singola persona, per cui certo che il risultato cambia se fatto diversamente rispetto alle istruzioni. Per ricordarsi il punto in cui è arrivata provi a farsi un appunto sul foglio delle spiegazioni. Buon lavoro!
29.11.2015 - 14:37
![]() Pernille Larsen wrote:
Pernille Larsen wrote:
Jeg synes I skal lave en instruktionsvideo for lige netop denne model, med de forkortede pinde og m1. Den er meget meget svær at forstå
31.10.2015 - 12:47
![]() Sandrine wrote:
Sandrine wrote:
Quant les mailles sont relevées au bord de l'empiècement on continue en rond en jersey c'est à dire qu'on tricote sur l'endroit ? en jersey endroit c'est bien ça ?
15.10.2015 - 10:20DROPS Design answered:
Bonjour Sandrine, on relève effectivement les mailles sur l'endroit, on tricote 1 tour env (en ajustant le nbe de m), 1 tour end (en plaçant les marqueurs), 1 tour end sur les mailles du devant et du dos en tric. les m des manches à l'env, et on continue ensuite en jersey (= tous les tours à l'end). Bon tricot!
15.10.2015 - 14:21
![]() Sandrine wrote:
Sandrine wrote:
Il faut commencer de faire les rangs raccourcis puis après la torsade ?
04.10.2015 - 18:41DROPS Design answered:
Bonjour Sandrine, les rangs raccourcis se tricotent en même temps que la torsade. Suivez le diagramme en même temps sur les mailles que vous tricotez. Bon tricot!
05.10.2015 - 09:56
![]() SANDRINE wrote:
SANDRINE wrote:
Est ce que vous avez la vidéo des rangs raccourcis et de la torsade en français ? Je ne comprends pas comment on fait les rangs raccourcis et la torsade ensemble ? merci
04.10.2015 - 18:11DROPS Design answered:
Bonjour Sandrine, l'empiècement va se tricoter ainsi: m point mousse, M.1, m point mousse. Tricotez 2 rangs sur toutes les mailles comme indiqué pour votre taille, puis 2 rangs sur les mailles jusqu'au 2ème marqueur (suivez le diagramme pour ces 2 rangs), puis 2 rangs jusqu'au 1er marqueur (suivez le diagramme pour les mailles à tricoter), puis 2 rangs sur toutes les mailles (continuez les diagrammes). Bon tricot!
05.10.2015 - 10:17Aimee Lee wrote:
Please help! Short Rows + M.1 Pattern = confused me! The M.1 pattern repeat is over 12 rows; the Short Rows repeat is over 14 "rows" (including half rows wherever it turns at a marker). Where exactly does the cable row of M.1 occur within the Short Row instructions? Thanks in advance! :)
15.07.2015 - 10:14DROPS Design answered:
Dear Mrs Lee, when working M1 with the short rows, work the sts in M1 as in diagram, turn and work return row, on next row follow diagram working sts as they should be on next row so that they should fit diagram. Happy knitting!
27.07.2015 - 13:45
![]() Mareike wrote:
Mareike wrote:
Hallo, müssen für dieses Modell die Randmaschen noch zusätzlich angeschlagen werden? Also für Größe M für die Passe 32 Maschen + 2 Randmaschen = 34 Maschen? Vielen Dank!
28.05.2015 - 11:05DROPS Design answered:
Bei unseren Modellen sind die Rand-M in der Regel enthalten, Sie brauchen also nicht zusätzlich Rand-M anzuschlagen.
29.05.2015 - 08:46
|
|||||||||||||||||||
Forest Nymph#forestnymphdress |
|||||||||||||||||||
|
|
|||||||||||||||||||
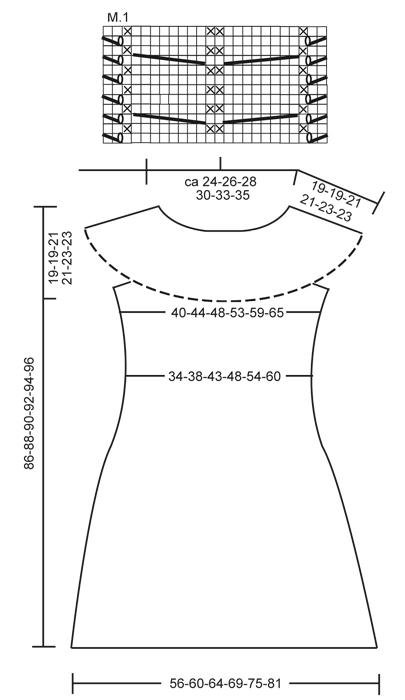
Knitted DROPS dress with yoke worked across with cables, short rows and crochet border in ”Delight” and ”Kid-Silk”. Size: S to XXXL
DROPS 132-1 |
|||||||||||||||||||
|
GARTER ST (back and forth on needle): K all rows. GARTER ST (in the round on circular needle): 1 ridge = 2 rounds: * K 1 round and P 1 round *, repeat from *-*. SHORT ROWS: To make the yoke wider at the bottom, work more rows over the bottom sts than the upper sts. This is done as follows: * Work 2 rows over all sts, work until 2nd marker, turn, tighten thread and work back, work until 1st marker, turn, tighten thread and work back, work 2 rows over all sts, work until 2nd marker, turn, tighten thread and work back, work 2 rows over all sts, work until 1st marker, turn, tighten thread and work back *, repeat from *-*, i.e. 1 repetition = 6 rows at the top and 14 rows at the bottom. PATTERN: See diagram M.1. Diagram shows 1 repetition of pattern in breadth (= 24 sts), the diagram shows pattern from RS. MEASURING TIP: Measure when piece is flat, it is important not to stretch the piece when measuring. DECREASE TIP: Work until 2 sts remain before marker, K 2 tog, slip 1 st as if to K, K 1, psso. INCREASE TIP: Work until 1 st remains before marker, make 1 YO, work 2 sts (marker is between these 2 sts), make 1 more YO. On next round K YOs twisted (i.e. work in back loop of st instead of front) to avoid holes . -------------------------------------------------------- -------------------------------------------------------- YOKE: Worked back and forth on circular needle, worked sideways from mid back. LOOSELY cast on 32-32-36-36-40-40 sts on circular needle size 5 mm with 1 thread Delight and 1 thread Kid-Silk. K 2 rows over all sts (1st row beg from bottom edge from RS). Work next row as follows (from RS): K 10-10-13-13-16-16, K 2 tog, 1 YO, K 1, K 2 sts in each of the next 4 sts (= K 8), K 2, K 2 in each of the next 4 sts (= K 8), K 1, 1 YO, slip 1 st as if to K, K 1, psso, K 6-6-7-7-8-8 = 40-40-44-44-48-48 sts. Work next row as follows (from WS): K 6-6-7-7-8-8, P 2, K 1, P 8, K 2, P 8, K 1, P 2 and K 10-10-13-13-16-16. Insert 2 markers in the piece as follows (from RS): 1st marker after 13-13-16-16-19-19 sts and 2nd marker after a total of 31-31-34-34-37-37 sts = 9-9-10-10-11-11 sts remain at the top after 2nd marker. Then work SHORT ROWS – see explanation above and PATTERN as follows: 10-10-13-13-16-16 sts in GARTER ST – see explanation above, diagram M.1 over the next 24 sts and 6-6-7-7-8-8 sts in garter st. Work until piece measures approx. 112-120-128-140-152-164 cm at bottom edge – SEE MEASURING TIP – finish after 2 rows have been worked on all sts. Work next row as follows (from RS): K 13-13-16-16-19-19, K the next 8 sts tog 2 by 2, K 2, K the next 8 sts tog 2 by 2, K 9-9-10-10-11-11 = 32-32-36-36-40-40 sts. K 1 row over all sts, then cast off all sts with K from RS. Piece measures approx. 114-122-130-142-154-166 cm at bottom edge. INSERTING MARKERS: Remove the markers in the piece and insert 4 new markers as follows: Place piece flat on a table and measure along the longest side. First find centre of piece – measure 18-20-21½-24-26½-29½ cm from centre out to each side – insert a marker in each side (i.e. there are 36-40-43-48-53-59 cm between markers on front piece), then measure 18-20-21½-24-26½-29½ cm in from cast off edge and cast on edge (= back piece) – insert markers here. There are now approx. 21-21-22-23-24-24 cm in each side between markers on front and back piece (= armholes). Sew yoke tog, sew edge to edge mid back to avoid a chunky seam. BODY: Worked in the round on circular needle. Knit up sts along bottom edge of yoke with 1 thread Delight and 1 thread Kid-Silk on circular needle size 5 mm – start round at marker in transition between left sleeve and back piece. Knit up 1 st in front loop of st in every ridge (1 ridge = 2 rows in garter st) between markers on back piece (approx. 60 to 98 sts), cast on 6-6-8-8-10-10 new sts (= under sleeve), skip to first marker on front piece and knit up 1 st in front loop of sts in every ridge on front piece (= approx. 60 to 98 sts), cast on 6-6-8-8-10-10 new sts (= under the other sleeve). NOW MEASURE PIECE FROM HERE! P 1 round while at the same time adjusting the no of sts to 136-148-162-180-200-220. Remove markers and insert 4 new markers as follows: K 14-15-16-18-20-22 sts, insert a marker, K 34-38-41-46-50-56 sts, insert a marker (these 2 markers marks where waistline should be worked on back piece), K 34-36-40-44-50-54 sts, insert a marker, K 34-38-41-46-50-56 sts, insert a marker (these 2 markers marks where waistline should be worked on front piece), K rest of round (= 20-21-24-26-30-32 sts). On next round, P 10-10-12-12-14-14 sts under each sleeve, K the remaining sts. Continue in stocking st over all sts. REMEMBER THE KNITTING TENSION! When piece measures 10 cm, dec 1 st on each side of the 4 markers - READ DECREASE TIP! Repeat dec when piece measures 15 cm = 120-132-146-164-184-204 sts. When piece measures 20-21-21-22-22-23 cm, inc 1 st on each side of the 4 markers – see INCREASE TIP. Repeat inc every 8 rounds a total of 9 times = 192-204-218-236-256-276 sts. When piece measures 63-65-65-67-67-69 cm, K 1 round while at the same time dec 12 sts evenly. Then work 4 cm in garter st. LOOSELY cast off. CROCHET LACE EDGE: Crochet an edge in bottom st in garter st along yoke (i.e. in same st that was knit up on body). Hold piece with neck opening towards you, work with 1 thread Kid-Silk on hook size 3.5 mm as follows – start mid back as follows: ROUND 1: 1 dc in first ridge (1 ridge = 2 rounds in garter st), * 3 ch, 1 dc in next ridge *, repeat from *-* the entire round, finish with 3 ch and 1 sl st in first dc on round (adjust so that there is an even number of ch-loops). ROUND 2: 2 ch, 1 dc in first ch-loop, * 5 ch, 1 dc in next ch-loop, 1 ch, 1 dc in next ch-loop *, repeat from *-*, finish with 1 sl st (instead of 1 dc) in first dc on round. ROUND 3: Work as follows in each of the large ch-loops (= 5 ch): 1 dc, 5 tr, 1 dc and work 1 dc in each of the small ch-loops (= 1 ch), finish with 1 sl st at beg of round, cut and fasten the thread. Steam the lace edge well to make it fold nicely downwards. |
|||||||||||||||||||
Diagram explanations |
|||||||||||||||||||
|
|||||||||||||||||||
 |
|||||||||||||||||||
Have you finished this pattern?Tag your pictures with #dropspattern #forestnymphdress or submit them to the #dropsfan gallery. Do you need help with this pattern?You'll find 17 tutorial videos, a Comments/Questions area and more by visiting the pattern on garnstudio.com. © 1982-2026 DROPS Design A/S. We reserve all rights. This document, including all its sub-sections, has copyrights. Read more about what you can do with our patterns at the bottom of each pattern on our site. |
|||||||||||||||||||


With over 40 years in knitting and crochet design, DROPS Design offers one of the most extensive collections of free patterns on the internet - translated to 17 languages. As of today we count 324 catalogues and 12290 patterns translated into English (UK/cm). 12290
We work hard to bring you the best knitting and crochet have to offer, inspiration and advice as well as great quality yarns at incredible prices! Would you like to use our patterns for other than personal use? You can read what you are allowed to do in the Copyright text at the bottom of all our patterns. Happy crafting!
Post a comment to pattern DROPS 132-1
We would love to hear what you have to say about this pattern!
If you want to leave a question, please make sure you select the correct category in the form below, to speed up the answering process. Required fields are marked *.