
Popular categories
Looking for a yarn?


Comments / Questions (169)
![]() Greta Lisk Pålsson wrote:
Greta Lisk Pålsson wrote:
Mönstret på oket går över 24 maskar. Den 2. Markören ligger innanför möstret. Så jag måste sticka tillbaka innan jag stickat klart mönstret, efter 21 m alltså. Hur hör jag? Jag förstår inte. Mvh/Greta
02.11.2020 - 12:42DROPS Design answered:
Hej Greta, Ja det stemmer, og så strikker du den mønsterpind du er kommet til, når du næste gang strikker over alle masker igen :)
04.11.2020 - 12:02
![]() Konni wrote:
Konni wrote:
Fehlt bei Runde 3 der gehäkelten Spitzenkante eine 1 fM? "3. RUNDE: Um die grossen Bogen wie folgt (= 5 Lm): 1 fM, 5 Stb, 1 fM. In die kleinen Bogen (= 1 Lm): 1 fM...."
04.05.2020 - 08:27DROPS Design answered:
Liebe Konni, stimmt, in jedem 5LM-Bogen häkeln Sie: 1 fM, 5 fM, 1 fM und um die 1 Lm häkeln Sie 1 fM; Korrektur erfolgt. Viel Spaß beim stricken!
04.05.2020 - 15:50
![]() Sabine Simma wrote:
Sabine Simma wrote:
Hallo liebes Drops Team, Ich möchte das Kleid in M stricken. Ich komme mit den verkürzten Reihen nicht zurecht. Wenn ich den Rapport mit den verkürzten Reihen stricke habe ich zwar die 6 Reihen oben und 14 Reihen unten, es fehlen mir dann aber die letzten 2 Reihen von M1 (Zopfmuster). Wo liegt mein Denkfehler. Ich habe schon mehrmals zur Probe gestrickt.
10.04.2019 - 10:40DROPS Design answered:
Liebe Simma, M.1 wird über insgesamt 11 Reihen gestrickt, die verkürzten Reihen sind dann mmmit 6 Reihen oben und 14 Reihen unten, und Sie wiederholen einfach M.1 = die Zöpfen entstehen in jeder 6. Reihe, die über die Zöpfe gestrickt sind. Viel Spaß beim stricken!
10.04.2019 - 11:54
![]() Jenny Strick wrote:
Jenny Strick wrote:
Ich liebe dieses Kleid. Super leicht zu Stricken und so einfach anzupassen für meinen langen aber schmalen Oberkörper. Mache es gerade schon zum zweiten Mal in einer anderen Farbkombi.
26.12.2018 - 14:42
![]() Ingrid Van Den Bosch wrote:
Ingrid Van Den Bosch wrote:
Bonjour, je voudrais faire ce modèle avec un fil qui fait 50 gr/200m et j'ai un échantillon de 26 mailles sur 33 rangs. Combien de pelotes je devrais prévoir en taille xxl ou comment calculer combien il me faudrait ? Merci
28.08.2018 - 13:40DROPS Design answered:
Bonjour Mme Vand Den Bosch, Nous ne sommes malheureusement pas en mesure de pouvoir ajuster chacun de nos modèles à chaque demande individuelle. N'hésitez pas à vous adresser au magasin où vous avez acheté votre laine pour toute assistance complémentaire. Merci pour votre compréhension.
04.09.2018 - 13:19
![]() Ana Cecilia Ramirez wrote:
Ana Cecilia Ramirez wrote:
Hei, trenger litt hjelp med starten her, jeg forstår ikke så godt hva de skriver. Forstår at dte er en bærestykk som skal strikkes men det er ikke helt klar, jeg må bruke en annen type garn for de som er I oppskriften blir ikke så lett å se hva man har gjørt. På forhånd takk.
30.07.2018 - 20:03DROPS Design answered:
Hei Ana. Du strikker med 2 tråder samtidig (1 tråd Delight + 1 tråd Kid silk), de tilhører begge garngruppe A. Alternativt kan du strikke med 1 tråd fra garngruppe C. Bærestykket (område rundt skuldrene) strikkes sidelengs. Det vil si det strikkes fra midt bak på ryggen, rundt skulderen, over brystet og rundt den andre skulderen. Deretter skal det plukkes opp masker langs nederkanten og strikke resten av genseren ovenfra og ned. For at bærestykket skal bli smalere øverst (halsen) enn nederst (bysten) må det strikkes forkortede pinner over bærestykke – fremgangsmåte står forklart i oppskriften. Det strikkes i tillegg etter mønster M.1 = flettemønsteret. God fornøyelse.
17.08.2018 - 07:29
![]() Carla wrote:
Carla wrote:
Hallo, ich mag das Kleid, würde es aber gerne statt in Delight und Kidsilk in Big Delight stricken. Wenn ich den Rechner zum umrechnen verwende, komme ich für die gewünschte Größe auf 326 g Big Delight, statt 350 g Delight. Kann das stimmen?
30.04.2018 - 15:47DROPS Design answered:
Liebe Carla, am besten lesen Sie hier, wieviel Big Delight Sie dann brauchen (Garnumrechner geht zur Zeit nicht zu 2 Fäden bis 1 Faden). Viel Spaß beim stricken!
30.04.2018 - 15:50
![]() Julia wrote:
Julia wrote:
Was bedeute: Ein Faden jeder Qualität? Soll ich dann mit zwei Fäden arbeiten? Wenn ja mit zwei Delight oder jeweils ein Delight Pfund ein Kid silk?
26.02.2018 - 15:54DROPS Design answered:
Liebe Julia, Sie stricken von Anfang bis zur Ende mit 1 Faden Delight + 1 Faden Kid-Silk zusammen. Viel Spaß beim stricken!
26.02.2018 - 16:06
![]() Francesca wrote:
Francesca wrote:
Salve sono arrivata ai ferri accorciati ed ho due domande:1)devo prima fare due ferri completi?2) quando giro ai ferri accorciati finisco lo schema M1 per poi ricominciarlo?
24.08.2017 - 14:22DROPS Design answered:
Buongiorno Francesca. La sequenza dei ferri accorciati inizia con 2 ferri su tutte le maglie. Quando lavora fino al secondo segnapunti, continua a lavorare lo schema M1. Buon lavoro!
24.08.2017 - 15:49
![]() Simonetta wrote:
Simonetta wrote:
Nella descrizione dei simboli del diagramma, nella ersione italiana, accanto al quadratino barrato con la x c'è scritto = rov. dal rovescio mentre dovrebbe essere scritto = dir. dal rovescio
14.02.2017 - 15:48DROPS Design answered:
Buongiorno Simonetta. Abbiamo corretto il testo. La ringraziamo per la segnalazione. Buon lavoro!
14.02.2017 - 15:56
|
|||||||||||||||||||
Forest Nymph#forestnymphdress |
|||||||||||||||||||
|
|
|||||||||||||||||||
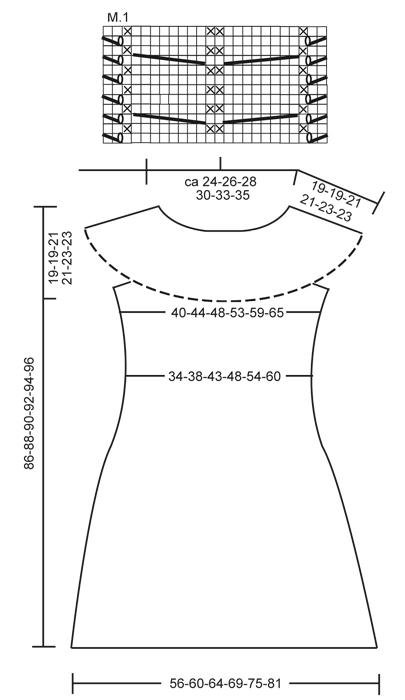
Knitted DROPS dress with yoke worked across with cables, short rows and crochet border in ”Delight” and ”Kid-Silk”. Size: S to XXXL
DROPS 132-1 |
|||||||||||||||||||
|
GARTER ST (back and forth on needle): K all rows. GARTER ST (in the round on circular needle): 1 ridge = 2 rounds: * K 1 round and P 1 round *, repeat from *-*. SHORT ROWS: To make the yoke wider at the bottom, work more rows over the bottom sts than the upper sts. This is done as follows: * Work 2 rows over all sts, work until 2nd marker, turn, tighten thread and work back, work until 1st marker, turn, tighten thread and work back, work 2 rows over all sts, work until 2nd marker, turn, tighten thread and work back, work 2 rows over all sts, work until 1st marker, turn, tighten thread and work back *, repeat from *-*, i.e. 1 repetition = 6 rows at the top and 14 rows at the bottom. PATTERN: See diagram M.1. Diagram shows 1 repetition of pattern in breadth (= 24 sts), the diagram shows pattern from RS. MEASURING TIP: Measure when piece is flat, it is important not to stretch the piece when measuring. DECREASE TIP: Work until 2 sts remain before marker, K 2 tog, slip 1 st as if to K, K 1, psso. INCREASE TIP: Work until 1 st remains before marker, make 1 YO, work 2 sts (marker is between these 2 sts), make 1 more YO. On next round K YOs twisted (i.e. work in back loop of st instead of front) to avoid holes . -------------------------------------------------------- -------------------------------------------------------- YOKE: Worked back and forth on circular needle, worked sideways from mid back. LOOSELY cast on 32-32-36-36-40-40 sts on circular needle size 5 mm with 1 thread Delight and 1 thread Kid-Silk. K 2 rows over all sts (1st row beg from bottom edge from RS). Work next row as follows (from RS): K 10-10-13-13-16-16, K 2 tog, 1 YO, K 1, K 2 sts in each of the next 4 sts (= K 8), K 2, K 2 in each of the next 4 sts (= K 8), K 1, 1 YO, slip 1 st as if to K, K 1, psso, K 6-6-7-7-8-8 = 40-40-44-44-48-48 sts. Work next row as follows (from WS): K 6-6-7-7-8-8, P 2, K 1, P 8, K 2, P 8, K 1, P 2 and K 10-10-13-13-16-16. Insert 2 markers in the piece as follows (from RS): 1st marker after 13-13-16-16-19-19 sts and 2nd marker after a total of 31-31-34-34-37-37 sts = 9-9-10-10-11-11 sts remain at the top after 2nd marker. Then work SHORT ROWS – see explanation above and PATTERN as follows: 10-10-13-13-16-16 sts in GARTER ST – see explanation above, diagram M.1 over the next 24 sts and 6-6-7-7-8-8 sts in garter st. Work until piece measures approx. 112-120-128-140-152-164 cm at bottom edge – SEE MEASURING TIP – finish after 2 rows have been worked on all sts. Work next row as follows (from RS): K 13-13-16-16-19-19, K the next 8 sts tog 2 by 2, K 2, K the next 8 sts tog 2 by 2, K 9-9-10-10-11-11 = 32-32-36-36-40-40 sts. K 1 row over all sts, then cast off all sts with K from RS. Piece measures approx. 114-122-130-142-154-166 cm at bottom edge. INSERTING MARKERS: Remove the markers in the piece and insert 4 new markers as follows: Place piece flat on a table and measure along the longest side. First find centre of piece – measure 18-20-21½-24-26½-29½ cm from centre out to each side – insert a marker in each side (i.e. there are 36-40-43-48-53-59 cm between markers on front piece), then measure 18-20-21½-24-26½-29½ cm in from cast off edge and cast on edge (= back piece) – insert markers here. There are now approx. 21-21-22-23-24-24 cm in each side between markers on front and back piece (= armholes). Sew yoke tog, sew edge to edge mid back to avoid a chunky seam. BODY: Worked in the round on circular needle. Knit up sts along bottom edge of yoke with 1 thread Delight and 1 thread Kid-Silk on circular needle size 5 mm – start round at marker in transition between left sleeve and back piece. Knit up 1 st in front loop of st in every ridge (1 ridge = 2 rows in garter st) between markers on back piece (approx. 60 to 98 sts), cast on 6-6-8-8-10-10 new sts (= under sleeve), skip to first marker on front piece and knit up 1 st in front loop of sts in every ridge on front piece (= approx. 60 to 98 sts), cast on 6-6-8-8-10-10 new sts (= under the other sleeve). NOW MEASURE PIECE FROM HERE! P 1 round while at the same time adjusting the no of sts to 136-148-162-180-200-220. Remove markers and insert 4 new markers as follows: K 14-15-16-18-20-22 sts, insert a marker, K 34-38-41-46-50-56 sts, insert a marker (these 2 markers marks where waistline should be worked on back piece), K 34-36-40-44-50-54 sts, insert a marker, K 34-38-41-46-50-56 sts, insert a marker (these 2 markers marks where waistline should be worked on front piece), K rest of round (= 20-21-24-26-30-32 sts). On next round, P 10-10-12-12-14-14 sts under each sleeve, K the remaining sts. Continue in stocking st over all sts. REMEMBER THE KNITTING TENSION! When piece measures 10 cm, dec 1 st on each side of the 4 markers - READ DECREASE TIP! Repeat dec when piece measures 15 cm = 120-132-146-164-184-204 sts. When piece measures 20-21-21-22-22-23 cm, inc 1 st on each side of the 4 markers – see INCREASE TIP. Repeat inc every 8 rounds a total of 9 times = 192-204-218-236-256-276 sts. When piece measures 63-65-65-67-67-69 cm, K 1 round while at the same time dec 12 sts evenly. Then work 4 cm in garter st. LOOSELY cast off. CROCHET LACE EDGE: Crochet an edge in bottom st in garter st along yoke (i.e. in same st that was knit up on body). Hold piece with neck opening towards you, work with 1 thread Kid-Silk on hook size 3.5 mm as follows – start mid back as follows: ROUND 1: 1 dc in first ridge (1 ridge = 2 rounds in garter st), * 3 ch, 1 dc in next ridge *, repeat from *-* the entire round, finish with 3 ch and 1 sl st in first dc on round (adjust so that there is an even number of ch-loops). ROUND 2: 2 ch, 1 dc in first ch-loop, * 5 ch, 1 dc in next ch-loop, 1 ch, 1 dc in next ch-loop *, repeat from *-*, finish with 1 sl st (instead of 1 dc) in first dc on round. ROUND 3: Work as follows in each of the large ch-loops (= 5 ch): 1 dc, 5 tr, 1 dc and work 1 dc in each of the small ch-loops (= 1 ch), finish with 1 sl st at beg of round, cut and fasten the thread. Steam the lace edge well to make it fold nicely downwards. |
|||||||||||||||||||
Diagram explanations |
|||||||||||||||||||
|
|||||||||||||||||||
 |
|||||||||||||||||||
Have you finished this pattern?Tag your pictures with #dropspattern #forestnymphdress or submit them to the #dropsfan gallery. Do you need help with this pattern?You'll find 17 tutorial videos, a Comments/Questions area and more by visiting the pattern on garnstudio.com. © 1982-2026 DROPS Design A/S. We reserve all rights. This document, including all its sub-sections, has copyrights. Read more about what you can do with our patterns at the bottom of each pattern on our site. |
|||||||||||||||||||


With over 40 years in knitting and crochet design, DROPS Design offers one of the most extensive collections of free patterns on the internet - translated to 17 languages. As of today we count 324 catalogues and 12290 patterns translated into English (UK/cm). 12290
We work hard to bring you the best knitting and crochet have to offer, inspiration and advice as well as great quality yarns at incredible prices! Would you like to use our patterns for other than personal use? You can read what you are allowed to do in the Copyright text at the bottom of all our patterns. Happy crafting!
Post a comment to pattern DROPS 132-1
We would love to hear what you have to say about this pattern!
If you want to leave a question, please make sure you select the correct category in the form below, to speed up the answering process. Required fields are marked *.