
Popular categories
Looking for a yarn?


Comments / Questions (45)
![]() Renard Muriel wrote:
Renard Muriel wrote:
Vous dites de monter 14ml pour faire le tour du bonnet? Combien faut il en monter?
16.12.2021 - 01:13DROPS Design answered:
Bonjour Mme Renard, on crochète d'abord la bordure en côtes tout autour du bonnet, les 14 mailles en l'air sont pour cette bordure que vous crochetez en demi-brides dans le brin arrière des mailles tous les rangs (avec 2 boutonnières), puis vous crochetez le bonnet autour de cette bordure. Bon crochet!
16.12.2021 - 07:30
![]() Nathalie Vandenberghe wrote:
Nathalie Vandenberghe wrote:
Graag had ik deze muts gehaakt, alleen is het me niet duidelijk hoeveel bollen wol ik dien te bestellen. 150-150g is dit gewoon 150g of 3 bollen van 50g Drops Alaska? Bij voorbaat dank voor een antwoord, met vriendelijke groet, Nathalie
24.02.2020 - 18:37DROPS Design answered:
Dag Nathalie,
Dat is inderdaad 3 bollen (50 gram per bol).
28.02.2020 - 19:50
![]() Alexia wrote:
Alexia wrote:
Hola. Necesito ayuda. No entiendo como debo empezar el gorro. Tengo hecha la orilla pero no entiendo cuando dice: empezar por la abertura del ojal y tejer 1y2p.b en cada vuelta. Me pueden ayudar por favor. Gracias
15.11.2015 - 21:58DROPS Design answered:
Hola Alexia. El gorro se comienza justo encima de los ojales. En la foto puedes ver bien el principio/final de la vta. La primera vta la trabajamos ALTERNANDO 1 p.b. /2 p.b. en cada fila de la orilla (es decir: en el primer pt trabajamos 1 p.b., en el sig pt trabajamos 2 p.b., etc. )
21.11.2015 - 18:16
![]() Charlotte wrote:
Charlotte wrote:
Bonjour, j'essaie de crocheter ce modèle mais je suis bloquée car je ne comprend pas la phrase suivante : Répéter ces diminutions 5 fois au total tous les 2 tours puis 1-2 fois au total tous les tours ?? Merci pour votre aide :)
24.06.2015 - 22:42DROPS Design answered:
Bonjour Charlotte, vous diminuez encore 8 B tous les 2 rangs encore 4 fois, puis 1-2 fois tous les tours, c'est-à-dire diminuez ensuite en crochetant (7-8 B, 2 B écoulées ens), puis (6-7 B, 2 B écoulées ens), il reste 32 B. Bon crochet!
25.06.2015 - 10:29
![]() Terri wrote:
Terri wrote:
This is so confusing - "crochet Info-1 and 2" Crochet DC TOG - How do I incorporate it into the pattern? Does it come before the "SEE CROCHET INFO-1" or after? Is it an alternate method? Why didn't they just put this into the pattern? I love this hat. have had the pattern for 2 years but everytime I try to make it, I end up crying in frustration. Is there a better, clearer version of this pattern?
12.02.2014 - 20:27DROPS Design answered:
The sections above the pattern is general info. In the pattern text it tells you when to look at the info, like when you work hdc on the edge, then it tells how to turn your rows in info 1, and later when you start working in the round and you will work rounds with sc and dc's then it tells you to read info 2 to know how to do this.
13.02.2014 - 00:44
![]() Ane wrote:
Ane wrote:
Så man ender opp med totalt 16 omganger etter vrangborden? På bildet ser det ikke ut som mer enn 12 omganger.. Nå har jeg rekket opp alt, og prøver igjen, denne gangen med felling på annenhver omgang fra vrangborden. Takk for raske tilbakemeldinger :) God natt!
06.02.2014 - 00:56DROPS Design answered:
Hej Ane. Ja, det er korrekt. God fornöjelse med luen :-)
06.02.2014 - 14:10
![]() Ane wrote:
Ane wrote:
Takk for svar på sent. Dette har jeg virkelig problemer med å forstå, beklager. Skjønner hva du skriver, men inkluderer de 12 omgangene ALT som er heklet fra vrangborden? "Når det er heklet 4 omg med st (arb måler nå ca 11 cm) felles det 8 st jevnt fordelt" Forstår det som at man skal hekle 4 omganger først UTEN felling, og SÅ starte fellingen?
05.02.2014 - 23:51DROPS Design answered:
Hej igen, nej det inkluderar ikke allt. Först hekler du 4 omg uten å felle. Dessa 4 omg plus kanten måler i allt 11 cm. Så starter du å felle, og det felles fördelt över 12 omg. Så luen kommer måle 11 cm + 12 omg. Hoppas det hjälper :)
06.02.2014 - 00:08
![]() Ane wrote:
Ane wrote:
Det står 'Gjenta fellingen på hver 2.omg totalt 5 ganger og...' Skal det felles bare i annenhver omgang i 5 omganger? Jeg får det heller ikke til å stemme. Da ender man ikke opp med 32 masker. Det må være felling i hver av de 5 omganger, kan ikke skjønne annet.
05.02.2014 - 17:49DROPS Design answered:
Du feller på annenhver omg 5 ggr, så det blir att du hekler 1 omg med felling, 1 omg uten felling, 1 omg med felling, en uten osv. Alltså hekles totalt 10 omg. Deretter 1-2 omg i tillegg med fellinger. Så tot 1-12 omg medan det felles.
05.02.2014 - 22:49
![]() Victoria wrote:
Victoria wrote:
Ane; Tror det må være en feil i oppskriften. At du skal gjenta fellingen på HVER omg totalt 5 ganger, ikke hver 2. omg. som står i oppskriften. Hva sier Drops?
05.02.2014 - 10:49DROPS Design answered:
Hei Victoria. Opskriften skulle vaere korrekt. Hvorfor mener du det er feil?
05.02.2014 - 16:31
![]() Ane wrote:
Ane wrote:
Kan noen forklare meg dette: "Gjenta fellingen på hver 2.omg totalt 5 ganger og deretter på hver omg totalt 1-2 ganger = 32-32 st tilbake." Deretter felle på totalt én omgang? Har nå heklet 10 omganger 'oppå' vrangborden, men får ikke helt avslutta her..
05.02.2014 - 00:55DROPS Design answered:
Hei Ane. Efter 4 omg med st har du fellet 8 st jevnt fordelt. Du skal derefter gjentage denne felling i hver 2. omg totalt 5 gange, og derefter 1 eller 2 gange i hver omgang (dvs, bare 1 gang i str XS/S eller 2 gange i str M/L). Saa har du 32 st tilbage paa raden.
05.02.2014 - 10:54
|
|
Winter Classic#winterclassicset |
|
|
|
|
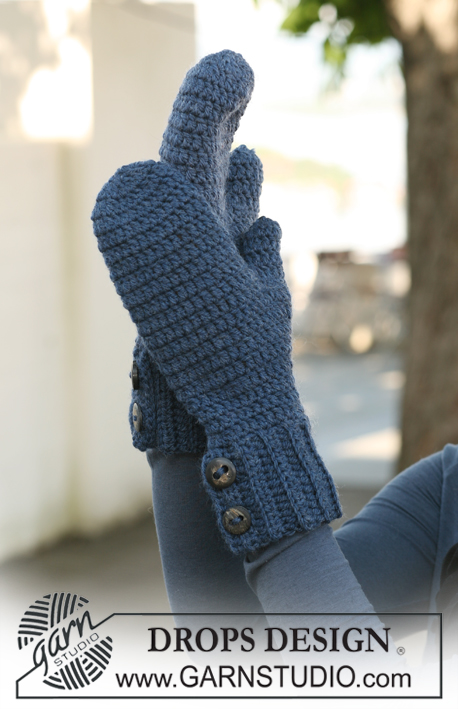
Crochet DROPS hat in ”Alaska”.
DROPS 126-21 |
|
|
CROCHET INFO-1: Replace first htr on row with 2 ch, finish row with 1 htr in 2nd ch from beg of previous row. CROCHET INFO-2: Replace first tr on round with 3 ch and finish round with 1 sl st in 3rd ch from beg of round. Replace first dc on round with 1 ch and finish round with 1 sl st in ch from beg of round. CROCHET TR TOG: Work 1 tr, but wait with the last pull-through (= 2 sts on hook), work next tr, but when doing the last pull-through pull thread through all sts on hook = 1 dec tr. CROCHET DC TOG: Work 1 dc, but wait with the last pull-through, work next dc and pull thread through both sts on hook. -------------------------------------------------------- HAT: Crochet an edge first back and forth in rib-structure, then form a ring, pick up new sts round the ring and crochet the hat in the round towards the top. EDGE: Work 14 ch with crochet hook size 4 mm with Alaska and work first row as follows: 1 htr in 3rd ch from hook, 1 htr in each of the next 11 ch = 13 htr, turn piece. See CROCHET INFO-1. Continue with 1 htr in each htr but work each htr in the back loop of st (i.e. not through the whole st) = rib-structure. When piece measures 52-56 cm make 2 buttonholes as follows: work 3 htr, 2 ch, skip 2 sts, 3 htr, 2 ch, skip 2 sts, 1 htr in each of the last 3 sts, turn piece. Work 1 htr in each htr and 2 htr in each ch-loop = 13 htr, cut and fasten thread. HAT: Slip the edge tog to a ring with the 2 rows on the side with buttonholes sitting over the 2 rows the opposite side = buttonhole split. See CROCHET INFO-2. Beg by buttonhole split and crochet alternately 1 and 2 dc in each row all the way round NOTE: by buttonhole split crochet through both layers = approx 78-84 dc. Continue with 1 tr in each st, AT THE SAME TIME adjust no of sts to 80-88 tr by crochet 2 tr in 1 st with regular intervals. After 4 rounds with tr (piece now measures approx 11 cm) dec 8 tr evenly, i.e. work every 9th and 10th tr tog in Size XS/S and every 10th and 11th tr tog in Size M/L – see above. Repeat the dec on every other round a total of 5 times and then on every round a total of 1-2 times = 32-32 tr left. Now work 2 rounds with dc, AT THE SAME TIME work 2 dc tog all the way round on both rounds = 8-8 dc left. Cut the thread, pull it through remaining sts, tighten tog and fasten. Hat measures approx 23-24 cm. Sew buttons to the edge. |
|
Have you finished this pattern?Tag your pictures with #dropspattern #winterclassicset or submit them to the #dropsfan gallery. Do you need help with this pattern?You'll find 8 tutorial videos, a Comments/Questions area and more by visiting the pattern on garnstudio.com. © 1982-2026 DROPS Design A/S. We reserve all rights. This document, including all its sub-sections, has copyrights. Read more about what you can do with our patterns at the bottom of each pattern on our site. |


With over 40 years in knitting and crochet design, DROPS Design offers one of the most extensive collections of free patterns on the internet - translated to 17 languages. As of today we count 324 catalogues and 12290 patterns translated into English (UK/cm). 12290
We work hard to bring you the best knitting and crochet have to offer, inspiration and advice as well as great quality yarns at incredible prices! Would you like to use our patterns for other than personal use? You can read what you are allowed to do in the Copyright text at the bottom of all our patterns. Happy crafting!
Post a comment to pattern DROPS 126-21
We would love to hear what you have to say about this pattern!
If you want to leave a question, please make sure you select the correct category in the form below, to speed up the answering process. Required fields are marked *.