
Popular categories
Looking for a yarn?


Comments / Questions (41)
![]() Betina Kjemtrup wrote:
Betina Kjemtrup wrote:
Skal der tages ind på hver pind, og ikke hver anden, som der står i opskriften, når flæserne nederst skal afsluttes??? Det er den eneste måde jeg kan ende op med det rigtige antal masker.Vh. Betina
29.11.2025 - 22:25
![]() Anne Grethe Andersen wrote:
Anne Grethe Andersen wrote:
Ved kant rundt om ærmegab skal man starte øverst på skulderen. Skal man også slutte der eller kun strikke ærmegab på forstykket? Mvh. Anne
21.10.2025 - 10:21
![]() Margarete wrote:
Margarete wrote:
Dzien dobry,chciałam nabrać na druty 2,5 80cm -504 oczek niestety nie zmieściłam. A w opisie sa nawet druty o długości 60cm? Więc nabrałam na 120 cm. Oczka sie przekrecaja tzn cala robotka sie przekreca . Powtarzalam to 3 razy. Za każdym razem robotka jest przekrecona.Co jest nie tak? Zawsze przerabiałam z prawej strony gdyz patrze na dolne nabrane oczka.
21.03.2025 - 08:53DROPS Design answered:
Witaj, w sytuacji gdy jest tak dużo oczek, nie łączyłabym robótki od początku na okrągło, tylko przerobiłabym pierwszy rząd normalnie (jak w robótce w rzędach), dopiero w następnym rzędzie połączyłabym ją na okrągło, początek robótki zszyjesz na końcu. Co do długości drutów zostanie wprowadzona korekta. Pozdrawiamy!
21.03.2025 - 10:44
![]() Berit Lundgren wrote:
Berit Lundgren wrote:
Har problem med mönstret på klänningen. Får för många maskor kvar när jag stickat resåren nederst. Har följt mönstret men har 256 maskor när det ska vara 192 maskor i storlek 12/18 mån, strax innan man ska byta till sticknummer 3. Kan någon förstå vad felet är? Förstår jag inte mönstret eller är det någon felskrivning på mönstret så jag ska minska ännu fler varv? Tacksam för hjälp.
25.11.2022 - 15:31DROPS Design answered:
Hej Berit, du har 448 m, strikker mønster (10r,4vr) 32 gange. Tager 2 masker ind i de 10r 4 gange = 8 i hver rapport 32 = 256 = 192 masker tilbage :)
30.11.2022 - 14:07
![]() Karin wrote:
Karin wrote:
Er der fejl i den lille størrelse jeg kan slet ikke få så mange masker til halskanten som der står i opskriften synes også stykket er meget smalt når man har lukket til ærmegab
30.10.2022 - 20:17DROPS Design answered:
Hei Karin. Det skal strikkes opp 48 masker til halskanten, er det der du ikke får plass til alle maskene? Se på målskissen, har du de målene som målskissen viser, er strikkefastheten overhold? Og husk det er knapper / knappekant i hver side, slik at plagget ikke skal over et babyhode og kan derfor være litt thight. mvh DROPS Design
31.10.2022 - 13:06
![]() Heli wrote:
Heli wrote:
Hi, again referring to what Amy and Michelle asked. There must be something wrong with the instruction of the ribbing of neckline. It is not possible to have 32 sts if there is space for only 20 or max 22 sts (the smallest size). There is the same problem in both sides. You can also answer in Finnish.
26.09.2022 - 17:40DROPS Design answered:
Dear Hell, pick up as many stitches as you can along front piece, then adjust the number of sts on first row to match ribbing edge (with 1 edge stitch on each side + K2 on each side), remember ribbing is tigthening piece and you don't want here to get tight neck edge - see picture. Happy knitting!
27.09.2022 - 08:35
![]() Lambion Josy wrote:
Lambion Josy wrote:
Pourrais avoir les explications pour tricot voir des aiguiles droites pour ce modele ? merci en francais
08.04.2022 - 17:11DROPS Design answered:
Bonjour Mme Lambion, cette leçon explique comment adapter un modèle sur aiguilles droites et pourra vous aider si besoin. Bon tricot!
08.04.2022 - 17:31
![]() Amy wrote:
Amy wrote:
Like Michelle in Canada (whose question from 2011 was never answered), I am confused as to the ribbing for the back neckline. Do I pick up shoulder stitches from the holders as well as the stitches that were cast off at the center back?
18.03.2021 - 11:24DROPS Design answered:
Dear Amy, neck is worked in 2 parts, on the front piece + on the back piece. On the front piece you pick up 48 to 64 sts including the middle sts slipped on a thread for neck (not the stitches on the threads for the shoulders) and work rib for 2-3 cm; on the back piece you pick up 32 to 48 sts along neck only (not the sts on the threads for shoulders). The stitches slipped on a thread for shoulders will be worked separately as explained under BUTTON BAND FRONT PIECE and BUTTON EDGE BACK PIECE. Happy knitting!
18.03.2021 - 12:25
![]() Naima wrote:
Naima wrote:
Bonjour Est ce possible de tricoter la robe en utilisant des aiguilles simples, si oui pourriez-vous me dire comment procéder Merci infiniment
03.12.2020 - 04:13DROPS Design answered:
Bonjour Naima, vous trouverez ici comment adapter un modèle sur aiguilles droites. Bon tricot!
03.12.2020 - 09:09
![]() Erika wrote:
Erika wrote:
Knopflochblende am Vorderteil, rechte Schulter. ich soll die Maschen vom Hilfsfaden auf die Nadel nehmen...sind hier nur die Maschen vom Vorderteil gemeint und wenn ja, was mache ich mit den Maschen von Rückenteil, denn die sind ja auch noch auf dem Hilfsfaden.
23.08.2019 - 12:18DROPS Design answered:
Liebe Erika, die stricken Sie später - siehe KNOPFBLENDEM AM RÜCKENTEIL. Viel Spaß beim stricken!
23.08.2019 - 14:45
|
|||||||
Sweet Sorbet#sweetsorbetdress |
|||||||
 |
 |
||||||
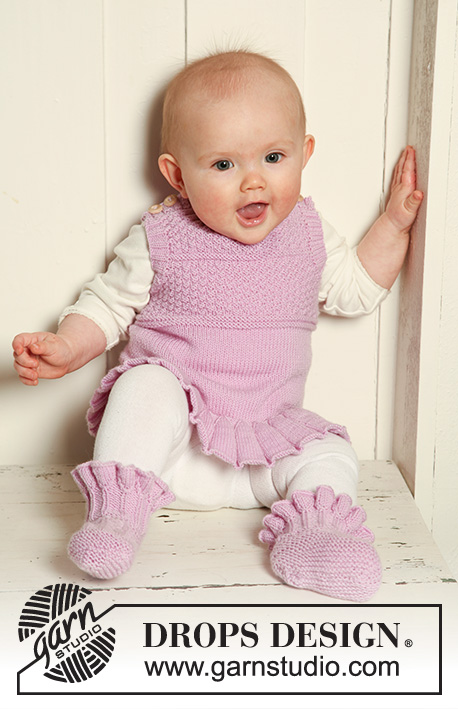
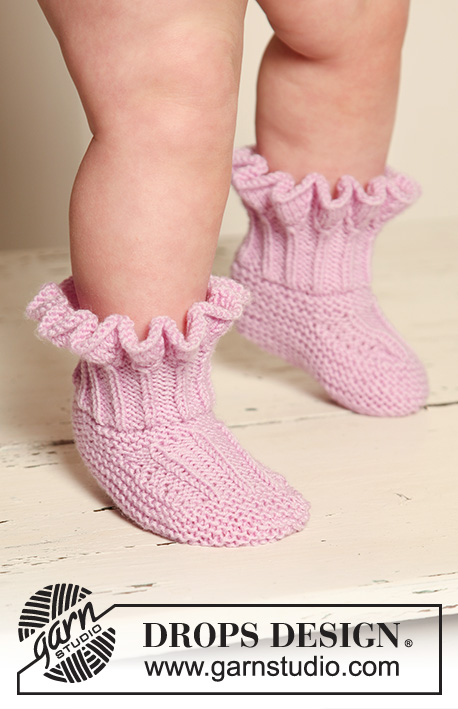
Set of dress with textured pattern plus booties with ruffles for baby and children in DROPS BabyMerino
DROPS Baby 19-19 |
|||||||
|
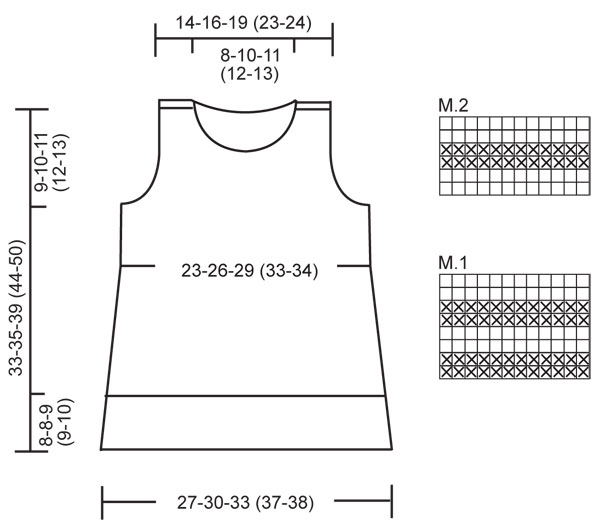
DRESS: GARTER ST (back and forth on needle): K all rows. DOUBLE MOSS ST: Row 1: * K2, P2 *, repeat from *-*. Row 2: K over K and P over P. Row 3: P over K and K over P. Row 4: like row 2. Repeat row 1-4. DECREASING TIP: Dec as follows before marker, beg 2 sts before marker: slip 1 st as if to K, K1, psso. Dec as follows after marker: K2 tog. PATTERN: See diagrams M.1 and M.2. Diagrams show the pattern from RS. -------------------------------------------------------- -------------------------------------------------------- DRESS: Worked in the round on circular needle. Cast on 392-420-448 (476-504) sts on circular needle size 2.5 mm with Baby Merino. Work rib as follows: P2, * K10, P4 *, repeat from *-* until 12 sts remain and finish with K10 and P2. Continue like this for 5-5-6 (6-7) cm. Now dec 1 st on both sides of each K-section by working the K10 as follows (work the P4 as before): slip 1 st as if to K, K1, psso, K sts until 2 sts remain, K2 tog. Repeat this dec on every other round a total of 4 times = 168-180-192 (204-216) sts. Work 1 round with K over K and P over P. Change to circular needle size 3 mm and K 1 round on all sts, AT THE SAME TIME dec 36-36-32 (28-32) sts evenly = 132-144-160 (176-184) sts. Insert 1 marker at beg of round and 1 marker after 66-72-80 (88-92) sts (to mark the sides). Now measure piece from here! Continue in stocking st on all sts. When piece measures 2-2-3 (3-3) cm from marker dec 1 st on each side of both markers – see DECREASING TIP - on every 2-2-2 (3-3.5) cm a total of 5 times = 112-124-140 (156-164) sts. Continue until piece measures 11-12-13 (16-18) cm from marker. Now work M.1 on all sts. After 1 vertical repeat of M.1 continue in DOUBLE MOSS ST – see above - on all sts. When piece measures 16-17-19 (23-27) cm from marker cast off 6 sts each side (i.e. 3 sts on each side of marker) for armhole. Now complete front and back pieces separately. BACK PIECE: = 50-56-64 (72-76) sts. Continue back and forth on needle in double moss st. AT THE SAME TIME cast off to shape the armhole each side on every other row: 2 sts 4 times and 1 st 1 time = 32-38-46 (54-58) sts. Now work M.2 on all sts. After 1 vertical repeat of M.2 continue in double moss st until piece measures 24-26-29 (34-39) cm from marker. Now cast off the middle 18-22-24 (26-30) sts for neck and complete each side separately. Cast off 1 st on neckline on next row = 6-7-10 (13-13) sts left on shoulder. Piece now measures approx 25-27-30 (35-40) cm from marker. Slip sts on a stitch holder. FRONT PIECE: = 50-56-64 (72-76) sts. Continue back and forth on needle in double moss st, AT THE SAME TIME cast off for armhole as described for back piece = 32-38-46 (54-58) sts. Now work M.2 on all sts. After 1 vertical repeat of M.2 continue in double moss st until piece measures approx 21-22-25 (29-34) cm from marker. Now cast off the middle 10-14-16 (18-22) sts for neck and complete each side separately. RIGHT SHOULDER: = 11-12-15 (18-18) sts. Continue in double moss st. AT THE SAME TIME cast off to shape the neckline at the beg of every row from mid front: 2 sts 2 times and 1 st 1 time = 6-7-10 (13-13) sts left on shoulder. Continue until piece measures 25-27-30 (35-40) cm. Slip sts on a stitch holder. LEFT SHOULDER: Like right shoulder. NECKLINE: Pick up 48 to 64 sts (divisible by 4) from RS round neck on front piece on circular needle size 2.5 mm. K 1 row from WS and continue as follows from RS: 1 GARTER ST – see above, * K2, P2 *, repeat from *-* and finish with K2 and 1 garter st. Continue like this back and forth on needle until neckline measures 2-2-2 (3-3) cm. Cast off with K over K and P over P. Pick up 32 to 48 sts (divisible by 4) from RS round neck on back piece. K 1 row from WS and continue as follows from RS: 1 garter st, * K2, P2 *, repeat from *-* and finish with K2 and 1 garter st. Continue like this back and forth on needle until neckline measures 2-2-2 (3-3) cm. Cast off with K over K and P over P. EDGE ROUND ARMHOLE: Beg by shoulder. Pick up 52 to 84 sts (divisible by 4) from RS round armhole on circular needle size 2.5 mm. K 1 row from WS and continue as follows from RS: 1 garter st, * K2, P2 *, repeat from *-* and finish with K2 and 1 garter st. Continue like this back and forth on needle until edge measures 2-2-2 (3-3) cm. Cast off with K over K and P over P. BUTTON BAND FRONT PIECE: Right shoulder: Pick up 6-6-6 (8-8) sts inside 1 garter st on neckline on circular needle size 2.5 mm, work the 6-7-10 (13-13) sts from stitch holder on shoulder back on needle and then pick up 6-6-6 (8-8) sts inside 1 garter st on armhole edge = 18-19-22 (29-29) sts. K 1 row from WS, AT THE SAME TIME inc 2-1-2 (3-3) sts evenly = 20-20-24 (32-32) sts. Continue as follows from RS: 1 garter st, * K2, P2 *, repeat from *-* and finish with K2 and 1 garter st. Continue like this until edge measures approx 1 cm. Now make buttonholes as follows (from RS): 1 garter st, K2, P2, K2 tog, 1 YO, P2, * K2, P2 *, repeat from *-* until 7 sts remain, 1 YO, K2 tog, P2, K2 and 1 garter st. Continue in rib as before until edge measures 2 to 3 cm. Cast off with K over K and P over P. Left shoulder: Like right shoulder. BUTTON EDGE BACK PIECE: Work edge for 2-3 cm on each shoulder as described for front piece, but WITHOUT buttonholes. ASSEMBLY: Sew buttons on shoulders. --------------------------------------------------------------------- BOOTIE: Worked back and forth on needle from mid back. Cast on 122-122-134 (134-146) sts (includes 1 edge st each side) on needle size 2.5 mm with Baby Merino. P 1 row from WS and work 2 rows rib P3/K9 with 1 edge st each side. On next row dec all K9 to K7 as follows (work all P3 and 1 edge st each side as before): slip 1 st as if to K, K1, psso, K sts in K-section until 2 sts remain, K2 tog = 102-102-112 (112-122) sts. Work 1 row with K over K and P over P. On next row dec all K7 to K5 in the same way as before = 82-82-90 (90-98) sts. Work 1 row with K over K and P over P. On next row dec all K5 to K3 in the same way as before = 62-62-68 (68-74) sts. Work 1 row with K over K and P over P. On next row dec all K3 to K1 as follows (work all P3 and 1 edge st each side as before): slip 1 st as if to K, K2 tog, psso = 42-42-46 (46-50) sts. Now continue in rib P3/K1 with 1 edge st each side until piece measures 5-6-6 (7-7) cm - adjust to a row from WS. P 1 row from WS, AT THE SAME TIME dec 7-3-7 (3-7) sts evenly = 35-39-39 (43-43) sts. K 6 rows on all sts. Now slip 12-12-12 (16-16) sts each side on stitch holders = 11-15-15 (11-11) sts left on needle (= upper foot). Work 4-4.5-5 (6-8) cm rib on these sts as follows (as seen from RS): * P3, K1 *, repeat from *-* and finish with P3. Now pick up 10-11-13 (16-21) sts each side of upper foot and slip sts from stitch holders back on needle = 55-61-65 (75-85) sts in total. Continue K these sts back and forth on needle from mid back - AT THE SAME TIME after 1.5-2.5-3 (3-4) cm dec as follows: K2 tog at the beg and end of row and each side of the middle st. Repeat the dec on every other row until piece measures 3-4-5 (5-6) cm from where sts were picked up. Cast off and sew seam under foot in outer loops of sts. Sew seam up along rib mid back inside 1 edge st. |
|||||||
Diagram explanations |
|||||||
|
|||||||
 |
|||||||
Have you finished this pattern?Tag your pictures with #dropspattern #sweetsorbetdress or submit them to the #dropsfan gallery. Do you need help with this pattern?You'll find 23 tutorial videos, a Comments/Questions area and more by visiting the pattern on garnstudio.com. © 1982-2026 DROPS Design A/S. We reserve all rights. This document, including all its sub-sections, has copyrights. Read more about what you can do with our patterns at the bottom of each pattern on our site. |
|||||||


With over 40 years in knitting and crochet design, DROPS Design offers one of the most extensive collections of free patterns on the internet - translated to 17 languages. As of today we count 324 catalogues and 12290 patterns translated into English (UK/cm). 12290
We work hard to bring you the best knitting and crochet have to offer, inspiration and advice as well as great quality yarns at incredible prices! Would you like to use our patterns for other than personal use? You can read what you are allowed to do in the Copyright text at the bottom of all our patterns. Happy crafting!
Post a comment to pattern DROPS Baby 19-19
We would love to hear what you have to say about this pattern!
If you want to leave a question, please make sure you select the correct category in the form below, to speed up the answering process. Required fields are marked *.