
Popular categories
Looking for a yarn?


Comments / Questions (68)
![]() Anne wrote:
Anne wrote:
Hej, hvor er beskrivelsen på hvordan ærmerne strikkes? De er slet ikke nævnt i opskriften.
04.07.2018 - 17:31DROPS Design answered:
Hei Anne. Ermene strikkes som en del av forstykkene og bakstykket: det legges opp masker i sidene til ermer. God fornøyelse
06.07.2018 - 08:02Kate wrote:
Hi, if this is knit with 2 strands of Alpaca together, could I use 1 Nepal strand instead?
20.12.2016 - 11:45DROPS Design answered:
Dear Kate, sure you could, read more about alternatives here. Happy knitting!
20.12.2016 - 12:28Harriet wrote:
Storlek 62/68 känns som en för liten storlek åt 6/9 månaders baby, hur skall man tolka det. Kan man lita på att det blir rätt storlek om man följer det maskantal som kommer som andra i följd?
01.10.2016 - 14:59DROPS Design answered:
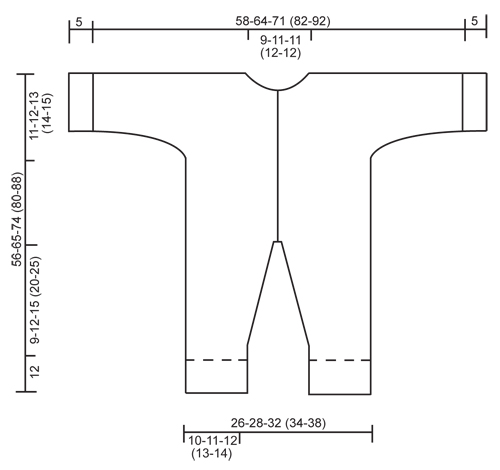
Hej Harriet. Se nederst paa opskriften. Her finder du maaleskitse med alle maal i cm per str. Du kan sammenligne her for at vaelge den str du vil lave. Og husk at strikke en pröve saa din strikkefasthed stemmer - saa kommer maalene ogsaa til at stemme.
04.10.2016 - 15:38
![]() Dinah wrote:
Dinah wrote:
Hallo liebes Drops-Team, wie genau näht man denn die Blenden und die 4 abgeketteten Maschen jedes Beins im Schritt zusammen? Die Blenden logischerweise übereinander, aber wie gehts weiter? Vielen Dank für die Hilfe Dinah
24.09.2016 - 12:05DROPS Design answered:
Liebe Dinah, die Blendemaschen müssen Sie dann unten am Strampler nähen, so dass es kein Loch entseht.
26.09.2016 - 11:31
![]() Caroline wrote:
Caroline wrote:
How much wool will be leftover after completing this project? I want to make it in two sizes (1/3 and 12/18) and I'm not sure how much wool I should buy.
18.07.2016 - 16:27DROPS Design answered:
Dear Caroline, you will find under materials amount of yarn in these both sizes - you may need a bit less than the total amount for these 2 sizes but rather check with your DROPS store, it maybe better to have enough yarn so that you don't run out yarn. Happy knitting!
18.07.2016 - 16:39
![]() Lena wrote:
Lena wrote:
Einfacher: 44+2(6+5+7+9)=98
14.12.2015 - 15:44
![]() Anja wrote:
Anja wrote:
Kruippakje maat 1: ACHTERPAND= 44, nieuwe st voor de mouwen: 2x3; 1x5; 1x7 en dan nog 1x9 = 98 Ik kom uit op 108. Wat doe ik verkeerd??
14.12.2015 - 12:39DROPS Design answered:
Hoi Anja. 2 x 3 st (= 12), 1 x 5 st (= 10), 1 x 7 st (= 14) en 1 x 9 st (= 18): 12+10+14+18+44 = 98 st.
14.12.2015 - 15:27
![]() Clarissa wrote:
Clarissa wrote:
Buongiorno, Ho fatto le due gambe separatamente. Poi le ho trasferite sul ferro circolare. Siccome le due gambe sono unite in centro (dalle 4 maglie per lato che ho chiuso), non riesco a lavorare con il ferro circolare. Cioé le maglie non hanno mobilità. E' possibile spiegarmi come avviare il davanti e dietro dal momento in cui si inserisce il ferro circolare? Sto impazzendo! La mia bimba nasce tra 15 giorni e devo finire in tempo! Grazie Clarissa.
01.12.2015 - 17:16DROPS Design answered:
Buongiorno Clarissa. Quando riporta le m su un unico ferro circolare, si assicuri di passarle sempre dalla stessa punta. In questo modo le m sono già nella posizione corretta per proseguire avanti e indietro sui ferri circolari. Potrebbero essere un po’ difficili i primi ferri. Buon lavoro!
03.12.2015 - 13:46
![]() Dinka wrote:
Dinka wrote:
Muss der Schritt unten nicht auch zusammengenäht werden? Die 4 Maschen, die bei jedem Bein um die Markierung abgekürzt werden, lassen doch ein Loch entstehen - logischerweise, damit der Popo reinpasst. Oder hab ich was falsch verstanden?
27.11.2015 - 06:00DROPS Design answered:
Ja, Sie haben Recht, es entsteht durch das Abketten der je 4 M in der Tat ein Schlitz zwischen den Beinen, der am Ende mit einer Naht geschlossen werden muss.
05.12.2015 - 17:18
![]() Carina wrote:
Carina wrote:
Ich habe Schwierigkeiten bei der Kapuze. Ich bekomme die Kapuze nicht schön an die Blenden genäht. Gibt es irgendwo eine Möglichkeit sich das anzuschauen, wie das geht? Lieben Gruß Carina
15.10.2015 - 09:32DROPS Design answered:
Speziell für diesen Fall haben wir leider kein Video. Vielleicht stecken Sie sich die Kapuze vorher an den Blenden fest, Sie müssen Sie ja doppelt legen, dann klappt es etwas besser. Versuchen Sie, die Naht möglichst flach zu arbeiten. Sie können auch versuchen, erst eine Hälfte des Kapuzenrandes an den Blenden festznähen und ihn dann umklappen und die zweite Hälfte anzunähen.
16.10.2015 - 12:03
|
|
My First Christmas#myfirstchristmasonesie |
|
|
|
|
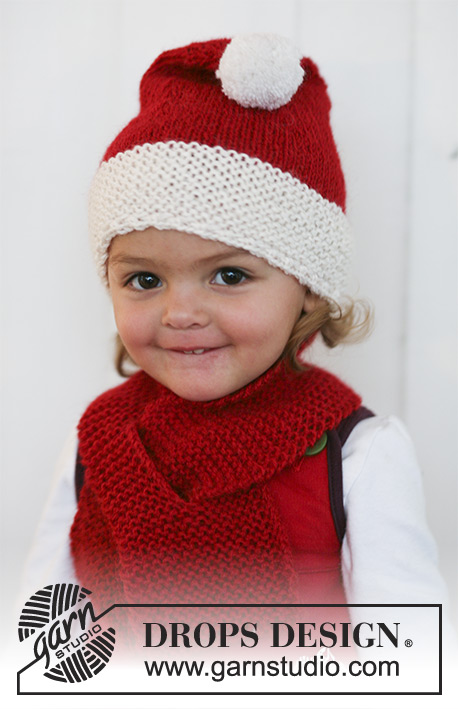
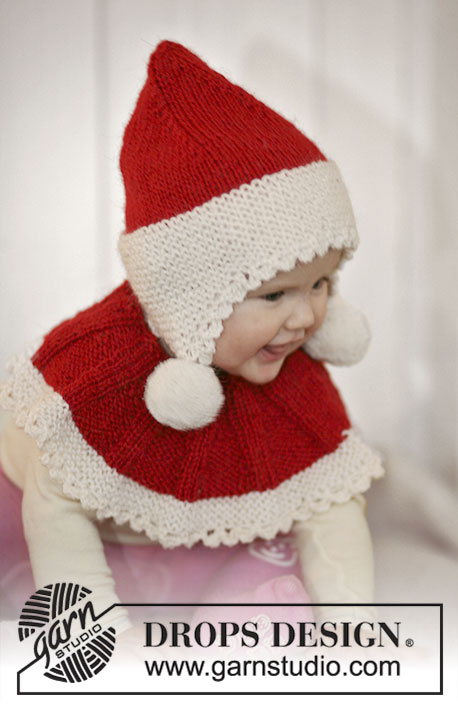
Santa onesie with hood for baby and children in 2 threads DROPS Alpaca
DROPS Baby 19-16 |
|
|
MOSS ST: Row 1: * K1, P1 *, repeat from *-*. Row 2: K over P and P over K. Repeat row 2. GARTER ST (back and forth on needle): K all rows. BUTTONHOLES: Make buttonholes on right front band. 1 BUTTONHOLE = K tog 3rd and 4th st from mid front and make 1 YO. Make buttonholes when piece measures a total of: SIZE 1/3 MONTHS: 23, 30, 37, 44, 51 cm SIZE 6/9 MONTHS: 28, 36, 44, 52, 60 cm SIZE 12/18 MONTHS: 31, 38, 46, 53, 61, 68 cm SIZE 2 YEARS: 34, 42, 50, 58, 66, 74 cm SIZE 3/4 YEARS: 39, 48, 56, 65, 73, 82 cm ---------------------------------------------------------- LEG: Worked in the round on double pointed needles. LOOSELY cast on 34-36-40 (44-48) sts on double pointed needles size 4.5 mm with 2 threads white. K 1 round and continue in MOSS ST – see above. When piece measures 12 cm change to double pointed needles size 5 mm and 2 threads red and continue in stocking st. Insert a marker at beg of round = inside of leg. REMEMBER THE KNITTING TENSION! When piece measures 14 cm inc 1 st each side of marker, and repeat the inc on every 2-2-3 (4-5) round a total of 7-8-9 (9-10) times = 48-52-58 (62-68) sts. When piece measures 21-24-27 (32-37) cm cast off 4 sts at the inside of leg (= 2 sts each side of marker) = 44-48-54 (58-64) sts. Put piece aside and knit the other leg in the same way. BODY: Slip both legs on the same circular needle size 5 mm with the inside of legs towards each other = 88-96-108 (116-128) sts. Now continue back and forth on circular needle from mid front as follows (first row = RS): Cast on 3 new sts on needle, K all sts on row and cast on 3 new sts at the end of row = 94-102-114 (122-134) sts. Insert a marker 25-27-30 (32-35) sts in from each side (= 44-48-54 (58-64) sts between markers on back piece). Continue in stocking st with 5 sts each side towards mid front in garter st (= front bands). AT THE SAME TIME when piece measures 23-28-31 (34-39) cm make buttonholes on right front band – SEE ABOVE! When piece measures 45-53-61 (66-73) cm divide the piece by the 2 markers and complete front and back pieces separately. BACK PIECE: = 44-48-54 (58-64) sts. Continue in stocking st, AT THE SAME TIME cast on new sts at the end of every row each side for sleeves: 3 sts 2-1-3 (1-2) times, 5 sts 1-2-1 (2-2) times, 7 sts 1-1-1 (2-2) times and then 9-10-12 (14-16) sts 1 time = 98-108-120 (140-156) sts on needle. When piece measures 55-64-73 (79-87) cm cast off the middle 16-18-18 (20-20) sts for neck and complete each shoulder/sleeve separately. Work 2 rows stocking st on the remaining 41-45-51 (60-68) sts and cast off LOOSELY. LEFT FRONT PIECE: = 25-27-30 (32-35) sts. Continue in stocking st with the 5 front band sts in garter st as before, AT THE SAME TIME cast on new sts at the end of every row towards the side for sleeve as described for back piece = 52-57-63 (73-81) sts. When piece measures 52-61-69 (75-83) cm cast off 5-6-6 (7-7) sts towards mid front for neck and cast off to shape the neckline at the beg of every row from mid front: 2 sts 2 times and 1 st 2 times = 41-45-51 (60-68) sts left on needle for shoulder/sleeve. Continue until piece measures 56-65-74 (80-88) cm and cast off LOOSELY. RIGHT FRONT PIECE: Like left front piece, but mirrored – remember buttonholes on front band. ASSEMBLY: Sew upper arm seams, edge to edge in outer loops of sts. Place right front band over left front band and sew tog at the bottom of body piece. Sew under arm seams, edge to edge in outer loops of sts. Sew on buttons. CUFF: Pick up 32-36-36 (40-40) sts on double pointed needles size 4.5 mm with 2 threads white round sleeve edge. Work moss st in the round until cuff measures 5 cm and cast off LOOSELY with K over P and P over K. Repeat round the other sleeve edge. Fold sleeve and leg edges towards RS. HOOD: Pick up approx 40 to 50 sts from RS round neck on circular needle size 5 mm with 2 threads red – beg after the 5 front band sts on right front piece and finish before the 5 front band sts on left front piece. Work stocking st back and forth on needle, AT THE SAME TIME on second row (= from RS) inc evenly to 66-70-74 (78-82) sts. Continue until hood measures 21-23-25 (27-28) cm and cast off. Sew hood tog at the top in outer loops of sts. Now work border round the opening of hood as follows: Pick up approx 81-89-97 (105-109) sts from RS along the opening of hood on needle size 4.5 mm with 2 threads white. Work moss st back and forth on needle until border measures 6 cm and cast off LOOSELY with K over P and P over K. Fold border double towards RS and sew border to the 5 garter sts each side. Make a white pompom with a diameter of approx 4-5 cm and attach to the top of hood. |
|
 |
|
Have you finished this pattern?Tag your pictures with #dropspattern #myfirstchristmasonesie or submit them to the #dropsfan gallery. Do you need help with this pattern?You'll find 22 tutorial videos, a Comments/Questions area and more by visiting the pattern on garnstudio.com. © 1982-2026 DROPS Design A/S. We reserve all rights. This document, including all its sub-sections, has copyrights. Read more about what you can do with our patterns at the bottom of each pattern on our site. |


With over 40 years in knitting and crochet design, DROPS Design offers one of the most extensive collections of free patterns on the internet - translated to 17 languages. As of today we count 324 catalogues and 12290 patterns translated into English (UK/cm). 12290
We work hard to bring you the best knitting and crochet have to offer, inspiration and advice as well as great quality yarns at incredible prices! Would you like to use our patterns for other than personal use? You can read what you are allowed to do in the Copyright text at the bottom of all our patterns. Happy crafting!
Post a comment to pattern DROPS Baby 19-16
We would love to hear what you have to say about this pattern!
If you want to leave a question, please make sure you select the correct category in the form below, to speed up the answering process. Required fields are marked *.