
Popular categories
Looking for a yarn?


Comments / Questions (33)
![]() Noël Marjolaine wrote:
Noël Marjolaine wrote:
Bonjour, Énorme coup de cœur pour ce modèle 😍 Souffrant de problème de peau, je ne supporte pas la laine. Auriez-vous la possibilité de me proposer des fils de remplacement (coton, polyester...), les couleurs et la quantité pour une taille xxl-xxxxl? En vous remerciant par avance pour votre aide. Excellent après-midi. Cordialement, Marjolaine
15.01.2026 - 12:58DROPS Design answered:
Bonjour Marjolaine et merci. Utilisez notre convertisseur pour voir les différentes alternatives possibles et les quantités correspondantes; en cas de doute, votre magasin saura vous conseiller, même par mail ou téléphone. Bon tricot!
16.01.2026 - 07:50
![]() Katinka wrote:
Katinka wrote:
Goddag, Jeg strikker M/L, og skal tage ud over på arbejdet først 7 gange på hver 2. p, og derfeter 7 gange på hver 4.p. Jeg ender med 360 m, ikke 380. Jeg har regnet efter og der burde i siden være 13 m + 14 udt = 27 m. Imellem hver mærketåd burde der være 6 m + 28 udt = 34 masker. Udtageningerne starter med 80 m fordelt på 2x13 m og 6x9 m. Efter udtagningerne burde der derfor være (2 x 27) + (9 x 34) = 360 m. Hvad har jeg misfostået? Tak på forhånd!
01.08.2025 - 16:09DROPS Design answered:
Hei Kathinka. I str. M/L - det legges opp 60 masker, så økes det med 20 masker = 80 masker. Det settes 10 merker i arbeidet og det økes 1 maske på hver side = 20 økte masker = 80 + 20 = 100 masker. Så skal denne økningen gjentas 7 ganger til på hver 2. pinne = 7 x 20 = 140 masker. Man hadde 100 masker etter 1. økning + så gjentas økningen 7 ganger til 140 masker = 100 + 140 = 240 masker. Så skal det økes på hver 4. pinne 7 ganger = 7 x 20 = 140. = 240 + 140 = 380 masker. mvh DROPS Design
25.08.2025 - 12:00
![]() Saskia Schoenmakers wrote:
Saskia Schoenmakers wrote:
Ik heb een vraag over het stukje na 66 cm. Hier ga je een voor en achterband breien maar dit komt nergens op de tekening voor en heb je dan een split? Of moet je die aan elkaar zetten ?
11.04.2023 - 18:20DROPS Design answered:
Dag Saskia,
Nee je hebt geen split en je zet de voorpanden en het achterpand ook niet aan elkaar vast. Je kunt de steken van het achterpand en 1 van de voorpanden op een hulpdraad zetten en dan elk deel afzonderlijk verder breien. Op de voor en achterpanden wordt nog een ronding gemaakt door in etappes af te kanten.
12.04.2023 - 20:24
![]() Naomi wrote:
Naomi wrote:
Work YO into back of loop on return row to avoid a hole. How exactly are we to do this? I have tried purling through the back loop. I still get a visible hole. Please advise
11.01.2023 - 05:12DROPS Design answered:
Hi Naomi, If you are finding this difficult, slip the yarn over off the left needle and replace it the other way round (twisted), then purl as normal. Hopefully this will avoid a hole. There is also a possibility the yarn overs are too loose and need to be worked slightly tighter. Hope this helps and happy knitting!
11.01.2023 - 06:53
![]() Emmanuelle Michel wrote:
Emmanuelle Michel wrote:
Hi I have a question about the increase. I don't understand how : "1 YO + K 2 tog (marker sits between these 2 sts) + 1 YO = 2 st increase. To me it increases only 1 st. I must do something wrong...
26.10.2022 - 15:41DROPS Design answered:
Dear Mrs Michel, pattern was wrong, you should knit 2 and not knit 2 together, it has been fixed, thanks for you feedback. Happy knitting!
26.10.2022 - 16:43
![]() Linda wrote:
Linda wrote:
Hallo Ihr Lieben, erstmal Danke für eure tolle Seite und die Mühe die Anleitungen kostenlos zur Verfügung zu stellen! Ich finde dieses Modell sehr schön, möchte nur keine Knopfleiste und Kragen. Kann ich diese einfach weglassen, oder würde der Schnitt beim Tragen dann oben einfach in sich zusammenfallen? Vielen Dank. Viele Grüße Linda
06.06.2022 - 09:47DROPS Design answered:
Liebe Linda, es würde sicher anders aussehen, aber leider können wir nicht jede Anleitung nach jeder Anfrage anpassen, gerne wird Ihnen Ihr DROPS Laden damit gerne - auch telefonisch oder per E-Mail helfen. Viel Spaß beim stricken!
07.06.2022 - 10:08
![]() Anne wrote:
Anne wrote:
Has anyone put pockets on this pattern? If so how?
10.08.2020 - 14:39DROPS Design answered:
Dear Anne, we are unfortunately not able to adjust every pattern to every single request but you are welcome to contact your DROPS store for any individual assistance - you could be inspired but our patterns with pockets. Happy Knitting!
10.08.2020 - 16:40
![]() MissBlue wrote:
MissBlue wrote:
As an FYI, your math for the M/L stich count is 20 short. To get to the desired 380 stitches you would need to do the increase rows a total of 15 times, you currently call for 14.
04.02.2019 - 23:42DROPS Design answered:
Dear MissBlue, number of stitches in M is right: you cast on 62 sts and increase to 80 sts on 4th row, then increase a total of 20 sts (every other round 8 times in total (1 time as explained + 7 more times) and every 4th round 7 times): 80 + (160+140)= 380 sts. Happy knitting!
05.02.2019 - 09:28
![]() Alessia wrote:
Alessia wrote:
Se non volessi utilizzare due tipi di filato ma solo uno, quale mi c onsigliereste? Grazie
12.11.2017 - 23:49DROPS Design answered:
Buongiorno Alessia. Potrebbe sostituire i due filati con il filato Melody che ha lo stesso spessore dei due filati suggeriti e lavorati insieme. Buon lavoro!
13.11.2017 - 08:26
![]() Yvonne De Graaf wrote:
Yvonne De Graaf wrote:
Bij het rechter voorpand staat aan het einde: Kant de st af bij een totale hoogte van in mijn geval 76 cm aan het middenvoor. Ik begrijp niet wat ze daar mee bedoelen, met aan het middenvoor. Misschien dat jullie het mij duidelijk kunnen maken. Vast bedankt.
11.09.2015 - 10:00DROPS Design answered:
Hoi Yvonne. Middenvoor = rand langs de voorkant (bies) van het voorpand. Je meet dus hier.
11.09.2015 - 13:41
|
|
In Flight |
|
 |
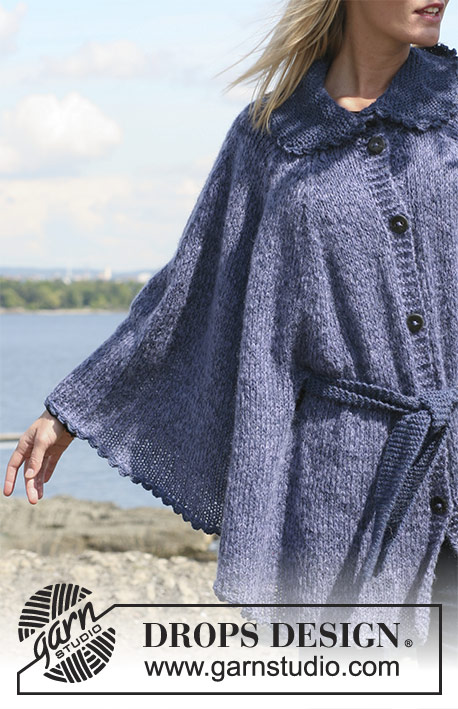 |
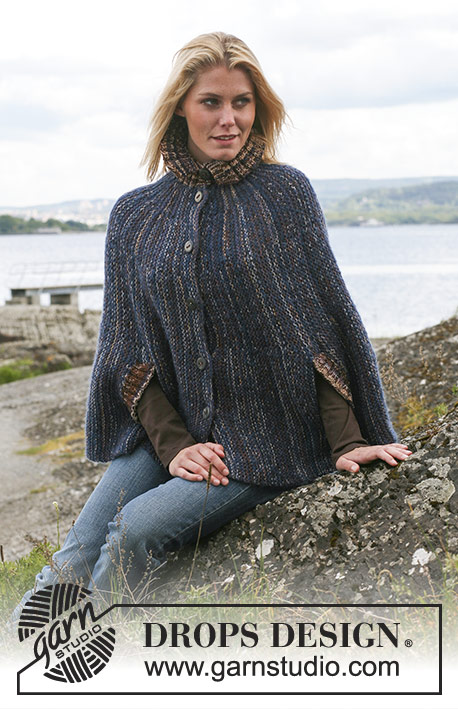
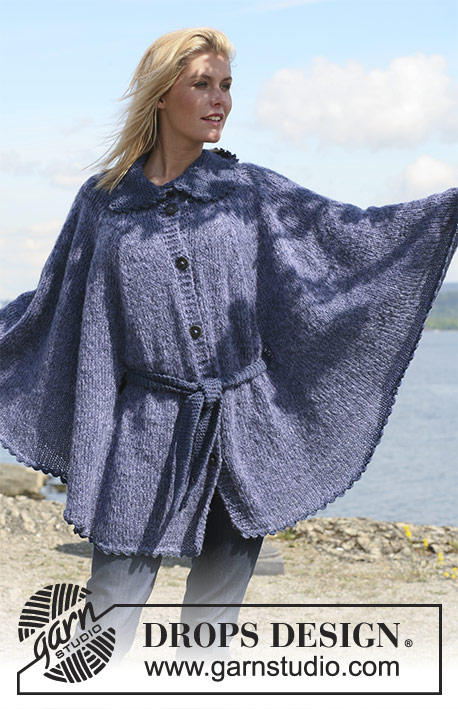
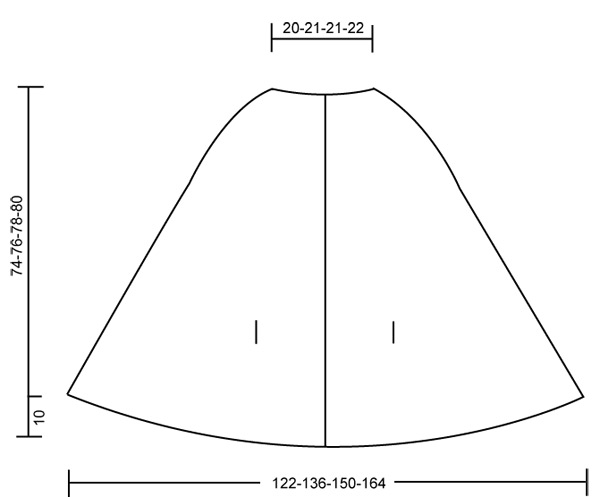
DROPS cape in ”Alpaca” and ”Vivaldi” with buttons and belt. Size S - XXXL.
DROPS 110-18 |
|
|
Garter st, back and forth on needle: K all rows. Measurement tip: Place piece flat for all measurements. Buttonhole: Cast off for buttonholes on right front band. 1 buttonhole = K tog 3rd and 4th st from mid front and make 1 YO. Cast off for the first buttonhole when piece measures 8 cm, and place the next 4 buttonholes with 12 cm between each (the 6th buttonhole will be on collar). Increasing tip: Make all inc from the RS as follows: beg 1 st before marker, make 1 YO, K 2 (marker sits between these 2 sts), make 1 YO. Work YO into back of loop on return row to avoid a hole. -------------------------------------------------------------------- Cape: Worked from top down. Cast on 60-62-64-66 sts with 1 thread of each quality on needle size 7 mm. K 4 rows, then K 1 row and inc to 80 sts evenly for all sizes. Insert 10 markers in piece as follows: First marker after 13 sts, and the next 9 markers with 6 sts between each = 13 sts left after the last marker . Read all of the following section before continuing! Continue in stocking st with 6 garter sts each side for front bands. At the same time on first row from RS inc 1st on each side of all markers – see Increasing tip – and repeat the inc on every other row another 5-7-9-11 times, then on every 4th row a total of 7-7-7-7 times = 340-380-420-460 sts. Remember the knitting tension! Buttonholes: At the same time when piece measures 8 cm cast off for buttonholes on right front band – see above. When piece measures approx 40-42-44-46 cm (adjust so that next row is from WS) cast off for 4 holes for belt as follows: Row from WS: 6 garter sts, P 23-27-30-33 sts, K 5 sts, P 105-117-131-145 sts, K 5 sts, P 52-60-66-72 sts, K 5 sts, P 105-117-131-145 sts, K 5 sts, P 23-27-30-33 sts and 6 garter sts. Next row from RS: Cast off the middle of the K sts in all K-sections (= hole for belt). Now work 6 rows stocking st back and forth on the 5 pieces separately with 2 garter sts on both sides of each hole. Continue on all sts from the RS, at the same time cast on 1 new st over all 4 holes = 340-380-420-460 sts. On next row from WS K 5 sts over all 4 holes. Continue in stocking st with front bands in garter st as before. When piece measures 64-66-68-70 cm work next row as follows from RS: 57-62-70-77 sts (= left front piece), cast off 60-70-76-82 sts, 106-116-128-142 sts (= back piece), cast off 60-70-76-82 sts, 57-62-70-77 sts (= right front piece). Now complete each piece separately. Right front piece: = 57-62-70-77 sts. Continue in stocking st with front band in garter st, at the same time cast off at the beg of every row from the side: 3-3-4-4 sts 8 times = 33-38-38-45 sts. Cast off when piece measures 74-76-78-80 cm mid front. Left front piece: Like right front piece, but mirrored. Back piece: = 106-116-128-142 sts. Continue in stocking st, at the same time cast off at the beg of every row: 3-3-4-4 sts 8 times = 58-68-64-78 sts. Cast off when piece measures 74-76-78-80 cm mid back. Collar: Pick up 60-62-64-66 sts round neckline with 1 thread of each quality on needle size 7 mm. Work 6 rows garter st on all sts, at the same time after 2 rows cast off for 1 buttonhole in line with the others on front band. After 6 rows change to 2 threads Alpaca and needle size 5 mm. Continue in garter st, at the same time inc evenly to 78-80-82-84 sts on first row. When collar measures 10 cm cast off 1 st at the beg of every row a total of 5 times, and then cast off 2 sts each side 1 time = 64-66-68-70 sts. Cast off. Belt: Cast on 12 sts with 2 threads Alpaca on needle size 5 mm. Work garter st back and forth on needle until belt measures 120-140-160-180 cm, cast off. Crochet border: Crochet a border along bottom edge of cape with 2 threads Alpaca and crochet hook size 6 mm as follows: 1 dc in first st, * 4 ch, 1 tr in the first ch (= 1 picot), skip approx 2 cm, 1 dc *, repeat from *-*. Crochet a similar border round the collar. Sew on buttons. |
|
 |
|
Have you finished this pattern?Tag your pictures with #dropspattern or submit them to the #dropsfan gallery. Do you need help with this pattern?You'll find 21 tutorial videos, a Comments/Questions area and more by visiting the pattern on garnstudio.com. © 1982-2026 DROPS Design A/S. We reserve all rights. This document, including all its sub-sections, has copyrights. Read more about what you can do with our patterns at the bottom of each pattern on our site. |
|


With over 40 years in knitting and crochet design, DROPS Design offers one of the most extensive collections of free patterns on the internet - translated to 17 languages. As of today we count 324 catalogues and 12290 patterns translated into English (UK/cm). 12290
We work hard to bring you the best knitting and crochet have to offer, inspiration and advice as well as great quality yarns at incredible prices! Would you like to use our patterns for other than personal use? You can read what you are allowed to do in the Copyright text at the bottom of all our patterns. Happy crafting!
Post a comment to pattern DROPS 110-18
We would love to hear what you have to say about this pattern!
If you want to leave a question, please make sure you select the correct category in the form below, to speed up the answering process. Required fields are marked *.