
Popular categories
Looking for a yarn?


Comments / Questions (26)
![]() Annica wrote:
Annica wrote:
Har inte stickat på länge men tänkte ta upp det igen. Tycker denna supersöta modell inspirerar :) MEN undrar var det finns en storleksguide så jag vet vilken storlek jag ska göra den i?? Har jag helt missat den? Med vänlig hälsning Annica
06.08.2013 - 20:56DROPS Design answered:
Längst ner på mönstret finns det en måttskiss på det färdiga plagget, där kan du se vilken storlek som kommer passa dig. Lycka till!
20.08.2013 - 14:48
![]() Connei wrote:
Connei wrote:
Hvordan kan det være jeg ikke kan udskrive mønsterside 3 på dansk.Jeg forsøgte så på norsk, da lykkedes det.
20.07.2011 - 21:19
![]() DROPS Design wrote:
DROPS Design wrote:
Svårt att göra det per mail :-) Kan du kontakta butiken där du köpt garnet ? Lycka till / Lena
18.09.2007 - 19:55
![]() Marie Leward wrote:
Marie Leward wrote:
Önskar utförligare beskrivning på de första 15 cm på fram- och bakstycket. Tack på förhand. M.
17.09.2007 - 21:30
![]() DROPS Design wrote:
DROPS Design wrote:
Kraven er de sidste 13-14-15-15-15 m som er tilbage på pinden. Der strikkes videre over disse masker som der står i opskriften. Disse remser syes sammen midt bagpå tilsidst og de syes til bagstykket langs med kanten også ifølge opskriften. Der er ikke mere krave end det som står her, så du kan følge opskriftern. God fornøjelse!
14.05.2007 - 10:16
![]() Anette Olsen wrote:
Anette Olsen wrote:
Hvordan skal kraven strikkes til trøjen?
14.05.2007 - 04:20Lena wrote:
Härlig kofta både i material och mönster. Skönt med raka modeller.
26.02.2007 - 20:13
![]() Torunn H wrote:
Torunn H wrote:
Denne SKAL jeg strikke!!!!
26.01.2007 - 21:11
![]() Marianne wrote:
Marianne wrote:
Super flot
03.01.2007 - 19:27Torunn Furu wrote:
Denne fikk jeg ikke stemt på, men den er riktig fin ? Håper denne kommer med !!
02.01.2007 - 17:04
|
|||||||||||||
Lily White#lilywhitecardigan |
|||||||||||||
|
|
|||||||||||||
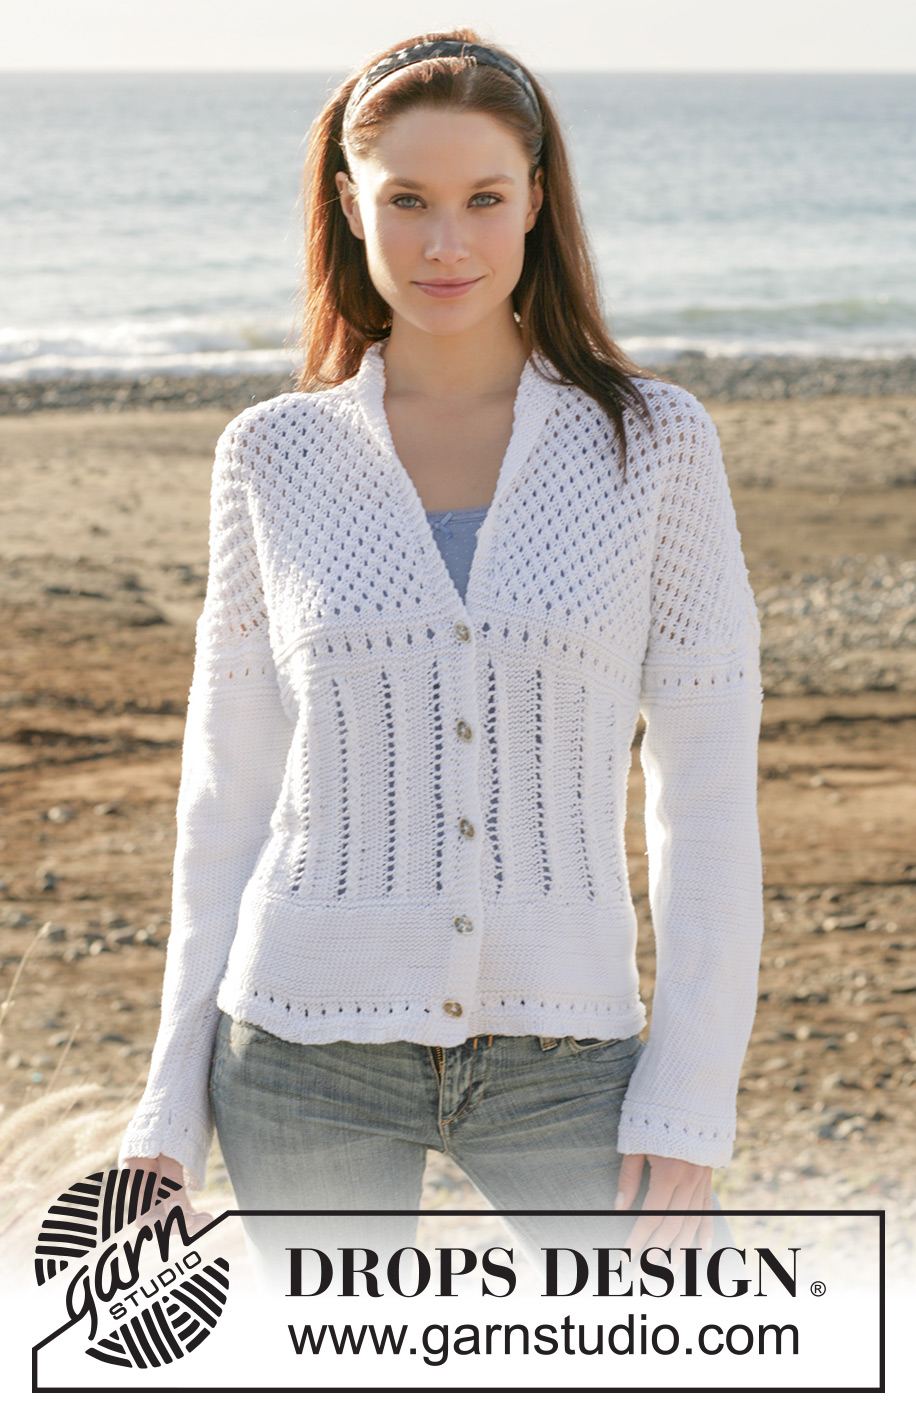
DROPS jacket with collar and lace pattern in “Muskat”
DROPS 101-22 |
|||||||||||||
|
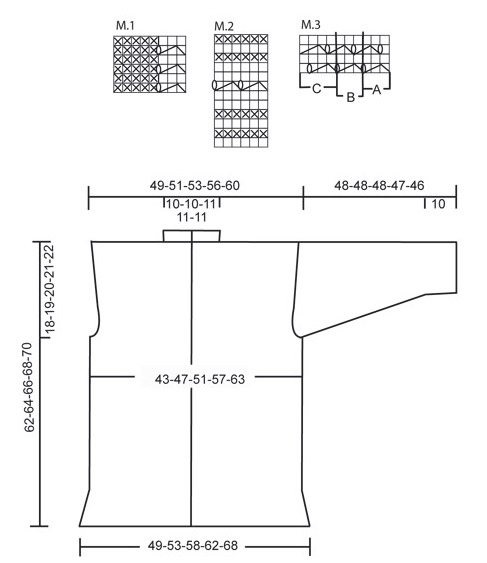
Knitting tension: 20 sts x 26 rows on needle size 4.5 mm in stocking sts = 10 x 10 cm Garter st, back and forth on needle: Knit all rows Pattern: See diagram M.1-M.3. The diagram is seen from the right side. Buttonholes: Make buttonholes on right front band. 1 buttonhole: K tog 3rd and 4th st from edge and make a yo. Make buttonholes when piece measures: Size S: 2, 9, 16, 23 and 30 cm Size M: 3, 10, 17, 24 and 31 cm Size L: 4, 11, 18, 25 and 32 cm Size XL: 5, 12, 19, 26 and 33 cm Size XXL: 6, 13, 20, 27 and 34 cm ___________________________________________________________ Back and front piece: Knitted back and forth on circular needle from mid front. Cast on 205-223-241-259-283 sts (incl 5 front band sts each side towards mid front, knitted in garter sts throughout) on circular needle size 4.5 mm. Knit first row as follows (from WS): 5 front band sts in garter sts, *P3, K3*, repeat from *-* and finish with P3 and 5 front band sts. Knit a further 2 rows like this and then continue with 1 vertical repeat of M.2 - remember buttonholes on right front band - see explanation above. After M.2 continue in reverse stocking sts until piece measures 13 cm, at the same time on the last row dec evenly to 181-197-213-237-261 sts (do not dec over front band sts). Knit 4 rows garter sts and continue in M.1 with front band sts in garter sts. When piece measures 33 cm knit M.2, at the same time adjust no of sts to 181-199-214-238-262 on the first row. On the last row of M.2 inc 1 st mid back = 182-200-215-239-263 sts. After M.2 finish piece in M.3 as follows: 5 front band sts, M.3 A (= 3 sts), M.3 B until 9 sts left on row, M.3 C (= 4 sts) and 5 front band sts. When piece measures 44-45-46-47-48 cm knit next row as follows: 46-50-53-58-63 sts (= front piece), cast off 2-4-6-8-10 sts for armhole, 86-92-97-107-117 sts (= back piece), cast off 2-4-6-8-10 sts for armhole, 46-50-53-58-63 sts (= front piece). Now complete each piece separately. Back piece: = 86-92-97-107-117 sts. Continue in M.3 with 1 garter st each side - make sure to continue the pattern, knit sts not fitting into pattern at the sides in stocking sts. When piece measures 3-4-5-6-7 cm from the split for the armhole inc 1 st inside 1 garter st each side for wide shoulder. Inc 1 st in the 4 smaller sizes (no inc in size XXL) a further 5-4-3-1 times on every 2-3-4-5 cm = 98-102-105-111-119 sts (knit inc sts in stocking st until they fit into pattern). When piece measures 60-62-64-66-68 cm cast off the middle 20-20-21-21-21 sts for neck = 39-41-42-45-49 sts left on each shoulder. Finish each side separately and continue in pattern – stocking st sts not fitting into pattern at neckline. Cast off remaining sts when piece measures 62-64-66-68-70 cm Right front piece: = 46-50-53-58-63 sts. Inc for wide shoulder as described for back piece = 52-55-57-60-64 sts. NB! No dec for neck. When piece measures 62-64-66-68-70 cm cast off the outermost 39-41-42-45-49 sts on shoulder = 13-14-15-15-15 sts left. Knit 5-5-6-6-6 cm as before over these sts (= neckline to be sewn to back piece afterwards, to be stretched slightly so do not knit more then the indicated cm). Put sts on a thread. Left front piece: Like right front piece, but mirrored. Sleeve: Knitted back and forth on needle. Cast on 50-50-50-56-56 sts (incl 1 edge st each side) on needle size 4.5 mm. Knit first row as follows from WS: 1 edge st, *K3, P3*, repeat from *-* and finish with 1 edge st. Knit a further 2 rows like this and then continue with 1 vertical repeat of M.2, at the same time on the first row dec evenly to 47-50-50-53-53 sts. Now knit 1 row from RS and continue in reverse stocking sts. At the same time when sleeve measures 10 cm, inc 1 st each side on every 2.5-2.5-2-2-2 cm a total of 13-14-17-16-16 times = 73-78-84-85-85 sts. When piece measures 43-43-43-42-41 cm knit 1 vertical repeat of M.2, at the same time on the first row adjust no of sts to 74-77-83-86-89. Cast off after M.2, sleeve measures approx 48-48-48-47-46 cm. Assembly: Sew shoulder seams. Sew collar tog mid back (sts from threads) with grafting sts and sew collar to back piece. Sew sleeve seams and sew sleeves to front and back piece. Sew on buttons. |
|||||||||||||
Diagram explanations |
|||||||||||||
|
|||||||||||||
 |
|||||||||||||
Have you finished this pattern?Tag your pictures with #dropspattern #lilywhitecardigan or submit them to the #dropsfan gallery. Do you need help with this pattern?You'll find 22 tutorial videos, a Comments/Questions area and more by visiting the pattern on garnstudio.com. © 1982-2026 DROPS Design A/S. We reserve all rights. This document, including all its sub-sections, has copyrights. Read more about what you can do with our patterns at the bottom of each pattern on our site. |
|||||||||||||


With over 40 years in knitting and crochet design, DROPS Design offers one of the most extensive collections of free patterns on the internet - translated to 17 languages. As of today we count 324 catalogues and 12290 patterns translated into English (UK/cm). 12290
We work hard to bring you the best knitting and crochet have to offer, inspiration and advice as well as great quality yarns at incredible prices! Would you like to use our patterns for other than personal use? You can read what you are allowed to do in the Copyright text at the bottom of all our patterns. Happy crafting!
Post a comment to pattern DROPS 101-22
We would love to hear what you have to say about this pattern!
If you want to leave a question, please make sure you select the correct category in the form below, to speed up the answering process. Required fields are marked *.