
Popular categories
Looking for a yarn?


Comments / Questions (11)
![]() Hilary Davis wrote:
Hilary Davis wrote:
Can we have a bit more detail please? Its not good enough to say "M1" or M2. I'm glad I am a very experienced knitter, heaven help anyone who is not!
09.12.2025 - 15:32DROPS Design answered:
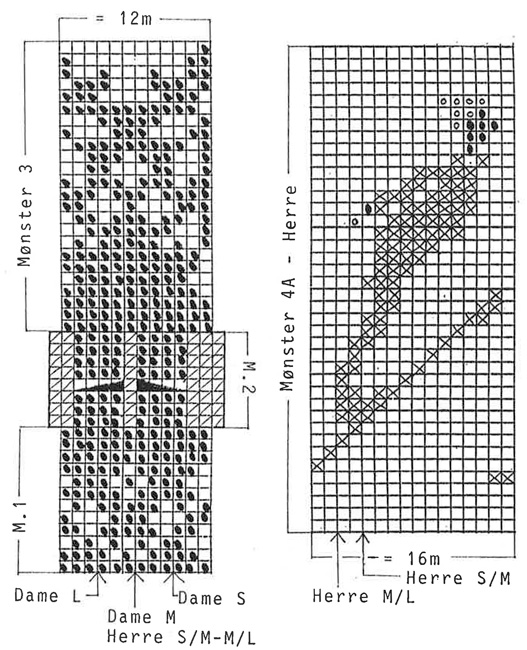
Dear Mrs Davis, M.1, M.2 etc. are the name of the diagrams you will find at the bottom of the page - read more about diagrams here. Happy knitting!
10.12.2025 - 07:47
![]() Mia wrote:
Mia wrote:
Hei! Jeg er ny på å lese oppskrifter med fletter og jeg står fast på ermet. Jeg forstår ikke helt dette: Etter M.1 strikkes M.2 samtidig som det økes 2 m mellom hver flette (+ 10 m). Skal jeg øke 2 m mellom hver rapport i hver omgang til arbeidet måler 41cm? Eller skal jeg økte 2m på hver 4 omgang når jeg strikker selve fletta? (I tillegg til de 2 økningene midt under ermet?
09.03.2023 - 21:41
![]() Charlaine wrote:
Charlaine wrote:
Pour le M1, il est possible que je nai pas inversé le diagramme comme j'aurais du le faire (mon pull est fond gris et motifs couleur). L'erreur qui est finalement la mienne. Pour le M2, j'ai persisté à interpréter les points noirs comme une couleur et non un fond blanc. Des carrés blancs pour un fond écru aurait été plus logique. L'inversion des couleurs que j'ai choisi a compliqué la lecture des diagrammes aux couleurs déjà inversées. Merci de votre réponse aidante
29.06.2021 - 15:05
![]() Charlaine wrote:
Charlaine wrote:
Bonjour. Les diagrammes sont à revoir. Il faut plus se fier à la photo du pull qui n\'a pas de zoom pour vérifier le motif du bas, qu\'aux explications. Le premier a les couleurs inversées : J\'ai fait le motif du bas en négatif. Second motif : il faut comprendre que ce sont des mailles envers et endroit pour faire les torsades. Je dois déjà détricoter la bande grise que j\'ai en bas du corps.
29.06.2021 - 09:08DROPS Design answered:
Bonjour Charlaine, j'ai peur de ne pas vous suivre - dans la légende du diagramme, il est bien indiqué le gris (= case vide) et l'écru (point noir) - les mailles envers en écru sont notées par le 6ème symbole (torsades de M.2)- ai-je loupé une information?
29.06.2021 - 09:23
![]() Jette Østerby wrote:
Jette Østerby wrote:
I damemodellen, mønster 2, er jeg i tvivl om hvordan jeg skal "læse" snoningen, diagram forklaringens tegn mener jeg vender forkert og kan det passe at der er 7 omgange mellem snoningerne?
16.02.2015 - 11:30DROPS Design answered:
Hej Jette. Diagramtegningen var rigtig nok vendt paa hovedet, det er rettet nu. Og ja, efter förste snoning har du 7 pinde imellem hver (4 pinde för den förste og derefter gentage M.2 = 7 pinde)
18.02.2015 - 11:43
![]() Marcia wrote:
Marcia wrote:
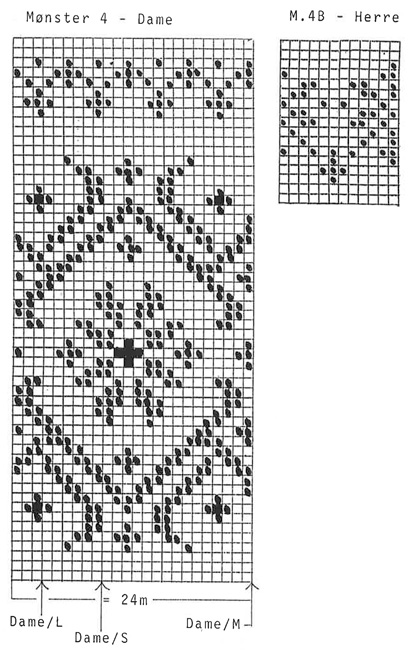
My problem with the woman's chart is not the decreases, that I understand. The chart does not seem to me to be correct asto the actual diagram of the flowers. Somehow I don't think that if I did the diagram I would not get the end result of the flowers as shown in the picture. It is not the decrease but the actual The dots are so big and sloppy that at times one has trouble distinguishing the dot from the block for the yellow.
03.03.2014 - 16:30DROPS Design answered:
You work 1 st in yellow on row 8 in chart, then 3 rows where the yellow is in the middle of the flower and then again 15 rows later. These stitches can also be worked in gray and then embroidered onto afterward.
03.03.2014 - 22:42
![]() Msrcia wrote:
Msrcia wrote:
I realize why you increase the stitches. It is the next chart after the cable one. That is the first set of flowers. Also the main woman's chart of the main section is difficult. The dots and black squares are poorly printed. Thank you again. Where can I find the clearer charts or should I wait for your checking of the diagrams?
03.03.2014 - 16:17
![]() Marcia Greenberg wrote:
Marcia Greenberg wrote:
Pattern 19-16 M3 after the cable section does not seem to match the first pattern above the cable section in the woman's sweater. Also as I mentioned before the woman's 4 is not very clear especially the yellow sections as opposed to the off white. That chart seems sloppily done. I would love to do this sweater so if possible would love the charts to be corrected. Am I right that the charts are confusing and in one section wrong? Please answer me in English. Sincerely Marcia Greenberg
03.03.2014 - 00:20DROPS Design answered:
Dear Mrs Greenberg, we will check diagram asap. For M2, as stated under "Pattern body piece), you inc 2 sts in each repeat on 1st row in M.2 then dec 2 sts in each repeat on 1st row in M.3, so that cables and pattern have the same width. Happy knitting!
03.03.2014 - 10:10
![]() Marcia Greenberg wrote:
Marcia Greenberg wrote:
The diagram's different colors are difficult to read in the chart itself. I am having trouble figuring out where the yellow color goes
28.02.2014 - 19:33DROPS Design answered:
Dear Mrs Greenberg, there are now larger diagrams. Happy knitting!
03.03.2014 - 14:58
![]() Elly wrote:
Elly wrote:
Dank je, ik ga hem zeker breien want ik vind hem heel mooi.
10.10.2013 - 10:17
|
|||||||||||||||||||||||||
DROPS 19-16 |
|||||||||||||||||||||||||
 |
 |
||||||||||||||||||||||||
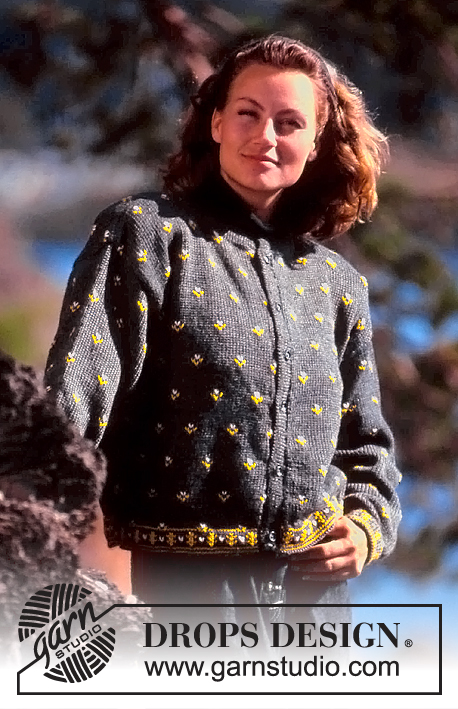
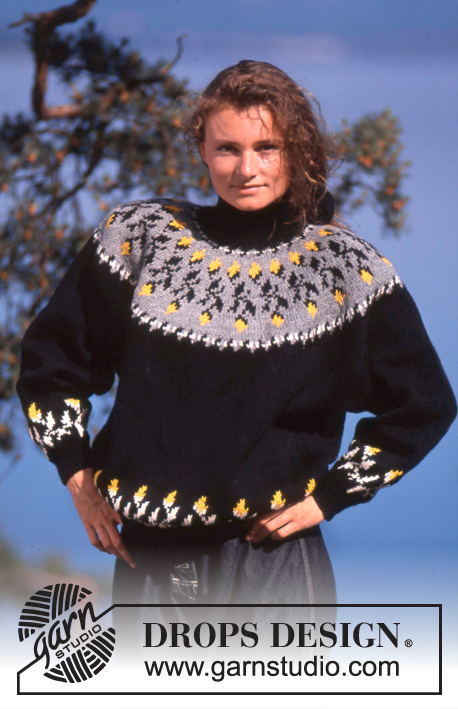
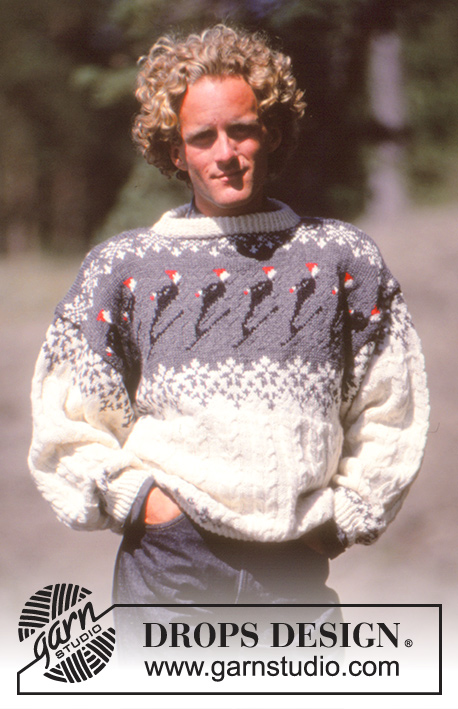
DROPS jumper with traditional pattern borders in “Karisma”. Ladies and Men’s size S – L.
DROPS 19-16 |
|||||||||||||||||||||||||
|
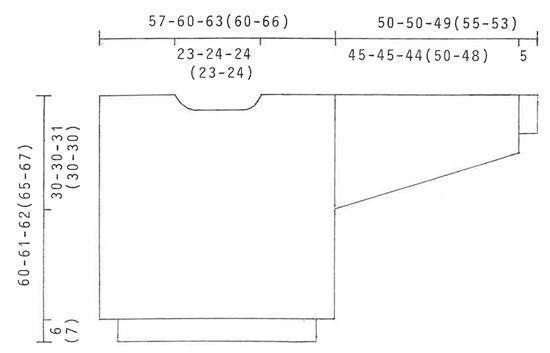
Pattern: See diagram. M.1, M.3 and M.4 are worked in stocking st. The diagrams show the pattern from the RS. Pattern body piece: M.1 (beg by arrow at the side), M.2, at the same time inc 2 sts in each repeat = 226-280-294 (280-308) sts. When piece measures 29-30-31 (34-36) cm (adjust to M.2) work M.3, at the same time dec 2 sts in each repeat = 228-240-252 (240-264) sts. Complete piece in M.4 (beg by arrow and work pattern on front piece, beg by arrow again and repeat pattern on back piece). Note: For Men’s sizes work M.4A and then M.4B. Rib: Row 1: *K1 into back of loop, P1 *. Row 2: * K1, P1 *. Repeat row 1 and 2. Body: The jumper is worked in the round on circular needle and cut for armholes afterwards. Numbers in ( ) refer to men’s sizes. Cast on 170-178-184 (190-200) sts on circular needle size 2.5 mm with off-white and work 6 (7) cm Rib. Change to circular needle size 4 mm and continue in pattern – see above - at the same time inc 58-62-68 (50-64) sts evenly on first round = 228-240-252 (240-264) sts. Remember the knitting tension. When piece measures 30-31-31 (35-37) cm inc 5 sts each side (to be cut for armhole afterwards and not included in pattern). When piece measures approx 57-58-59 (60-62) cm (8 (12) pattern rounds remain) cast off the middle 38-40-40 (38-40) sts mid front for neck and complete piece back and forth on needle. Cast off to shape the neckline on every other row: 2 sts 1 times, 1 st 2 times. At the same time when 3 pattern rounds remain cast off the middle 46-48-48 (46-48) sts for neck mid back. Cast off remaining sts on shoulder when piece measures 60-61-62 (65-67) cm. Sleeve: Cast on 44-46-46 (48-50) sts on double pointed needles size 2.5 mm with off-white and work 5 cm Rib. Change to double pointed needles size 4 mm and continue in M.1 (place a pattern repeat mid upper sleeve), at the same time inc 14-14-16 (12-12) sts evenly on first round = 58-60-62 (60-62) sts. After M.1 continue in M.2, at the same time inc 2 sts between each cable (= plus 10 sts). At the same time after the rib inc 2 sts mid under arm a total of 37-37-37 (37-36) times on every * other, other and 3rd * round alternately = 142-144-146 (144-144) sts. Incorporate inc sts in pattern as you go along. When piece measures 41-41-40 (46-44) cm dec 2 sts in each cable (= minus 22 sts) = 120-122-124 (122-122) sts. Now work M.3 – make sure to have a pattern repeat mid upper sleeve. After M.3 piece measures approx 50-50-49 (55-53) cm. Now work 5 rounds in reverse stocking st (for sewing sleeve to body piece). Cast off. Assembly: Insert a marking thread in the middle of the inc sts for armhole. Sew 2 seams on a sewing machine around the marking thread, 1st seam = ½ st from the MT, 2nd seam = ½ st from the 1st seam. Cut for armholes. Sew the shoulder seams. Pick up approx 100 sts round the neck on double pointed needles size 2.5 mm with off-white and work 7 cm rib, cast off. Fold rib double towards WS and fasten. Set in sleeves as follows: sew the last row in stocking st on sleeves to row after machine seam on armhole. Turn jumper inside out and fasten piece in reverse stocking st on sleeve to body piece. English explanation to pattern diagram: Dame = Ladies sizes Herre: Men’s sizes |
|||||||||||||||||||||||||
Diagram explanations |
|||||||||||||||||||||||||
|
|||||||||||||||||||||||||
 |
|||||||||||||||||||||||||
 |
|||||||||||||||||||||||||
 |
|||||||||||||||||||||||||
Have you finished this pattern?Tag your pictures with #dropspattern or submit them to the #dropsfan gallery. Do you need help with this pattern?You'll find 27 tutorial videos, a Comments/Questions area and more by visiting the pattern on garnstudio.com. © 1982-2026 DROPS Design A/S. We reserve all rights. This document, including all its sub-sections, has copyrights. Read more about what you can do with our patterns at the bottom of each pattern on our site. |
|||||||||||||||||||||||||


With over 40 years in knitting and crochet design, DROPS Design offers one of the most extensive collections of free patterns on the internet - translated to 17 languages. As of today we count 324 catalogues and 12290 patterns translated into English (UK/cm). 12290
We work hard to bring you the best knitting and crochet have to offer, inspiration and advice as well as great quality yarns at incredible prices! Would you like to use our patterns for other than personal use? You can read what you are allowed to do in the Copyright text at the bottom of all our patterns. Happy crafting!
Post a comment to pattern DROPS 19-16
We would love to hear what you have to say about this pattern!
If you want to leave a question, please make sure you select the correct category in the form below, to speed up the answering process. Required fields are marked *.