
Popular categories
Looking for a yarn?


Comments / Questions (106)
![]() Beate wrote:
Beate wrote:
Jeg har lest gjennom alle spørsmål og kommentarer for å finne en løsning på armene. Når jeg gjør som oppskriften beskriver mangler jeg stavgrupper på den ene armen. Har dere bilde som viser ryggen og under armene på jakken? Mulig dette kan vise hvordan det er løst.
15.03.2026 - 09:13DROPS Design answered:
Hei Beate. Når du hekler bakstykket og arbeidet måler ca 20-23-23 (27-30) cm legges det ut til ermer i hver side slik. Klipp tråden, hekle 16-19-19 (25-28) lm med ny tråd og hekle som før over bakstykke, på slutten av raden hekles 16-19-19 (25-28) lm. Formen på plagget ser ut som en T (veldig tynn vannrett strek og en meget tykk loddrett strek). Snu arbeidet og hekle som 1.rad over luftmaskene, men mønstret fortsettes som før. Ermene på bakstykket skal bli lik. Hekle forstykkene på samme måte, men husk å klippe tråden på det ene forstykke og starte med luftmasker. mvh DROPS Design
16.03.2026 - 13:08
![]() Sannie wrote:
Sannie wrote:
Kunne man lave en video, så vi kunne forstå hvotdan man tagef ud til de ærmer. Det virke åbenlyst ikke at forklare det samme som allerede står i opskriften
22.01.2026 - 08:08DROPS Design answered:
Hei Sanni. Vi noterer ned ditt video ønske, men kan ikke si når den evnt, blir laget. Men når bakstykket måler x antall cm legges det ut til ermer i hver side. Tråden er klippet og du starter med ny tråd. Hekle x antall luftmasker, deretter skal du hekle denne luftmaskeraden fast i bakstykket, hekle 2 staver mellom de 2 første st-gruppene fra forrige rad på bakstykket og fortsett som før over bakstykket. Når du har kommet til andre enden av bakstykket, hekles det enda en luftmaskerad. Snu og hekle over luftmaskeraden, bakstykket og den andre luftmaskeraden. mvh DROPS Design
30.01.2026 - 12:00
![]() Pia wrote:
Pia wrote:
Tack för svar till montering. Köper jag en ny tunnare ulltråd och monterar med? Isf hur tunn? Ecru?
08.12.2025 - 17:24DROPS Design answered:
Hei Pia. Selv om Snow er et tykt garn, ville jeg ha montert med sammen garn som plagget er heklet i, og da i natur, og evnt med de ulike fargene når sidekanten skal sys. mvh DROPS Design
15.12.2025 - 09:33
![]() Pia wrote:
Pia wrote:
Hur monterar jag?
07.12.2025 - 19:26DROPS Design answered:
Hei Pia. Sy i ytterste maske mot ytterste maske med små string, slik at det ikke blir en tykk kant. mvh DROPS Design
08.12.2025 - 14:01
![]() Pia wrote:
Pia wrote:
Jag virkar sök 3/4. När arbetet var 30 lade jag ut för ärmar men örnarna blir alldeles för smala för att sättas ihop. Vad gör jag för fel? Ärmarna blir endast i ecru
28.11.2025 - 10:23DROPS Design answered:
Hei Pia. Når arbeidet måler 30 cm skal ermene hekles. Klipp tråden til bakstykket. Start med å hekle 28 luftmasker, hekle deretter disse luftmaske fast til bakstykket ved å hekle som før over bakstykket og deretter hekles det nye 28 luftmasker. Du har nå et arbeidet som ser ut som en T (med en tykk I og 2 tynne streker). Snu arbeidet og hekle som forklart i 1.rad så mønsteret fortsetter på samme måte som før. Når arbeidet måler 45 cm klippes tråden. Halve tykkelsen på ermet er ca 15 cm. Nå ser arbeidet ut som en mer riktig T. Hekle forstykkene som forklart i oppskriften. mvh DROPS Design
08.12.2025 - 10:02
![]() Christelle FRANCES wrote:
Christelle FRANCES wrote:
Bonjour je bloqué au niveau de la construction des manches, je ne comprends pas les explications. Faire la chaînette etc.... Peut être un schéma pour être plus explicite.😉 Merci pour votre retour. Christelle
26.03.2025 - 17:58DROPS Design answered:
Bonjour Mme Frances, lorsque vous avez crocheté la hauteur du bas du dos, coupez le fil. Vous allez maintenant former les manches en créant de nouvelles mailles de chaque côté du dos: crochetez le nombre de mailles en l'air indiqué pour la taille pour la 1ère manche, crochetez le rang suivant du dos comme avant (pensez à ajuster endroit/envers); et crochetez le nombre de mailles en l'air indiqué pour l'autre manche, tournez et crochetez ensuite les groupes de brides exactement comme avant, sur toutes les mailles, y compris les nouvelles mailles de chaque côté = celles des manches, avec le dos au milieu. Bon crochet!
27.03.2025 - 08:11
![]() Bouchon wrote:
Bouchon wrote:
Je ne comprends pas pour assembler la veste et la réalisation de la capuche
09.03.2025 - 19:10DROPS Design answered:
Bonjour Mme Bouchon, crochetez les épaules/manches du dos et du devant ensemble en laissant 5 groupes de brides au milieu dos pour l'encolure. Pour la capuche, crocheter tout autour de l'encolure, en commençant sur le bord du devant droit puis le long de l'encolure dos et terminer le long du devant gauche. Vous crochetez des groupes de brides comme avant jusqu'à la hauteur indiquée, puis vous plierez le dernier rang en double et vous assemblerez les mailles entre elles (en haut de la capuche = dessus de la tête). Bon crochet!
10.03.2025 - 09:48
![]() Sandra wrote:
Sandra wrote:
Fijn patroon ook omdat het in cm aangegeven is . Nu kun je evt ook andere steken gebruiken . En de je wat dikkere wol voor een klein vestje kan gebruiken
10.11.2024 - 10:50
![]() Rebekah wrote:
Rebekah wrote:
Hi, really enjoying making this! Just wondered with the increase for the sleeves, is there a specific way of changing colour for the next row without the foundation chains either side being a different colour from the tr groups, or is it just sewed into the seam when assembling?
12.09.2024 - 17:31DROPS Design answered:
Dear Rebekah, use the colour for the next stripe when crocheting the new chain stitches for sleeves at the beg of row, then crochet the row as before and crochet the new chain for sleeves at the end of row. Then use the color for next stripe for next row. You can start then a new row using the technique shown in this video. Happy crocheting!
13.09.2024 - 08:31
![]() Aina Jensen Melera wrote:
Aina Jensen Melera wrote:
Hei. Vil strikke denne i 3/6 mnd. Hva blir maskeantallet? Mvh Aina
06.05.2024 - 17:45DROPS Design answered:
Hej Aina, se måleskitsen nederst i opskriften og vælg den størrelse som modsvarer målene i måleskitsen :)
08.05.2024 - 11:25
|
||||||||||||||||||||||
Cozy Cuddle Jacket#cozycuddlejacket |
||||||||||||||||||||||
 |
 |
|||||||||||||||||||||
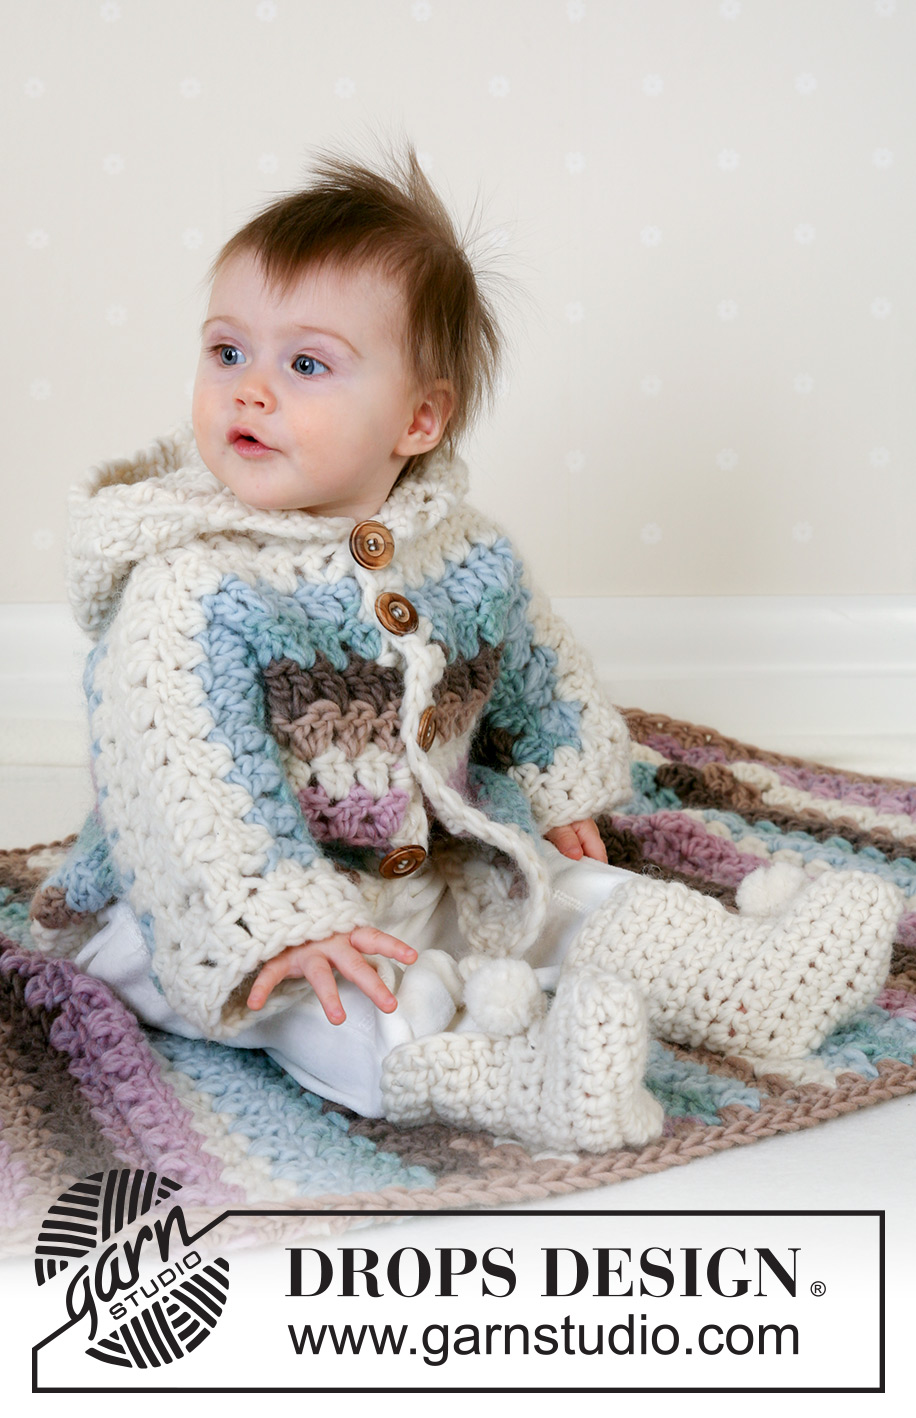
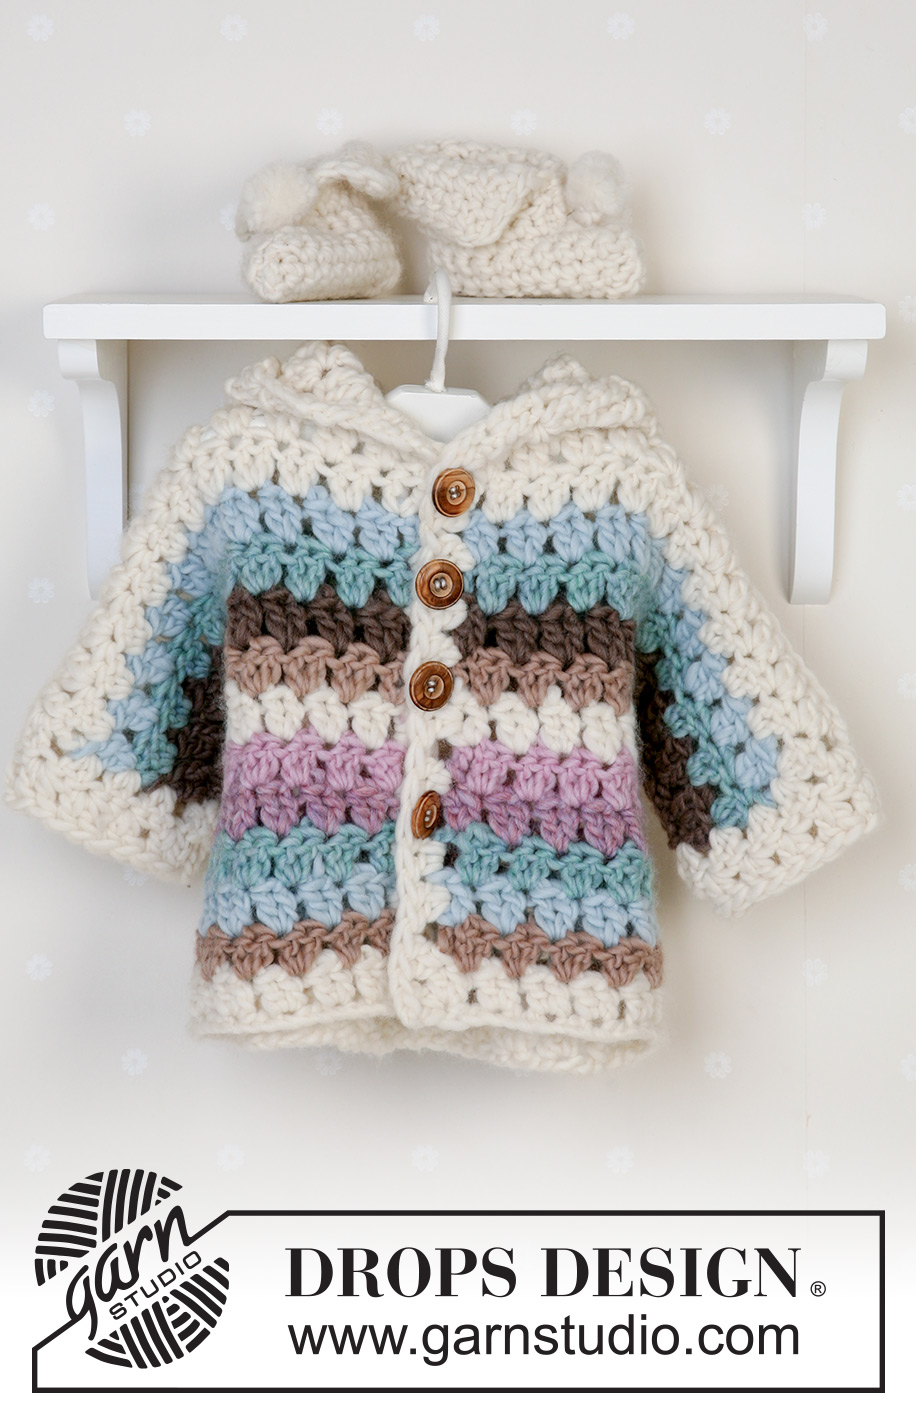
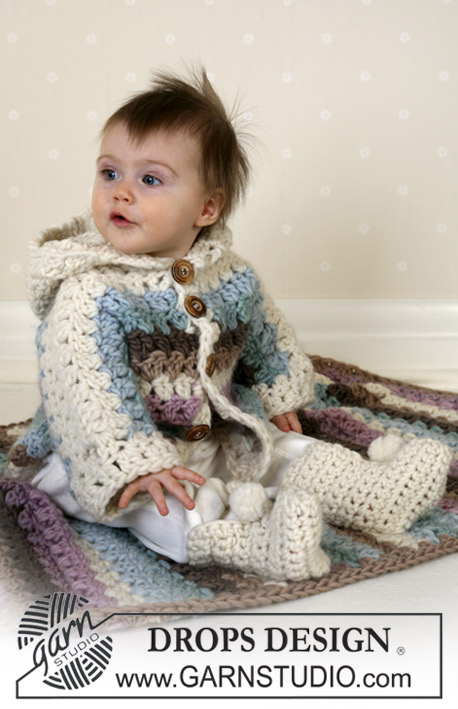
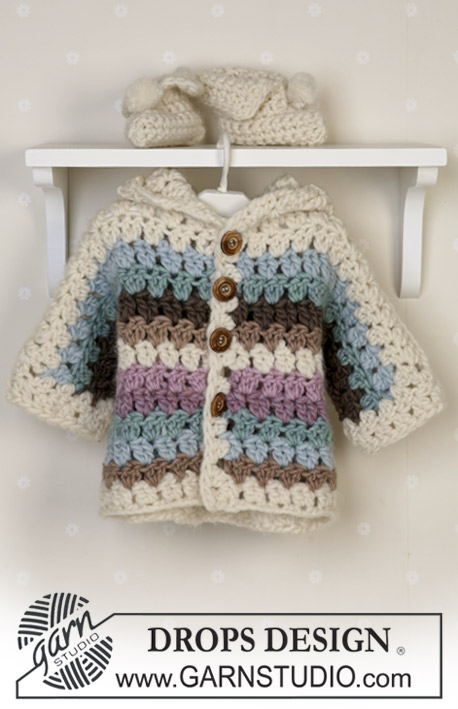
Crochet set of striped jacket and slippers in DROPS Snow. Sizes baby and children from 1 month to 4 years.
DROPS Baby 14-25 |
||||||||||||||||||||||
|
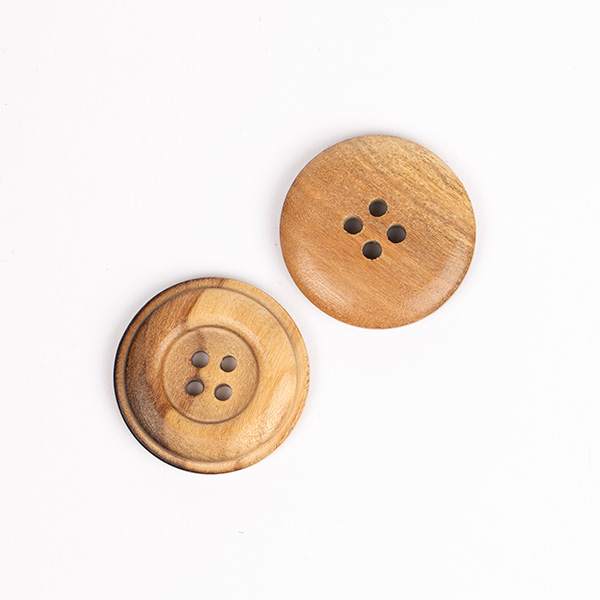
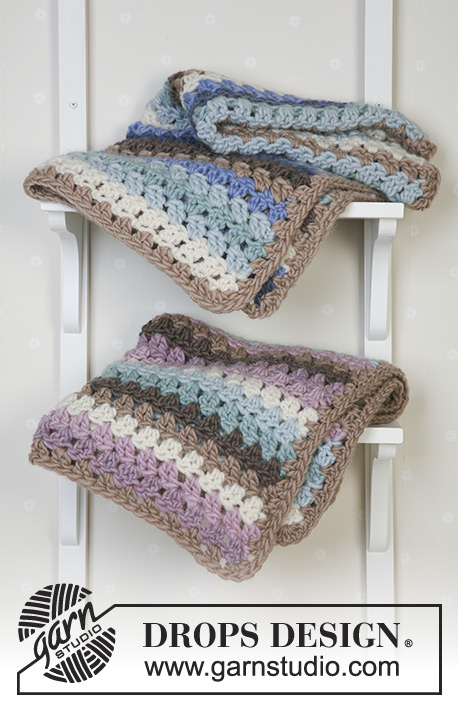
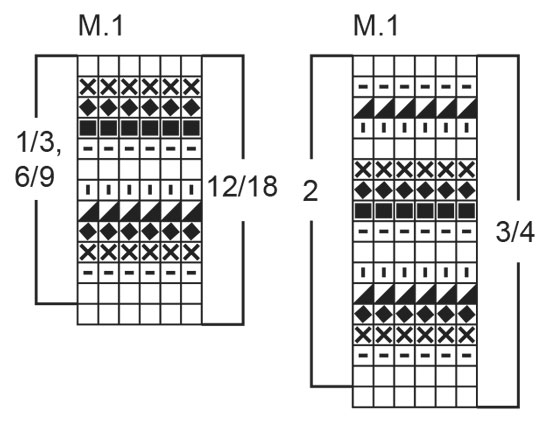
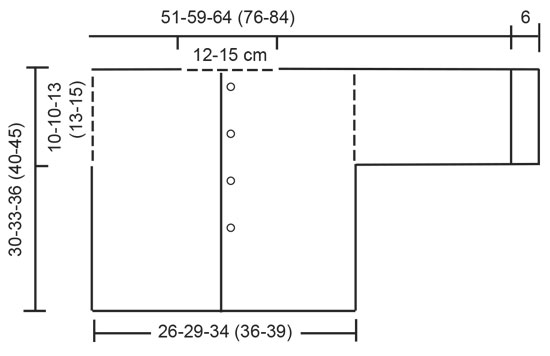
JACKET: Crochet Gauge: Width of 4 tr-groups and 4 rows using crochet hook size 9 mm = 10 x 10 cm Stripes: See diagram M.1. 1 row in diagram = 1 row of tr’s. Crochet info 1: At the beginning of each row of tr’s replace the 1st tr with 3 ch, and finish each row with 1 tr in 3rd ch from beginning of previous row. Crochet info 2: 1 tr-group = 2 tr in same st. ½ tr-group = 3 ch (equals 1 tr) Back piece: Read Crochet info 1. Crochet 31-34-40 (43-46) ch (incl 3 ch to turn with) using Snow 01 and crochet hook size 9 mm. Crochet stripes after M.1 as follows: 1st row: 1 tr in 4th ch from hook, *skip 2 ch, 2 tr in next ch*, repeat from *-* = 10-11-13 (14-15) tr-groups on row, turn the piece 2nd row: 3 ch (= 1 tr), 2 tr between the first 2 tr-groups from previous row (crochet at top of st and not round the whole st), *2 tr between the next 2 tr-groups*, repeat from *-* and finish with 2 tr at the top of the last tr = 1 tr (3 ch) + 10-11-13 (14-15) tr-groups on row – see Crochet info 2. Repeat 2nd row. When piece measures approx 20-23-23 (27-30) cm inc for sleeves each side as follows: Cut the yarn. Crochet 16-19-19 (25-28) ch, crochet as before over the back piece, at the end of row crochet 16-19-19 (25-28) ch. Turn the piece and crochet as explained for 1st row so that the pattern continues as before = 1 tr (3 ch) + 20-23-25 (30-33) tr-groups on row. When piece measures 30-33-36 (40-45) cm cut the thread. Left front piece: Crochet 16-16-19 (22-22) ch (incl 3 ch to turn with) using Snow 01 and crochet hook size 9 mm. Crochet stripes after M.1 and tr-groups as described for back piee = 1 tr (3 ch) +5-5-6 (7-7) tr groups after 2nd row. When piece measures approx 20-23-23 (27-30) cm inc for sleeve at side as described for back piece. Continue pattern as before = 1 tr (3 ch) + 10-11-12 (15-16) tr-groups on row. When piece measures 30-33-36 (40-45) cm cut the thread. Right front piece: Crochet as left front piece, but mirrored. Cuffs: Crochet 2 rows of tr along sleeve edge using Snow 01 = approx 1 tr (3 ch) + 8-8-10 (10-11) tr on row. Front edge: Crochet 1 row of tr-groups along the front edge of both front pieces using Snow 01 = approx 12-13-14 (16-18) tr-groups. Assembly: Sew shoulder/sleeve seams – start at sleeve edge and work towards neckline – leave 5-5 tr-groups mid back for neck opening. Sew underarm and side seams. Hood: Use Snow 01. Crochet 1 dc in 1st st, 3 ch, approx 13-14-15 (16-17) tr-groups round neckline as described for jacket. Continue with tr-groups until hood measures approx 22-24-26 (29-30) cm, cut the thread. Fold hood double and sew top seam with neat sts. Sew on buttons on left front piece – the top one approx 1-2 cm from neckline and the bottom one approx 10-12 cm from lower edge. BOOTIES: To fit foot length: 10-11-12 (14-15) cm Crochet Gauge: Width of 10 dc and 11 rows using crochet hook size 7 mm = 10 x 10 cm. Crochet info 1: At the beginning of each row of dc’s replace the 1st dc with 1 ch, and finish each row with 1 dc in ch from beginning of previous row. Crochet the bootie in one piece and sew seams mid front and mid back. Crochet 7-8-9 (10-11) ch (incl 1 ch to turn with) using crochet hook size 7 mm and Snow 01. Crochet rows – read Crochet Info 1 – start in 2nd ch from hook. = 7-8-9 (10-11) dc on row. When piece measures 7-8-9 (10-10) cm inc at one side for foot by crocheting 3-3-3 (404) new ch and continue with dc in all sts = 10-11-12 (14-15) dc. When piece measures 15-18-21 (24-26) cm cast off the 3-3-3 (4-4) foot sts by turning the piece just before these sts. Continue with dc over the remaining 7-8-9 (10-11) dc until piece measures 22-26-30 (34-36) cm. Assembly: Fold bootie double and sew seam mid back and mid front with neat sts – leave an opening of approx 5-6-7 (8-8) cm at the top mid front. Crochet the other bootie. Pompon: Make 2 small pompons with a diameter of approx 3 cm and attach to top of each bootie. BLANKET: see pattern 14-21 |
||||||||||||||||||||||
Diagram explanations |
||||||||||||||||||||||
|
||||||||||||||||||||||
 |
||||||||||||||||||||||
 |
||||||||||||||||||||||
Have you finished this pattern?Tag your pictures with #dropspattern #cozycuddlejacket or submit them to the #dropsfan gallery. Do you need help with this pattern?You'll find 7 tutorial videos, a Comments/Questions area and more by visiting the pattern on garnstudio.com. © 1982-2026 DROPS Design A/S. We reserve all rights. This document, including all its sub-sections, has copyrights. Read more about what you can do with our patterns at the bottom of each pattern on our site. |
||||||||||||||||||||||


With over 40 years in knitting and crochet design, DROPS Design offers one of the most extensive collections of free patterns on the internet - translated to 17 languages. As of today we count 324 catalogues and 12290 patterns translated into English (UK/cm). 12290
We work hard to bring you the best knitting and crochet have to offer, inspiration and advice as well as great quality yarns at incredible prices! Would you like to use our patterns for other than personal use? You can read what you are allowed to do in the Copyright text at the bottom of all our patterns. Happy crafting!
Post a comment to pattern DROPS Baby 14-25
We would love to hear what you have to say about this pattern!
If you want to leave a question, please make sure you select the correct category in the form below, to speed up the answering process. Required fields are marked *.