
Popular categories
Looking for a yarn?


Comments / Questions (25)
![]() Fernanda wrote:
Fernanda wrote:
Existe um adorno na parte de baixo do biquíni, existe a receita deste adorno?
23.08.2025 - 20:38DROPS Design answered:
Bom dia, A parte de baixo do biquíni tem presilhas (explicadas na receita) por onde passa um atilho (também explicado na receita). Bons crochés!
26.08.2025 - 09:05
![]() Fernanda wrote:
Fernanda wrote:
Estou a buscar a linha Drops Paris número 55, como do modelo, mas não encontrei.
22.08.2025 - 01:01DROPS Design answered:
Bom dia, Encontra, no link abaixo, a lista de lojas DROPS em Portugal e todas elas vendem o fio Paris. Poderá perguntar se têm a cor 55. https://www.garnstudio.com/findastore.php?id=28&cid=28 Bom fim-de-semana!
22.08.2025 - 08:43
![]() Matilda wrote:
Matilda wrote:
Jättefint mönster, men jag undrar om det finns fler bilder? Den bild ni har visar inte så mycket av underdelen
31.05.2024 - 11:19DROPS Design answered:
Hei Mathilda. Vi skal se om vi har noen flere bilder i bildearkivet vårt. Har vi det, vil vi legge disse ut. mvh DROPS Design
03.06.2024 - 10:48
![]() Matilda wrote:
Matilda wrote:
Hej! Nu har jag virkat klart min underdel, men kanterna på baksidan rullar sej åt olika håll och är för "slappa". Har ni några tips eller har jag kanske gjort nåt fel? Det hade kanske inte varit ett så stort problem om båda kanterna rullar sej inåt men nu rullar sej en inåt och en utåt så det ser inte bra ut.
31.05.2024 - 11:17DROPS Design answered:
Hei Mathilde. Prøv å damp kantene lett, evnt. fukt plagget og la det tørke flatt. mvh DROPS Design
03.06.2024 - 10:46
![]() Mariska wrote:
Mariska wrote:
Am I meant to skip the first single crochet of the top part and single crochet in the chain of the previous row for the top? These instructions aren't very clear
27.06.2022 - 03:13DROPS Design answered:
Dear Mariska, you first work a small square over 8-10 sc in width and 6-7 cm in height, then you will work along both of the sides of this square and the same time increase in the corner: 1 sc in each of the sc of the previous row, 4 sc in the corner, 8-10 sc along the side of square = 20-24 sc. Continue working 1 sc in each sc for 10-11 cm from marker increasing 1 st on the side on every 3 cm a total of 3 times= 23-27 sc. Happy crocheting!
27.06.2022 - 09:09
![]() Anna Zambelli wrote:
Anna Zambelli wrote:
Hallo could you translate this pattern in italian? thank you
27.06.2021 - 16:43DROPS Design answered:
Dear Anna, our translators work continiously to translate the patterns, but please understand that the new patterns have priority, so older ones are getting trasnlated, when the translators have extra time between new collections. Happy Stitching!
28.06.2021 - 03:38
![]() Janicka Salas wrote:
Janicka Salas wrote:
I love your patterns and have been crocheting for many years but I can not for the life of me figure out what you meant when you get to the bond off section of the bottoms please help. Am I to decrease on both sides start and end of the rows?
07.06.2019 - 18:07DROPS Design answered:
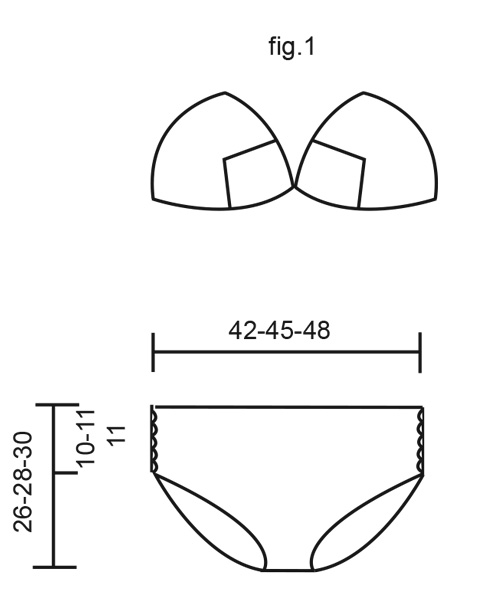
Dear Mrs Salas, when both cups are done, they should look like in fig. 1, starting at the bottom corner of the left cup (when worn) = from WS, crochet 1 sc in each stitch/end of rows along the bottom edge of the left cup, then 1 sc in each st /end of row along the bottom edge of the right cup = both cups are now worked together, turn and work lace row from RS as explained. Happy crocheting!
11.06.2019 - 09:41Efi Tsalikoglou wrote:
Thank you again for this beautiful pattern! Can you please tell me how to attach the sides? It doesn't say and at the photo it seems that you just put a ribbon. Is that correct or is there another way? I hope there is... Thank you in advance.
08.02.2017 - 12:00DROPS Design answered:
Dear Mrs Tsalikoglou, you thread a ribbon in the ch-loops crocheted on both pieces (front and back) in zig zags (like a shoe lace) annd tie them tog at the bottom. Happy crocheting!
08.02.2017 - 13:59
![]() Tashi wrote:
Tashi wrote:
Hello there :) Could you tell me how to do the 'binding off bit' during the bikini bottoms. I'm quite confused by this : see binding off tips above: 9 sts 2 times, 4 sts 2 times, 2 sts 1-2-3 times and 1 st 9-10-11 times = 14 dc left on row. and the binding off tips. Please could you explain :) Thank you
13.07.2016 - 16:41DROPS Design answered:
Dear Mrs Tashi, work row until 9 sts remain before end of row, turn and work next row until 9 sts remain before end of row, turn (= 9 sts dec 1 time on each side, ie repeat these 2 rows 1 more time = 9 sts dec 2 times on each side), and continue that way decreasing number of sts worked at the end of row. Happy crocheting!
13.07.2016 - 17:37
![]() Vivian :-) wrote:
Vivian :-) wrote:
Hei. vil først få si veldig fin bikini. Skal man øke maske på siden mot armen?
20.07.2015 - 13:28DROPS Design answered:
Hej Vivian, ja det stemmer, du øker mod siden under armen. God fornøjelse!
29.07.2015 - 13:23
|
|
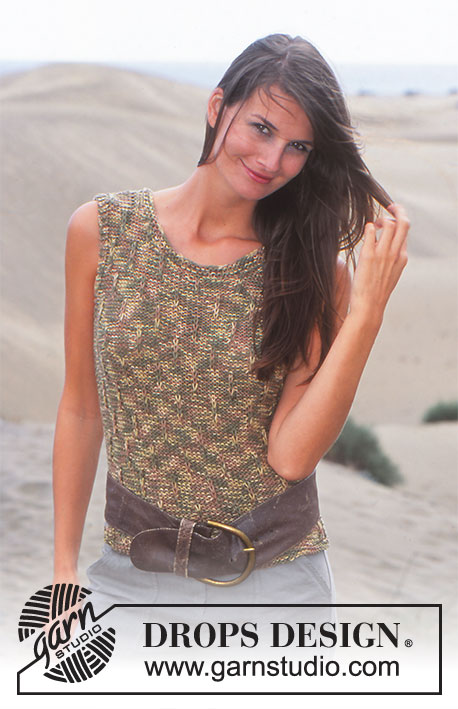
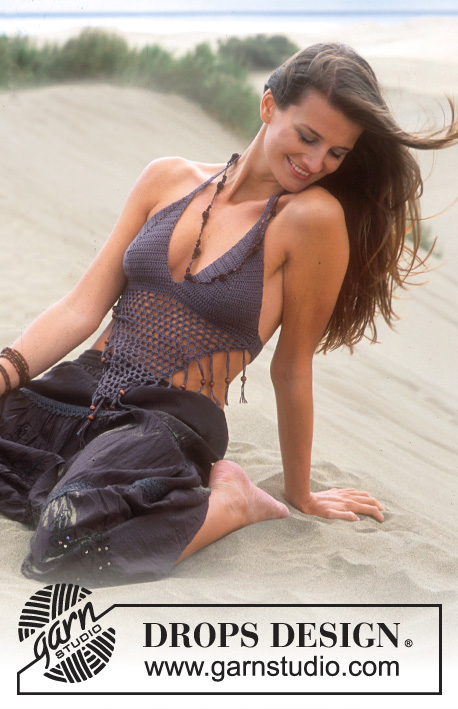
DROPS 95-28 |
|
|
|
|
DROPS Crochet bikini top in Paris and bikini bottoms in Safran.
DROPS 95-28 |
|
|
Crochet Gauge: 14 dc and 18 rows should measure 10 x 10 cm. Crochet info: At the beginning of each row replace each dc with a ch. Finish each row with a dc in the ch from beginning of previous row. Bikini top: Crochet 2 separate parts and assemble them with a crochet edge. Part 1: Crochet loosely 8 (10) ch (inclusive of a ch to turn with) on hook size 5 With Paris. Crochet 1st row as follows: 1 dc into the 2nd ch from the hook. 1 dc in each of the following 6 (8) ch = 8 (10) dc, turn the piece. Read crochet info and crochet 1 dc in each dc from previous row and continue until the piece measures 6 (7) cm – insert a marking thread in the last row. Crochet the next row as follows: Crochet 1 dc in each dc from the previous row, crochet 4 dc in the corner and crochet 8 (10) dc down along the other side = 20 (24) dc on row. Turn the piece and crochet 1 dc in each dc from previous row until the piece measures 10 (11) cm from the marking thread – at the same time when the piece measures 3 cm inc. 1 dc at one side of the piece (at the side) on every 3 cm a total of 3 times = 23 (27) dc – NB: Inc 1 dc as follows: crochet 1 extra dc into the second outermost dc from the side. After the last row the piece measures approx. 16 (18) cm from the centre front and out towards the side. Part 2: Crochet as the 1st one but reversed. Assembly: Put the 2 pieces tog. – see fig. 1. Crochet 1 round of dc along the whole bikini edge as follows (begin at the bottom corner on one of the 2 pieces and crochet from the wrong side): 1 sl st into the 1st st, hereafter crochet a dc into each dc/row along the whole button edge of the bikini (this way the 2 pieces are kept tog.) and hereafter along the other edges, turn the piece. Crochet a row with laces along the top of the bikini as follows: (don’t crochet along the bottom edge) 4 ch, *skip 1 st, 1 tr into the next st, 1 ch*, repeat from *-* and finish with a tr into the last st, turn the piece. Now crochet 1 row of dc’s as follows: *1 ch, 1 dc into the 1st tr, 1 dc around the ch, 1 dc into the next tr*, repeat from *-* along the lace edge and cut the thread. String: Crochet a string from each side of the bikini and a string at the top of each bikini part to be knotted tog. at the back of the neck. String: Crochet 1 sl st into the corner of the bikini part, crochet 70 ch (the ch row should measure approx 50 cm, or the length you need), turn and crochet 1 dc into the 2nd ch from the hook. Continue to crochet 1 dc into each ch, and finish with a sl st in the sl st from the beginning, cut the thread. _____________________________________________ Bikini trousers in Safran Size: S-M-L Materials: DROPS Safran from Garnstudio 150-150-150 g colour no. 22, brown Drops crochet hook size 3 mm or the size needle to obtain the correct gauge String: Approx 1 m for the sides. Crochet Gauge: 21 dc and 26 rows should measure 10 x 10 cm. Crochet info: Turn every row with a ch. Binding off tips: Bind off as follows at the end of the row: Turn the work when number of dc left on row equals the number of sts to be bound off and crochet the next row. Inc. tips: Inc. as follows at the end of the row: Crochet the number of ch equal to number of inc. + 1 ch extra. Turn the piece and crochet 1 dc into the second ch + 1 dc into each of the remaining ch. Trousers: The trousers are crochet in 1 piece, begin at the top front and crochet down between the legs and up the back. Crochet loosely 89-95-101 ch (inclusive 1 ch to turn with). Continue to crochet 1 dc into each ch = 88-94-0100 dc. Crochet the next row as follows: 4 ch, *skip 1 st, 1 tr into the next st, 1 ch*, repeat from *-* and finish with a tr. Continue to crochet a dc into each st. When the piece measures 10-11-11 cm bind off at the end of each row – see binding off tips above: 9 sts 2 times, 4 sts 2 times, 2 sts 1-2-3 times and 1 st 9-10-11 times = 14 dc left on row. The piece now measures approx 21-23-25 cm – insert a marking thread. When the piece measures 8 cm from the marking thread inc. each side at the end of each row – see increasing tips above: 1 st 1-2-3 times, 2 sts 4-3-3 times, 3 sts 4-4-4 times and 2 sts 8-10-11 times = 88-94-100 dc. Crochet rows of dc until the piece measures 30-32-34 cm from the marking thread (= 9-10-10 cm at the sides). Crochet the next row as follows: 4 ch, *skip 1 st, 1 tr into the next st, 1 ch*, repeat from *-* and finish with a tr. Now crochet 1 row of dc into all st. Cut the thread. Assembly: Crochet around each leg as follows: 1 dc, *1 ch, skip 1 st, 1 dc into the next st*, repeat from *-*. Begin at the right side of the front piece, crochet down along the side, around the opening for the leg and up along the back piece. Repeat for the other side - do not crochet along the top edge on front and back. Pull a thread, for example leather, into a cross at the sides so that the width of the bottoms may be adjusted. |
|
 |
|
Have you finished this pattern?Tag your pictures with #dropspattern or submit them to the #dropsfan gallery. Do you need help with this pattern?You'll find 6 tutorial videos, a Comments/Questions area and more by visiting the pattern on garnstudio.com. © 1982-2026 DROPS Design A/S. We reserve all rights. This document, including all its sub-sections, has copyrights. Read more about what you can do with our patterns at the bottom of each pattern on our site. |


With over 40 years in knitting and crochet design, DROPS Design offers one of the most extensive collections of free patterns on the internet - translated to 17 languages. As of today we count 324 catalogues and 12290 patterns translated into English (UK/cm). 12290
We work hard to bring you the best knitting and crochet have to offer, inspiration and advice as well as great quality yarns at incredible prices! Would you like to use our patterns for other than personal use? You can read what you are allowed to do in the Copyright text at the bottom of all our patterns. Happy crafting!
Post a comment to pattern DROPS 95-28
We would love to hear what you have to say about this pattern!
If you want to leave a question, please make sure you select the correct category in the form below, to speed up the answering process. Required fields are marked *.