
Categorías populares
¿Buscas un hilo?


Comentarios / Preguntas (28)
![]() Matilda escribió:
Matilda escribió:
Jättefint mönster, men jag undrar om det finns fler bilder? Den bild ni har visar inte så mycket av underdelen
31.05.2024 - 11:19DROPS Design respondió:
Hei Mathilda. Vi skal se om vi har noen flere bilder i bildearkivet vårt. Har vi det, vil vi legge disse ut. mvh DROPS Design
03.06.2024 - 10:48
![]() Matilda escribió:
Matilda escribió:
Hej! Nu har jag virkat klart min underdel, men kanterna på baksidan rullar sej åt olika håll och är för "slappa". Har ni några tips eller har jag kanske gjort nåt fel? Det hade kanske inte varit ett så stort problem om båda kanterna rullar sej inåt men nu rullar sej en inåt och en utåt så det ser inte bra ut.
31.05.2024 - 11:17DROPS Design respondió:
Hei Mathilde. Prøv å damp kantene lett, evnt. fukt plagget og la det tørke flatt. mvh DROPS Design
03.06.2024 - 10:46
![]() Mariska escribió:
Mariska escribió:
Am I meant to skip the first single crochet of the top part and single crochet in the chain of the previous row for the top? These instructions aren't very clear
27.06.2022 - 03:13DROPS Design respondió:
Dear Mariska, you first work a small square over 8-10 sc in width and 6-7 cm in height, then you will work along both of the sides of this square and the same time increase in the corner: 1 sc in each of the sc of the previous row, 4 sc in the corner, 8-10 sc along the side of square = 20-24 sc. Continue working 1 sc in each sc for 10-11 cm from marker increasing 1 st on the side on every 3 cm a total of 3 times= 23-27 sc. Happy crocheting!
27.06.2022 - 09:09
![]() Anna Zambelli escribió:
Anna Zambelli escribió:
Hallo could you translate this pattern in italian? thank you
27.06.2021 - 16:43DROPS Design respondió:
Dear Anna, our translators work continiously to translate the patterns, but please understand that the new patterns have priority, so older ones are getting trasnlated, when the translators have extra time between new collections. Happy Stitching!
28.06.2021 - 03:38
![]() Janicka Salas escribió:
Janicka Salas escribió:
I love your patterns and have been crocheting for many years but I can not for the life of me figure out what you meant when you get to the bond off section of the bottoms please help. Am I to decrease on both sides start and end of the rows?
07.06.2019 - 18:07DROPS Design respondió:
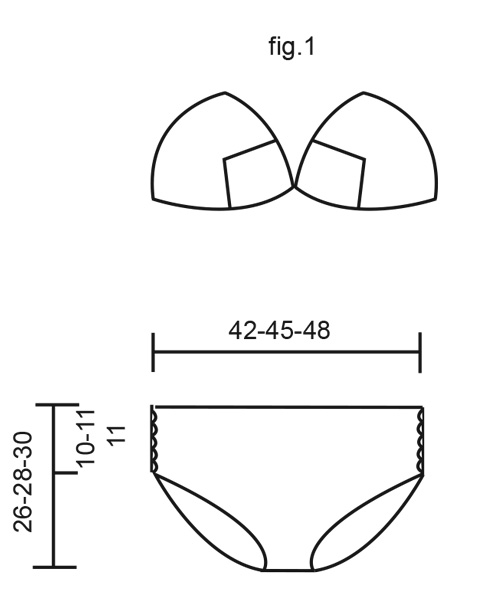
Dear Mrs Salas, when both cups are done, they should look like in fig. 1, starting at the bottom corner of the left cup (when worn) = from WS, crochet 1 sc in each stitch/end of rows along the bottom edge of the left cup, then 1 sc in each st /end of row along the bottom edge of the right cup = both cups are now worked together, turn and work lace row from RS as explained. Happy crocheting!
11.06.2019 - 09:41Efi Tsalikoglou escribió:
Thank you again for this beautiful pattern! Can you please tell me how to attach the sides? It doesn't say and at the photo it seems that you just put a ribbon. Is that correct or is there another way? I hope there is... Thank you in advance.
08.02.2017 - 12:00DROPS Design respondió:
Dear Mrs Tsalikoglou, you thread a ribbon in the ch-loops crocheted on both pieces (front and back) in zig zags (like a shoe lace) annd tie them tog at the bottom. Happy crocheting!
08.02.2017 - 13:59
![]() Tashi escribió:
Tashi escribió:
Hello there :) Could you tell me how to do the 'binding off bit' during the bikini bottoms. I'm quite confused by this : see binding off tips above: 9 sts 2 times, 4 sts 2 times, 2 sts 1-2-3 times and 1 st 9-10-11 times = 14 dc left on row. and the binding off tips. Please could you explain :) Thank you
13.07.2016 - 16:41DROPS Design respondió:
Dear Mrs Tashi, work row until 9 sts remain before end of row, turn and work next row until 9 sts remain before end of row, turn (= 9 sts dec 1 time on each side, ie repeat these 2 rows 1 more time = 9 sts dec 2 times on each side), and continue that way decreasing number of sts worked at the end of row. Happy crocheting!
13.07.2016 - 17:37
![]() Vivian :-) escribió:
Vivian :-) escribió:
Hei. vil først få si veldig fin bikini. Skal man øke maske på siden mot armen?
20.07.2015 - 13:28DROPS Design respondió:
Hej Vivian, ja det stemmer, du øker mod siden under armen. God fornøjelse!
29.07.2015 - 13:23
![]() Jenna escribió:
Jenna escribió:
I am having issues with the bottom of this pattern. The tops of many of your patterns have been super easy and I love them, but I am having issues with the bottom.. After you do your rows of TR it says to continue DC in each stitch and this basically continues down to be the body of suit, I read that as a DC in each space between the TR and that leaves a large amount of space that will make a visable bottom of a bathing suit. Am I reading this correct?
17.08.2014 - 04:34DROPS Design respondió:
Dear Jenna, remember that there are different crochet terminology for US & UK ENglish - click here to see both wording. Happy crocheting!
20.08.2014 - 12:57
![]() Sandra Fisher escribió:
Sandra Fisher escribió:
Im struggling with this pattern from the second part of Part 1. ive got my 20 stitches but when i turn is the row now including the corner i made, and how can something thet measures 10cm also measure 3cm. Im sorry to ask, but it thought this would be a reasonable easy pattern to follow for a beginner/ intermediate. Am i jumping in at the deep end. Thank you in advance.
12.07.2014 - 16:10DROPS Design respondió:
Dear Mrs Fisher, when you have 20 sts, work back and forth with 1 dc in each dc (in rows) over the 20 sts until piece measures 10 cm from marker, at the same time inc 1 dc every 3 cm (measured from marker). Happy crocheting!
14.07.2014 - 08:52
|
|
DROPS 95-28 |
|
|
|
|
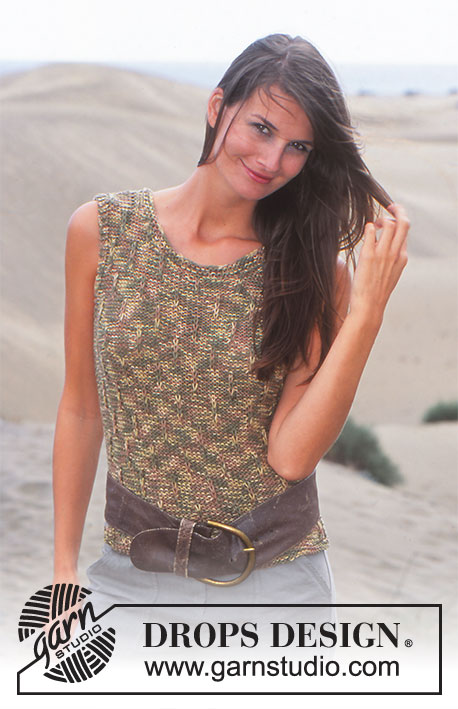
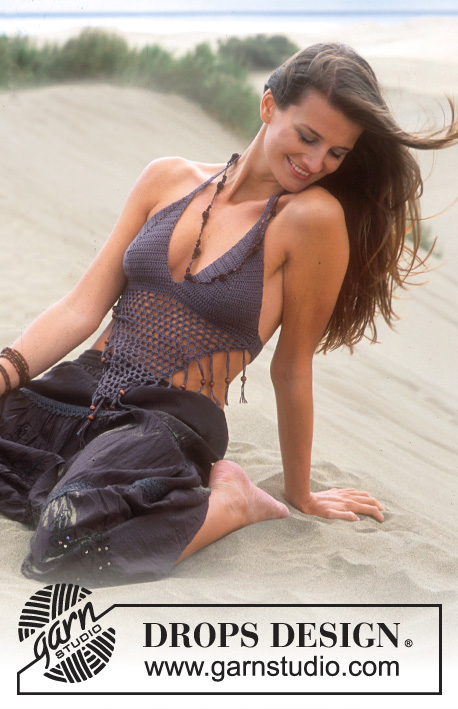
Bikini a ganchillo DROPS: Parte superior en Paris y parte inferior en Safran.
DROPS 95-28 |
|
|
Tensión de la muestra: 14 p.b. x 18 filas = 10 x 10 cm. Información para la realización del trabajo: Al inicio de cada fila sustituir cada p.b. por 1 p.de cad. Finalizar cada fila con 1 p.b. en el p.de cad del inicio de la fila anterior. Bikini top: Trabajar en 2 partes separadas y unirlas con un borde a ganchillo. Crochet the next row as follows: Crochet 1 dc in each dc from the previous row, crochet 4 dc in the corner and crochet 8 (10) dc down along the other side = 20 (24) dc on row. Turn the piece and crochet 1 dc in each dc from previous row until the piece measures 10 (11) cm from the marking thread – at the same time when the piece measures 3 cm inc. 1 dc at one side of the piece (at the side) on every 3 cm a total of 3 times = 23 (27) dc – NB: Inc 1 dc as follows: crochet 1 extra dc into the second outermost dc from the side. After the last row the piece measures approx. 16 (18) cm from the centre front and out towards the side. Un lado: Trabajar flojo 8 (10) p.de cad. (incl. 1 p.de cad. para girar) con ag de ganchillo tamaño 5 mm con Paris. Fila 1: 1 p.b. en el 2º p.de cad. desde el ganchillo, 1 p.b. en cada uno de los sig 6 (8) p.de cad. = 8 (10) p.b., girar la labor. Leer la información para la realización del trabajo, trabajar 1 p.b. en cada p.b. de la fila anterior y continuar hasta que la labor mida 6 (7) cm - insertar un marcapuntos (MP) en la última fila. Fila sig.: Trabajar 1 p.b. en cada p.b. de la fila anterior, trabajar 4 p.b. en la esquina y 8 (10) p.b. hacia abajo a lo largo del otro lado = 20 (24) p.b. en la fila. Girar la labor y trabajar 1 p.b. en cada p.b. de la fila anterior hasta que la labor mida 10 (11) cm desde el MP – al mismo tiempo cuando la labor mida 3 cm aum 1 p.b. a un lado de la labor (en el lateral) cada 3 cm un total de 3 vcs = 23 (27) p.b. – ATENCIÓN:Aum 1 p.b. como sigue: trabajar 1 p.b. extra en el anteúltimo p.b. en el lado. Después de la última fila la labor mide aprox 16 (18) cm desde el centro del delantero hasta el lado. Otro lado: Trabajar de la misma manera pero a la inversa. TERMINACIÓN: Poner ambas partes juntas – ver fig. 1. Trabajar 1 vta de p.b. a lo largo de todo el bikini como sigue (comenzar en la esquina inferior de una de las 2 copas y trabajar por el LR): 1 p.e. en el primer pt, desde aquí trabajar 1 p.b. en cada p.b./fila a lo largo de todo el borde inferior del bikini (así se unen las 2 copas) y desde aquí a lo largo de los otros bordes, girar la labor. Trabajar una fila con calados a lo largo de la parte superior del bikini como sigue: (no trabajar a lo largo del borde inferior) 4 p.de cad, *saltar 1 pt, 1 p.a. en el sig pt, 1 p.de cad*, repetir de *a* y finalizar con 1 p.a. en el último pt, girar la labor. Ahora trabajar 1 fila de p.b. como sigue: *1 p.de cad, 1 p.b. en el primer p.a., 1 p.b. alrededor del p.de cad, 1 p.b. en el sig p.a.*, repetir de *a* a lo largo del borde de calados y cortar el hilo. CORDÓN: Trabajar un cordón desde cada lado del bikini y otro desde la parte superior de cada copa para atarlos en la espalda y detrás del cuello. Cordón: Trabajar 1 p.e. en la esquina de la parte del bikini, trabajar 70 p.de cad (la cadeneta debe medir aprox 50 cm, o el largo que necesites), girar y trabajar 1 p.b. en el 2º p.de cad desde el ganchillo. Continuar trabajando 1 p.b. en cada p.de cad y finalizar con 1 p.e. en el p.e. del inicio, cortar el hilo. _____________________________________________ PARTE INFERIOR DEL BIKINI EN SAFRÁN Talla: S-M-L Materiales: DROPS Safran de Garnstudio 150-150-150 g color nº 22, café Aguja de ganchillo Drops tamaño 3 mm o el tamaño necesario para obtener la tensión correcta Cordón: Aprox 1 mt para los lados. Tensión de la muestra: 21 p.b. y 26 filas = 10 x 10 cm. Información para la realización del trabajo: Girar cada fila con 1 p.de cad. Tip para las disminuciones: Dism como sigue al final de la fila: Girar la labor cuando quede en la fila el nº de p.b. que hay que disminuir y trabajar la fila de vta. Tip para los aumentos: Aum como sigue al final de la fila: Trabajar un nº de p.de cad igual al nº de aumentos + 1 p.de cad extra. Girar la labor y trabajar 1 p.b. en el 2º p.de cad + 1 p.b.en cada uno de los p.d cad restantes. SHORTS: Los shorts se trabajan en una pieza, comenzar en la parte delantera superior y trabajar hacia abajo entre las piernas, subiendo después por la parte de detrás. Trabajar flojo 89-95-101 p.de cad (incl 1 p.de cad para girar). Continuar trabajando 1 p.b. en cada p.de cad = 88-94-100 p.b. Trabajar la sig fila como sigue: 4 p.de cad, *saltar 1 pt, 1 p.a. en el sig pt, 1 p.de cad*, repetir de *a* y finalizar con 1 p.a. Continuar trabajando 1 p.b. en cada pt. Cuando la labor mida 10-11-11 cm cerrar al final de cada fila - ver Tip para las dism arriba: 9 pts 2 vcs, 4 pts 2 vcs, 2 pts 1-2-3 vcs y 1 pt 9-10-11 vcs = 14 p.b. restantes en la fila. La labor mide ahora 21-23-25 cm - insertar 1 marcapuntos (MP). Cuando la labor mida 8 cm desde el MP aum a cada lado al final de cada fila - ver tip para los aum arriba: 1 pt 1-2-3 vcs, 2 pts 4-3-3 vcs, 3 pts 4-4-4 vcs y 2 pts 8-10-11 vcs = 88-94-100 p.b. Trabajar filas de p.b. hasta que la labor mida 30-32-34 cm desde el MP (= 9-10-10 cm en los lados). Trabajar la sig fila como sigue: 4 p.de cad, *saltar 1 pt, 1 p.a. en el sig pt, 1 p.de cad*, repetir de *a* y finalizar con 1 p.a. Ahora trabajar una fila de p.b. sobre todos los pts. Cortar el hilo. TERMINACIÓN: Trabajar alrededor de cada pierna como sigue: 1 p.b., *1 p.de cad, saltar 1 pt, 1 p.b. en el sig pt*, repetir de *a*. Comenzar en el lado derecho del delantero, trabajar hacia abajo a lo largo del lado, alrededor de la abertura para la pierna y hacia arriba en la parte de la espalda. Repetir en el otro lado - no trabajar a lo largo del borde superior del delantero y la espalda. Pasar un hilo, de cuero, por ejemplo, cruzado en los lados de modo que podamos ajustar el ancho. |
|
|
|
¿Terminaste este patrón?Entonces, etiqueta tus fotos con #dropspattern o envíalas a la galería #dropsfan. ¿Necesitas ayuda con este patrón?Encontrarás 6 videos tutoriales, un espacio para comentarios/preguntas y más visitando la página del patrón en garnstudio.com © 1982-2025 DROPS Design A/S. Todos los derechos reservados. Este documento, incluyendo todas sus sub-secciones, está protegido por los derechos de autor (copyright). Lee más acerca de lo que puedes hacer con nuestros patrones en la parte de abajo de cada patrón de nuestro sitio. |


Con más de 40 años en el diseño de modelos de punto y de ganchillo, DROPS Design ofrece una de las más vastas colecciones de patrones gratuitos en el internet - traducidos en 17 idiomas. Al día de hoy, contamos con 314 catálogos y 11822 patrones - de los cuales 11158 están traducidos en español.
Nosotros trabajamos con mucho esmero para brindarte lo mejor que las labores de punto y ganchillo tienen para ofrecer,inspiración y consejos, así como hilos de magnífica calidad a precios increíbles! Te gustaría usar nuestros patrones para otro fin además del uso personal? Puedes leer acerca de lo que estás permitida a hacer en el texto de Copyright en la parte de abajo de todos nuestros patrones. Felices labores!
Escribe un comentario sobre DROPS 95-28
¡Nos encantaría saber qué piensas acerca de este patrón!
Si quieres escribir una pregunta referente al patrón, por favor asegúrate de elegir la categoría correcta en el formulario debajo, para acelerar el proceso de respuesta. Los campos obligatorios están marcados con un *.