
Popular categories
Looking for a yarn?


Comments / Questions (34)
![]() Tiziana wrote:
Tiziana wrote:
Buongiorno,mi piacerebbe poter eseguire il modello con maniche a 3/4, come posso ricavare i punti necessari? Grazie
22.02.2019 - 15:08DROPS Design answered:
Buonasera Tiziana, per un'assistenza personalizzata e adatta alle sue modifiche le suggeriamo di rivolgersi al suo rivenditore DROPS di fiducia. Buon lavoro!
19.08.2019 - 18:20
![]() VU Anna wrote:
VU Anna wrote:
Bonjour Madame, Je crois qu'il y a une erreur de frappe pour le nombre de mailles à monter pour les manches pour la taille S : Il serait plus juste que ce soit 38 mailles au lieu de 28 comme indiqué. Merci pour votre confirmation.
24.11.2018 - 01:54DROPS Design answered:
Bonjour Mme Vu, c'est exact, il faut bien monter 38 m en taille S, la correction a été faite, merci. Bon tricot!
26.11.2018 - 07:47
![]() MARGARET R LERNER wrote:
MARGARET R LERNER wrote:
1. Instructions for pattern says that chart on the left M.2 is Pattern 2 and chart on the right is Patterns 1A and 1B, this is the reverse of the actual presentation of the charts. 2. also, i had selected language English (US/in) but all of the instructions per se are in cm.
02.07.2017 - 17:50DROPS Design answered:
Dear Mrs Lerner, M.1 A/B and M.2 are the correct diagrams. Measurements in inches will be added, thanks for your feedback. Happy knitting!
03.07.2017 - 10:18
![]() Greta wrote:
Greta wrote:
Bonjour, j'aimerais savoir comment adapter ce modèle en taille XS, est-ce seulement le nombre de mailles à monter qui est réduit ou est-ce plus complexe que cela? (dommage que tous les modèles ne soient pas à ma taille :( )
28.02.2015 - 01:04DROPS Design answered:
Bonjour Greta, vous trouverez en bas de page un schéma avec toutes les mesures pour chaque taille, prises à plat, d'un côté à l'autre. Comparez ces mesures à celles d'un vêtement analogue qui vous va et dont vous aimez la forme pour pouvoir ajuster. Pour toute assistance personnalisée, rappelez-vous que votre magasin DROPS peut vous aider. Bon tricot!
28.02.2015 - 09:02
![]() Mme Berteau wrote:
Mme Berteau wrote:
Merci beaucoup pour votre aide , je vais pouvoir continuer tranquillement mon tricot.
30.10.2014 - 18:38
![]() Jessica wrote:
Jessica wrote:
Guten Tag, ich habe eine frage zu den cm angaben in der Anleitung: Sie geben an das die erhöhten Maschen am Rückenteil nach 9 cm gestrickt werden. Ich werde leider nicht daraus schlau. Sind mit den 9 cm die gesamte Höhe des Strickstückes gemeint? Oder werden die Maschen zugenommen nachdem einmal M1 in der Höhe gestrickt wurde (was ja mit einer Höhe von 9 cm angegeben ist)?
09.08.2014 - 10:07DROPS Design answered:
Liebe Jessica, mit den 9 cm ist die Gesamthöhe gemeint. Das gilt, soweit nicht anders angegeben, auch für die anderen cm-Angaben.
11.08.2014 - 09:39
![]() Sabine wrote:
Sabine wrote:
Wo finde ich denn die Maße in cm für die verschiedenen Größen?
21.01.2014 - 11:09DROPS Design answered:
LIebe Sabine, alle cm Angaben finden Sie unten in der Massskizze.
22.01.2014 - 08:25
![]() Julie B wrote:
Julie B wrote:
Dans l'explication du devant droit, à la 8e ligne, on peut lire " tricoter 1 rang end avec les 5 m côté...". Devrait-on lire 1 rang env? Avec un rang end, on a 2 rang point mousse consécutif alors qu'au dos et aux manches, on en a qu'un. Merci pour tout vos merveilleux modèles!
05.07.2012 - 16:34DROPS Design answered:
Bonjour Julie, effectivement on tricote 1 rang sur l'envers avec les 5 m en côtes et 1 m lis au point mousse comme avant, le texte a été corrigé. Merci et bon tricot !
06.07.2012 - 10:09
![]() Drops Design wrote:
Drops Design wrote:
On left piece you work this row like this: Knit the next row as follows from right side: K 22-25-28-33-38, P 1, K 1, P 1, K 1, then K 1 (edge st knit in garter st) (= 5 edge sts), bind off the outermost 19 sts for tie, fasten off = 27-30-33-38-43 sts on needle. Turn and with new yarn K 1 row back, keeping the outermost 5 edge sts at the center front in rib and garter st as established.
25.09.2009 - 19:29
![]() Kelley wrote:
Kelley wrote:
I need a little help on the Left Front. I don't know how to reverse the shaping at the point of binding off for the tie. On the row that I should bind off, I am on a knit row; if I bind off per pattern I end up with a duplicate of the Right Front. Do I add a row somewhere in order to bind off on the 'reverse' side? Thanks!
24.09.2009 - 00:36
|
||||||||||
DROPS 87-15 |
||||||||||
|
|
||||||||||
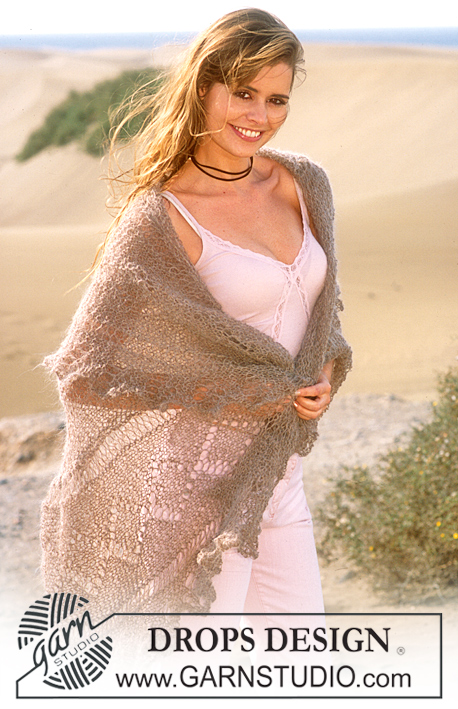
DROPS Bolero in Alpaca, Vivaldi and Glitter.
DROPS 87-15 |
||||||||||
|
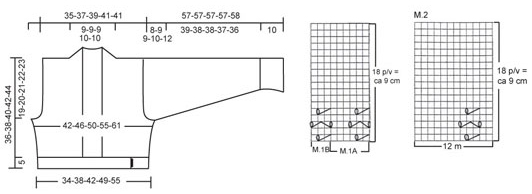
Gauge: 15 sts x 21 rows with 1 strand of each yarn (3 strands) on larger needles in stockinette st = 10 x 10 cm. Pattern: See charts. The pattern is seen from the right side. The chart on the left (M.2) is Pattern 2. The chart on the right shows Patterns 1A and 1B (M.1A and M.1B) «18 p/v = ca 9 cm» – 18 rows = approx. 9 cm. Back: Cast on 53-59-65-75-85 sts on smaller needles with 1 strand of each yarn (= 3 strands). Knit 2 rows garter st, change to larger needles and stockinette st. When the piece measures 5 cm P 1 row (right side), then 2 rows stockinette st, K 1 row (wrong side) and 2 rows stockinette st. Read the entire next section before knitting: Establish pattern on the next row as follows from right side: K 1 (edge st knit in garter st), 3-0-3-2-1 sts stockinette st, Pattern 1A over the following 42-54-54-66-78 sts, Pattern 1B (= 3 sts), 3-0-3-2-1 sts stockinette st and K 1 (edge st knit in garter st). Continue in pattern as established. When Pattern 1 is complete repeat Pattern 2 a total of 2 times (Pattern 2 starts inside of 1 edge st + the increased sts at each side (see instructions below) + 3-0-3-2-1 sts stockinette st at each side so that the lace pattern in Pattern 2 comes between the 2 lace patterns in Pattern 1). After Pattern 2 continue in stockinette st to finished measurements. Side inc: When the piece measures 9 cm inc 1 st at each side a total of 6-6-6-5-4 times: Sizes S + M + L: every other row Size XL: every 3 rows, and Size XXL: every 4 rows = 65-71-77-85-93 sts – knit the increased sts in stockinette st. Armhole: When the piece measures 17-18-19-20-21 cm bind off for armhole at each side every other row: 3 sts 1 time, 2 sts 0-1-2-3-4 times and 1 st 3-3-2-3-5 times = 53-55-59-61-61 sts. When the piece measures 34-36-38-40-42 cm bind off the center 11-11-11-13-13 sts for the neck. On the next row dec 1 st at each neck edge = 20-21-23-23-23 sts remain on each shoulder. Bind off when the piece measures 36-38-40-42-44 cm. Right front: Cast on 46-49-52-57-62 sts on smaller needles with 1 strand in each yarn (= 3 strands). Knit 2 rows garter st, change to larger needles and stockinette st but keep the outermost st at the center front edge in garter st throughout. When the piece measures 5 cm, P 1 right side row (keep edge st at the center front edge in garter st as before), 2 rows stockinette st and K 1 wrong side row. Knit the next row as follows from right side: bind off the outermost 19 sts at the center front edge for tie, then K 1 (edge st knit in garter st), K 1, P 1, K 1, P 1 (= 5 edge sts) and K 22-25-28-33-38 = 27-30-33-38-43 sts. P 1 row back, keeping the outermost 5 edge sts at the center front in rib and 1 garter st at the edge as established. Read the entire next section before knitting: Pattern: Knit the next row as follows (right side row): 5 edge sts as before, 3 sts stockinette st, Pattern 1A over the following 12-18-18-24-30 sts, Pattern 1B (= 3 sts), 3-0-3-2-1 sts stockinette st and K 1 (edge st knit in garter st). Continue in pattern as established. When Pattern 1 is complete repeat Pattern 2 a total of 2 times (start Pattern 2 inside of 5 edge sts and 3 sts in stockinette st from center front edge so that the lace pattern in Pattern 2 comes between the 2 lace patterns in Pattern 1). After Pattern 2 continue in stockinette st to finished measurements. Side inc: When the piece measures 9 cm inc at the side as on back = 33-36-39-43-47 sts – knit the increased sts in stockinette st. Armhole: When the piece measures 17-18-19-20-21 cm bind off for armhole at the side as on back = 27-28-30-31-31 sts. When the piece measures 36-38-40-42-44 cm bind off the 20-21-23-23-23 sts on shoulder. Continue neckband over the remaining 7-7-7-8-8 sts as before. When neckband measures approx. 4-4.5 cm from shoulder (the edge should stretch slightly when sewn to neckband) put sts on a st holder. Left front: Cast on and knit the same as the right reversing shaping. Sleeve: Cast on 38-40-42-44-46 sts on smaller needles with 1 strand in each yarn (= 3 strands). Knit 2 rows garter st, change to larger needles and stockinette st, decreasing 4 sts evenly distributed on the 1st row = 34-36-38-40-42 sts. Read the entire next section before knitting: When the piece measures 10 cm, P 1 right side row, 2 rows stockinette st, K 1 wrong side row, and 2 rows stockinette st. Pattern: Establish pattern on the next row as follows (right side row): K 1 (edge st knit in garter st), 1-2-0-1-2 sts stockinette st, Pattern 1A over the following 30-30-36-36-36 sts, 1-2-0-1-2 sts stockinette st and K 1 (edge st knit in garter st). Continue the pattern as established. When Pattern 1 has been knit 1 time (18 rows), repeat Pattern 2 a total of 3 times (54 rows). Place Pattern 2 above Pattern 1. After Pattern 2 continue in stockinette st to finished measurements. When the piece measures 14 cm inc 1 st at each side every 3.5-3.5-3-2.5-2.5 cm a total of 10-10-11-12-13 times = 54-56-60-64-68 sts. When sleeve measures 49-48-48-47-46 cm bind off for sleeve cap at each side every other row 3 sts 1 time, 2 sts 2-2-2-3-3 times and 1 st 2-3-3-2-4 times, continue to bind off 2 sts at each side until piece measures 56-56-56-56-57 cm, then bind off 3 sts 1 time at each side. Bind off the remaining sts, the piece measures approx. 57-57-57-57-58 cm. Assembly: sew shoulder seams. Neckband: Join neckband at center back with Kitchener st. Sew the edge to back neckband. Sew in sleeves. Sew sleeve and side seams using edge sts as a seam allowance. |
||||||||||
Diagram explanations |
||||||||||
|
||||||||||
 |
||||||||||
Have you finished this pattern?Tag your pictures with #dropspattern or submit them to the #dropsfan gallery. Do you need help with this pattern?You'll find 19 tutorial videos, a Comments/Questions area and more by visiting the pattern on garnstudio.com. © 1982-2026 DROPS Design A/S. We reserve all rights. This document, including all its sub-sections, has copyrights. Read more about what you can do with our patterns at the bottom of each pattern on our site. |
||||||||||


With over 40 years in knitting and crochet design, DROPS Design offers one of the most extensive collections of free patterns on the internet - translated to 17 languages. As of today we count 324 catalogues and 12290 patterns translated into English (UK/cm). 12290
We work hard to bring you the best knitting and crochet have to offer, inspiration and advice as well as great quality yarns at incredible prices! Would you like to use our patterns for other than personal use? You can read what you are allowed to do in the Copyright text at the bottom of all our patterns. Happy crafting!
Post a comment to pattern DROPS 87-15
We would love to hear what you have to say about this pattern!
If you want to leave a question, please make sure you select the correct category in the form below, to speed up the answering process. Required fields are marked *.