
Popular categories
Looking for a yarn?






































Comments / Questions (17)
 Anne Marshall wrote:
People are selling your patterns complete with your photography etc on Etsy! But hiding reference to drops design AND the suggested yarn. Put a ‘not for resale’ on at least the new patterns? A watermark?
27.09.2026 - 15:08
 Greet Luijmes wrote:
Kun je dit patroon ook van beneden naar boven breien.
16.08.2026 - 09:29
Anje wrote:
Bij de pas staat dat er verdeeld gemeerderd moet worden. Ik begrijp niet helemaal waar in het proces ik meerderen 1 of meerderen 2 moet gebruiken. Als ik de beschrijving lees gaat het steeds over verdeeld meerderen= dus 1. Waar gebruik ik dan meerderen 2
28.07.2026 - 14:59DROPS Design answered:
Dag Anje,
Tip 1 legt uit hoe je uitrekent waar op de naald je moet meerderen. Tip 2 legt uit hoe je de steken precies breit op het moment dat je een meerdering maakt.
29.07.2026 - 21:00
 Ingela wrote:
Varför ska man göra ökningar samtidigt som man börjar med resåren, funkar det inte om man gör ökningar på sista varvet innan man börjar med resåren, vad är vitsen, har det någon betydelse?
18.07.2026 - 18:07DROPS Design answered:
Hei Ingela. Om du ønsker å øke på sista varvet innan man börjar med resåren, kan du fint gjøre det. I oppskriften er det valgt å gjøre det når resåren starter da overgangen med økning og resår får en penere overgang. mvh DROPS Design
04.08.2026 - 07:44
 Doris Fimmers wrote:
Ich würde gerne diesen Pullover Dewy Dream stricken. Kann ich mir die Anleitung ausdrucken?
06.07.2026 - 21:31DROPS Design answered:
Liebe Frau Fimmers, um die Anleitung zu drucken, klicken Sie auf dem "Druck-Knopf" oben rechts der Seite. Viel Spaß beim Stricken!
07.07.2026 - 14:17
Heike wrote:
Hallo zusammen, ich denke, dass in der Beschreibung ein Fehler ist. Der Markierer wird direkt nach Aufnahme der Maschen gesetzt. Dann strickt man 3 cm 2 Maschen rechts und 2 Maschen links. Nach 3 cm wird auf glatt rechts gewechselt unter Zunahme von Maschen. Und nun soll man glatt rechts Stricken bis man 3 cm ab Markierer erreicht hat. Diese 3 cm sind aber bereits gestrickt worden. Muss es hier nicht heißen, weitere 3 cm Stricken bzw. Stricken bis 6 cm ab Markierer erreicht sind ?
28.06.2026 - 06:29DROPS Design answered:
Liebe Heike, nach dem Bündchen der Halsblende wird man eine Markierung einsezten, dann die Arbeit wird von hier gemessen, nicht ab Anschlagskante, so nache der 1. Runde glattrechts mit Zunahmen strickt man 3 cm glattrechts (3. und 4. Größe) ab Markierung, dh 6 cm ab Anschlagskante. Viel Spaß beim Stricken!
29.06.2026 - 11:16
 Shannon wrote:
Hello, In the graphic it says to knit two together twisted, is this another way of writing knit two together through the back loop?
15.06.2026 - 20:06DROPS Design answered:
Dear Shannon, correct, when you knit 2 stitches together twisted, these two stitches should be knitted together into the back loop of both stitches - see also this technique in video, here. Happy knitting!
16.06.2026 - 08:09
 Anna wrote:
Salve, ho intenzione di realizzare questo modello in BELLE. Purtroppo il colore numero 12 acquistato non corrisponde al ciliegia raffigurato in tabella... direi che piuttosto sia un fucsia... ormai lo tengo, ma per chi volesse comprare questa tonalità in futuro, potreste rettificare le foto? Grazie
26.05.2026 - 16:04DROPS Design answered:
Buonasera Anna, purtroppo le colorazioni variano anche a seconda dello schermo: ci sono diversi video anche di combinazioni di filati in cui può vedere i colori. In alternativa può consultare il suo rivenditore DROPS di fiducia e chiedere delle foto più accurate. Buon lavoro!
26.05.2026 - 22:31
 ELISABETH wrote:
Bonjour, j'ai lu votre réponse, à une autre Elisabeth 😁, au sujet des 2 techniques d'augmentations. MAIS , j'ai relu les explications, et ne vois pas quand utiliser la 1ère et quand la 2ème. ? Merci
28.02.2026 - 07:57DROPS Design answered:
Bonjour Elisabeth, les augmentations-1 expliquent comment augmenter augmenter à intervalles réguliers (le calcul - que vous pouvez vous épargner en utilisant la calculette, cf la clé à molette en bas à droite de la page) et les augmentations-2 expliquent comment augmenter = comment faire ces augmentations, retrouvez cette technique ici, en vidéo. Bon tricot!
02.03.2026 - 08:17
Marchand wrote:
Pourquoi n y a t il plus de compteur pour les augmentations dans les explications?
20.02.2026 - 12:53DROPS Design answered:
Bonjour Mme Marchand, la petite calculatrice est toujours disponible, faites légèrement défiler la page vers le bas, vous la trouverez dans le coin en bas à droite. Bon tricot!
23.02.2026 - 07:20
|
|||||||||||||||||||
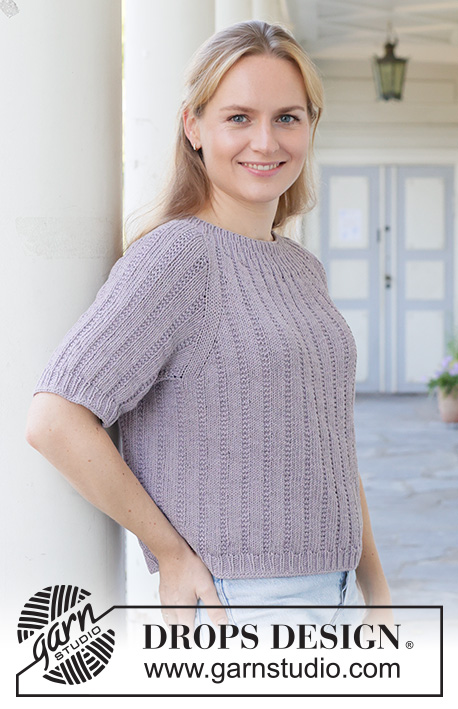
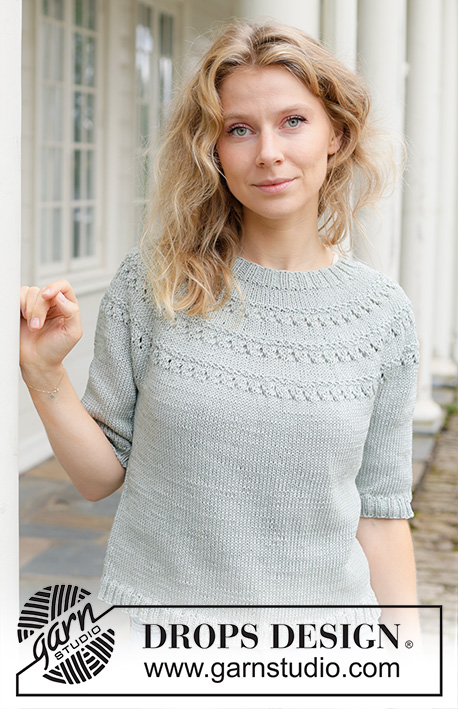
Dewy Dream#dewydreamsweater |
|||||||||||||||||||
 |
 |
||||||||||||||||||
Knitted jumper in DROPS Muskat. The piece is worked top down with round yoke, lace pattern and short sleeves. Sizes S - XXXL.
DROPS 258-26 |
|||||||||||||||||||
|
------------------------------------------------------- EXPLANATIONS FOR THE PATTERN: ------------------------------------------------------- PATTERN: See diagram A.1. Choose diagram for your size. DECREASE TIP: Decrease 1 stitch on each side of the marker-thread as follows: Work until there are 3 stitches left before the marker-thread, knit 2 together, knit 2 (marker-thread sits between these 2 stitches), slip 1 stitch knit-wise, knit 1 and pass the slipped stitch over the knitted stitch (2 stitches decreased). INCREASE TIP-1 (evenly spaced): To work out how to increase evenly, count the total number of stitches on the needle (e.g., 120 stitches) and divide by the number of increases to be made (e.g., 20) = 6. In this example, increase after each 6th stitch. INCREASE TIP-2: These symmetrical increases give 1 new stitch. Follow points 1-4 below: 1. Keep the working strand behind the piece. Slip the first stitch on the left stitch purl-wise onto the right stitch. 2. Insert the left needle behind the slipped stitch and between the slipped stitch and the first stitch on the right needle. 3. Make 1 yarn over the right needle and pull it through the stitch (1 new stitch on the right needle). 4. Slip the outermost loop off the left needle and knit through the front of the second loop 1 stitch increased. SLEEVE TIP: When knitting up stitches under the sleeve, you can get a small hole in the transition between stitches on the body and sleeve. This hole can be closed by picking up the strand between 2 stitches and working this strand twisted together with the first stitch between body and sleeve. ------------------------------------------------------- START THE PIECE HERE: ------------------------------------------------------- JUMPER – SHORT OVERVIEW OF THE PIECE: The pattern uses both long and short needles; start with the length which fits the number of stitches and change when necessary. The neck and yoke are worked in the round with circular needle, top down and from the right back shoulder. When the yoke is finished, it is divided for the body and sleeves and the body continued in the round, while the sleeves wait. The sleeves are worked top down, in the round. NECK: Cast on 120-124-128-136-140-148 stitches with circular needle size 3 mm and DROPS Muskat. Work rib in the round (knit 2, purl 2) for 3-3-3-4-4-4 cm. Insert 1 marker after the first 43-44-45-49-50-52 stitches (approx. mid-front), the yoke is measured from here. YOKE: Change to circular needle size 4 mm. Work stocking stitch and increase 20-20-24-24-24-24 stitches evenly on the first round - read INCREASE TIP-1 and INCREASE TIP-2 in explanations above = 140-144-152-160-164-172 stitches. Work stocking stitch until the yoke measures 2-2-3-3-4-4 cm from the marker. Remember to maintain the knitting tension. Now work PATTERN – read description above, as follows: Work A.1, 35-36-38-40-42-44 times on the round, increasing on each round marked with an arrow as follows – remember INCREASE TIP-1 and INCREASE TIP-2: Arrow-1: Increase 44-48-56-60-68-72 stitches evenly spaced = 184-192-208-220-232-244 stitches. Arrow-2: Increase 36-40-44-48-56-60 stitches evenly spaced = 220-232-252-268-288-304 stitches. Arrow-3: Increase 32-36-36-44-44-48 stitches evenly spaced = 252-268-288-312-332-352 stitches. Arrow-4: Increase 32-32-32-40-40-44 stitches evenly spaced = 284-300-320-352-372-396 stitches. Arrow-5: Increase 4-6-10-8-12-14 stitches evenly spaced = 288-306-330-360-384-410 stitches. Continue working until the yoke measures 20-21-22-23-24-25 cm from the marker. Now divide for the body and sleeves. DIVIDE FOR BODY AND SLEEVES: Place the first 60-62-68-74-76-78 stitches on a thread without working them, cast on 8-10-12-14-16-18 stitches (under sleeve), work 84-91-97-106-116-127 stitches as before (= front piece), place the next 60-62-68-74-76-78 stitches on a thread without working them, cast on 8-10-12-14-16-18 stitches (under sleeve), work the last 84-91-97-106-116-127 stitches as before (= back piece). The body and sleeves are finished separately. BODY: = 184-202-218-240-264-290 stitches. Work stocking stitch in the round until the piece measures 39-41-43-44-45-47 cm from the marker-mid-front. Change to circular needle size 3 mm. Begin the rib (knit 2, purl 2) and increase 24-30-30-32-36-42 stitches evenly on the first round = 208-232-248-272-300-332 stitches. When the rib measures 3-3-3-4-4-4 cm, cast off with rib. The jumper measures approx. 42-44-46-48-49-51 cm from the marker and 48-50-52-54-56-58 cm from top of shoulder. SLEEVES: Place the 60-62-68-74-76-78 sleeve-stitches from one thread on circular needle size 4 mm and knit up 1 stitch in each of the 8-10-12-14-16-18 stitches cast on under the sleeve – read SLEEVE TIP = 68-72-80-88-92-96 stitches. Insert a marker-thread in the middle of the 8-10-12-14-16-18 stitches under the sleeve. Start at the marker-thread and work stocking stitch in the round. When the sleeve measures 2-2-3-3-3-3 cm, decrease 2 stitches under the sleeve – read DECREASE TIP. Decrease like this every 2-2-2-2-2½-5 cm a total of 7-7-6-6-4-2 times = 54-58-68-76-84-92 stitches. Continue working until the sleeve measures 17-16-16-14-15-14 cm from the division. Change to double pointed needles size 3 mm. Work rib (knit 2, purl 2), AT THE SAME TIME increase 6-6-8-8-12-12 stitches evenly on the first round = 60-64-76-84-96-104 stitches. When the rib measures 3-3-3-4-4-4 cm, cast off with rib. The sleeve measures approx. 20-19-19-19-18-17 cm. |
|||||||||||||||||||
Diagram explanations |
|||||||||||||||||||
|
|||||||||||||||||||
 |
|||||||||||||||||||
 |
|||||||||||||||||||
Have you finished this pattern?Tag your pictures with #dropspattern #dewydreamsweater or submit them to the #dropsfan gallery. Do you need help with this pattern?You'll find 20 tutorial videos, a Comments/Questions area and more by visiting the pattern on garnstudio.com. © 1982-2026 DROPS Design A/S. We reserve all rights. This document, including all its sub-sections, has copyrights. Read more about what you can do with our patterns at the bottom of each pattern on our site. |
|||||||||||||||||||






With over 40 years in knitting and crochet design, DROPS Design offers one of the most extensive collections of free patterns on the internet - translated to 17 languages. As of today we count 333 catalogues and 12525 patterns translated into English (UK/cm). 12525
We work hard to bring you the best knitting and crochet have to offer, inspiration and advice as well as great quality yarns at incredible prices! Would you like to use our patterns for other than personal use? You can read what you are allowed to do in the Copyright text at the bottom of all our patterns. Happy crafting!
Post a comment to pattern DROPS 258-26
We would love to hear what you have to say about this pattern!
If you want to leave a question, please make sure you select the correct category in the form below, to speed up the answering process. Required fields are marked *.