
Popular categories
Looking for a yarn?


Comments / Questions (17)
![]() Paule Mercier wrote:
Paule Mercier wrote:
Bonjour Dans le modèle quiet Bay sweater, comment faire le raglan.? Avez-vous une vidéo explicative pour tricot avec aiguille circulaire? On laisse une maille entre les deux jetés ou pas? l'explication pour la maille torse est complexe. Merci de m'éclairer.
10.03.2026 - 20:52DROPS Design answered:
Bonjour Mme Mercier, retrouvez ici, en vidéo, comment on fait ce type d'augmentations - notez que dans la vidéo, on augmente (on fait le jeté) de chaque côté d'une maille, mais ici, pour ce modèle, on va augmenter avant/après les 2 m du raglan (celles avec 1 fil marqueur entre elles). Vous augmentez ainsi d'abord de chaque côté de chaque raglan puis vous augmenterez alternativement juste pour le dos/le devant (4 m) et pour le dos/le devant et les manches (8 m comme au début). Bon tricot!
11.03.2026 - 07:44
![]() Anke wrote:
Anke wrote:
Hallo, ich bin gerade mit den Zunahmen fertig. Nun soll ich glatt rechts weiter stricken bis ich eine Höhe von 20 cm ab dem Markierer habe. Mein Markierer ist ja direkt oben, bei dem Ende des Rippenmusters. Da habe ich ja jetzt schon etwas mehr als 20 cm gestrickt. Wie geht es weiter? Habe ich einen Denkfehler? Liebe Grüße Anke
19.12.2025 - 12:11
![]() Laura Fitzmaurice wrote:
Laura Fitzmaurice wrote:
How much positive ease does the sweater have that the model is wearing in the photo for this pattern? I want to imitate that exact fit / look.
16.11.2025 - 15:14DROPS Design answered:
Hi Laura, I can't say for sure. I think at least 20 cm. How to deal with ease issue you will find HERE. Happy knitting!
28.11.2025 - 08:58
![]() Sylmi wrote:
Sylmi wrote:
Bonjour, j’aimerais faire votre pull, mais je ne sais pasà quoi correspondent vos tailles?M et L par exemple ? 42, 44, 46 ? Merci beaucoup si vous pouvez me l’indiquer
25.09.2025 - 14:07DROPS Design answered:
Bonjour Sylmi, mesurez un pull similaire que vous avez et dont vous aimez la forme et comparez ces mesures à celles du schéma pour trouver la taille correspondante. Retrouvez plus d'infos ici. Bon tricot!
25.09.2025 - 16:38
![]() GISELE AUBUT wrote:
GISELE AUBUT wrote:
Switch to circular needle size 3.5 mm. Work in stocking stitch in the round and increase for RAGLAN after/before 2 raglan stitch at every marker thread in every transition between front piece/back piece and sleeves - Does this mean do the increase 2 stitches before/after the raglan stitch?
20.03.2025 - 14:16DROPS Design answered:
Dear Mrs Aubut, you first decrease 8 stitches: 2 sts on each front /back pieces and sleeve, so you will increase with 1 yarn over before the 2 stitches with a marker in between + 1 yarn over after the 2 stitches with a marker in between - afterwards you will increase alternately 4 sts (back and front piece only = after the 2 sts at the beg of front/back piece + before the 2 sts at the end of front/back piece) and 8 stitches (just as before). Happy knitting!
20.03.2025 - 15:43
![]() Micheline wrote:
Micheline wrote:
I need clarification on the transition between the ribbed neck edge and the yoke on the Quiet Bay pattern. The pattern says “beginning of round is at right shoulder at the back. Insert one marker in piece after the first ‘50’ stitches on round (approx. mid front), measure piece from this marker.” Do I knit stockinette stitch or rib stitch from the beginning of my round to the 50th stitch and then place the marker? Or do I just place the marker without knitting any stitches?
06.03.2025 - 02:00DROPS Design answered:
Dear Micheline, the beginning of the rounds are at right shoulders at the back, the marker inserted after the first 50 sts of the round is just a mark for mid front and to measure from, rounds still start as before = from beg of right shoulder. Insert this marker without working the stithces, just counting them. Happy knitting!
06.03.2025 - 11:09
![]() Jana Sušková wrote:
Jana Sušková wrote:
Dobrý den, jsem na konci pleteni sedla a nevím, zda mám na konci sedla plést lícovým žerzejem 21 cm od konce druhého raglanoveho přidávání nebo od konce prvního. Myslím si, ze od místa, kde mam 402 ok na jehlici t.j. Po druhém raglanovem přidávání. Chci se jen ujistit. Dekuji
25.01.2025 - 10:09DROPS Design answered:
Dobrý den, Jano, lícovým žerzejem do celkové výše 20-22-23-24-26-28 cm od značky na průkrčníku - svetr můžete každopádně před oddělením rukávů vyzkoušet a zjistit, zda nebudou průramky moc krátké/těsné. Hodně zdaru! Hana
26.01.2025 - 09:36
![]() Alcaraz wrote:
Alcaraz wrote:
Bonjour, je suis en train de tricoter un pull de haut en bas, j’ai fini le col et j’ai fait les premières augmentations sur un tour, j’ai tricoté les jetés comme indiqué, mais je ne sais pas si il faut faire des augmentations à tout les tours ou non ? Ils disent de continuer jusqu’à 2 cm mais avec ou sans augmentation ?
20.01.2025 - 12:23DROPS Design answered:
Bonjour Mme Alcaraz, dans ce modèle, lorsque vous avez augmenté (et 144 à 180 mailles sur l'aiguille - cf taille), vous allez continuer en rond jusqu'à ce l'ouvrage mesure 2 cm à partir du marqueur = tricotez les mailles comme elles se présentent. Continuez ensuite en jersey avec l'aiguille 3,5 et commencez à augmenter pour le raglan comme indiqué. Bon tricot!
20.01.2025 - 15:44
![]() Paulina wrote:
Paulina wrote:
My first sweater! It's easy and bautiful. Thank you for this model and clear description with a lot of videos
17.12.2024 - 15:50
![]() Sarah wrote:
Sarah wrote:
Vielen Dank für die Erklärung. Beginne ich mit der Aufteilung denn ab dem ursprünglichen oder ab dem neuen Rundenbeginn? Dieser versetzte Anfang ist bei mir nämlich zwischen zwei Linksmaschen. Vielleicht ist das der Grund dafür, dass ich trotz der Erklärung, bei der Einteilung, zwischen 2 Linksmaschen auskomme.
27.11.2024 - 14:43DROPS Design answered:
Liebe Sarah, ab Rundbeginn = ab die 1. rechte Masche der Runde (wie das Bündchen bei der Halskante begonnen hat). Viel Spaß beim Stricken!
27.11.2024 - 16:31
|
|
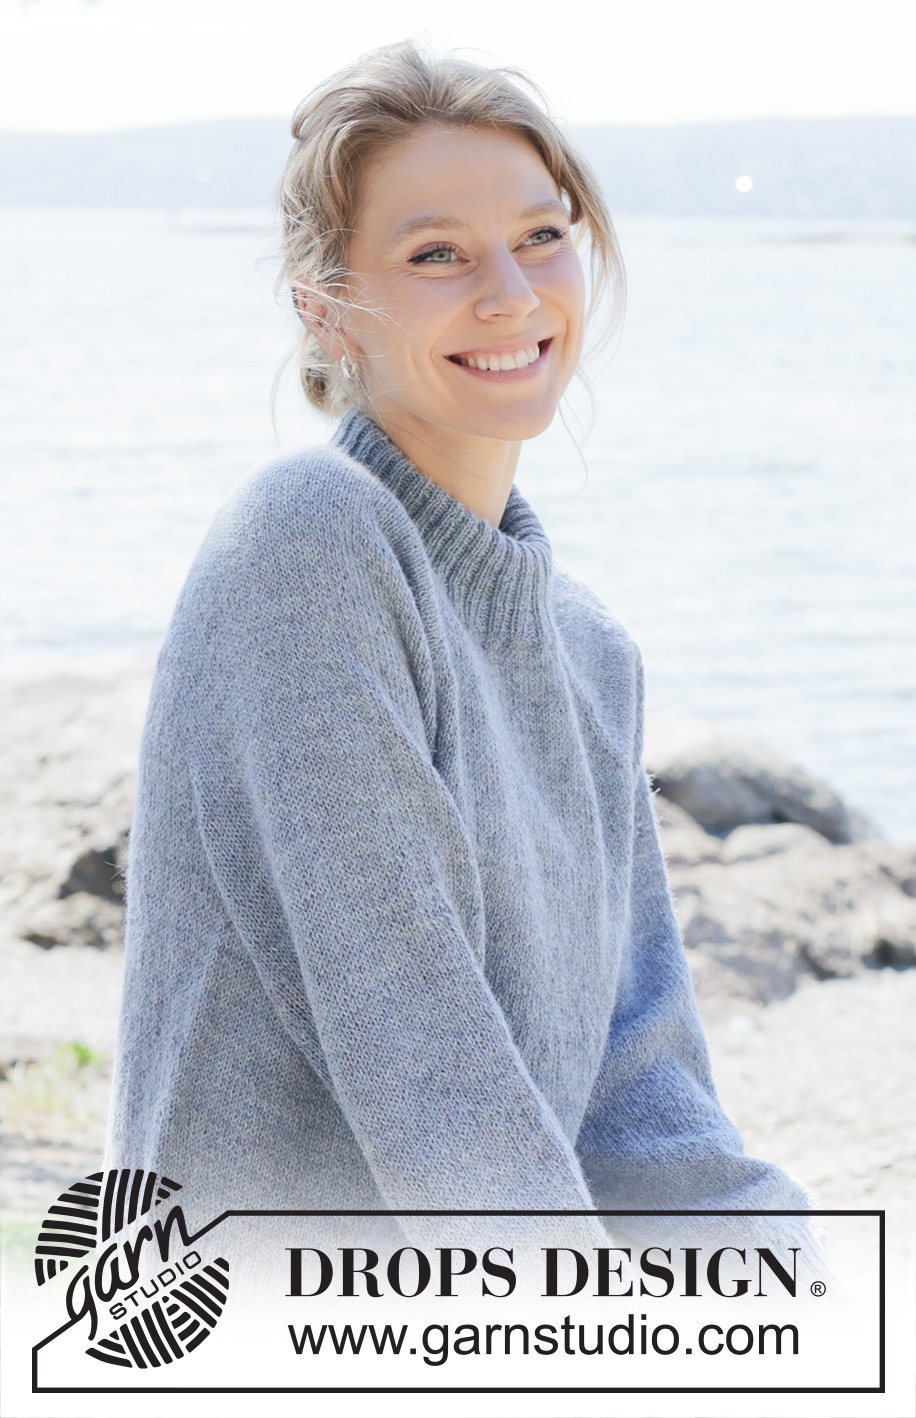
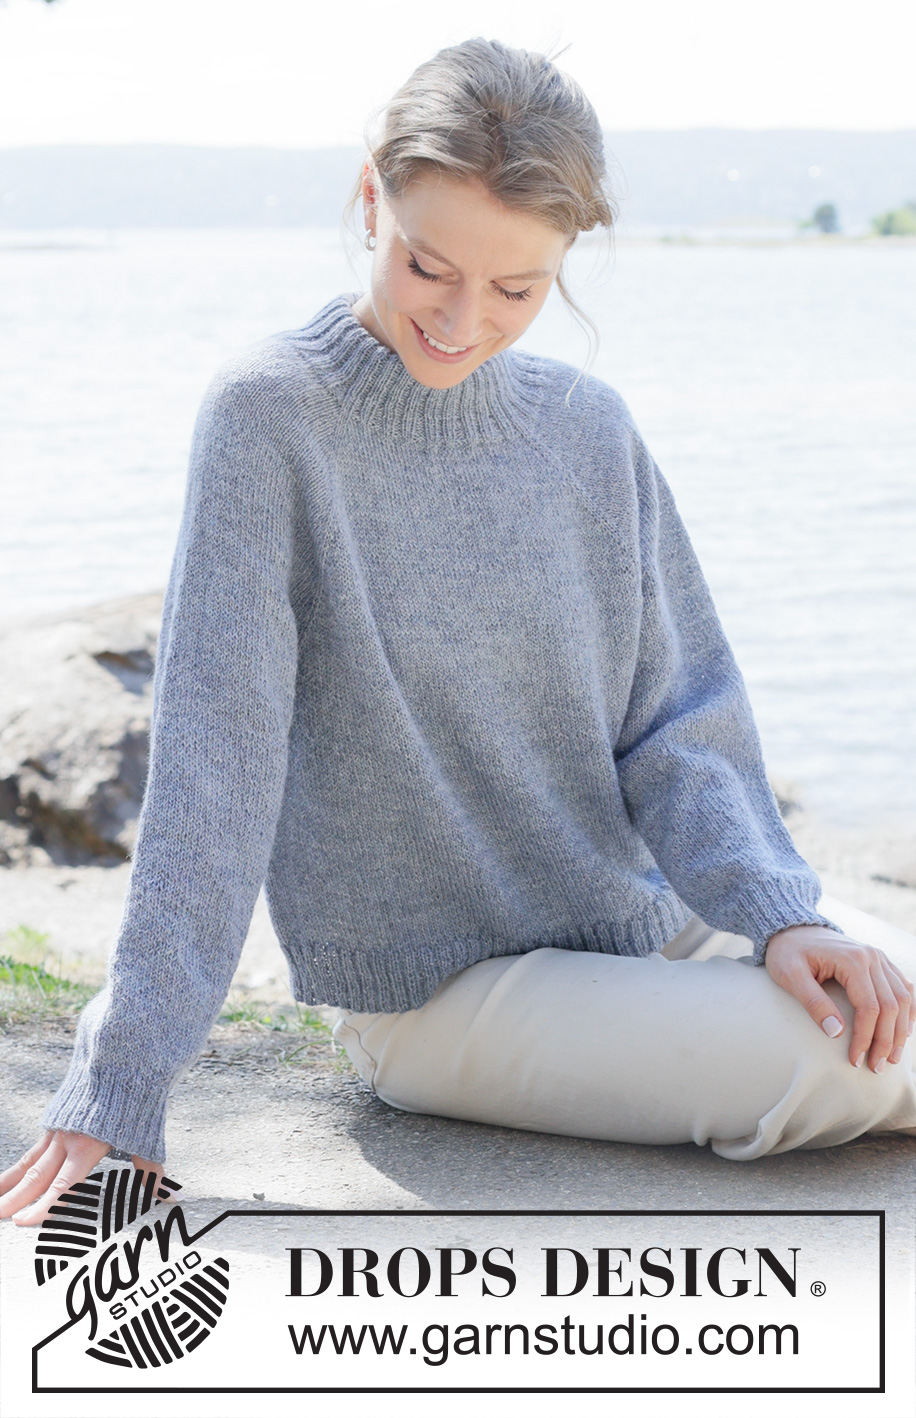
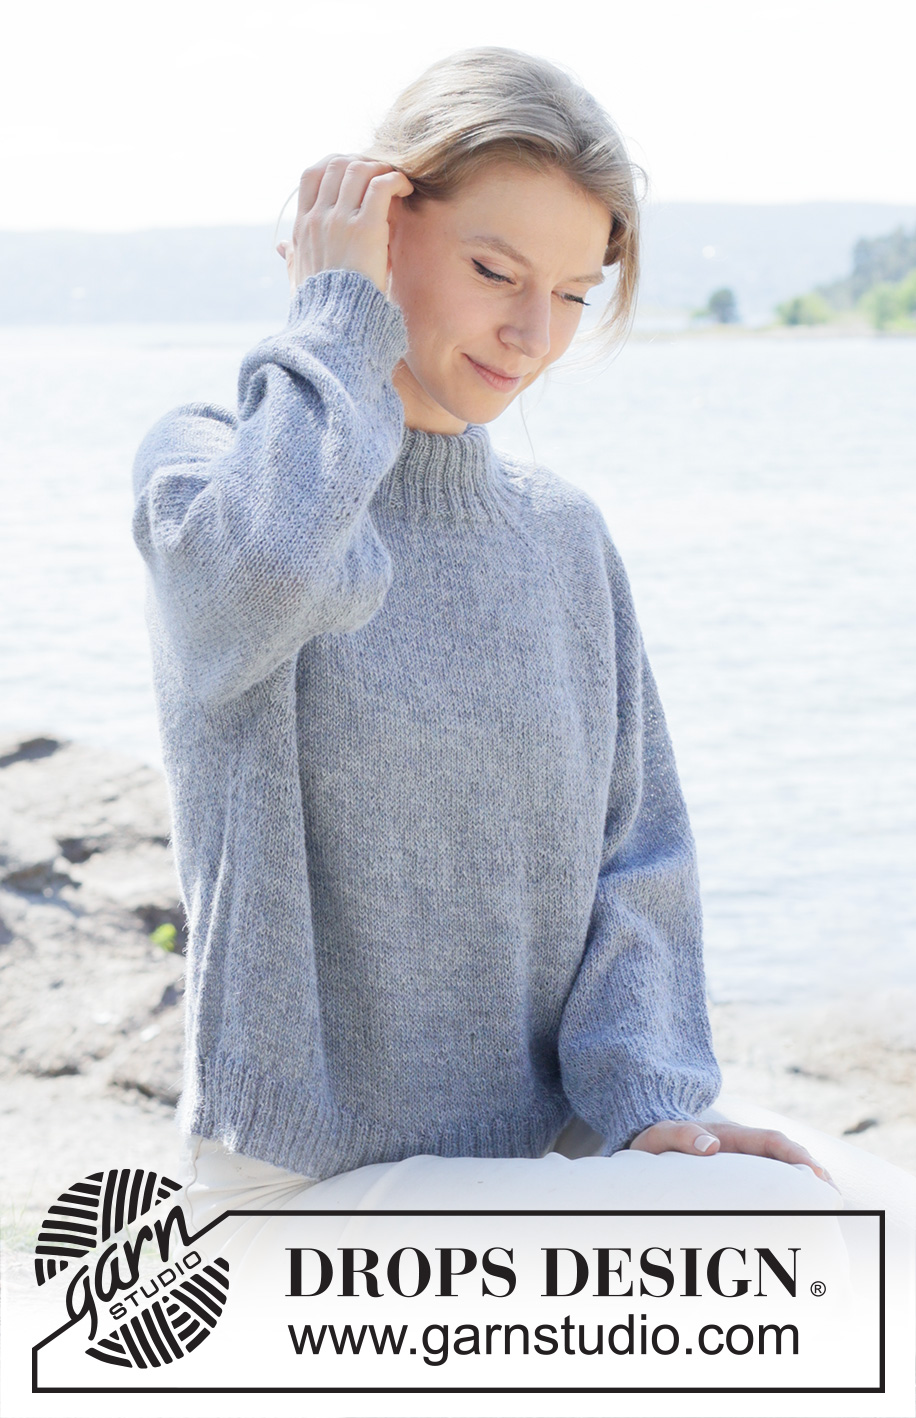
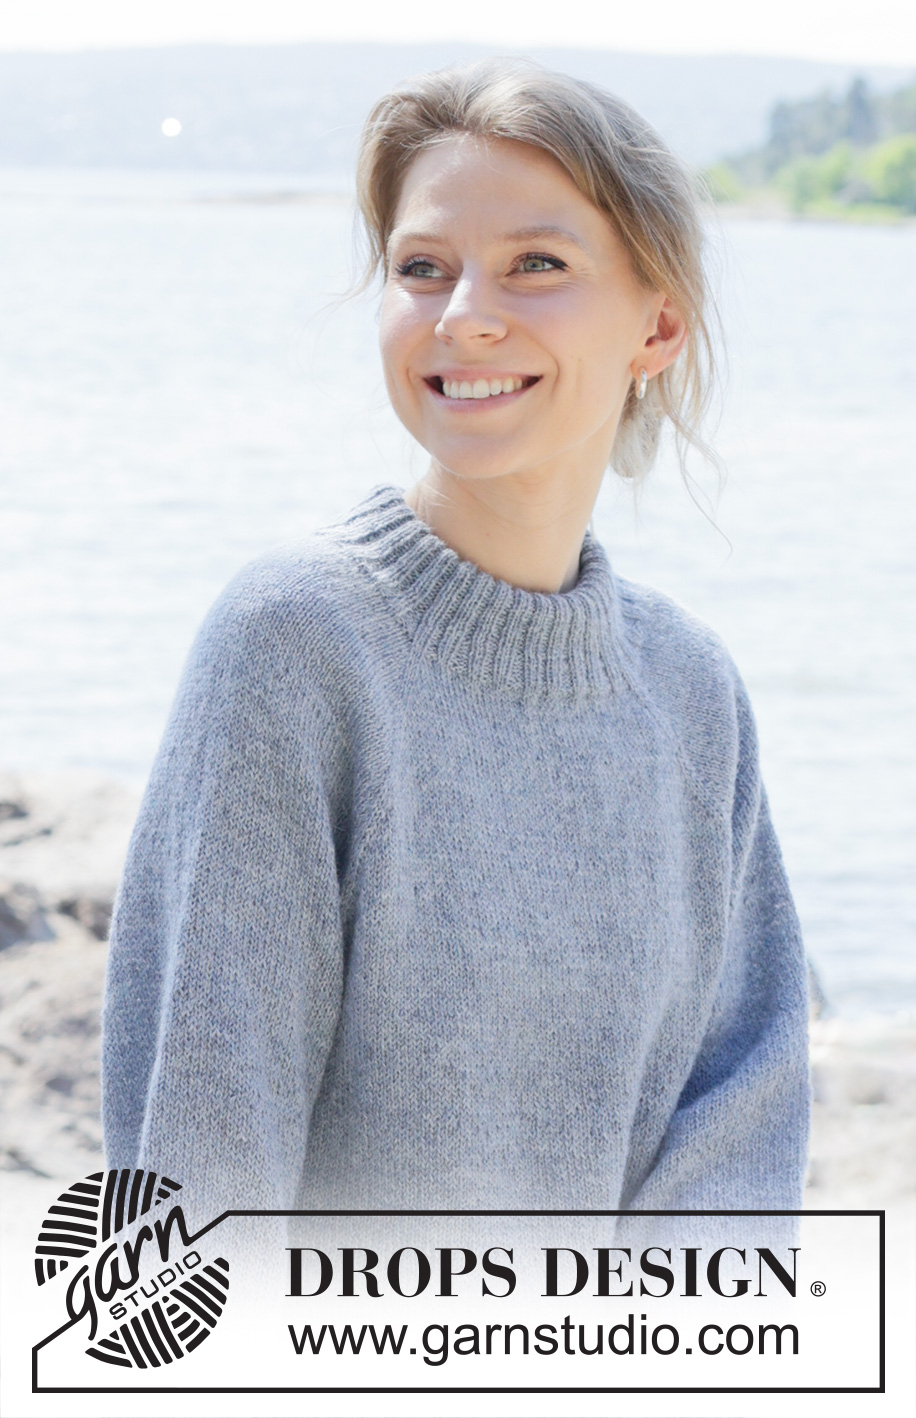
Quiet Bay Sweater#quietbaysweater |
|
 |
 |
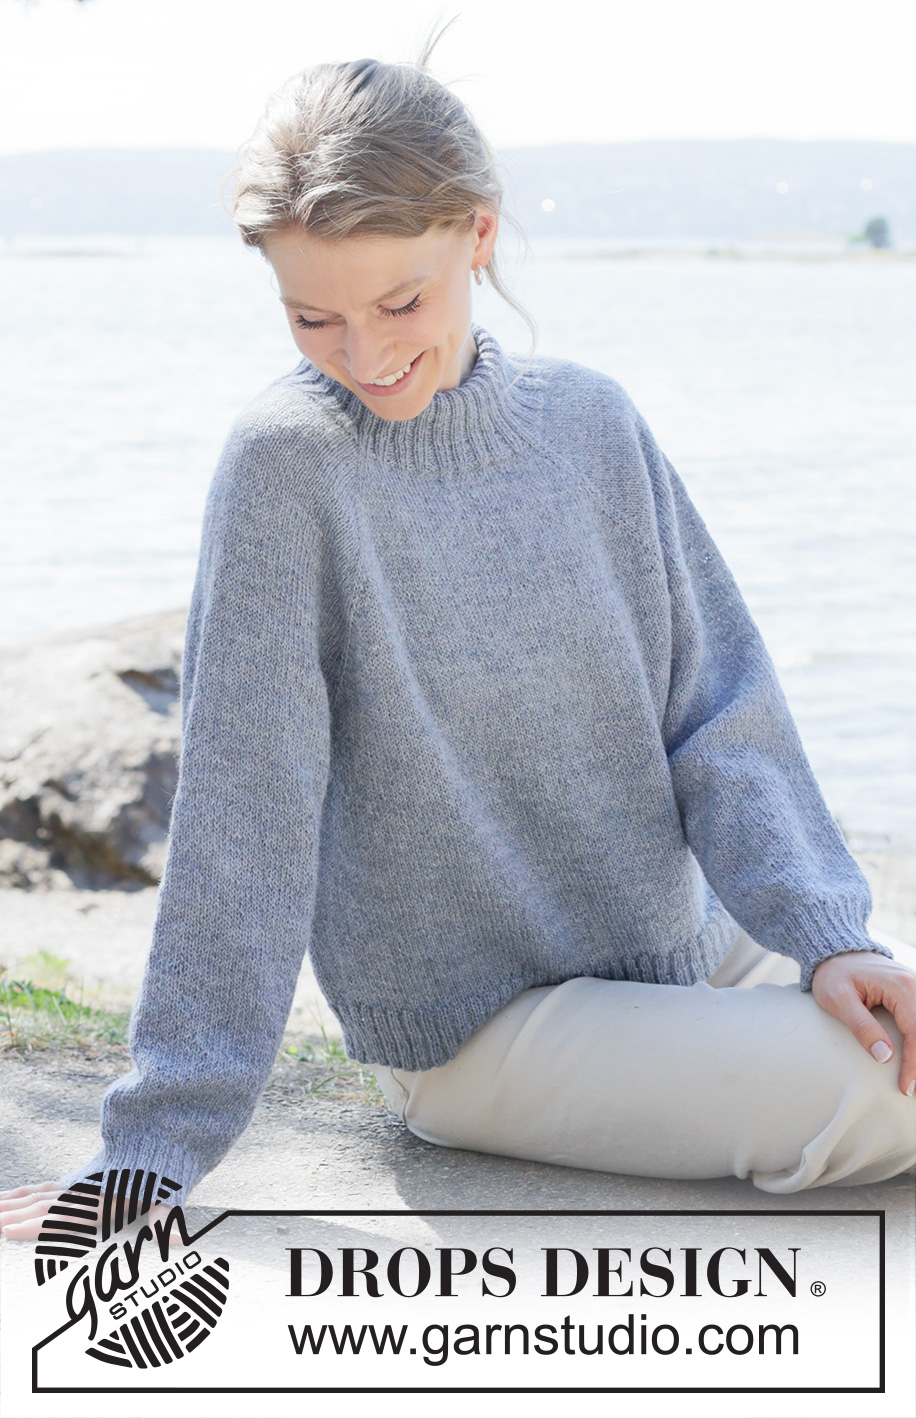
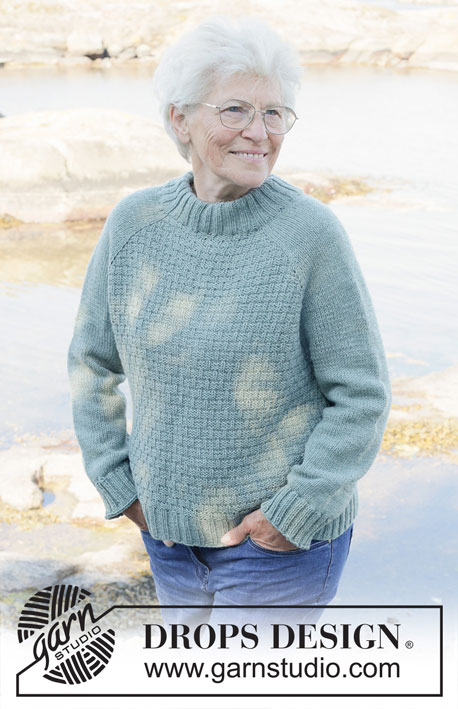
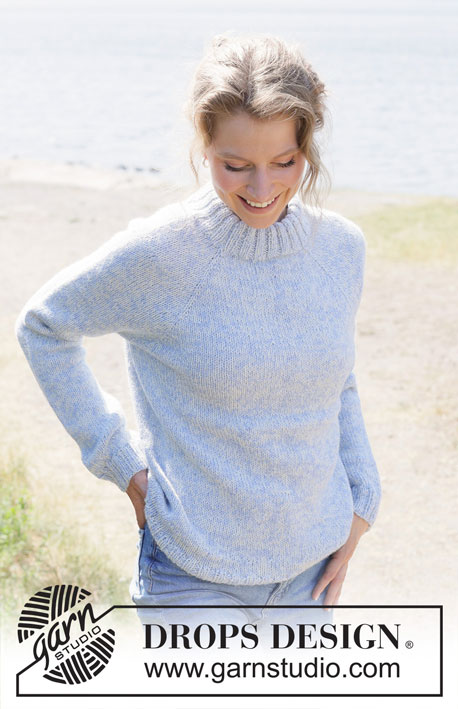
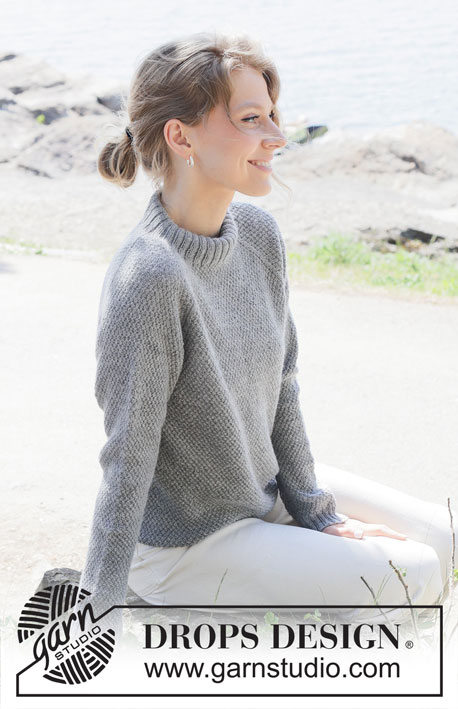
Knitted jumper in DROPS Alpaca or DROPS Nord. Piece is knitted top down with raglan and double neck edge. Size: S - XXXL
DROPS 254-33 |
|
|
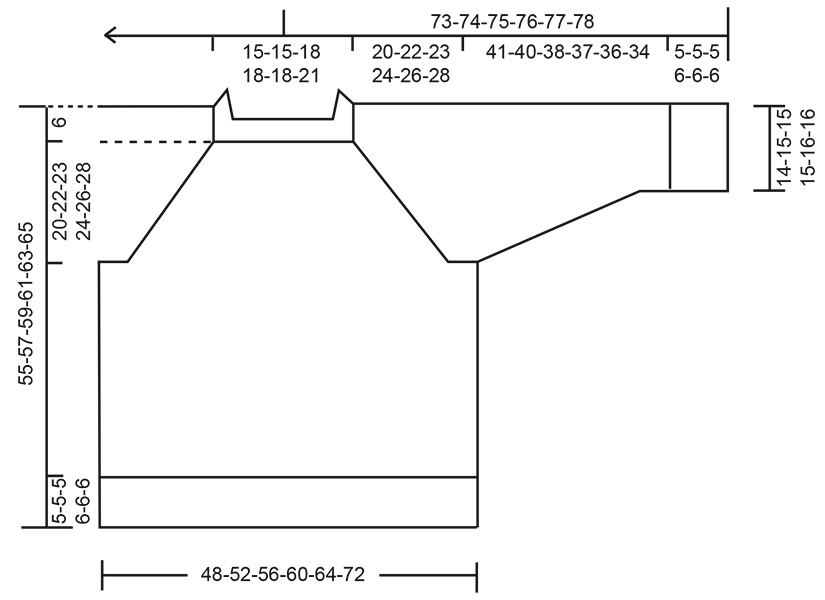
---------------------------------------------------------- EXPLANATION FOR THE PATTERN: ---------------------------------------------------------- RAGLAN: Increase 1 stitch by making 1 yarn over, on next round work yarns over as explained below: BEFORE MARKER THREAD: Slip stitch off left needle and put it back on left needle but the opposite way (insert left needle in from behind when slipping it back on needle). Knit yarn overs in front loop of stitches to avoid holes. Then work the new stitches in stocking stitch. AFTER MARKER THREAD: Knit yarn overs in back loop of stitches to avoid holes. Then work the new stitches in stocking stitch. DECREASE TIP: Decrease 1 stitch on each side of marker thread as follows: Work until 3 stitches remain before marker thread and knit 2 together, knit 2 (marker thread is in the middle of these 2 stitches), slip 1 stitch knitwise, knit 1, pass slipped stitch over stitch worked (= 2 stitches decreased). ---------------------------------------------------------- START THE PIECE HERE: ---------------------------------------------------------- JUMPER - SHORT OVERVIEW OF THE PIECE: In this pattern needles of different length have been used, begin with fitting length for number of stitches and switch as needed. Work neck edge and yoke in the round on circular needle from right shoulder back, and work top down. When yoke is done, divide piece for body and sleeves. Work body down wards in the round on circular needle while putting the sleeves aside. Then work sleeves downwards in the round on needle. Fold the neck edge double against the wrong side and fasten. NECK EDGE: Cast on 128-128-144-144-144-160 stitches on circular needle size 3.5 mm with DROPS Alpaca or DROPS Nord. Switch to circular needle size 2.5 mm (cast on on a larger needle to get an elastic cast-on edge). Work rib in the round as follows: Knit 1, * purl 2, knit 2 *, work from *-* until 3 stitches remain on round, finish with purl 2 and knit 1. Work until piece measures 8-8-8-9-9-9 cm. The neck edge is later folded in towards wrong side and assembled to form a neck edge of approx. 4 cm. Beginning of round is at right shoulder at the back. Insert 1 marker in piece after the first 46-46-50-50-50-54 stitches on round (= approx. mid front), measures piece from this marker. YOKE: Insert 4 marker threads in piece without working the stitches, insert marker threads between 2 knitted stitches, and these 2 stitches are called raglan stitches. Insert 1st marker thread at beginning of round, count 28 stitches (= sleeve), insert 2nd marker thread before next stitch, count 36-36-44-44-44-52 stitches (= front piece), insert 3rd marker thread before next stitch, count 28 stitches (= sleeve), insert 4th marker thread before next stitch, 36-36-44-44-44-52 stitches remain after last marker thread (= back piece). On next round increase 16-16-18-18-18-20 stitches AT THE SAME TIME continue rib, work next round as follows: * Knit 1, purl 1, make 1 yarn over, purl 1, knit 2, purl 2, knit 1 *, work from *-* the rest of round = 144-144-162-162-162-180 stitches. Increase in every other purl section, i.e. increase 4 stitches on each sleeve and 4-4-5-5-5-6 stitches on front piece/back piece. Continue in the round with knit over knit and purl over purl – purl the yarn overs twisted to avoid holes - until piece measures 2 cm from marker. Switch to circular needle size 3.5 mm. Work in stocking stitch in the round and increase for RAGLAN after/before 2 raglan stitch at every marker thread in every transition between front piece/back piece and sleeves - read explanation above (= 8 stitches increased on every increase round). Increase for raglan every other round 12-16-21-19-18-17 times in total = 240-272-330-314-306-316 stitches. Remember to follow the knitting tension! Continue with stocking stitch and increase for raglan but on every other increase, increase only on body. I.e. increase on body every other round, and on sleeves every 4th round. Increase alternately 4 and 8 stitches. Increase like this 16-16-12-16-20-24 times on body (8-8-6-8-10-12 times on sleeves). Increase has been done 28-32-33-35-38-41 times in total on body and 20-24-27-27-28-29 times on sleeves = 336-368-402-410-426-460 stitches. Work without increasing until piece measures 20-22-23-24-26-28 cm from marker (i.e. after approx. 18-20-21-22-24-26 cm with stocking stitch). Now divide yoke for body and sleeves. DIVIDING FOR BODY AND SLEEVES: AT THE SAME as next round is worked divide yoke for body and sleeves as follows: Work 1 stitch (= belongs to back piece), slip the next 70-78-84-84-86-88 stitches on a thread for sleeve, cast on 16-18-18-22-26-30 new stitches on needle (= in the side mid under sleeve), work 98-106-117-121-127-142 stitches in stocking stitch (= front piece), slip the next 70-78-84-84-86-88 stitches on a thread for sleeve, cast on 16-18-18-22-26-30 new stitches on needle (= in the side mid under sleeve) and work the last 97-105-116-120-126-141 stitches in stocking stitch (= back piece). Finish body and sleeves separately. BODY: = 228-248-270-286-306-344 stitches. Insert 1 marker in one side of piece (= in the middle of the 16-18-18-22-26-30 stitches that were cast on under sleeve). Work until marker, round begins here and work in the round. Work stocking stitch until piece measures 44-46-48-49-51-53 cm from marker mid front. Switch to circular needles size 2.5 mm, work rib (= knit 2/purl 2) while AT THE SAME TIME increasing 68-72-74-82-90-100 stitches evenly on 1st round = 296-320-344-368-396-444 stitches. When rib measures 5-5-5-6-6-6 cm cast off all stitches somewhat loosely. Jumper measures 49-51-53-55-57-59 cm from marker mid front and approx. 55-57-59-61-63-65 cm from the top of shoulder. SLEEVES: Slip 70-78-84-84-86-88 sleeve stitches from one thread on to circular needle size 3.5 mm and pick in addition up 1 stitch in each of the 16-18-18-22-26-30 stitches cast on under sleeve = 86-96-102-106-112-118 stitches. Insert 1 marker thread in the middle of the 16-18-18-22-26-30 new stitches under sleeve - round begins at the marker thread. Work in stocking stitch in the round on needle - AT THE SAME TIME when sleeve measures 2 cm from division, decrease mid under sleeve – read DECREASE TIP and decrease as follows: Decrease 2 stitches every 4-2½-2-2-1½-1½ cm 9-13-15-16-18-20 times in total = 68-70-72-74-76-78 stitches. Work until sleeve measures 41-40-38-37-36-34 cm from division. Switch to double pointed needles size 2.5 mm and work rib (= knit 2/purl 2) while AT THE SAME TIME increasing 20-18-20-22-20-22 stitches evenly on 1st round = 88-88-92-96-96-100 stitches. When rib measures 5-5-5-6-6-6 cm cast off all stitches somewhat loosely. Sleeve measures approx. 46-45-43-43-42-40 cm from division. ASSEMBLY: Fold rib at the top of neck down to marker on the inside of neck edge (i.e. 2 cm over where stocking stitch begins). Fasten rib to get a double neck edge. To avoid a tight neck edge that sticks out it is important to keep the seam elastic. |
|
 |
|
Have you finished this pattern?Tag your pictures with #dropspattern #quietbaysweater or submit them to the #dropsfan gallery. Do you need help with this pattern?You'll find 28 tutorial videos, a Comments/Questions area and more by visiting the pattern on garnstudio.com. © 1982-2026 DROPS Design A/S. We reserve all rights. This document, including all its sub-sections, has copyrights. Read more about what you can do with our patterns at the bottom of each pattern on our site. |
|


With over 40 years in knitting and crochet design, DROPS Design offers one of the most extensive collections of free patterns on the internet - translated to 17 languages. As of today we count 325 catalogues and 12298 patterns translated into English (UK/cm). 12298
We work hard to bring you the best knitting and crochet have to offer, inspiration and advice as well as great quality yarns at incredible prices! Would you like to use our patterns for other than personal use? You can read what you are allowed to do in the Copyright text at the bottom of all our patterns. Happy crafting!
Post a comment to pattern DROPS 254-33
We would love to hear what you have to say about this pattern!
If you want to leave a question, please make sure you select the correct category in the form below, to speed up the answering process. Required fields are marked *.