
Popular categories
Looking for a yarn?


Comments / Questions (62)
![]() Anita wrote:
Anita wrote:
Comment se fait-il que l'explication de la bretelle ne correspond pas à celle de la photo?
24.05.2025 - 11:11DROPS Design answered:
Bonjour Anita, la bretelle correspond bien aux explications, notez que vous crochetez d'abord une bretelle toute simple, mais qu'ensuite, vous allez crocheter une bordure au crochet le long de chaque côté de cette bretelle toute simple, vous aurez ainsi le résultat sur la photo. Bon crochet!
26.05.2025 - 09:10
![]() Magali wrote:
Magali wrote:
Bonjour, je ne sais pas trop lire les diagrammes, serait il possible de me le traduire s'il vous plait?
15.04.2025 - 22:09DROPS Design answered:
Bonjour Magali, nous n'avons que des diagrammes pour ce modèle, mais cette leçon devrait vous aider pour comprendre comment les lire. Bon crochet!
22.04.2025 - 10:01
![]() Emily wrote:
Emily wrote:
Hey, ich habe mir jetzt die Kommentare durchgelesen und das Diagramm angeschaut. Ich komme aber mit A1, A2 und A3 nicht klar. Ich weiß nicht was ich machen soll. A1 verstehe ich denke noch. Aber bei A2 hört es auf. Und wie oft muss ich was wiederholen?
26.03.2025 - 20:50DROPS Design answered:
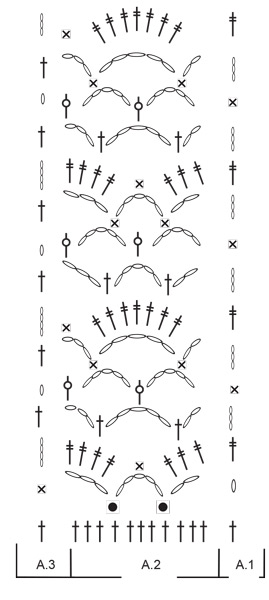
Liebe Emily, A.1 zeigt wie man die Hinreihen beginnt: 1 Lm bei der 1. Reihe, dann wird man A.2 wiederholen, z.B. 1. Reihe =*2 Lm, 3 M überspringen, 1 feste Masche in die nächste Masche, 5 Lm, 3 M überspringen, 1 feste Masche in die nächste Masche, 3 Lm, 3 M überspringen*, von *bis* wiederholen, bis noch 1 Masche übrig ist, und mit A.3 enden: 1 feste M in die letzte M bei der 1. Reihe. Die Rückreihen lesen Sie dann links nach rechts mit zuerst A.3, dann A.2 und A.1. Viel Spaß beim Häkeln!
27.03.2025 - 08:24
![]() Beata wrote:
Beata wrote:
Nie znalazłam opisu jak wykończyć brzeg. Proszę o instrukcję
26.03.2025 - 10:35DROPS Design answered:
Witaj Beato, zobacz w BRZEG NA SZYDEŁKU w objaśnieniach do wzoru. Pozdrawiamy!
26.03.2025 - 11:28
![]() Boucher wrote:
Boucher wrote:
Could you please écrase my last comment. I made a mistake. Sorry
08.03.2025 - 10:02
![]() Boucher wrote:
Boucher wrote:
Je ne comprends pas: sur mon échantillon 24 mailles font 10cm, mais 13 rangs de brides font bien plus que 10cm! 5 rangs débridés donnent 10cm
08.03.2025 - 08:00
![]() Ester wrote:
Ester wrote:
Hej, Jeg tror ikke helt jeg får hvordan man måler størrelsen. Har kigget på guiden under opskriften. Tænker det er i cm, men vi er enige om at det er målet fra den ene side til den anden og ikke hele vejen rundt?
20.01.2025 - 14:15DROPS Design answered:
Hej Ester, ja det stemmer, i den mindste størrelse er omkredsen 40 x 2 = 80 cm :)
22.01.2025 - 14:15
![]() Reno wrote:
Reno wrote:
Hallo, wieso ist die erste Reihe im Mustersatz eine Rückreihe? Sie folgt doch auf Reihe 5 (die Reihe mit den Zunahmen), die eine Rückreihe ist?
11.11.2024 - 23:07DROPS Design answered:
Liebe Reno, das Diagram beginnt mit einer Hinreihe: A.1(sollte 1 Masche anstatt 1 Stäbchen sein), dann A.2 wiederholen und mit A.3 (auch hier 1 Masche anstatt 1 Stäbchen); bei der Rückreihe häkeln Sie: A.3, A.2 dann A.1. Diagramme beginnt aber mit der 2. Reihe, die 1. Reihe mit Stäbchen zeigt nur, wie die Maschen vom A.1, A.2 und A.3 gehäkelt werden. Viel Spaß beim Häkeln!
12.11.2024 - 09:14
![]() René Edwards wrote:
René Edwards wrote:
Hej! Jag har virkat sedan 70-talet men aldrig behövt virka efter ett mönster som detta. Nu tänkte jag att jag nog klarar av det men jag körde fast meddetsamma jag kom till teckningen av mönstret. Tidigare i beskrivningen sägs det att jag alltid ska börja med 3 lm= 1 st. Gäller detta här med? Ska jag sen fortsätta med 1+ 2 lm och sen 1 fm. Jag får inte ihop det med hur kanten/ början blir. 😄 Mvh René
26.08.2024 - 14:16
![]() Anna M Saura wrote:
Anna M Saura wrote:
¿Qué quiere decir 1 punto doble en el punto? ¿ Un punto alto doble en un punto? ¿Dos puntos en un mismo punto? No encuentro la respuesta en internet. Gracias
10.08.2024 - 00:40
|
|||||||||||||||||||
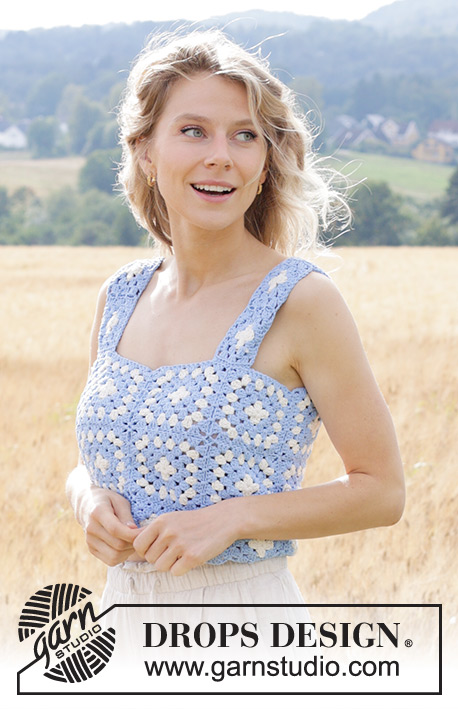
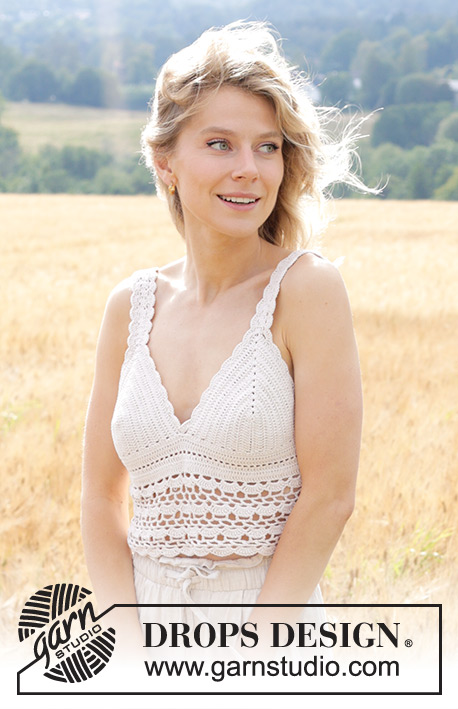
Dreamcatcher Top#dreamcatchertop |
|||||||||||||||||||
 |
 |
||||||||||||||||||
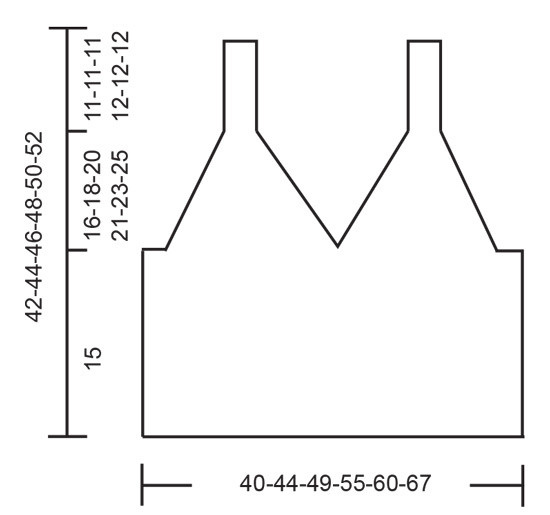
Crocheted top in DROPS Safran. The piece is worked top down with fan pattern. Sizes S - XXXL.
DROPS 248-1 |
|||||||||||||||||||
|
------------------------------------------------------- EXPLANATIONS FOR THE PATTERN: ------------------------------------------------------- CROCHET INFORMATION: At the beginning of each row of treble crochets work 3 chain stitches, which replace the first treble crochet. At the beginning of each row of double crochets work 1 chain stitch, which replaces the first double crochet. CHAIN STITCH: If you work outermost on the hook the chain stitch will often be too tight; 1 chain stitch should be as long as 1 treble crochet is wide. PATTERN: See diagrams A.1 to A.3. ------------------------------------------------------- START THE PIECE HERE: ------------------------------------------------------- TOP - SHORT OVERVIEW OF THE PIECE: 2 triangles are worked to start with, one for the right side and one for the left side. The 2 pieces are crocheted together, then the bottom section is worked downwards. A strap is worked on each triangle. The top opens mid-back and is closed with a twisted cord. TRIANGLE: Work 21-24-27-27-32-38 chain stitches with hook size 3 mm and DROPS Safran. Work as follows back and forth (row 1 = right side): Work 1 treble crochet in the 5th chain stitch from the hook (= 2 treble crochets) - read CROCHET INFORMATION, then 1 treble crochet in each of the next 15-18-21-21-26-32 chain stitches, work (2 treble crochets, 1 chain stitch, 2 treble crochets) in the last chain stitch on the row, rotate the piece and skip the first chain stitch (i.e., the chain stitch you just worked in), work 1 treble crochet in each of the 17-20-23-23-28-34 chain stitches on the other side of the row of chain stitches = 38-44-50-50-60-72 treble crochets + 1 chain stitch. Turn and continue back and forth with 1 treble crochet in each treble crochet on each side of the row of chain stitches, working (2 treble crochets, 1 chain stitch, 2 treble crochets) around the chain stitch at the top of the row. REMEMBER THE CROCHET TENSION! Work like this for a total of 11-12-13-14-14-15 rows of treble crochets, but on the last row adjust the stitch count so you have 40-44-48-52-56-64 treble crochets on each side of the chain stitch at the top (= 80-88-96-104-112-128 treble crochets). The piece measures approx. 7-7½-8-9-9-9½ cm from the row of chain stitches out. Work 1 more triangle in the same way. BOTTOM SECTION: Work the 2 triangles together. NOTE: Make sure you work over both triangles from the right side! Work 47-56-65-75-84-98 loose chain stitches, then 48-50-53-56-59-62 double crochets evenly spaced over the outermost treble crochets (i.e., along the bottom edge of one triangle), work 48-50-53-56-59-62 double crochets evenly spaced over the other treble crochets (along the bottom edge of the second triangle), then work 47-56-65-75-84-98 loose chain stitches at the end of the row = 190-212-236-262-286-320 stitches. Work back and forth as follows: Row 1 (wrong side): Work 1 treble crochet in each double crochet / chain stitch– remember CROCHET INFORMATION. Row 2 (right side): Work 1 treble crochet in each treble crochet. Row 3 (wrong side): * Work 1 treble crochet, 1 chain stitch, skip 1 treble crochet *, work from *-* until there are 2 treble crochets left, work 1 treble crochet in each of the 2 last treble crochets. Row 4 (right side): Work 1 treble crochet in each treble crochet and 1 treble crochet around each chain stitch. Row 5 (wrong side): Work 1 treble crochet in each treble crochet, AT THE SAME TIME increase 10-10-8-4-13-12 treble crochets evenly spaced = 200-222-244-266-299-332 treble crochets. Work as follows: A.1 (= 1 stitch), A.2 over the next 198-220-242-264-297-330 treble crochets, A.3 (1 stitch). When A.1, A.2 and A.3 are finished in height, cut and fasten the strand. STRAP: Work 1 strap in the top of each triangle: Start at the top of the triangle, work 1 treble crochet in the treble crochet before the chain-space, 2 treble crochets around the chain-space and 1 treble crochet in the treble crochet after the chain-space = 4 treble crochets. Work these 4 treble crochets back and forth for 40-42-44-46-48-50 cm. Cut and fasten the strand. Try the top on and adjust the length of the strap if necessary – it is fastened to the top back edge. CROCHET EDGE: Start from the wrong side at the bottom of the right side of the back piece. Work as follows: 1 double crochet, * 3 chain stitches, skip 1½ cm, 1 double crochet *, work from *-* as far as the corner on the back piece, making sure you work a double crochet in the corner and the number of chain-spaces is divisible by 2 + 1, work * 3 chain stitches, skip 2 treble crochets, 1 double crochet *, work from *-* as far as the right triangle, making sure you work a double crochet in the corner and the number of chain-spaces is divisible by 2 + 1. Work to the top of the triangle and continue along the strap, finishing with 1 double crochet, making sure the number of chain-spaces is divisible by 2 + 1. At the top of the strap work as follows: 1 double crochet in the first treble crochet, 3 chain stitches, skip 2 treble crochets, 1 double crochet in the last treble crochet. Continue down the strap and down the other side of the right triangle (finishing with 1 double crochet, making sure the number of chain-spaces is divisible by 2 + 1), work 1 double crochet between the pieces. Continue in the same way along the left triangle and strap, then continue over the double crochets on the back piece (making sure the number of chain-spaces is divisible by 2 + 1), finish with 1 double crochet. Work * 3 chain stitches, skip 1½ cm, 1 double crochet *, work from *-* down the left side of the back piece, making sure you work a double crochet in the corner and the number of chain-spaces is divisible by 2+ 1. Turn. ROW 2: Work 1 chain stitch + 1 slip stitch to the middle of the first chain-space, 1 double crochet around this chain-space, * work 5 treble crochets around the next chain-space, 1 double crochet around the next chain-space *, work from *-*. Cut and fasten the strand. TWISTED CORD: Cut 2 strands of 2.5 metres. Twist the strands together until they begin to resist, fold the cord double and it will continue to twist. Tie a knot in each end. Start at the top mid-back and thread the ends of the cord through each side, then thread the ends back and forth across the opening – through the fan pattern, making sure the ends are of equal length at the bottom. Tie a bow. ASSEMBLY: Sew 2 buttons to the wrong side, top of each side at the back. Fasten each strap through a hole in the fan pattern. |
|||||||||||||||||||
Diagram explanations |
|||||||||||||||||||
|
|||||||||||||||||||
 |
|||||||||||||||||||
 |
|||||||||||||||||||
Have you finished this pattern?Tag your pictures with #dropspattern #dreamcatchertop or submit them to the #dropsfan gallery. Do you need help with this pattern?You'll find 12 tutorial videos, a Comments/Questions area and more by visiting the pattern on garnstudio.com. © 1982-2026 DROPS Design A/S. We reserve all rights. This document, including all its sub-sections, has copyrights. Read more about what you can do with our patterns at the bottom of each pattern on our site. |
|||||||||||||||||||


With over 40 years in knitting and crochet design, DROPS Design offers one of the most extensive collections of free patterns on the internet - translated to 17 languages. As of today we count 324 catalogues and 12290 patterns translated into English (UK/cm). 12290
We work hard to bring you the best knitting and crochet have to offer, inspiration and advice as well as great quality yarns at incredible prices! Would you like to use our patterns for other than personal use? You can read what you are allowed to do in the Copyright text at the bottom of all our patterns. Happy crafting!
Post a comment to pattern DROPS 248-1
We would love to hear what you have to say about this pattern!
If you want to leave a question, please make sure you select the correct category in the form below, to speed up the answering process. Required fields are marked *.