
Popular categories
Looking for a yarn?


Comments / Questions (149)
![]() Johanna wrote:
Johanna wrote:
Hallo, ich möchte diesen Pullover (Größe M) mit DROPS Andes stricken. Wie viel Garn werde ich dafür schätzungsweise benötigen? Vielen Dank!
14.03.2026 - 14:18DROPS Design answered:
Liebe Johanna, hier lesen Sie, wie Sie die neue Garnmenge kalkulieren. Viel Spaß beim Stricken!
16.03.2026 - 08:40
![]() Petra wrote:
Petra wrote:
Werden die Zöpfe im Ärmel auch ins Muster eingepflegt?
15.02.2026 - 21:56
![]() Louise wrote:
Louise wrote:
Hej! Jag har precis börjat med första ärmen i storlek L. Jag ska enligt mönstret ha 52 maskor. När resåren är färdig och jag ska börja på mönstret stickar jag 7 maskor, A1 och A2 över de nästa 24 maskorna. Men stickar jag sedan A3 kommer jag endast ha 3 maskor kvar på varvet. Men i mönstret ska jag ha 7 maskor kvar? Jag får det inte att stämma.
15.02.2026 - 15:53DROPS Design answered:
Hei Louise. Du har 52 masker (str L) og har strikket vrangbord (2 rett/2 vrang) i 8 cm. Sett 1 merketråd mellom de 2 første rettmaskene, nå starter omgangen her, så strikk 1 masker rett. Strikk deretter vrangbord som før over 7 masker (= 1r-2vr-2r-2vr). Strikk A.1 (= 8 m) + A.2 over 24 masker + A.3 (= 6 m). Det er nå strikket over 7+8+24+6= 45 masker og det skal være 7 masker igjen til merketråden/omgangens nye start. Strikk de 7 maskene som vrangbord (2vr-2r-2vr-1r) = 52 masker. mvh DROPS Design
23.02.2026 - 10:07
![]() Mubina wrote:
Mubina wrote:
I am working sleeves for M, but it is not possible to do that. I don't understand how to increase a stich. The rib is not looking good.
05.12.2025 - 16:48DROPS Design answered:
Dear Mubina, you should increase on each side of the 2 sts mid under sleeves (with the marker in-between): make 1 yarn over, purl or knit the next 2 sts and make 1 yarn over; on next round, work the new stitches into the rib to get same pattern all around sleeve. Happy knitting!
08.12.2025 - 07:23
![]() Ida wrote:
Ida wrote:
Hvordan kan jeg nogensinde opnå et fletmønster på forsiden, hvis jeg indledende (i str. m) altid skal strikke 1 vrang, 2 ret, 2 vrang før jeg påbegynder mønsteret (A1) ? Efter min vurdering vil jeg ende med en lang rib stribe hele vejen op igennem sweaterens front. Skift til rundpind 8 og strik maskerne på forstykket således: * Strik 1 vrang, rib (= 2 ret / 2 vrang) over de næste 0-4-4-4-8-8 masker, A.1 (etc)
15.11.2025 - 15:10DROPS Design answered:
Hei Ida. Nei, når du starter med flettene vil du få en fin overgang der rett maskene i vrangborden går over til rett maskene i flettene og vrangmaskene forblir vrangmasker opp gjennom arbeidet. Husk, 1 vrangmaske etter vrangborden strikkes vrang, så strikkes det 2 rett / 2 vrang over de 4 neste maskene (= strikket 5 masker). mvh DROPS Design
24.11.2025 - 09:32
![]() Paola wrote:
Paola wrote:
Grazie! L’ho trovato su Amazon!
13.11.2025 - 08:58
![]() Paola wrote:
Paola wrote:
Ora ho un altro problema: evidentemente devo aver sbagliato a ordinare il filato di alpaca (grigio chiaro 02), e me ne servono ancora 4 gomitoli. Nel sito leggo: in magazzino. Come posso procurarmelo? Grazie in anticipo
11.11.2025 - 09:09DROPS Design answered:
Buongiorno Paola, può provare a contattare direttamente il rivenditore DROPS da cui ha fatto l'acquisto. Buon lavoro!
13.11.2025 - 08:39
![]() Paola wrote:
Paola wrote:
Grazie, espresso così è tutto chiaro, ma siccome A1 e A2 sono identici è facile fraintendere. Grazia ancora
11.11.2025 - 08:59
![]() Paola wrote:
Paola wrote:
1+4+24+6+2+24+6+4+1 = 72, non 88 Ho comprato la lana e sono bloccata: doveva essere un regalo di compleanno per mia figlia. Qualcuno mi può aiutare?
10.11.2025 - 12:55DROPS Design answered:
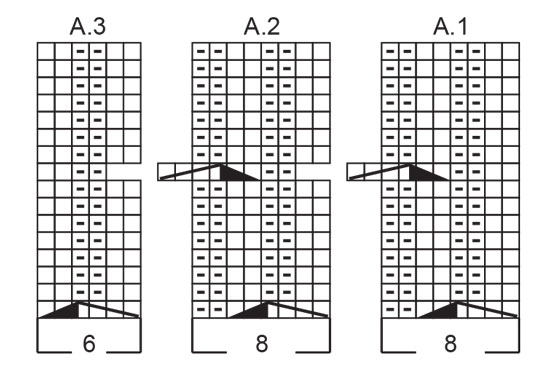
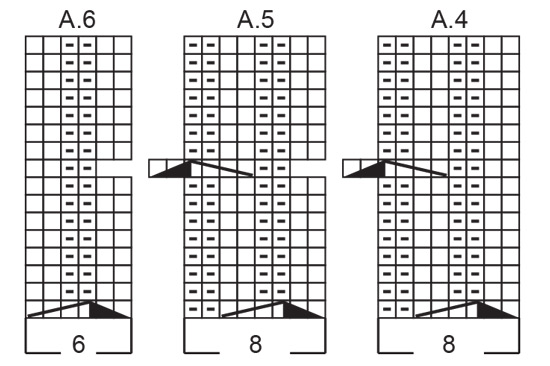
Buonasera Paola, 1 rov + coste (4) + A.1 (8), A.2 (24) + A.3 (6) + 2 rov, A.4 (8), A.5 (24), A.6 (6), coste (4), 1 rov = 88 maglie, e poi si ripete sull'altra metà. Buon lavoro!
10.11.2025 - 20:31
![]() Paola wrote:
Paola wrote:
Mi riferisco alla prima riga dopo le coste iniziali: 1 rovescio + 4 coste + 24 motivo + 6 motivo + 2 rovesci + 24 motivo + 6 motivo + 4 coste + 1 rovescio non fa 88. O sono io che non capisco bene? Grazie dell'aiuto
06.11.2025 - 08:59DROPS Design answered:
Buonasera Paola, 1 rov + coste (4) + A.1 (8), A.2 (24) + A.3 (6) + 2 rov, A.4 (8), A.5 (24), A.6 (6), coste (4), 1 rov = 88 maglie, e poi si ripete sull'altra metà. Buon lavoro!
12.11.2025 - 17:04
|
|||||||||||||
Sand Trails#sandtrailssweater |
|||||||||||||
 |
 |
||||||||||||
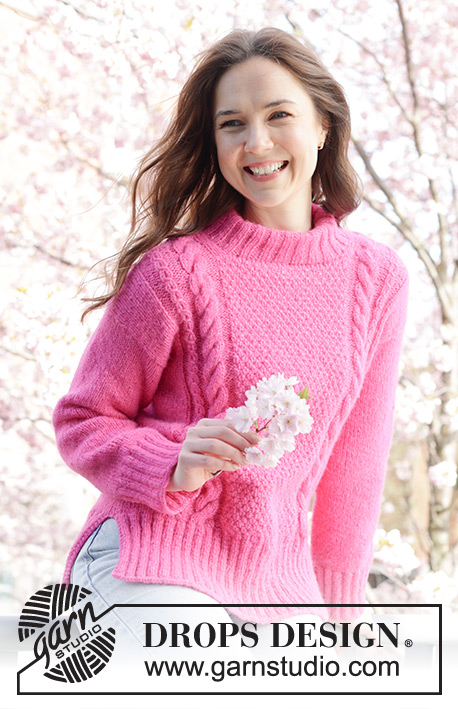
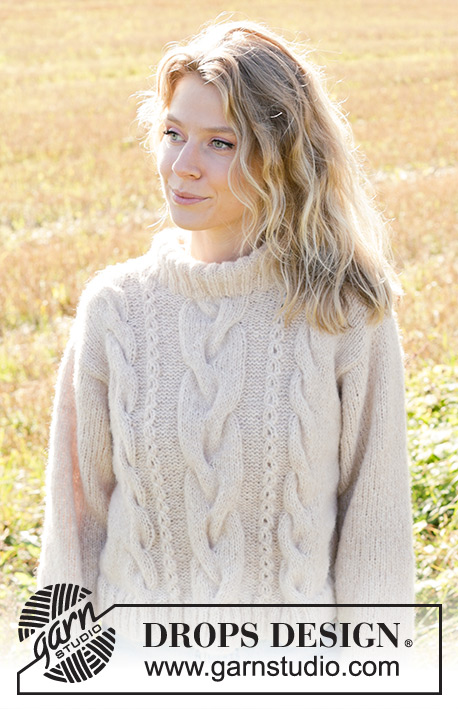
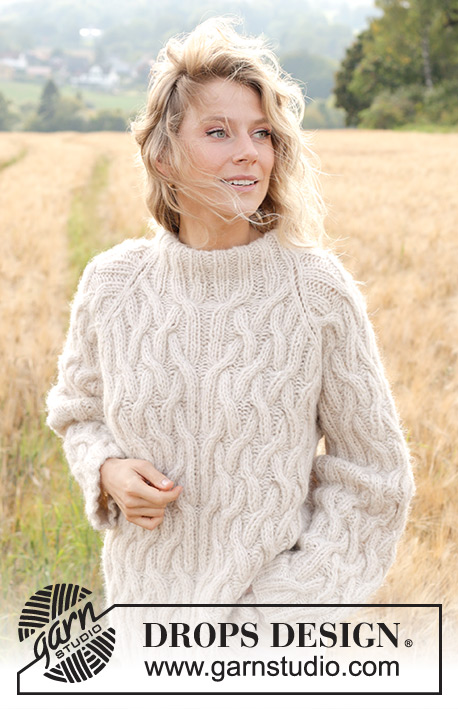
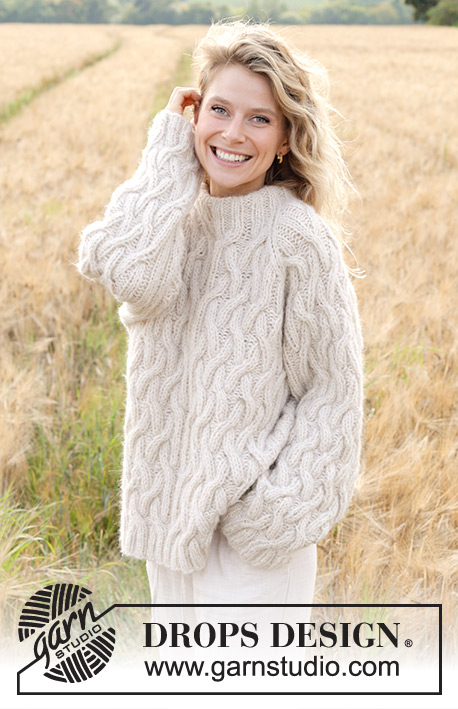
Knitted jumper in DROPS Air and DROPS Brushed Alpaca Silk. The piece is worked bottom up with raglan, cables and double neck. Sizes S - XXXL.
DROPS 248-3 |
|||||||||||||
|
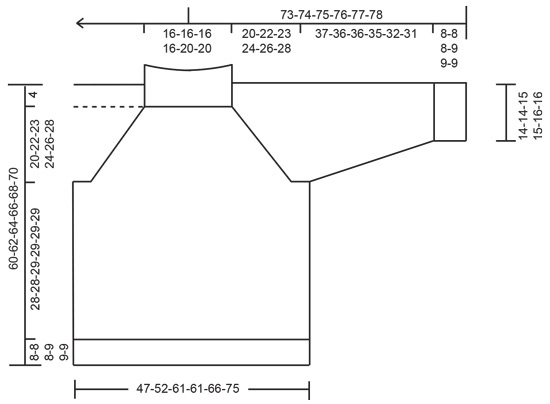
------------------------------------------------------- EXPLANATIONS FOR THE PATTERN: ------------------------------------------------------- KNITTING TIP: If your knitting tension is too tight vertically the armholes will be too small – this can be adjusted for, if necessary, by working more rounds between the decreases. RAGLAN Decrease as follows before and after the marker-threads: DECREASE AFTER MARKER-THREAD: Slip 1 stitch knit-wise, knit 1, pass slipped stitch over knitted stitch (= 1 stitch decreased). DECREASE BEFORE MARKER-THREAD : Knit 2 together (= 1 stitch decreased). INCREASE TIP (for sleeves): Increase 1 stitch on each side of the marker-thread: Work until there is 1 stitch left before the marker-thread, 1 yarn over, knit/purl 2 as before (marker-thread sits between these 2 stitches), 1 yarn over. On the next round work the yarn overs twisted to avoid holes. Then work the new stitches into the rib (it is important to match the rib already worked on each side of A.1, A.2 and A.3, not towards mid-under sleeve). ------------------------------------------------------- START THE PIECE HERE: ------------------------------------------------------- JUMPER - SHORT OVERVIEW OF THE PIECE: The pattern uses both long and short needles; start with the length which fits the number of stitches and change when necessary. The piece is worked in the round with circular needle, bottom up as far as the armholes. The sleeves are worked in the round, bottom up as far as the armholes. The body and sleeves are placed on the same circular needle and the yoke continued in the round while decreasing for raglan. The neck is worked to finish, folded double and sewn down to the inside. If there is a «0» in your chosen size, skip the information and go straight to the next instruction. BODY: Cast on 160-176-208-208-224-256 stitches with circular needle size 6 mm, 1 strand DROPS Air and 1 strand DROPS Brushed Alpaca Silk (= 2 strands). Work rib in the round as follows: Purl 1, rib (knit 2, purl 2) until there is 1 stitch left, purl 1. Insert 1 marker-thread at the beginning of the round and 1 marker-thread after 80-88-104-104-112-128 stitches, inserting the threads between 2 purled stitches. Work the rib for 8-8-8-9-9-9 cm. Change to circular needle size 8 mm and work as follows over the front piece: * Purl 1, rib (knit 2, purl 2) over the next 0-4-4-4-8-8 stitches, A.1, A.2 over the next 24-24-32-32-32-40 stitches, A.3, purl 2 (= mid-front), A.4, A.5 over the next 24-24-32-32-32-40 stitches, A.6, rib (purl 2, knit 2) over the next 0-4-4-4-8-8 stitches, purl 1 *, marker-thread is here, work from *-* 1 more time over the back piece. Continue this pattern onwards. REMEMBER THE KNITTING TENSION! Work until the body measures approx. 36-36-37-38-38-38 cm – note which round in the pattern was worked on the last row. DIVIDE FOR ARMHOLES: On the next round divide for the front and back pieces as follows: Cast off the first 4-4-5-5-7-7 stitches for the armhole, work 72-80-94-94-98-114 stitches as before, cast off 8-8-10-10-14-14 stitches for the armhole, work 72-80-94-94-98-114 stitches as before and cast off the last 4-4-5-5-7-7 stitches. Cut the strand, lay the piece to one side and work the sleeves. SLEEVES: Cast on 48-48-52-52-56-56 stitches with double pointed needles size 6 mm and 1 strand of each quality (= 2 strands). Work rib in the round (knit 2, purl 2) for 8-8-8-9-9-9 cm. Insert 1 marker-thread between the first 2 purled stitches in sizes S, M, XXL and XXXL, and between the first 2 knitted stitches in sizes L and XL – the round starts here. Allow the marker-thread to follow your work onwards; it is used when increasing under the sleeve. Change to double pointed needles size 8 mm and work pattern as follows: Rib as before over the first 5-5-7-7-9-9 stitches, A.1, A.2 over the next 24 stitches, A.3, rib as before over the last 5-5-7-7-9-9 stitches. Continue this pattern. When the sleeve measures 10-10-11-12-12-12 cm from the cast-on edge, increase 2 stitches under the sleeve – read INCREASE TIP. Increase like this every 4-2½-3-2-2-1½ cm a total of 8-12-10-14-12-16 times = 64-72-72-80-80-88 stitches. Work until the sleeve measures approx. 45-44-44-44-41-40 cm – adjust to finish on the same round as for body. Cast off the middle 8-8-10-10-10-10 stitches under the sleeve (4-4-5-5-5-5 stitches on each side of the marker-thread) = 56-64-62-70-70-78 stitches. Work the other sleeve in the same way. YOKE: Place the sleeves on the same circular needle as the body, where stitches were cast off for the armholes = 256-288-312-328-336-384 stitches. Insert 1 marker-thread in each transition between the body and sleeves (= 4 marker-threads, each one inserted between 2 stitches). Start the round at the marker thread before back piece. Continue the pattern in the round. When the yoke measures 1 cm from the division, begin to decrease for raglan at each marker-thread - the decreases are different on the front/back pieces and the sleeves – read RAGLAN-DECREASES ON FRONT/BACK PIECES and RAGLAN-DECREASES ON SLEEVES before continuing. RAGLAN-DECREASES ON FRONT/BACK PIECES: Read RAGLAN and KNITTING TIP above. Decrease a total of 22-26-33-33-31-39 times on each side of the front and back pieces as follows: DECREASE 1: Every 2nd round 7-6-0-2-7-2 times. DECREASE 2: Every round 15-20-33-31-24-37 times. RAGLAN-DECREASES ON SLEEVES: Read RAGLAN and KNITTING TIP above. Decrease a total of 22-26-25-29-29-33 times on each side of the sleeves as follows: DECREASE 1: Every 2nd round 7-6-8-6-9-8 times. DECREASE 2: Every round 15-20-17-23-20-25 times. AFTER LAST DECREASE: After the last decrease there are 80-80-80-80-96-96 stitches. The yoke measures approx. 20-22-23-24-26-28 cm from the join and the jumper measures approx. 60-62-64-66-68-70 cm from the shoulder. There are 28-28-28-28-36-36 stitches between the marker-threads on the front/back pieces and 12 stitches between the marker-threads on the sleeves. NECK: = 80-80-80-80-96-96 stitches. Change to circular needle size 6 mm. Start from the marker-thread before the back piece: * Knit 1, rib (knit 2, purl 2) – the rib should match the pattern on the front/back pieces, knit 1 before the next marker-thread. Over the 12 sleeve-stitches, work as follows from the marker-thread: Knit 1, purl 2 together two times, knit 2, purl 2 together two times, knit 1 (= 4 stitches decreased, 8 stitches left on sleeve) *, work from *-* 1 more time = 72-72-72-72-88-88 stitches; there is now a regular rib (knit 2, purl 2) all the way round. Continue the rib for 13-13-13-15-15-15 cm. Cast off a little loosely and fold the neck double to the wrong side. Sew down – making sure the seam is elastic to avoid the neck being tight. The neck measures approx. 6-6-6-7-7-7 cm when folded. ASSEMBLY: Sew together the 8-8-10-10-10-10 cast-off stitches on the sleeves and the 8-8-10-10-14-14 cast-off stitches on the body. |
|||||||||||||
Diagram explanations |
|||||||||||||
|
|||||||||||||
 |
|||||||||||||
 |
|||||||||||||
 |
|||||||||||||
Have you finished this pattern?Tag your pictures with #dropspattern #sandtrailssweater or submit them to the #dropsfan gallery. Do you need help with this pattern?You'll find 23 tutorial videos, a Comments/Questions area and more by visiting the pattern on garnstudio.com. © 1982-2026 DROPS Design A/S. We reserve all rights. This document, including all its sub-sections, has copyrights. Read more about what you can do with our patterns at the bottom of each pattern on our site. |
|||||||||||||


With over 40 years in knitting and crochet design, DROPS Design offers one of the most extensive collections of free patterns on the internet - translated to 17 languages. As of today we count 324 catalogues and 12290 patterns translated into English (UK/cm). 12290
We work hard to bring you the best knitting and crochet have to offer, inspiration and advice as well as great quality yarns at incredible prices! Would you like to use our patterns for other than personal use? You can read what you are allowed to do in the Copyright text at the bottom of all our patterns. Happy crafting!
Post a comment to pattern DROPS 248-3
We would love to hear what you have to say about this pattern!
If you want to leave a question, please make sure you select the correct category in the form below, to speed up the answering process. Required fields are marked *.