
Popular categories
Looking for a yarn?


Comments / Questions (32)
![]() Marilyn wrote:
Marilyn wrote:
I'm confused about the sleeve portion of instructions. Is the sleeve to be knit in a tubular fashion until one reaches the bind off section for sleeve caps? I make this assumption because in the assembly section there is no mention of sewing sleeve seams, just "Sew in the sleeves and buttons."
24.04.2019 - 16:55DROPS Design answered:
Hi Marilyn, Yes the sleeves are worked in the round as far as the sleeve cap and then worked back and forth over the cap. Happy knitting!
25.04.2019 - 08:16
![]() Angela Souster wrote:
Angela Souster wrote:
Love some of your sesigns stunning. I just can't understand the patterns otherwise I'd be knitting them all the time
11.04.2019 - 19:41DROPS Design answered:
Dear Mrs Souster, have you read our FAQ? You might find some answers to your questions - please feel free to ask your questions here, and for any individual assistance, please contact the store where you bought the yarn, even per mail or telephone. Happy knitting!
12.04.2019 - 09:13
![]() Ynke wrote:
Ynke wrote:
Hoe meerder ik bij model 55-18 voor de kraag? Doe ik dat binnen de 6 steken van de voorbies?
17.04.2018 - 18:01DROPS Design answered:
Hallo Ynke, Je meerdert voor de kraag inderdaad binnen de 6 voorbiessteken en de gemeerderde steken brei je in gerstekorrel (M.1)
21.04.2018 - 13:06
![]() Francijn Borst wrote:
Francijn Borst wrote:
Hoe minder ik bij de voorbies van drops 55-18. Neem aan dat ik dezelfde steken moet houden. Namelijk 6 steken van de voorbies. Weet even niet hoe ik dat moet doen. vr. gr Francijn.
20.10.2017 - 15:38DROPS Design answered:
Hallo Francijn, Je mindert op de voorpanden vlak naast de 6 voorbiessteken, zodat deze bies in tact blijft. Dus niet in/over de bies minderen, maar er vlak naast.
03.11.2017 - 13:06
![]() Sylvia wrote:
Sylvia wrote:
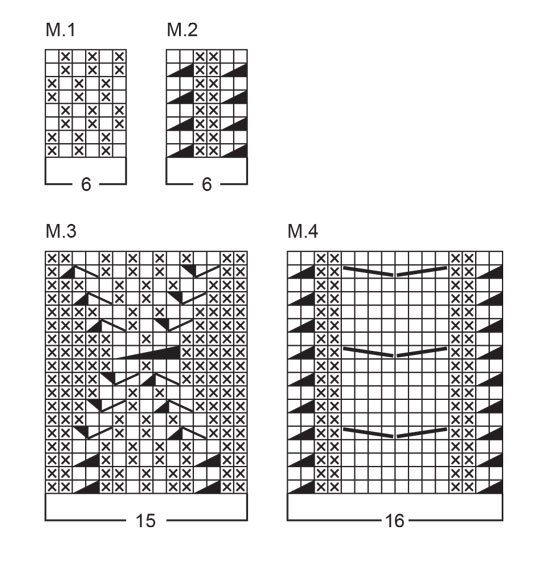
Jag får inte mönster 3 att stämma
02.10.2014 - 11:16Sylvia Kachalsky wrote:
Hi, in the pattern are both Right side and wrong side indicated or wrong side should be knitted as appear? Also is the pattern starting from the bottom or from the first upper line?
09.02.2014 - 17:03DROPS Design answered:
Dear Mrs Kachalsky, in the diagrams, 1 square = 1 st x 1 row. All rows are shown seen from RS. Start to read diagram with bottom corner on the right side towards the right from RS (1st row = RS), and read WS rows from left towards right. Happy knitting!
10.02.2014 - 10:01
![]() Gab wrote:
Gab wrote:
Bonjour je rencontre des difficultés pour exécuter le diagramme n°3 de ce modèle. à la 5ème ligne faut il compter la maille envers de l'aiguille aux. avec les trois mailles envers du début du diagramme? merci beaucoup.
27.11.2013 - 09:42DROPS Design answered:
Bonjour Gab, au 5ème rang de M.3 les mailles 4,5 et 6 se tricotent comme indiqué sous le 4ème symbole. Les mailles 11, 12 et 13, se tricotent comme indiqué pour le 5ème symbole. Bon tricot!
27.11.2013 - 11:50
![]() Melissa Wold wrote:
Melissa Wold wrote:
Hi again. Another question re the neckline decrease. If I knit the 6 st band (rt side) and then decrease, I will be taking stitches away from the P1, Pattern 2 stitches. The pictures show that pattern staying in place for several inches above the beginning of the decrease. ???? Thanks, Melissa
29.08.2013 - 00:15DROPS Design answered:
Dear Melissa, you first dec for V-neckline inside the 6 sts, and when all dec are done, you inc number of sts for collar. Happy knitting!
29.08.2013 - 12:14
![]() Melissa Wold wrote:
Melissa Wold wrote:
Hi. I have a question about the decrease of the neckline. The pattern says to Dec 1 st for the neck INSIDE the 6 button band stitches every other row (15) times and then every 4th row . . . and then . . .inc 1 st . . . at the outer edge every 6th row . . . It seem that the button band would be down to 3 st wide after 6 rows.
26.08.2013 - 20:42DROPS Design answered:
Dear Mrs Wold, you dec for neck inside the 6 button band sts (ie after the 6 sts for right front piece and before the 6 sts for left front piece). You then inc number of sts for button band/collar working back and front loop of edge st towars mid front, you'll then get 12 sts worked in M.1 for collar. Happy knitting!
28.08.2013 - 10:51
![]() Rue Lucas wrote:
Rue Lucas wrote:
Is there an error in Chart 3 of pattern 55-18 or is the diamond supposed to be uneven?
17.05.2012 - 20:09DROPS Design answered:
Not that we are aware of. This jacket was released several years ago and has been very popular. The one in the picture was knitted following these charts.
17.05.2012 - 20:44
|
|||||||||||||||||||||||||
Summertime Twist |
|||||||||||||||||||||||||
 |
 |
||||||||||||||||||||||||
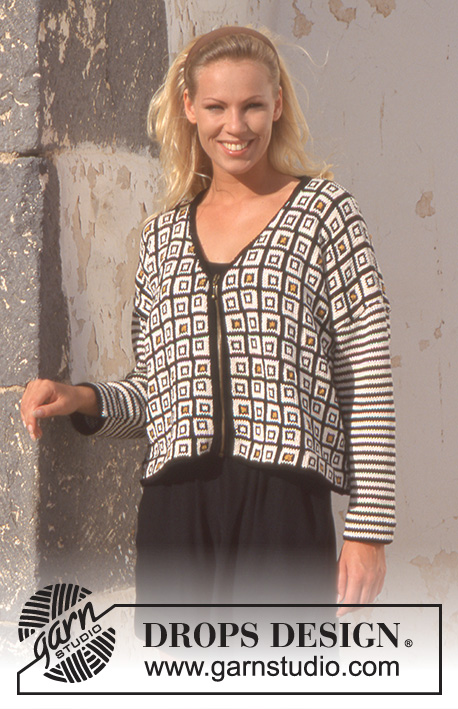
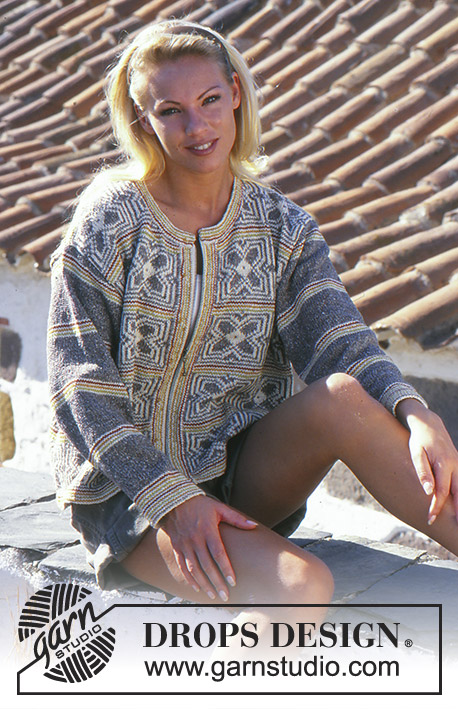
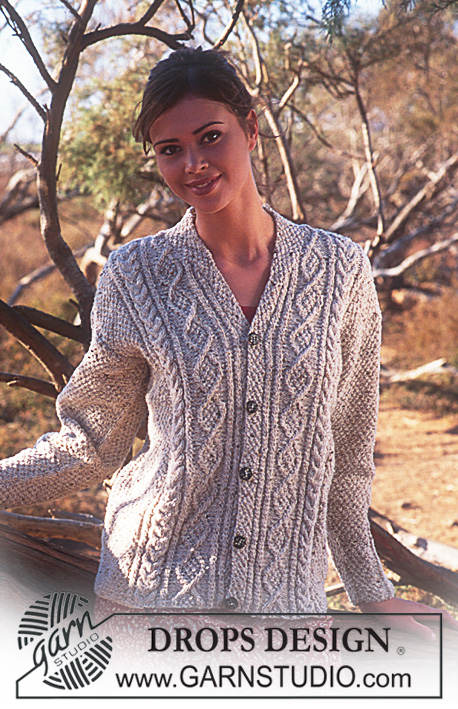
DROPS Cardigan in Angora-Tweed with cables and scarf collar.
DROPS 55-18 |
|||||||||||||||||||||||||
|
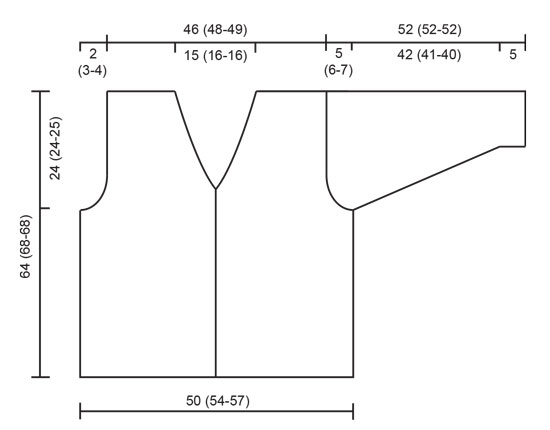
Gauge: 21 sts and 28 rows in stockinette st = 10 x 10 cm . Buttonholes: When the work measures 1 cm , 12.5 (13.5-13.5) cm , 23.5 (26-26) cm , 34.5 (38.5-38.5) cm , and 46 (51-51) cm , make buttonholes on the right front as follows: bind off the 3rd and 4th sts and cast on 2 new sts over the bound-off sts on the next row. Pattern: See charts (1 chart = 1 repeat). The pattern is seen from the right side. Binding off over Pattern 4: On the last row before binding off over Pattern 4, dec the center 8 sts to 4 sts by K 2 tog 4 times. Then bind off according to the pattern. Body: Cast on 240 (256-268) sts on circular needles and establish Pattern as follows: 6 sts of Pattern 1 (for button band), P 1, Pattern 2, Pattern 3, Pattern 4, P 2, 34 (42-48) sts of Pattern 1, P 2, Pattern 4, Pattern 3, Pattern 2, P 2 (center back), Pattern 2, Pattern 3, Pattern 4, P 2, 34 (42-48) sts of Pattern 1, P 2, Pattern 4, Pattern 3, Pattern 2, P 1, 6 sts of Pattern 1 (for button band). Make buttonholes on the right front (see instructions above). Knit in pattern as established until the work measures 40 (44-43) cm , then knit the next row as follows: 61 (65-68) sts for the front, bind off 4 sts for armhole, 110 (118-124) sts for the back, bind off 4 sts for armhole, 61 (65-68) sts for the front. Knit the rest of each part separately. Front: 61 (65-68) sts. Bind off for armholes every other row: 2 sts 1 (2-2) times, 1 st 1(1-3) times. 58 (60-61) sts. When the work measures 48 (52-52) cm , knit the collar by increasing for the collar and at the same time decreasing for the neck as follows: Dec 1 st for the neck inside the 6 button band sts every other row 14 (15-15) times, and then every 4th row 2 times. Inc 1 st for the collar at the outer edge every 6th row 6 times, knitting the increased sts into Pattern 1 as you go along. When the work measures 64 (68-68) cm , adjusting for pattern if necessary, bind off 32 (33-34) sts for the shoulder (see the instructions above concerning binding off over Pattern 4 - 36 (37-38) sts are bound off). Knit the remaining 12 sts (the collar) for a further 7.5 (8-8) cm . Bind off. This is the back collar. Back: 110 (118-124) sts. Bind off for armholes as on the front. 104 (108-110) sts. When the work measures 62 (66-66) cm , bind off the center 28 (30-30) sts for the neck. Bind off 2 sts at each neck edge on the next row. Bind off when the work measures 64 (68-68) cm , adjusting for pattern if necessary. (See the instructions above concerning binding off over Pattern 4 - 36 (37-38) sts are bound off). Sleeves: Cast on 47 (47-49) sts on double pointed needles. Join, being careful not to twist the sts. Place a marker at the join and establish pattern as follows: 8 (8-9) sts of Pattern 1, P 2, Pattern 2, Pattern 3, Pattern 2, P 2, 8 (8-9) sts of Pattern 1. At the same time, when the work measures 5 cm , inc 1 st each side of the marker 27 (27-28) times. Sizes S + M: every 4th row. Size L: alternately every 3rd and 4th row. = 101 (101-105) sts. Knit the increased sts into Pattern 1 as you go along. When the work measures 47 (46-45) cm , bind off 2 sts each side of the marker and knit the rest back and forth on the needles. Bind off for sleeve caps each side every other row: 5 (4-4) sts 6 (7-9) times. Bind off. The work measures approx. 52 cm . Assembly: Sew shoulder seams. Weave the collar together at the center back and sew the collar onto the neck opening on the back. Sew in the sleeves and buttons. |
|||||||||||||||||||||||||
Diagram explanations |
|||||||||||||||||||||||||
|
|||||||||||||||||||||||||
 |
|||||||||||||||||||||||||
 |
|||||||||||||||||||||||||
Have you finished this pattern?Tag your pictures with #dropspattern or submit them to the #dropsfan gallery. Do you need help with this pattern?You'll find 21 tutorial videos, a Comments/Questions area and more by visiting the pattern on garnstudio.com. © 1982-2026 DROPS Design A/S. We reserve all rights. This document, including all its sub-sections, has copyrights. Read more about what you can do with our patterns at the bottom of each pattern on our site. |
|||||||||||||||||||||||||


With over 40 years in knitting and crochet design, DROPS Design offers one of the most extensive collections of free patterns on the internet - translated to 17 languages. As of today we count 324 catalogues and 12290 patterns translated into English (UK/cm). 12290
We work hard to bring you the best knitting and crochet have to offer, inspiration and advice as well as great quality yarns at incredible prices! Would you like to use our patterns for other than personal use? You can read what you are allowed to do in the Copyright text at the bottom of all our patterns. Happy crafting!
Post a comment to pattern DROPS 55-18
We would love to hear what you have to say about this pattern!
If you want to leave a question, please make sure you select the correct category in the form below, to speed up the answering process. Required fields are marked *.