
Popular categories
Looking for a yarn?


|
|||||||||||||||||||||||||
Summertime Twist |
|||||||||||||||||||||||||
|
|
|||||||||||||||||||||||||
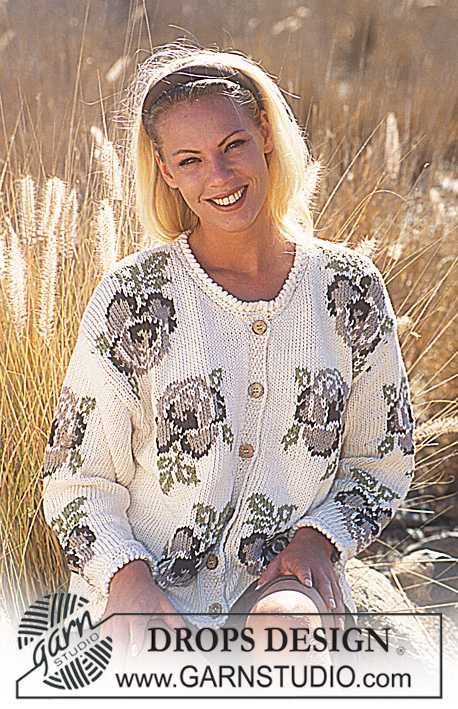
DROPS Cardigan in Angora-Tweed with cables and scarf collar.
DROPS 55-18 |
|||||||||||||||||||||||||
|
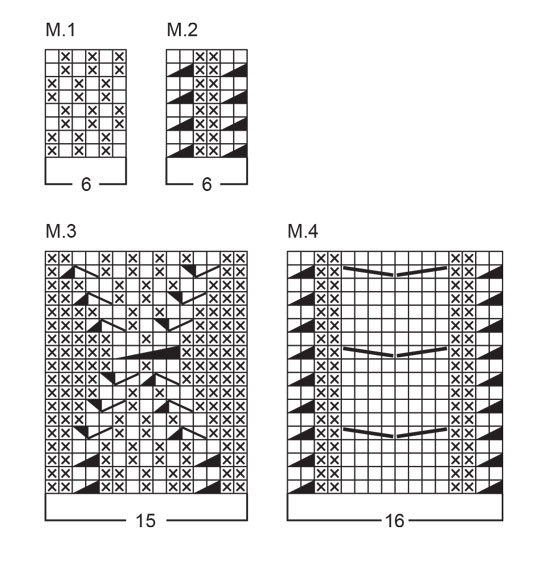
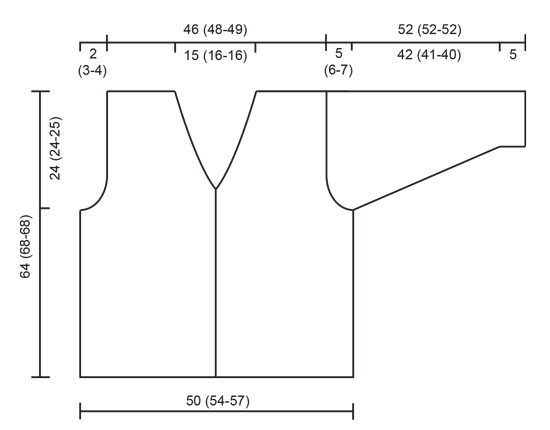
Gauge: 21 sts and 28 rows in stockinette st = 10 x 10 cm (4" x 4"). Buttonholes: When the work measures 1 cm [3/8»], 12.5 (13.5-13.5) cm [4-⅞" (5.25" - 5.25")], 23.5 (26-26) cm [9.25" (10.25" - 10.25")], 34.5 (38.5-38.5) cm [13-⅝" (15-⅛" - 15-⅛")], and 46 (51-51) cm [18-⅛" (20" - 20")], make buttonholes on the right front as follows: bind off the 3rd and 4th sts and cast on 2 new sts over the bound-off sts on the next row. Pattern: See charts (1 chart = 1 repeat). The pattern is seen from the right side. Binding off over Pattern 4: On the last row before binding off over Pattern 4, dec the center 8 sts to 4 sts by K 2 tog 4 times. Then bind off according to the pattern. Body: Cast on 240 (256-268) sts on circular needles and establish Pattern as follows: 6 sts of Pattern 1 (for button band), P 1, Pattern 2, Pattern 3, Pattern 4, P 2, 34 (42-48) sts of Pattern 1, P 2, Pattern 4, Pattern 3, Pattern 2, P 2 (center back), Pattern 2, Pattern 3, Pattern 4, P 2, 34 (42-48) sts of Pattern 1, P 2, Pattern 4, Pattern 3, Pattern 2, P 1, 6 sts of Pattern 1 (for button band). Make buttonholes on the right front (see instructions above). Knit in pattern as established until the work measures 40 (44-43) cm [15.75" (17.25" - 16-⅞")], then knit the next row as follows: 61 (65-68) sts for the front, bind off 4 sts for armhole, 110 (118-124) sts for the back, bind off 4 sts for armhole, 61 (65-68) sts for the front. Knit the rest of each part separately. Front: 61 (65-68) sts. Bind off for armholes every other row: 2 sts 1 (2-2) times, 1 st 1(1-3) times. 58 (60-61) sts. When the work measures 48 (52-52) cm [18-⅞" (20.5" - 20.5")], knit the collar by increasing for the collar and at the same time decreasing for the neck as follows: Dec 1 st for the neck inside the 6 button band sts every other row 14 (15-15) times, and then every 4th row 2 times. Inc 1 st for the collar at the outer edge every 6th row 6 times, knitting the increased sts into Pattern 1 as you go along. When the work measures 64 (68-68) cm [25.25" (26.75" - 26.75»)], adjusting for pattern if necessary, bind off 32 (33-34) sts for the shoulder (see the instructions above concerning binding off over Pattern 4 - 36 (37-38) sts are bound off). Knit the remaining 12 sts (the collar) for a further 7.5 (8-8) cm [3"(3-⅛" - 3-⅛")]. Bind off. This is the back collar. Back: 110 (118-124) sts. Bind off for armholes as on the front. 104 (108-110) sts. When the work measures 62 (66-66) cm [24-⅜" (26" - 26»)], bind off the center 28 (30-30) sts for the neck. Bind off 2 sts at each neck edge on the next row. Bind off when the work measures 64 (68-68) cm [25.25" (26.75" - 26.75")], adjusting for pattern if necessary. (See the instructions above concerning binding off over Pattern 4 - 36 (37-38) sts are bound off). Sleeves: Cast on 47 (47-49) sts on double pointed needles. Join, being careful not to twist the sts. Place a marker at the join and establish pattern as follows: 8 (8-9) sts of Pattern 1, P 2, Pattern 2, Pattern 3, Pattern 2, P 2, 8 (8-9) sts of Pattern 1. At the same time, when the work measures 5 cm [2»], inc 1 st each side of the marker 27 (27-28) times. Sizes S + M: every 4th row. Size L: alternately every 3rd and 4th row. = 101 (101-105) sts. Knit the increased sts into Pattern 1 as you go along. When the work measures 47 (46-45) cm [18.5" (18-⅛" - 17.75")], bind off 2 sts each side of the marker and knit the rest back and forth on the needles. Bind off for sleeve caps each side every other row: 5 (4-4) sts 6 (7-9) times. Bind off. The work measures approx. 52 cm [20.5"]. Assembly: Sew shoulder seams. Weave the collar together at the center back and sew the collar onto the neck opening on the back. Sew in the sleeves and buttons. |
|||||||||||||||||||||||||
Diagram explanations |
|||||||||||||||||||||||||
|
|||||||||||||||||||||||||
|
|||||||||||||||||||||||||
|
|||||||||||||||||||||||||
|
Have you made this or any other of our designs? Tag your pictures in social media with #dropsdesign so we can see them! Do you need help with this pattern?You'll find tutorial videos, a Comments/Questions area and more by visiting the pattern on garnstudio.com. © 1982-2024 DROPS Design A/S. We reserve all rights. This document, including all its sub-sections, has copyrights. Read more about what you can do with our patterns at the bottom of each pattern on our site. |
|||||||||||||||||||||||||


With over 40 years in knitting and crochet design, DROPS Design offers one of the most extensive collections of free patterns on the internet - translated to 17 languages. As of today we count 304 catalogs and 11422 patterns - 11417 of which are translated into English (US/in).
We work hard to bring you the best knitting and crochet have to offer, inspiration and advice as well as great quality yarns at incredible prices! Would you like to use our patterns for other than personal use? You can read what you are allowed to do in the Copyright text at the bottom of all our patterns. Happy crafting!
Comments / Questions (29)
Bonjour et merci pour votre réponse. Mais cela fait 48m et non 47m, au montage c'est 47m pour la taille M et S : 9mde M1 + 2menv + 6m de M2 + 15m de M3 + 6m de M2 +2m env + 8m de M1 = 48m au total. Merci
22.02.2024 - 16:47DROPS Design answered:
Bonjour Gigi, effectivement, il y avait une faute de frappe dans les explications en français, il faut bien commencer par 8 m de M.1 en S et en M, correction faite, merci pour votre retour. Bon tricot!
23.02.2024 - 08:30Bonjour, on doit monter 47 m (suivant la taille) pour les manches, puis au 1er rang 9m de m1, 2m env, M2, M3, M2, 2m envers et enfin 8 m de M1. Cela correspond à 48 m au total et non 47m. Ma question est n\'y -t-il pas erreur au début 8m de M1 au lieu de 9M comme mentionné ? puisque le dernier M1 est de 8m. Merci
21.02.2024 - 16:47DROPS Design answered:
Bonjour Gigi, en taille S et M avec 47mailles, on commence effectivement par 9 m de M.1 et on termine par 8 M. Bon tricot!
22.02.2024 - 09:27Drops 55-18. Kom er niet uit... voorpand. Hoe moet ik minderen na de 6 steken voor de bies. Terwijl het patroon wel door blijft lopen. (Zoals te zien is op foto). En minderen voor de kraag.
10.01.2024 - 21:53DROPS Design answered:
Dag Marian,
Het patroon loopt niet door maar wordt uiteindelijk een beetje 'opgeslokt' door het afkanten voor de v-hals/kraag binnen de 6 voorbiessteken. Daarnaast meerder je voor de kraag, om de kraag breder te maken. Dit meerderen doe je binnen de buitenste 6 steken en heeft dus geen invloed op het patroon, maar maakt alleen de kraag breder.
11.01.2024 - 18:48Tout d'abord merci pour votre réponse rapide à mon message précédent :-) Autre question : doit-on commencer sur le même rang la diminution pour le col à 6 mailles du bord et augmenter à la lisière ? Merci
28.04.2023 - 14:05DROPS Design answered:
Bonjour Gigi, la 1ère augmentation du col se fait effectivement en même temps que la 1ère diminution pour l'encolure, mais ensuite, elles vont se faire à un rythme différent (on augmente tous les 6 rangs pour le col mais on diminue d'abord tous les 2 rangs puis tous les 4 rangs pour l'encolure). Bon tricot!
28.04.2023 - 15:44Bonjour, lorsque l'on doit diminuer 1 m pour l'encolure à 6 m de bordure devant 14-15-15 fois tous les 2 rangs, doit-on diminuer la 5eme et 6eme maille ensemble ou 6eme et 7eme maille ensemble ? Et pour l'augmentation dans la lisière doit-on faire un jeté ? Merci
27.04.2023 - 23:02DROPS Design answered:
Bonjour Gigi, quand on doid diminuer à 6 m du bord, on va diminuer la 7ème et la 8ème maille ensemble, ainsi on ne "touche" pas aux 6 mailles de la bordure devant. Pour les augmentations, vous pouvez tout à fait faire 1 jeté à 1 maille du bord (tricoté torse au rang suivant) ou bien tricoter alternativement la maille du bord dans le brin avant et le brin arrière, au choix. Bon tricot!
28.04.2023 - 10:20Pour quel raison les modèles sont toujours à travailler avec aiguilles circulaire , je n\'aime pas du tout\r\npourtant vos modèles sont très jolis , c\'est dommage
17.04.2023 - 10:49DROPS Design answered:
Bonjour Mme Busata, c'est une technique très fréquente en Europe du Nord et Scandinavie, mais la plupart du temps, les explications sont très faciles à adapter sur aiguilles droites - vous trouverez quelques explications ici. Bon tricot!
17.04.2023 - 16:01à quelle hauteur commencer les augmentations pour le col.Merci
31.05.2022 - 19:35DROPS Design answered:
Bonjour Mme Geoffriau, on commence à augmenter le nombre de mailles pour le col en même temps que l'on commence à diminuer pour l'encolure, autrement dit, à 48 ou à 52 cm selon la taille. Bon tricot!
01.06.2022 - 08:06Voor de hals ga je minderen net na de voorbijs. 14*1 om de naald en 2*1 om de 4 naalden. Hoe kan het dan zo zijn dat het patroon van M3 volgens de foto blijft bestaan . 6 bies, 1 av, M2 6 stekken M3 15 steken, na de 6 M2 steken wordt M3 al aangesproken om te minderen. Op de foto blijft M3 nagenoeg bestaan. Een groot raadsel.
09.12.2021 - 17:35DROPS Design answered:
Dag Hetty,
Je mindert in totaal 16 steken voor de halslijn, dat zijn 6 steken van M.2 en 10 steken van M.3. Als je op de afbeelding kijkt, zie je ook je bij de schouder ergens in M.3 uitkomt.
10.12.2021 - 10:20Jo, det är fel i m 3. Flätan som börjar till hö i mönstret är fel från v 5, och även när den går över till hö sida, från v 13. Man får en a m i flätan!
20.11.2021 - 21:17När jag har lagt upp 286 maskor och stickar första raden med de olika M:n så får jag 21 maskor kvar.
06.10.2021 - 15:37DROPS Design answered:
Hej Annika. Jag antar att det är 268 m du menar att du lagt upp och då stickar du såhär: 6+1+6+15+16+2+48+2+16+15+6+2+6+15+16+2+48+2+16+15+6+1+6=268 m. Mvh DROPS Design
07.10.2021 - 08:21