
Popular categories
Looking for a yarn?


Comments / Questions (39)
![]() Paula wrote:
Paula wrote:
Kan ik de patroon krijgen
05.02.2026 - 06:58
![]() Pia Anderberg wrote:
Pia Anderberg wrote:
Tyvärr har min föregående fråga inte uppdaterats av Design avd. Min fråga nu är: Under HALSFÖRSKJUTNING Varv 2-4 står det "Sticka som förut". Vad betyder det? Sticka som Varv 1? Eller på något annat sätt? Tack för hjälpen. / Vänligen
25.07.2025 - 13:36DROPS Design answered:
Hei Pia. Når du strikker f.eks venstre forstykke er det forklart hvordan det strikkes / hvordan mønstret strikkes (kantmaske, glattstrikk, vrangmasker, rett maske osv). Det er forklart hvordan det strikkes fra retten og fra vrangen og når du starter med Halsforskyvningen og 2.-4. pinne, skal 2.-4. pinne strikkes som før, altså strikkes som mønstret er forklart förut. mvh DROPS Design
18.08.2025 - 10:45
![]() Elvy Vendelstrand wrote:
Elvy Vendelstrand wrote:
Hej hur gör ja för sprundet på ärmen ska ja maska av 4cm st L på båda sidor om mittmarkeringe n underrmen ärmen Mvh Elvy
10.07.2025 - 07:38
![]() Pia Anderberg wrote:
Pia Anderberg wrote:
Förstår inte FRAMSTCKETS mönster (exempel här XXXL). Hur kan framstycket ha 118 m vid 52 cm när (2x14) 28 m maskats av vid 51 cm? Det borde väl vara 90 m som på bakstycket vid 51 cm?
05.07.2025 - 12:20DROPS Design answered:
Hei Pia. Du strikker forstykket på samme måte som bakstykket og når arbeidet måler 51 cm felles det 14 masker til ermhull på begynnelsen av de 2 neste pinnene = 90 masker på pinnen, og når arbeidet måler 52 cm deles arbeidet og det skal nå økes og felles masker på pinnen til hals. Oppskriften er oversendt til Design avd. for en dobbelt sjekk og evnt. rette opp tallene etterdet er felt til ermene (burde være = 74-76-80-84-86-90 masker). mvh DROPS Design
11.07.2025 - 11:03
![]() Pia Frensdorf wrote:
Pia Frensdorf wrote:
Det er forvirrende, at der står: Tag 1 maske ud og 1 maske ind på hver 4. pind (= hver 2. pind fra retsiden). Hver 2. pind ER retsiden! Det vil være mere forståeligt, hvis der stod: Tag 1 maske ud og 1 maske ind på hver 4. pind (= hver 2. RETPIND). Måske der er gået noget tabt i oversættelsen.
17.06.2025 - 10:09
![]() Pia Frensdorf wrote:
Pia Frensdorf wrote:
Betyder "strik som før" at pind 2 - 4 skal strikkes som pind 1, pind 6 - 8 som pind 5, o.s.v. ? 1. PIND: Tag ud og ind 2.-4.PIND: Strik som før 5. PIND: Tag ud og ind 6.-8. PIND: Strik som før
13.06.2025 - 15:00DROPS Design answered:
Hei Pia. Se vårt forrige svart til deg under. mvh DROPS Design
16.06.2025 - 10:57
![]() Pia Frensdorf wrote:
Pia Frensdorf wrote:
Jeg er i gang med v forstykke XL. Hvad der menes med: Tag 1 maske ud og 1 maske ind på hver 4.pind (= hver 2.pind fra retsiden). Hvordan kan hver 4. pind være hver 2. pind fra retsiden? Jeg har strikket halsforskydningen således: 1. pind ud- og indtagning, 2.-4. pind ingen ud- og indtag, 5. pind som pind 1, 6.-8. pind som 2.-4., 9. som pind 1. og 5., 10. som 2.3.4.6.7.8.og 10., 11. udt. og pind 12. uden ud- og ind. Jeg mangler 1 maske ved 72 cm. Hvad gør jeg forkert?
12.06.2025 - 14:30DROPS Design answered:
Hei Pia. Under venstre forstykke er det forklart 1. (retten) og 2. (vrangen) pinne. Så fortsettes dette mønstret og halsforskyvning, samt at man starter med øk/fell på neste pinne, og fra denne pinne skal det økes/felles på hver 4. pinne (hver 2. pinne fra retten). I str. XL startet du med 1 kantmaske + 42 masker + 3 vrang + 1 rett + 3 masker i riller + 4 nye masker = 54 masker. Så skal det økes 5 ganger = 54 + 5 = 59 masker. Når arbeidet måler 49 cm, felles det 8 masker = 51 masker. Fortsett til arbeidet måler72 cm, fell av de første 20 maskene fra siden = 31 masker på pinnen. mvh DROPS Design
16.06.2025 - 09:14
![]() Elvy wrote:
Elvy wrote:
Kan ja sticka den här tröjan med rundsticka o sticka bak o framstycket i hopp till ärmarna
10.05.2025 - 17:38DROPS Design answered:
Hei Elvy. Du kan tilpassen den slik at du strikker rundt, men vær obs på at fellingen til hals starter før ermene. mvh DROPS Design
19.05.2025 - 12:48
![]() Marian Van Miltenburg wrote:
Marian Van Miltenburg wrote:
Vervolg van mijn vorige vragen. Brei als volgt: Naald 1: meerder en minder. Naalden 2-3-4 brei zoals hiervoor. WAT WORDT HIER MEE BEDOELT? Alle losse stukken tekst kan ik niet tot 1 duidelijk geheel maken. Ik hoop dat jullie het me wat meer kunnen verhelderen. Vriendelijke groet, Marian
07.03.2025 - 21:05DROPS Design answered:
Dag Marian,
Je begint het werk bij het achterpand (onder het stukje 'BEGIN HET WERK HIER') Alles wat daar boven staat zijn instructies, waarnaar in het patroon wordt verwezen. Dus op een gegeven moment (bij het rechter voorpand) staat dat je de halsverschuivingen moet breien. Dan pak je de instructies daarover erbij die bovenaan het patroon staan.
12.03.2025 - 11:04
![]() Michelle Bazinet wrote:
Michelle Bazinet wrote:
Bonjour, j'aimerais savoir où trouver l'information quand à la concordance des tailles des patrons avec celles des mensurations. Merci à l'avance
12.01.2025 - 17:28DROPS Design answered:
Bonjour Mme Bazinet, mesurez un vêtement similaire que la personne à qui est destiné l'ouvrage plaît, et comparez ces mesures à celles du schéma du bas de page, vous trouverez ainsi la taille correspondante. Retrouvez plus d'infos ici. Bon tricot!
13.01.2025 - 11:08
|
||||
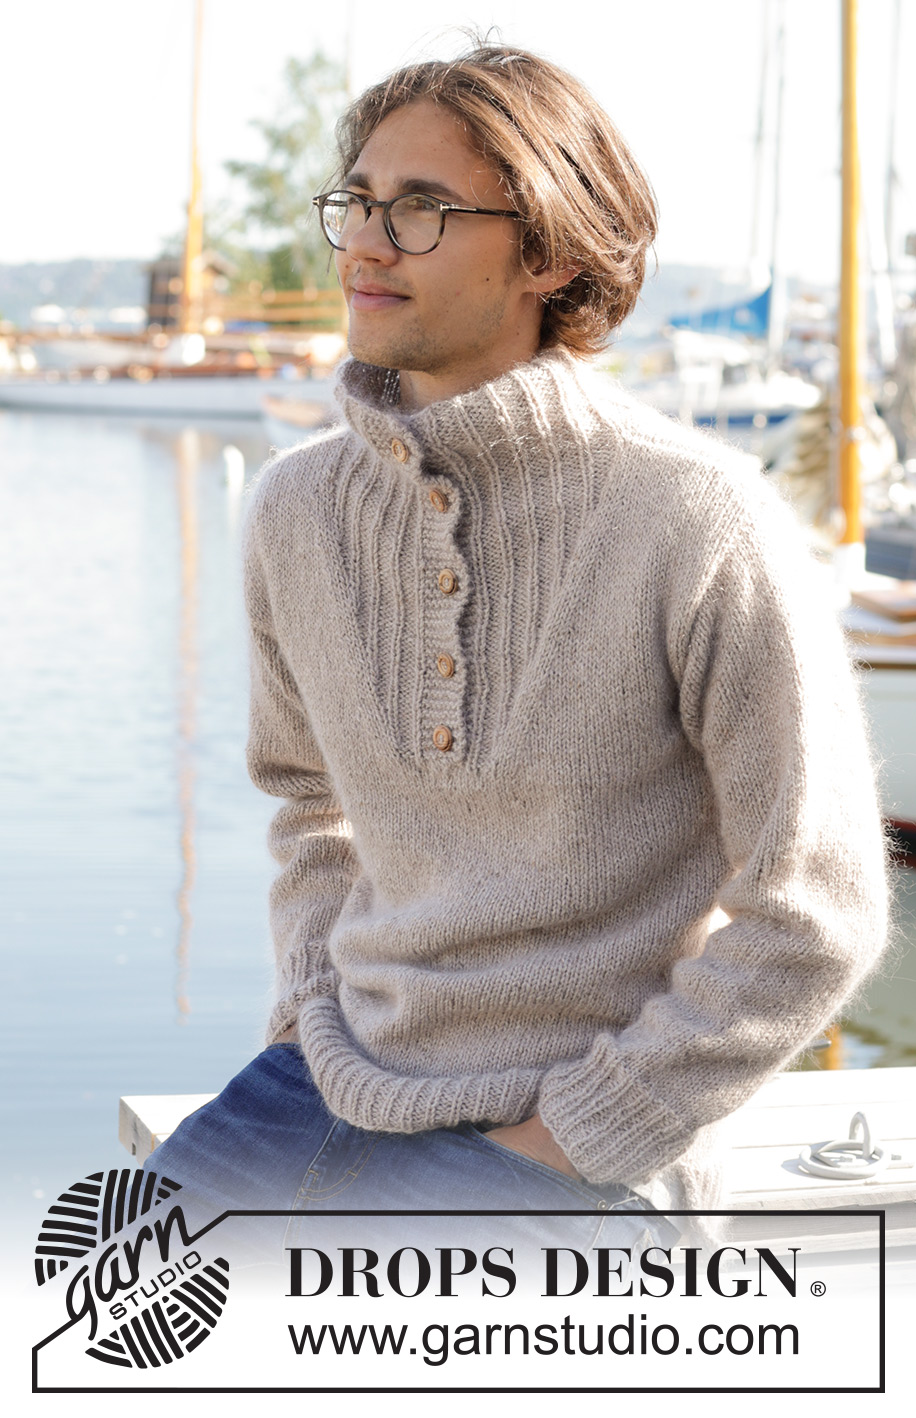
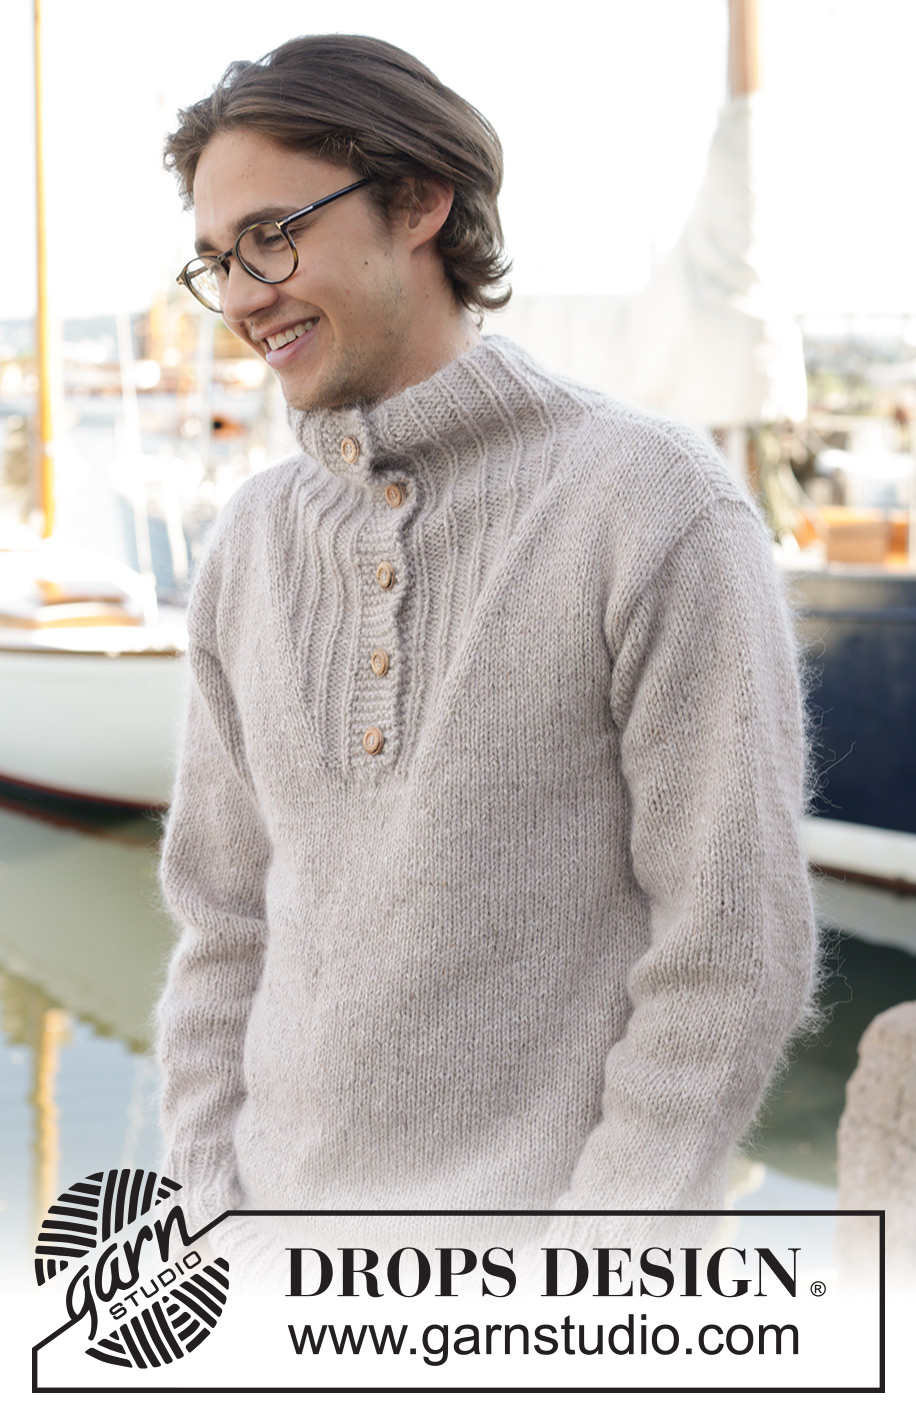
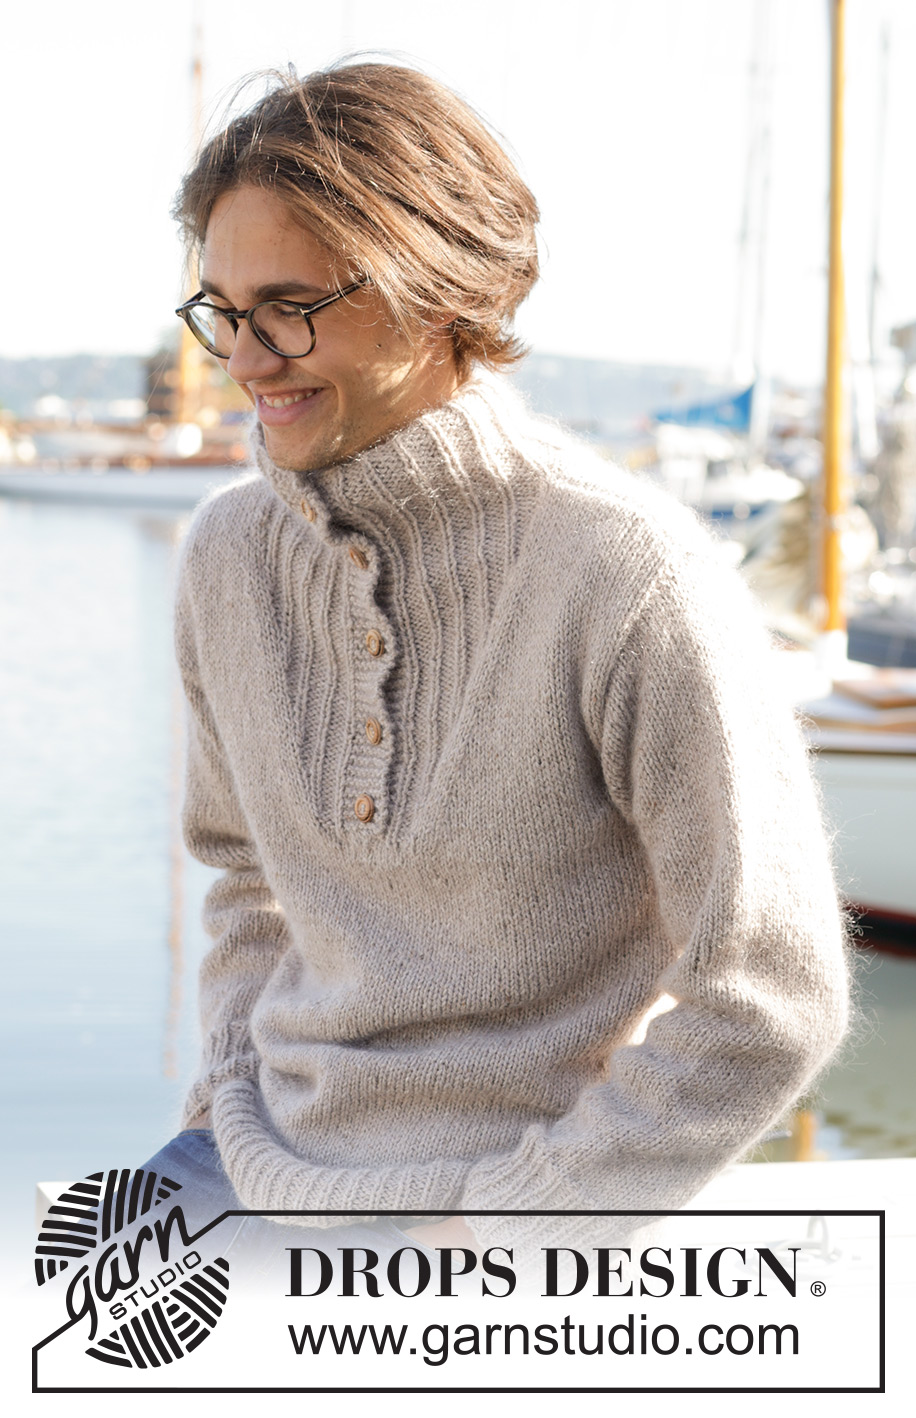
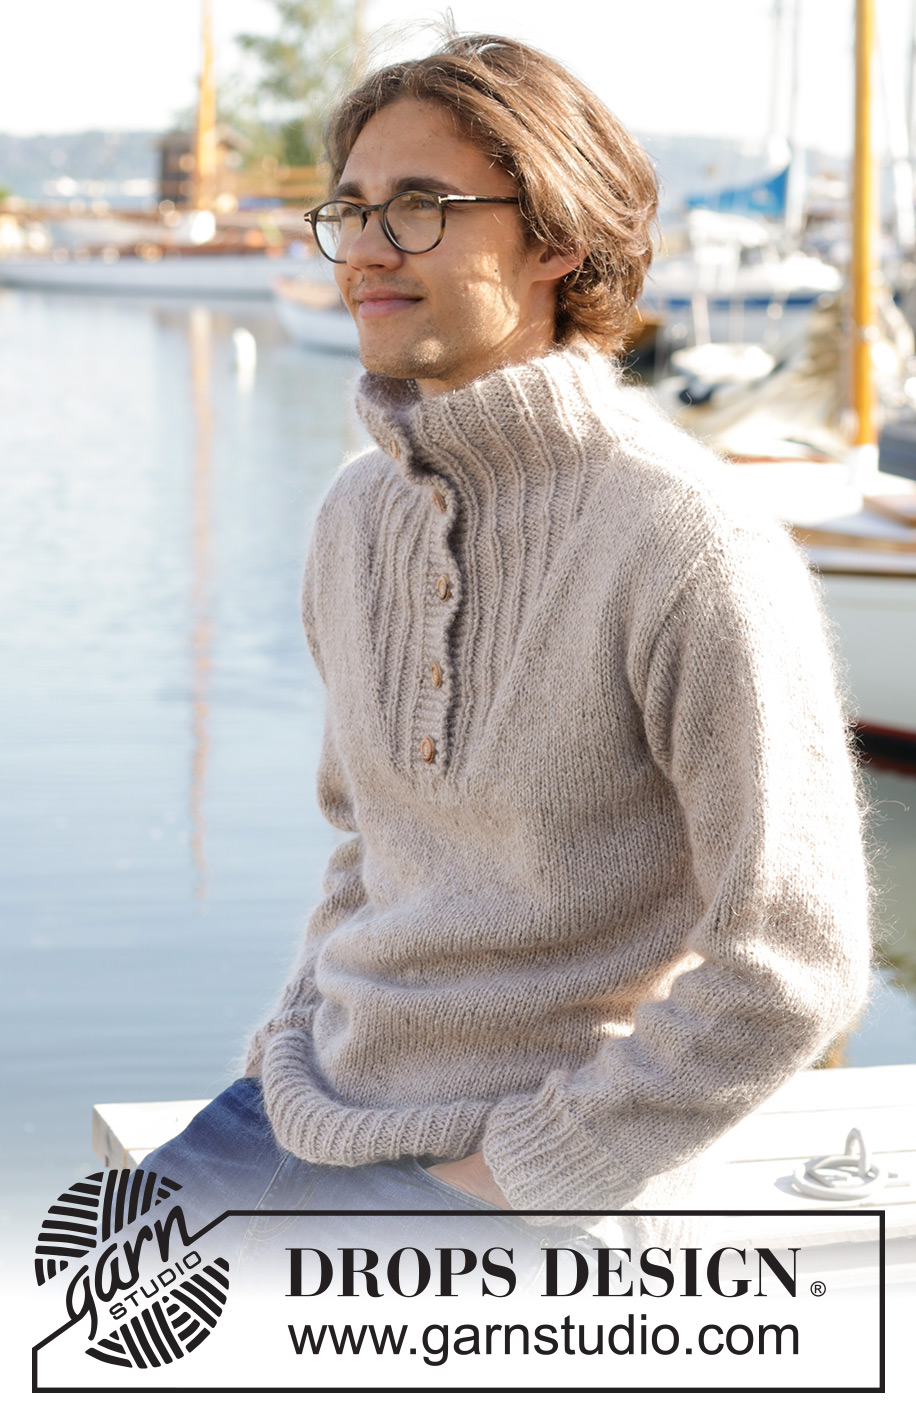
Travellers Rest#travellersrestsweater |
||||
 |
 |
|||
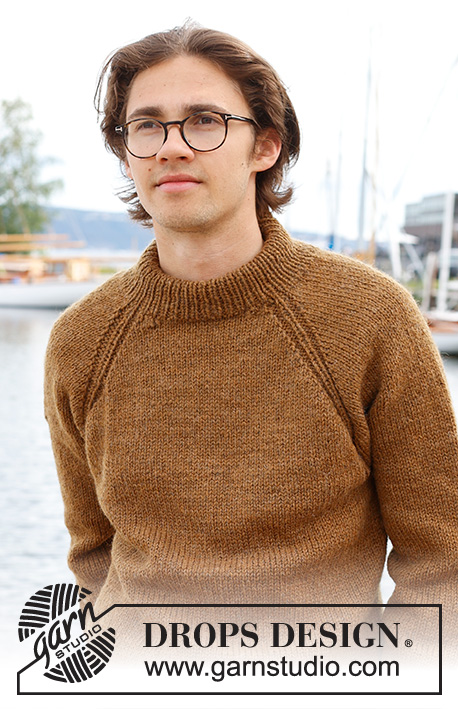
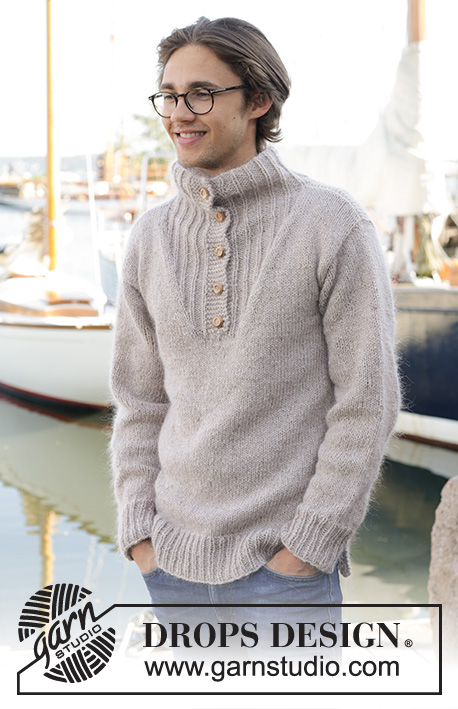
Knitted jumper for men in DROPS Soft Tweed and DROPS Kid-Silk. The piece is worked bottom up with high neck. Sizes S - XXXL.
DROPS 233-8 |
||||
|
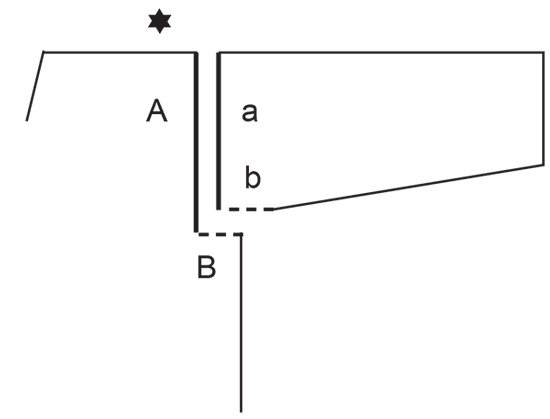
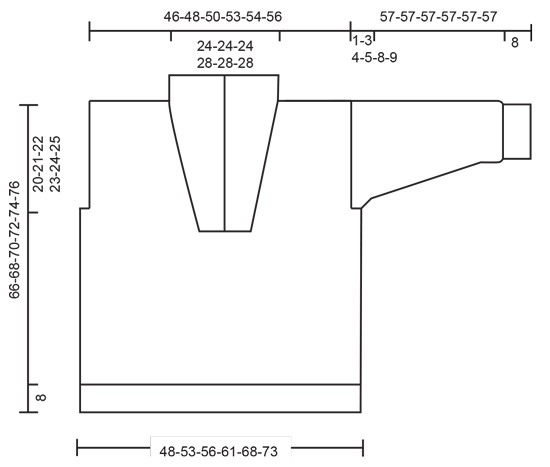
------------------------------------------------------- EXPLANATIONS FOR THE PATTERN: ------------------------------------------------------- RIDGE/GARTER STITCH (worked back and forth): Knit all rows. 1 ridge = knit 2 rows. NECK-DISPLACEMENTS: LEFT FRONT PIECE: Decrease 1 stitch before the marker and increase 1 stitch after the marker as follows: Work until there are 3 stitches left before the marker, knit 2 together, knit 2 (marker is between these 2 stitches), make 1 yarn over. NOTE: To avoid the rib becoming tight, increase 1 stitch (without decreasing) every 3rd increase/decrease. The yarn overs are worked twisted on the next row and worked into the rib (knit 1/purl 3 seen from the right side). Work as follows: ROW 1: Increase and decrease ROWS 2-4: Work as before ROW 5: Increase and decrease ROWS 6-8: Work as before ROW 9: Increase and decrease ROW 10: Work as before ROW 11: Increase ROW 12: Work as before. Repeat these 12 rows. RIGHT FRONT PIECE: Increase 1 stitch before the marker and decrease 1 stitch after the marker as follows: Work until there is 1 stitch left before the marker, make 1 yarn over, knit 2 (marker is between these 2 stitches), slip 1 stitch as if to knit, knit 1 and pass the slipped stitch over the knitted stitch. Increase and decrease in the same way as on the left front piece. BUTTONHOLES: Work buttonholes on the right band. 1 BUTTONHOLE = knit together the 3rd and 4th stitch from the edge and make 1 yarn over. On the next row knit the yarn over to leave a hole. Work buttonholes when the piece measures: S: 44, 51, 59 and 67 cm M: 46, 53, 61 and 69 cm L: 48, 55, 63 and 71 cm XL: 49, 57, 65 and 73 cm XXL: 51, 59, 67 and 75 cm XXXL: 53, 61, 69 and 77 cm The last buttonhole is worked when the neck measures 6 cm. INCREASE TIP (sleeves): Start 1 stitch before the marker thread, make 1 yarn over, knit 2 (marker thread sits between these 2 stitches), 1 yarn over. On the next round knit the yarn overs twisted to avoid holes. ------------------------------------------------------- START THE PIECE HERE: ------------------------------------------------------- JUMPER – SHORT OVERVIEW OF THE PIECE: The piece is worked back and forth in sections then sewn together. The neck-line is worked with displaced stitches, giving more ribbed stitches in front and less stocking stitches at the sides. The neck is worked to finish. The sleeves are worked bottom up, in the round, with double pointed needles/short circular needle. BACK PIECE: Cast on 87-96-102-111-120-129 stitches with circular needle size 4 mm and 1 strand DROPS Soft Tweed and 1 strand DROPS Kid-Silk. Purl 1 row from the wrong side. Work rib as follows: 1 edge stitch in GARTER STITCH – read description above, * knit 1, purl 2 *, work from *-* until there are 2 stitches left, knit 1, 1 edge stitch in garter stitch. Continue this rib back and forth for 8 cm. Knit 1 row from the right side and decrease 9-10-10-11-10-11 stitches evenly spaced = 78-86-92-100-110-118 stitches. Change to circular needle size 5mm. Work stocking stitch with 1 garter stitch on each side. REMEMBER THE KNITTING TENSION! When the piece measures 46-47-48-49-50-51 cm, cast off 2-5-6-8-12-14 stitches at the beginning of the next 2 rows for the armholes = 74-76-80-84-86-90 stitches. Continue with stocking stitch and 1 garter stitch on each side. When the piece measures 64-66-68-70-72-74 cm, cast off the middle 36-36-36-42-42-42 stitches for the neck and finish each shoulder separately. Cast off 1 stitch on the next row from the neck = 18-19-21-20-21-23 stitches. Continue with stocking stitch and 1 garter stitch on each side until the piece measures 66-68-70-72-74-76 cm. Cast off. Work the other shoulder in the same way. FRONT PIECE: Cast on and work in the same way as the back piece until the front measures 43-45-47-48-50-52 cm = 78-86-92-100-110-118 stitches. Now divide for the neck. Place the last 39-43-46-50-55-59 stitches on a thread and work the first 39-43-46-50-55-59 stitches as follows: LEFT FRONT PIECE: The first row is worked from the right side: 1 edge stitch in garter stitch, stocking stitch over the next 31-35-38-42-47-51 stitches, purl 3, knit 1, 3 garter stitches, then cast on 4 stitches at the end of the row = 43-47-50-54-59-63 stitches. Wrong side: 7 band stitches in garter stitch, purl 1, knit 3, purl 2 and insert a marker between these 2 stitches, work to the end of the row. Continue this pattern and work NECK-DISPLACEMENTS – read description above (remember to cast off for the armhole as described below). Increase 1 stitch and decrease 1 stitch every 4th row (= every 2nd row from the right side) 12-12-12-15-15-15 times. NOTE! In addition increase 1 extra stitch 4-4-4-5-5-5 times. The rib increases mid-front and the stocking stitch decreases towards the side. Increase and decrease on each side of 2 stocking stitches (marker sits between these 2 stitches); this creates a diagonal line up the shoulder. AT THE SAME TIME when the piece measures 46-47-48-49-50-51 cm cast off 2-5-6-8-12-14 stitches from the side for the armhole. When the neck displacements are finished there are 45-46-48-51-52-54 stitches. Continue working until the piece measures 66-68-70-72-74-76 cm, cast off 18-19-21-20-21-23 stitches from the side = 27-27-27-31-31-31 stitches. Lay the piece to one side and work the right front piece. RIGHT FRONT PIECE: Cast on 4 stitches and place the 39-43-46-50-55-59 stitches from the thread back on the needle. Work as follows: 3 stitches in garter stitch, knit 1, purl 3, work stocking stitch until there is 1 stitch left, 1 edge stitch in garter stitch = 43-47-50-54-59-63 stitches. Wrong side: 1 edge stitch in garter stitch, stocking stitch until there are 13 stitches left, purl 2 and insert a marker between these 2 stitches, knit 3, purl 1 and 7 band stitches in garter stitch. Continue this pattern and work NECK-DISPLACEMENTS - (remember to cast off for the armhole as described below). Increase 1 stitch and decrease 1 stitch every 4th row (= every 2nd row from the right side) 12-12-12-15-15-15 times. NOTE! In addition increase 1 extra stitch 4-4-4-5-5-5 times. The rib increases mid-front and the stocking stitch decreases towards the side. Increase and decrease on each side of 2 stocking stitches (marker between these 2 stitches); this creates a diagonal line up the shoulder. In addition work the BUTTONHOLES – read description above. AT THE SAME TIME when the piece measures 46-47-48-49-50-51 cm, cast off 2-5-6-8-12-14 stitches from the side for the armhole. When the neck displacements are finished there are 45-46-48-51-52-54 stitches. Continue working until the piece measures 66-68-70-72-74-76 cm, cast off 18-19-21-20-21-23 stitches from the side = 27-27-27-31-31-31 stitches. Lay the piece to one side. SLEEVES: Cast on 45-45-48-48-51-54 stitches with double pointed needles size 4 mm and 1 strand of each quality (2 strands). Knit 1 round, then work rib (knit 1, purl 2). When the piece measures 8 cm, change to double pointed needles size 5 mm. Insert a marker thread at the beginning of the round = mid-under sleeve. Continue with stocking stitch. AT THE SAME TIME when the piece measures 11-12-11-12-11-13 cm, increase 1 stitch on each side of the marker thread – read INCREASE TIP. Increase like this every 4½-3½-3½-3-3-2½cm a total of 10-12-12-13-13-13 times = 65-69-72-74-77-80 stitches. When the sleeve measures 56-54-53-52-49-48 cm, continue back and forth for the sleeve cap (from mid-under sleeve) until the sleeve measures 57 cm in all sizes (a split of 1-3-4-5-8-9 cm). Cast off. Work the other sleeve in the same way. ASSEMBLY: Sew the shoulder seams. Sew the sleeve caps to the armholes, then the openings at the bottom of the armholes – see sketch. Sew the side seams, leaving an 8 cm split at the bottom. NECK: Place the 27-27-27-31-31-31 stitches from each front piece on circular needle size 4 mm and knit up 37-37-37-45-45-45 stitches along the top of the back piece = 91-91-91-107-107-107 stitches. Work as follows from the wrong side: 7 band stitches in garter stitch, * purl 1, knit 3 *, work from *-* until there are 8 stitches left, purl 1 and 7 band stitches in garter stitch. Work this rib for 8 cm, cast off with knit over knit and purl over purl. Lay the right band over the left band at the bottom of the neck and sew together. Sew the buttons onto the left band. |
||||
Diagram explanations |
||||
|
||||
 |
||||
 |
||||
Have you finished this pattern?Tag your pictures with #dropspattern #travellersrestsweater or submit them to the #dropsfan gallery. Do you need help with this pattern?You'll find 33 tutorial videos, a Comments/Questions area and more by visiting the pattern on garnstudio.com. © 1982-2026 DROPS Design A/S. We reserve all rights. This document, including all its sub-sections, has copyrights. Read more about what you can do with our patterns at the bottom of each pattern on our site. |
||||


With over 40 years in knitting and crochet design, DROPS Design offers one of the most extensive collections of free patterns on the internet - translated to 17 languages. As of today we count 324 catalogues and 12290 patterns translated into English (UK/cm). 12290
We work hard to bring you the best knitting and crochet have to offer, inspiration and advice as well as great quality yarns at incredible prices! Would you like to use our patterns for other than personal use? You can read what you are allowed to do in the Copyright text at the bottom of all our patterns. Happy crafting!
Post a comment to pattern DROPS 233-8
We would love to hear what you have to say about this pattern!
If you want to leave a question, please make sure you select the correct category in the form below, to speed up the answering process. Required fields are marked *.