DROPS Soft Tweed
DROPS Soft Tweed
50% Wool, 25% Alpaca, 25% Viscose
from 5.80 $ /50g
DROPS Kid-Silk
DROPS Kid-Silk
75% Mohair, 25% Silk
from 6.75 $ /25g
Get the yarn to make this pattern from 92.70$.

The yarn cost is calculated from the pattern’s smallest size and the yarn’s cheapest product type. Looking for an even better price? You might find it on the DROPS Deals!

DROPS SS24

Travellers Rest

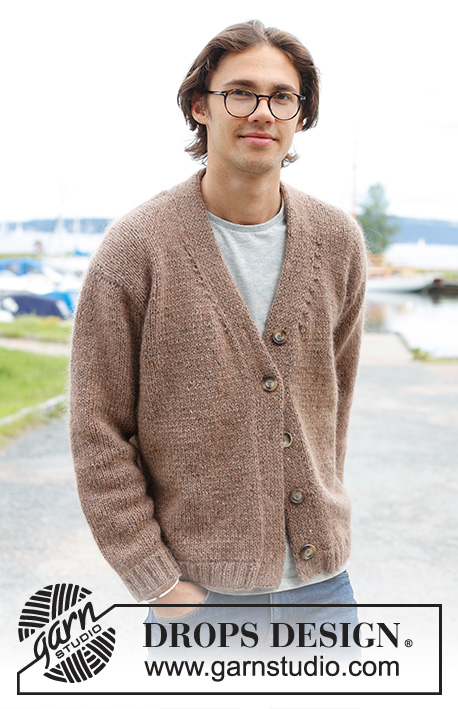
Knitted sweater for men in DROPS Soft Tweed and DROPS Kid-Silk. The piece is worked bottom up with high neck. Sizes S - XXXL.

DROPS 233-8
DROPS Design: Pattern st-030
Yarn group B + A
-------------------------------------------------------

SIZES:
S - M - L - XL - XXL – XXXL

Finished measurements:
Chest measurements: 96-106-112-122-136-146 cm = 37¾"-41¾"-44"-48"-53½"-57⅜"
Full length: 66-68-70-72-74-76 cm = 26"-26¾"-27½"-28⅜"-29⅛"-29½"
All measurements in charts are in cm.

MATERIALS:
DROPS SOFT TWEED fra Garnstudio (belongs to yarn group B)
450-500-550-600-650-700 g color 03, sand
And use:
DROPS KID-SILK from Garnstudio (belongs to yarn group A)
150-150-175-175-200-225 g color 20, light beige

DROPS BUTTONS NO 511: 5 items in all sizes

NEEDLES:
DROPS CIRCULAR NEEDLE SIZE 5 MM = US 8: Length 40 cm = 16" and 80 cm = 32".
DROPS CIRCULAR NEEDLE SIZE 4 MM = US 6: Length 40 cm = 16" and 80 cm = 32".
DROPS DOUBLE POINTED NEEDLES SIZE 5 MM = US 8.
DROPS DOUBLE POINTED NEEDLES SIZE 4 MM = US 6.
The technique MAGIC LOOP can be used – you then only need circular needle of 80 cm = 32" in each size.

KNITTING GAUGE:
16 stitches in width and 21 rows in height with stockinette stitch and 1 strand of each quality = 10 x 10 cm = 4" x 4".
NOTE: Needle size is only a guide. If you get too many stitches on 10 cm = 4", change to a larger needle size. If you get too few stitches on 10 cm = 4", change to a smaller needle size.

-------------------------------------------------------

Alternative Yarn – See how to change yarns here
Yarn Groups A to F – Use the same pattern and change the yarn here
Yarn usage using an alternative yarn – Use our yarn converter here

-------------------------------------------------------

DROPS Soft Tweed
DROPS Soft Tweed
50% Wool, 25% Alpaca, 25% Viscose
from 5.80 $ /50g
DROPS Kid-Silk
DROPS Kid-Silk
75% Mohair, 25% Silk
from 6.75 $ /25g
Get the yarn to make this pattern from 92.70$.

The yarn cost is calculated from the pattern’s smallest size and the yarn’s cheapest product type. Looking for an even better price? You might find it on the DROPS Deals!

Pattern instructions

NOTE: This pattern is written in American English. All measurements in charts are in cm. For conversion from inches to cm - click here. There are different terms for crocheting in American and British English. If this pattern includes crochet, click for "crochet terms" here. For this pattern in British English, please click here.
-------------------------------------------------------

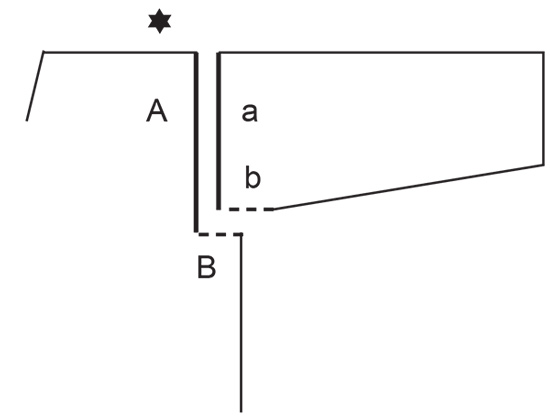
EXPLANATIONS FOR THE PATTERN:
-------------------------------------------------------

RIDGE/GARTER STITCH (worked back and forth):
Knit all rows.
1 ridge = knit 2 rows.

NECK-DISPLACEMENTS:
LEFT FRONT PIECE:
Decrease 1 stitch before the marker and increase 1 stitch after the marker as follows:
Work until there are 3 stitches left before the marker, knit 2 together, knit 2 (marker is between these 2 stitches), make 1 yarn over.
NOTE: To avoid the rib becoming tight, increase 1 stitch (without decreasing) every 3rd increase/decrease. The yarn overs are worked twisted on the next row and worked into the rib (knit 1/purl 3 seen from the right side).

Work as follows:

ROW 1: Increase and decrease
ROWS 2-4: Work as before
ROW 5: Increase and decrease
ROWS 6-8: Work as before
ROW 9: Increase and decrease
ROW 10: Work as before
ROW 11: Increase
ROW 12: Work as before.

Repeat these 12 rows.

RIGHT FRONT PIECE:
Decrease 1 stitch before the marker and increase 1 stitch after the marker as follows:
Work until there is 1 stitch left before the marker, make 1 yarn over, knit 2 (marker is between these 2 stitches), slip 1 stitch as if to knit, knit 1 and pass the slipped stitch over the knitted stitch.

Increase and decrease in the same way as on the left front piece.

BUTTONHOLES:
Work buttonholes on the right band. 1 BUTTONHOLE = knit together the 3rd and 4th stitch from the edge and make 1 yarn over. On the next row knit the yarn over to leave a hole.
Work buttonholes when the piece measures:
S: 44, 51, 59 and 67 cm = 17¼", 20", 23¼" and 26⅜"
M: 46, 53, 61 and 69 cm = 18", 21", 24" and 27⅛"
L: 48, 55, 63 and 71 cm = 19", 21⅝", 24¾" and 28"
XL: 49, 57, 65 and 73 cm = 19¼", 22½", 25½" and 28¾"
XXL: 51, 59, 67 and 75 cm = 20", 23¼", 26⅜" and 29½"
XXXL: 53, 61, 69 and 77 cm = 21", 24", 27⅛" and 30⅜"
The last buttonhole is worked when the neck measures 6 cm = 2⅜".

INCREASE TIP (sleeves):
Start 1 stitch before the marker thread, make 1 yarn over, knit 2 (marker thread sits between these 2 stitches), 1 yarn over. On the next round knit the yarn overs twisted to avoid holes.

-------------------------------------------------------

START THE PIECE HERE:

-------------------------------------------------------

SWEATER – SHORT OVERVIEW OF THE PIECE:
The piece is worked back and forth in sections then sewn together. The neck-line is worked with displaced stitches, giving more ribbed stitches in front and less stockinette stitches at the sides. The neck is worked to finish. The sleeves are worked bottom up, in the round, with double pointed needles/short circular needle.

BACK PIECE:
Cast on 87-96-102-111-120-129 stitches with circular needle size 4 MM = US 6 and 1 strand DROPS Soft Tweed and 1 strand DROPS Kid-Silk. Purl 1 row from the wrong side. Work rib as follows:
1 edge stitch in GARTER STITCH – read description above, * knit 1, purl 2 *, work from *-* until there are 2 stitches left, knit 1, 1 edge stitch in garter stitch. Continue this rib back and forth for 8 cm = 3⅛". Knit 1 row from the right side and decrease 9-10-10-11-10-11 stitches evenly spaced = 78-86-92-100-110-118 stitches. Change to circular needle size 5mm. Work stockinette stitch with 1 garter stitch on each side. REMEMBER THE KNITTING GAUGE!

When the piece measures 46-47-48-49-50-51 cm = 18"-18½"-19"-19¼"-19¾"-20", bind off 2-5-6-8-12-14 stitches at the beginning of the next 2 rows for the armholes = 74-76-80-84-86-90 stitches.
Continue with stockinette stitch and 1 garter stitch on each side.
When the piece measures 64-66-68-70-72-74 cm = 25¼"-26"-26¾"-27½"-28⅜"-29⅛", bind off the middle 36-36-36-42-42-42 stitches for the neck and finish each shoulder separately. Bind off 1 stitch on the next row from the neck = 18-19-21-20-21-23 stitches. Continue with stockinette stitch and 1 garter stitch on each side until the piece measures 66-68-70-72-74-76 cm = 26"-26¾"-27½"-28⅜"-29⅛"-29½". Bind off. Work the other shoulder in the same way.

FRONT PIECE:
Cast on and work in the same way as the back piece until the front measures 43-45-47-48-50-52 cm = 17"-17¾"-18½"-19"-19¾"-20½" = 78-86-92-100-110-118 stitches. Now divide for the neck. Place the last 39-43-46-50-55-59 stitches on a thread and work the first 39-43-46-50-55-59 stitches as follows:

LEFT FRONT PIECE:
The first row is worked from the right side:
1 edge stitch in garter stitch, stockinette stitch over the next 31-35-38-42-47-51 stitches, purl 3, knit 1, 3 garter stitches, then cast on 4 stitches at the end of the row = 43-47-50-54-59-63 stitches.
Wrong side: 7 band stitches in garter stitch, purl 1, knit 3, purl 2 and insert a marker between these 2 stitches, work to the end of the row.

Continue this pattern and work NECK-DISPLACEMENTS – read description above (remember to bind off for the armhole as described below). Increase 1 stitch and decrease 1 stitch every 4th row (= every 2nd row from the right side) 12-12-12-15-15-15 times. NOTE! In addition increase 1 extra stitch 4-4-4-5-5-5 times. The rib increases mid-front and the stockinette stitch decreases towards the side. Increase and decrease on each side of 2 stockinette stitches (marker sits between these 2 stitches); this creates a diagonal line up the shoulder.

AT THE SAME TIME when the piece measures 46-47-48-49-50-51 cm = 18"-18½"-19"-19¼"-19¾"-20" bind off 2-5-6-8-12-14 stitches from the side for the armhole. When the neck displacements are finished there are 45-46-48-51-52-54 stitches. Continue working until the piece measures 66-68-70-72-74-76 cm = 26"-26¾"-27½"-28⅜"-29⅛"-29½", bind off 18-19-21-20-21-23 stitches from the side = 27-27-27-31-31-31 stitches. Lay the piece to one side and work the right front piece.

RIGHT FRONT PIECE:
Cast on 4 stitches and place the 39-43-46-50-55-59 stitches from the thread back on the needle. Work as follows: 3 stitches in garter stitch, knit 1, purl 3, work stockinette stitch until there is 1 stitch left, 1 edge stitch in garter stitch = 43-47-50-54-59-63 stitches.
Wrong side:
1 edge stitch in garter stitch, stockinette stitch until there are 13 stitches left, purl 2 and insert a marker between these 2 stitches, knit 3, purl 1 and 7 band stitches in garter stitch.

Continue this pattern and work NECK-DISPLACEMENTS - (remember to bind off for the armhole as described below). Increase 1 stitch and decrease 1 stitch every 4th row (= every 2nd row from the right side) 12-12-12-15-15-15 times. NOTE! In addition increase 1 extra stitch 4-4-4-5-5-5 times. The rib increases mid-front and the stockinette stitch decreases towards the side. Increase and decrease on each side of 2 stockinette stitches (marker between these 2 stitches); this creates a diagonal line up the shoulder. In addition work the BUTTONHOLES – read description above.

AT THE SAME TIME when the piece measures 46-47-48-49-50-51 cm = 18"-18½"-19"-19¼"-19¾"-20", bind off 2-5-6-8-12-14 stitches from the side for the armhole. When the neck displacements are finished there are 45-46-48-51-52-54 stitches. Continue working until the piece measures 66-68-70-72-74-76 cm = 26"-26¾"-27½"-28⅜"-29⅛"-29½", bind off 18-19-21-20-21-23 stitches from the side = 27-27-27-31-31-31 stitches. Lay the piece to one side.

SLEEVES:
Cast on 45-45-48-48-51-54 stitches with double pointed needles size 4 MM = US 6 and 1 strand of each quality (2 strands). Knit 1 round, then work rib (knit 1, purl 2). When the piece measures 8 cm = 3⅛", change to double pointed needles size 5 MM = US 8. Insert a marker thread at the beginning of the round = mid-under sleeve. Continue with stockinette stitch.
AT THE SAME TIME when the piece measures 11-12-11-12-11-13 cm = 4⅜"-4¾"-4⅜"-4¾"-4⅜"-5⅛", increase 1 stitch on each side of the marker thread – read INCREASE TIP. Increase like this every 4½-3½-3½-3-3-2½ cm = 1⅝"-1¼"-1¼"-1⅛"-1⅛"-1" a total of 10-12-12-13-13-13 times = 65-69-72-74-77-80 stitches. When the sleeve measures 56-54-53-52-49-48 cm = 22"-21¼"-21"-20½"-19¼"-19", continue back and forth for the sleeve cap (from mid-under sleeve) until the sleeve measures 57 cm = 22½" in all sizes (a split of 1-3-4-5-8-9 cm = ⅜"-1⅛"-1½"-2"-3⅛"-3½"). Cast off. Work the other sleeve in the same way.

ASSEMBLY:
Sew the shoulder seams. Sew the sleeve caps to the armholes, then the openings at the bottom of the armholes – see sketch. Sew the side seams, leaving an 8 cm = 3⅛" split at the bottom.

NECK:
Place the 27-27-27-31-31-31 stitches from each front piece on circular needle size 4 MM = US 6 and knit up 37-37-37-45-45-45 stitches along the top of the back piece = 91-91-91-107-107-107 stitches. Work as follows from the wrong side: 7 band stitches in garter stitch, * purl 1, knit 3 *, work from *-* until there are 8 stitches left, purl 1 and 7 band stitches in garter stitch. Work this rib for 8 cm = 3⅛", bind off with knit over knit and purl over purl. Lay the right band over the left band at the bottom of the neck and sew together. Sew the buttons onto the left band.

Diagram

All measurements in charts are in cm.

symbols = Sleeve cap sewn to armhole: a to A and b to B
diagram
diagram

Each of our patterns has specific tutorial videos to help you.

Do you have a question? See a list of frequently asked questions (FAQ)

Knitting tension is what determines the final measurements of your work, and is usually measured per 10 x 10 cm. It is provided like so: number of stitches in width x number of rows in height - eg: 19 stitches x 26 rows = 10 x 10 cm.

The knitting tension is very individual; some people knit/crochet loosely while others work tightly. You adjust the knitting tension with the needle size, which is why the suggested needle size only serve as a guide! You need to adjust this (up or down) to ensure that YOUR knitting tension matches the knitting tension provided in the pattern. If you work with a different knitting tension than provided you will have a different yarn consumption, and your work will have different measurements than what the pattern suggests.

The knitting tension also determines which yarns can replace each other. As long as you achieve the same knitting tension you can replace one yarn with another.

See DROPS lesson: How to measure your tension/gauge

See DROPS video: How to make a gauge tension swatch

The required amount of yarn is provided in grams, eg: 450 g. To calculate how many balls you’ll need you first need to know how many grams are in 1 ball (25g, 50g or 100g). This information is available if you click on the individual yarn quality on our pages. Divide the amount required with the amount of each ball. For example, if each ball is 50g (the most common amount), the calculation will be as follows: 450 / 50 = 9 balls.

The important thing when changing from one yarn to another is that the knitting/crochet tension remains the same. This is so that the measurements of the finished piece will be the same as on the sketch provided. It is easier to achieve the same knitting tension using yarns from the same yarn group. It is also possible to work with multiple strands of a thinner yarn to achieve the knitting tension of a thicker one. Please try our yarn converter. We recommend you to always work a test swatch.

Please NOTE: when changing yarn the garment might have a different look and feel to the garment in the photo, due to individual properties and qualities of each yarn.

See DROPS lesson: Can I use a different yarn than the one mentioned in the pattern?

All our yarns are categorised into yarn groups (from A to F) according to thickness and knitting tension – group A contains the thinnest yarns and group F the thickest. This makes it easier for you to find alternative yarns to our patterns, should you wish to switch yarn. All yarns within the same group have a similar knitting tension and can easily replace each other. However, different yarn qualities have different structures and properties which will give the finished work a unique look and feel.

Click here for an overview of the yarns in each yarn group

At the top of all our patterns you’ll find a link to our yarn converter, which is a helpful tool should you wish to use a different yarn than suggested. By filling in the yarn quality you wish to replace, the amount (in your size) and number of strands, the converter will present good alternative yarns with the same knitting tension. Additionally it will tell you how much you’ll require in the new qualities and whether you’ll need to work with multiple strands. Most skeins are 50g (some are 25g or 100g).

If the pattern is worked with multiple colours, every colour will have to be converted separately. Similarly, if the pattern is worked with several strands of different yarns (for example 1 strand Alpaca and 1 strand Kid-Silk) you will have to find alternatives for each, individually.

Click here to see our yarn converter

Since different yarns have different qualities and textures we have chosen to keep the original yarn in our patterns. However, you can easily find options among our available qualities by using our yarn converter, or simply pick a yarn from the same yarn group.

It is possible that some retailers still have discontinued yarns in stock, or that someone has a few skeins at home that they would like to find patterns for.

The yarn converter will provide both alternative yarn as well as required amount in the new quality.

If you think it's hard to decide what size to make, it can be a good idea to measure a garment you own already and like the size of. Then you can pick the size by comparing those measures with the ones available in the pattern's size chart.

You'll find the size chart at the bottom of the pattern.

See DROPS lesson: How to read size chart

The needle size provided in the pattern serves only as a guide, the important thing is to follow the knitting tension. And since knitting tension is very individual, you will have to adjust the needle size to ensure that YOUR tension is the same as in the pattern – maybe you’ll have to adjust 1, or even 2 needle sizes, up or down to achieve the correct tension. For this, we recommend that you work test swatches.

Should you work with a different knitting tension than the one provided, the measurements of the finished garment might deviate from the measurement sketch.

See DROPS lesson: How to measure your tension/gauge

See DROPS video: How to make a gauge tension swatch

Working a garment top-down provides more flexibility and room for personal adjustment. For example it is easier to try the garment on while working, as well as making adjustments to length of yoke and shoulder caps.

The instructions are carefully explaining every step, in the correct order. Diagrams are adjusted to the knitting direction and are worked as usual.

The diagram depicts all rows/rounds, and every stitch seen from the right side. It is read from bottom to top, from right to left. 1 square = 1 stitch.

When working back and forth, every other row is worked from the right side and every other row is worked from the wrong side. When working from the wrong side, the diagram will have to be worked reversed: from left to right, knit stitches are purled, purl stitches are knit etc.

When working in the round every round is worked from the right side and the diagram are worked from right to left on all rounds.

See DROPS lesson: How to read knitting diagrams

The diagram depicts all rows/rounds, and every stitch seen from the right side. It is worked from bottom to top, from right to left.

When working back and forth every other row is worked from the right side: from right to left and every other row is worked from the wrong side: from left to right.

When working in the round, every row in the diagram are worked from the right side, from right to left.

When working a circular diagram you start in the middle and work your way outwards, counter clockwise, row by row.

The rows usually start with a given number of chain stitches (equivalent to the height of the following stitch), this will either be depicted in the diagram or explained in the pattern.

See DROPS lesson: How to read crochet diagrams

Instructions for working several diagrams after each other on the same row/round, will often be written like so: “work A.1, A.2, A.3 a total of 0-0-2-3-4 times". This means you work A.1 once, then A.2 is worked once, and A.3 is repeated (in width) the number of times provided for your size – in this case like so: S = 0 times, M = 0 times, L=2 times, XL= 3 times and XXL = 4 times.

The diagrams are worked as usual: begin with the first row in A.1, then work the first row in A.2 etc.

See DROPS lesson: How to read knitting diagrams

See DROPS lesson: How to read crochet diagrams

The total width of the garment (from wrist-to-wrist) will be larger in the larger sizes, despite the actual sleeves being shorter. The larger sizes have longer sleeve caps and wider shoulders, so there will be a good fit in all sizes.

The measurement sketch/schematic drawing provides information regarding the full length of the garment. If it’s a jumper or a jacket the length is measured from the highest point on the shoulder (usually closest to the neckline), and straight down to the bottom of the garment. It is NOT measured from the tip of shoulder. Similarly, the length of yoke is measured from the highest point on the shoulder and down to where yoke is split into body and sleeves.

See DROPS lesson: How to read a schematic drawing

Diagrams are often repeated on the round or in height. 1 repeat is the diagram the way it appears in the pattern. If it says to work 5 repeats of A.1 in the round, then you work A.1 a total of 5 times after/next to each other in the round. If it says to work 2 repeats of A.1 vertically/in height you work the entire diagram once, then begin again at the start and work the entire diagram one more time.

Chain stitches are slightly narrower than other stitches and to avoid working the cast-on edge too tight, we simply chain more stitches to begin with. The stitch count will be adjusted on the following row to fit the pattern and measurement sketch.

The rib edge is more elastic and will contract slightly compared to, for example, stocking stitch. By increasing before the rib edge, you avoid a visible difference in width between the rib edge and the rest of the body.

It’s very easy to cast off too tightly, and by making yarn overs while casting off (and simultaneously casting these off) you avoid a too tight cast off edge.

See DROPS video: How to bind off with yarn overs (yo)

To achieve an even increase (or decrease) you can increase on, for example: every 3rd and 4th row alternately, like so: work 2 rows and increase on the 3rd row, work 3 rows and increase on the 4th. Repeat this until the increase is complete.

See DROPS lesson: Increase or decrease 1 st on every 3rd and 4th row alternately

Should you prefer to work in the round instead of back and forth, you may of course adjust the pattern. You’ll need to add steeks mid-front (usually 5 stitches), and follow the instructions. When you would normally turn and work from the wrong side, simply work across the steek and continue in the round. At the end you’ll cut the piece open, pick up stitches to work bands, and cover the cut edges.

See DROPS video: How to knit steeks and cut open

Should you prefer to work back and forth instead of in the round, you may of course adjust the pattern so you work the pieces separately and then assemble them at the end. Divide the stitches for the body in 2, add 1 edge stitch in each side (for sewing) and work the front and back pieces separately.

See DROPS lesson: Can I adapt a pattern for circular needles into straight needles?

Pattern repeats can vary slightly in the different sizes, in order to get the correct proportions. If you’re not working the exact same size as the garment in the photo, yours might deviate slightly. This has been carefully developed and adjusted so that the complete impression of the garment is the same in all sizes.

Make sure to follow instructions and diagrams for your size!

If you have found a pattern you like which is available in women’s size it’s not very difficult to convert it to men’s size. The biggest difference will be the length of sleeves and body. Start working on the women size that you think would fit across the chest. The additional length will be worked right before you cast off for the armhole/sleeve cap. If the pattern is worked top-down you can add the length right after the armhole or before the first decrease on sleeve.

Regarding additional yarn amount, this will depend on how much length you add, but it is better with a skein too many than too few.

All yarns will have excess fibres (from production) that might come off as lint or shedding. Brushed yarns (ie hairier yarns) have more of these loose, excess fibres, causing more shedding.

Shedding also depends on what is worn under or over the garment, and whether this pulls at the yarn fibres. It’s therefore not possible to guarantee that there will be no shedding

Below are some tips on how to get the best result when working with hairier yarns:

1. When the garment is finished (before you wash it) shake it vigorously so the looser hairs come off. NOTE: do NOT use a lint roller, brush or any method that pulls at the yarn.

2. Place the garment in a plastic bag and put it in your freezer - the temperature will cause the fibres to become less attached to each other, and excess fibres will come off easier.

3. Leave in the freezer for a few hours before taking it out and shaking it again.

4. Wash the garment according to the instructions on the yarn label.

Pilling is a natural process that happens to even the most exclusive of fibers. It's a natural sign of wear and tear that is hard to avoid, and that is most visible in high friction areas of your garment like a sweater's arms and cuffs.

You can make your garment look as new by removing the pilling, using a fabric comb or a pill/lint remover.

Still can't find the answer you need? Then scroll down and leave your question so one of our experts can try to help you. This will be done normally within 5 to 10 working days.
In the meantime, you can read the questions and answers that others have left to this pattern or join the DROPS Workshop on Facebook to get help from fellow knitters/crocheters!

You might also like...

Post a comment to pattern DROPS 233-8

We would love to hear what you have to say about this pattern!

If you want to leave a question, please make sure you select the correct category in the form below, to speed up the answering process. Required fields are marked *.

Comments / Questions (23)

country flag Jane Wragg wrote:

Hi can you please clarify Left side, neck displacement NOTE! in addition you increase an extra stitch 4-4-4-5-5-5 times where is this and how please, many thanks, Jane.

24.01.2024 - 14:30

DROPS Design answered:

Dear Mrs Wragg, this increase (without decrease) is explained under row 11 under NECK DISPLACMENTS, this means you will increase exactly as before, but this increase will not be compensated by a decrease and will increase the number of sts on needle. Happy knitting!

25.01.2024 - 08:21

country flag Carole Brenton wrote:

For drops travellers rest pattern why do i need soft tweed AND kids silk yarn. I can't see mention of changing yarn in the pattern.Thanks

19.01.2024 - 20:07

DROPS Design answered:

Hi Carole, DROPS Kid Silk gives the garment special softenes and kind of fluffiness. We do not change yarns while knitting, but knit with both threads at the same time, so whole sweater is knitted with double yarn. Happy knitting!

20.01.2024 - 14:46

country flag Francesconi Isabelle wrote:

Les explications indiquent 4 boutonnières alors que le pull montre 5 boutons. Il manque l'indication de la dernière boutonnière, non ?

02.11.2023 - 00:07

DROPS Design answered:

Bonjour Mme Francesconi, la dernière boutonnière se fait quand le col mesure 6 cm, autrement dit dans la partie COL. Bon tricot!

02.11.2023 - 18:13

country flag Isabelle Francesconi wrote:

Excusez moi, encore une question : devant droit, on tricote jusqu'à ce que l'ouvrage mesure 72 cm. Devant gauche, la où il y a les boutonnières, en xl jusqu'à 73 cm. Est-ce correct ? 1 cm de plus ? Merci encore une fois de votre aide.

27.10.2023 - 12:40

DROPS Design answered:

Bonjour Mme Francesconi, vous tricotez bien les 2 devants jusqu'à 72 cm pour que les épaules aient la même hauteur que le dos, les 2 dernières boutonnières se font sur le col: la 1ère 1 cm après avoir repris les mailles du col et la 2ème quand le col mesure 6 cm. Bon tricot!

28.10.2023 - 08:26

country flag Francesconi Isabelle wrote:

Je commence donc à augmenter ma maille supplémentaire à partir du 11eme rang, je fais donc 2 jetés à la suite ?

25.10.2023 - 10:16

DROPS Design answered:

Bonjour Mme Francesconi, lorsque vous faites le décalage, votre nombre de mailles ne change pas, mais comme vous augmentez d'un côté et diminuez de l'autre, vous décalez les côtes. En revanche, quand vous tricotez le 11ème des 12 rangs, vous augmentez 1 maille comme avant (= 1 seule maile), et vous ne diminuez pas = vous augmentez bien 1 maille. Bon tricot!

25.10.2023 - 15:18

country flag Isabelle Francesconi wrote:

Bonjour, Pour DECALAGE DU COL DEVANT GAUCHE : NOTE : Augmenter 1 maille supplémentaire. Ou l'augmenter ? Après le marqueur ? Après chaque 3ème augm/dim cad pour commencer au 9ème rang ? Merci d'avance pour votre aide.

24.10.2023 - 21:40

DROPS Design answered:

Bonjour Mme Francesconi, toutes les augmentations se font au même niveau, mais pour cette augmentation supplémentaire, on ne fait pas de diminution en même temps (cf rang 11 des 12 rangs à répéter du devant gauche). Bon tricot!

25.10.2023 - 07:42

country flag FRANCESCONI wrote:

Merci pour votre réponse rapide. Mais, on peut adapter dos et devant en circulaire ? (pour éviter les coutures sur le cotés !) J'ai commencé à le faire, j'espère que ça ira....:))

19.10.2023 - 18:37

DROPS Design answered:

Bonjour Mme Francesconi, tout à fait, vous pouvez adapter les explications pour tricoter le bas du pull en rond, il vous suffira alors juste de diviser pour les emmanchures pour terminer chaque partie séparément. Bon tricot!

20.10.2023 - 08:45

country flag Jan Fisher wrote:

Ireland, not UK.

19.10.2023 - 17:24

country flag Jan Fisher wrote:

I would like to knit the Travellers Rest jumper, but I have not used circular needles before. Am I needing 4 sets of circular needles (5mm/40cm and 80cm-4mm/40cm and 80cm)? I prefer to work with bamboo needles, but finding it difficult to source what I need. Any suggestions appreciated.\r\nJan

19.10.2023 - 17:23

country flag FRANCESCONI wrote:

Bonjour, DOS : ...."1 m lisière au point mousse..... Continuer en côtes ainsi en allers et retours pendant 8 cm. " Mais le modèle ne se tricote pas en rond, comme les manches ? Merci d'avance pour votre réponse. Isabelle

19.10.2023 - 14:13

DROPS Design answered:

Bonjour Isabelle, effectivement, le dos et le devant se tricotent en allers et retours sur aiguille circulaire, avec des coutures sur les côtés et aux épaules, on ne tricote que les manches en rond. Bon tricot!

19.10.2023 - 15:59