
Popular categories
Looking for a yarn?


Comments / Questions (58)
![]() Svetlana wrote:
Svetlana wrote:
Мне очень нравится ваш сайт о вязании 👍👍👍
30.03.2026 - 03:04
![]() Lisa wrote:
Lisa wrote:
Så här står det: "När arbetet mäter 18-19-20-21-22-23 cm mätt efter resåren mitt fram, tas markörerna bort......På nästa varv ökas det både FÖRE och EFTER maskorna med markör i – kom ihåg ÖKNINGSTIPS (= 4 maskor ökade). Öka så på varje varv totalt 6 gånger = 190-206-216-232-258-274 maskor. Efter sista ökningen mäter arbetet ca 27-28-29-30-31-32 cm"
19.03.2026 - 13:29DROPS Design answered:
Hej Lisa. Första gången mäter du efter resåren mitt fram och sedan mäster du arbetet totalt från uppläggningskanten mitt fram. "När arbetet mäter 18-19-20-21-22-23 cm mätt efter resåren mitt fram,......Efter sista ökningen mäter arbetet ca 27-28-29-30-31-32 cm från uppläggningskanten mitt fram." Mvh DROPS Design
20.03.2026 - 09:50
![]() Lisa wrote:
Lisa wrote:
Hej. Jag ska nu öka fram och bak på shortsen 6 varv i sträck innan jag delar upp benen i två. På dessa 6 varv ska arbetet öka med 9 cm? Var tänker jag fel? mvh Lisa
13.03.2026 - 11:36DROPS Design answered:
Hej Lisa. Se svar ovan. Mvh DROPS Design
20.03.2026 - 09:51
![]() Esther wrote:
Esther wrote:
Country flag Esther skrev: Oppfølgende spørsmål til et tidligere spørsmål: Hei igjen, hvor mange masker skal jeg strikke tilbake? Hvis jeg følger videoen, er det en maske jeg ikke strikker. I videoen om (hvordan strikke en forhøyning midt bak) strikker en 9 masker av 10. Hvor mange masker skal jeg strikke tilbake når jeg følger oppskriften? Jeg følger M størrelsen. Skal jeg strikke 8 tilbake?
13.02.2026 - 14:34DROPS Design answered:
Hei Esther. Når det står (str M.): Start fra retten ved merket, strikk 9 masker rett, snu arbeidet, stram tråden, Strikk da 9 masker, snu (for at unngå hull tar vi 1.maske løst av når det strikkes tilbake og strammer tråden litt), og så strikkes 8 masker vrang = det er nå "strikket " over 9 masker (løft 1 maske + strikk 8 masker = 9 masker). mvh DROPS Deign
16.02.2026 - 09:04
![]() Esther wrote:
Esther wrote:
Oppfølgende spørsmål til et tidligere spørsmål: Hei igjen, hvor mange masker skal jeg strikke tilbake? Hvis jeg følger videoen, er det en maske jeg ikke strikker.
12.02.2026 - 15:56DROPS Design answered:
Hei Ester. Videoen (Hvordan strikkes en forhøyning midt bak) er en generell video, slik at du må følge maskeantallet i den størrelsen du strikker etter (i videoen løftes den 1. av 10 masker = løft 1 masker, strikk 9 m osv). mvh DROPS Design
13.02.2026 - 07:51
![]() Esther wrote:
Esther wrote:
Heisan, når en skal strikke forhøyning midt bak på shortsen, skal en som det står i oppskriften (snu arbeidet, stram tråden og strikk) eller følge videoinstruksen som er: "snu arbeidet, sett en maske over på den andre pinnen, stram tråden, strikk"? Dersom en følger oppskriften strikker en den ene masken som på videoen viser at den ikke strikkes, men settes over på en andre pinnen. Håper jeg er tydelig, ser frem til svar. :) ;)
11.02.2026 - 16:58DROPS Design answered:
Hej Esther, du må gerne følge videoen, for at undgå et lille hul i overgangen :)
12.02.2026 - 14:33
![]() Carine BATTA wrote:
Carine BATTA wrote:
Bonjour. Je souhaite savoir si les augmentations du short se font sur tous les tours en alternant les augmentations avant marqueurs et celles après marqueur tous les 3 cm ou si elles se font sir 1 tour sur 2?
08.11.2025 - 14:07DROPS Design answered:
Bonjour Carine, les augmentations du short se font en alternant les augmentations avant marqueurs et celles après marqueur tous les 3 cm, c'est-a dire tous les 6-7 tours. Comment le faire: 1er tour: vous augmentez 1 maille avant chaque fil marqueur (6 mailles augmentees). Tours 2-7(8): tricoter toutes les mailles, sans augmenter. Tour 8(9): vous augmentez 1 maille apres chaque fil marqueur (6 mailles augmentees). Tours 10-16: tricoter toutes les mailles, sans augmenter. Etc. Happy knitting!
24.11.2025 - 10:46
![]() Johanna wrote:
Johanna wrote:
Hi, was bedeutet Maschen in der Höhe abnehmen? Vielen Dank für die Hilfe
08.09.2025 - 11:50DROPS Design answered:
Hi Johanna, um welches Kleidungsstück geht es in Ihrer Frage und welche Größe fertigen Sie an?
20.09.2025 - 21:43
![]() Zeynep wrote:
Zeynep wrote:
Hello, I have a question about short legs. Size M says to knit the leg for 5 cm, then increase 35 stitches all in the same round resulting in 144 stitches, then make the ribbing. 144 was the starting stitch count for the waist. In the measurement chart, waist is 42 cm and leg is 32 cm with same count of stitches. How is that possible? And wouldn’t increasing that much in one row flare out the leg ribbing? Thank you!
05.07.2025 - 12:58DROPS Design answered:
Dear Zeynep, you increase to 144 to work the rib, which has a tighter gauge than the stocking stitch section before. It's quite common to adjust the width of the lower rib section by increasing enough stitches to account for the difference in gauge right before starting working in rib. So, in order to keep a similar width in the rib section and the stocking stitch section of the leg, we need to increase the number of stitches to be worked in the rib. Happy knitting!
06.07.2025 - 20:39
![]() Sophie wrote:
Sophie wrote:
I have knitting tension with the 5 mm needle for the shorts. Do I follow the pattern and start with the 4mm needle as mentioned and switch to 5mm as explained in the pattern. Or I start with the 5 mm and switch to a larger needle later in the pattern?
14.06.2025 - 00:14DROPS Design answered:
Dear Sophie, the gauge is calculated for the main pattern, which is worked with the 5mm needles. So you work the rib edges with the smaller needle, 4mm needles and use the 5mm needles for the main pattern afterwards, since they match the gauge needed for the pattern. Happy knitting!
15.06.2025 - 23:12
|
|
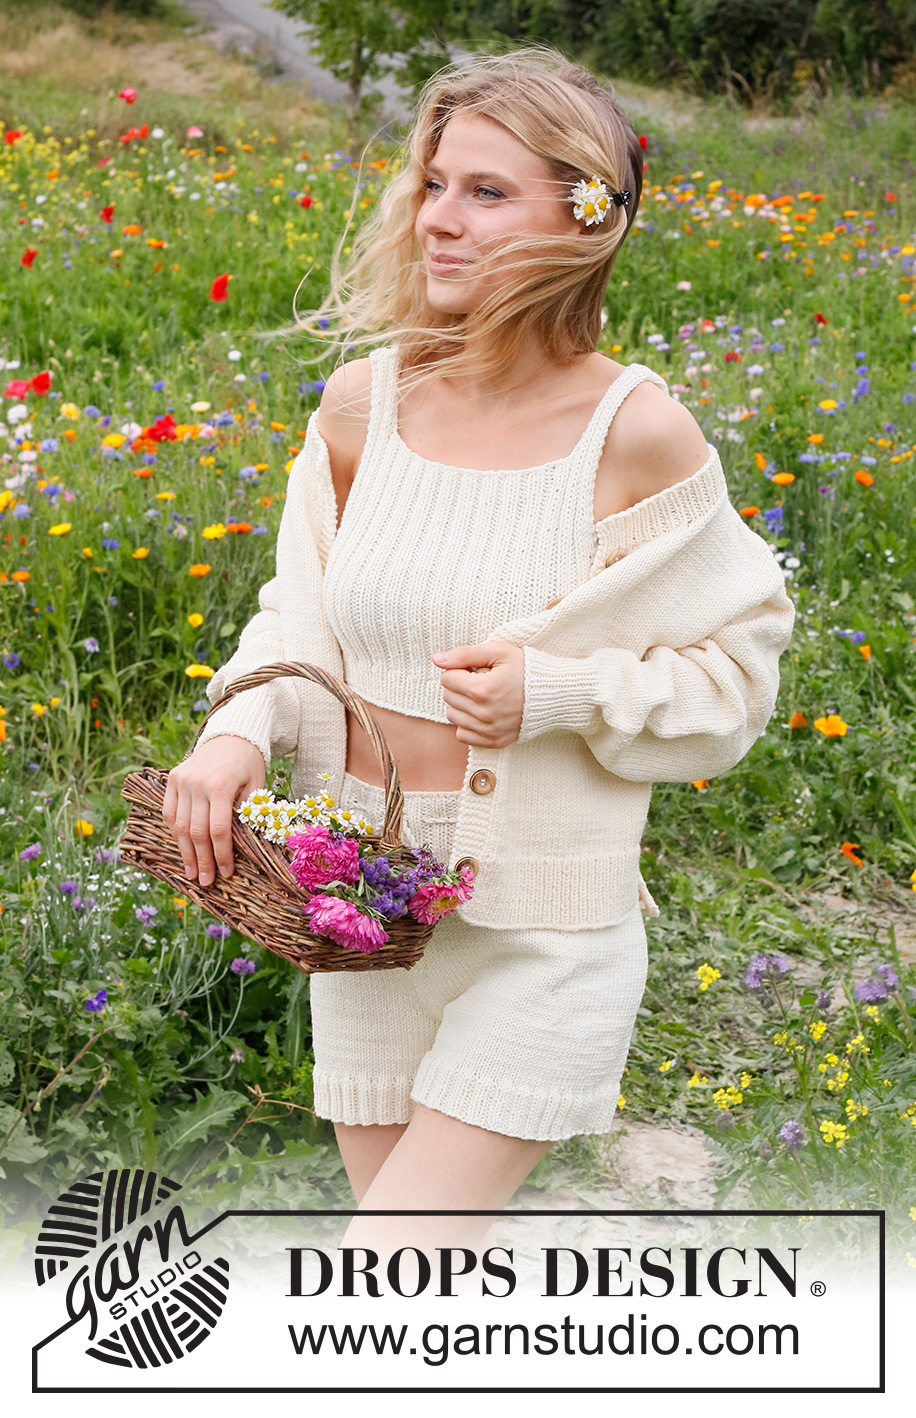
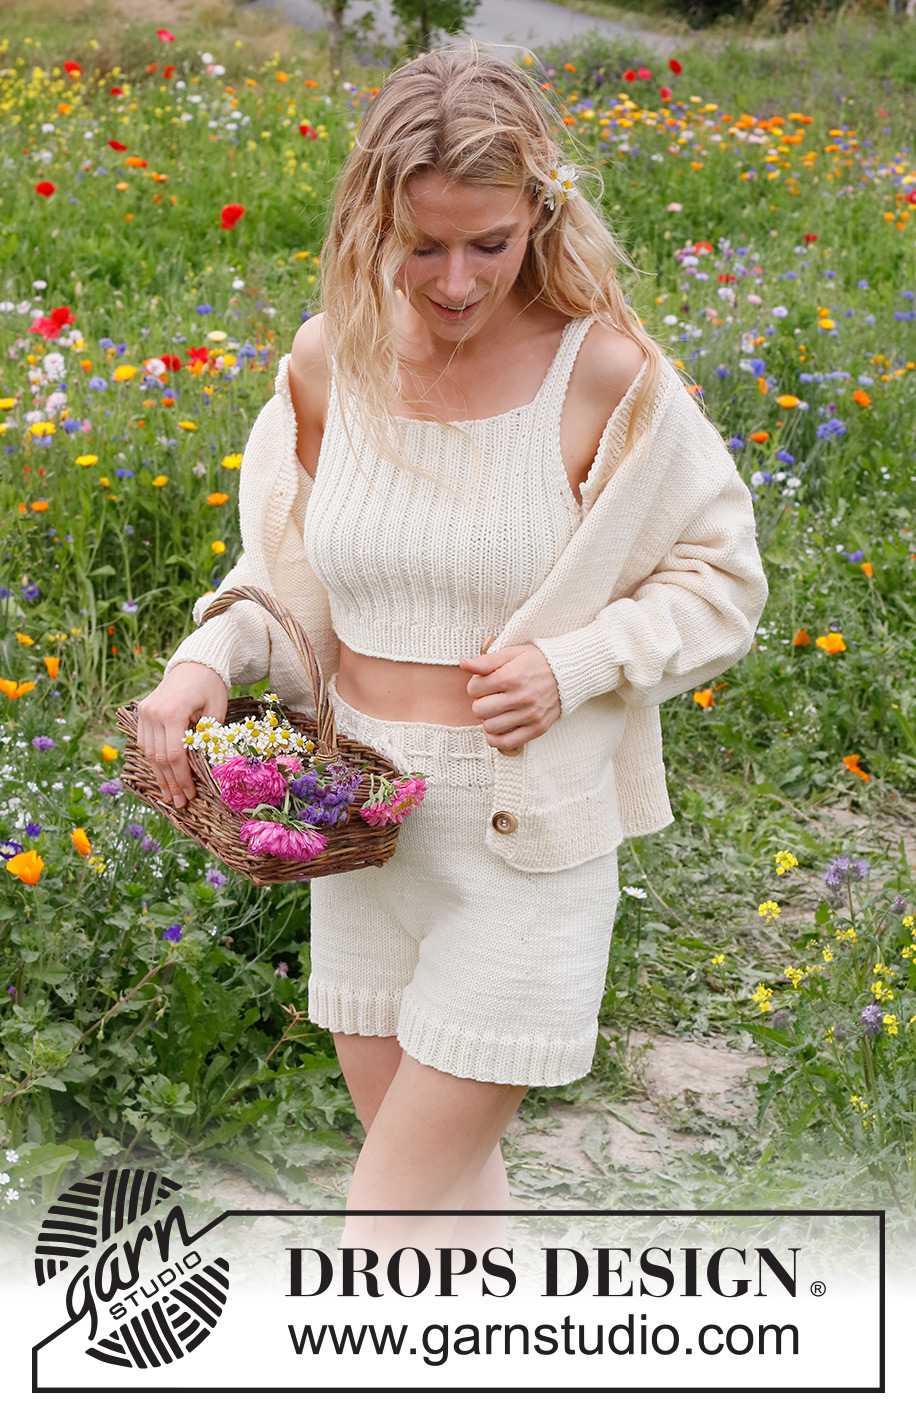
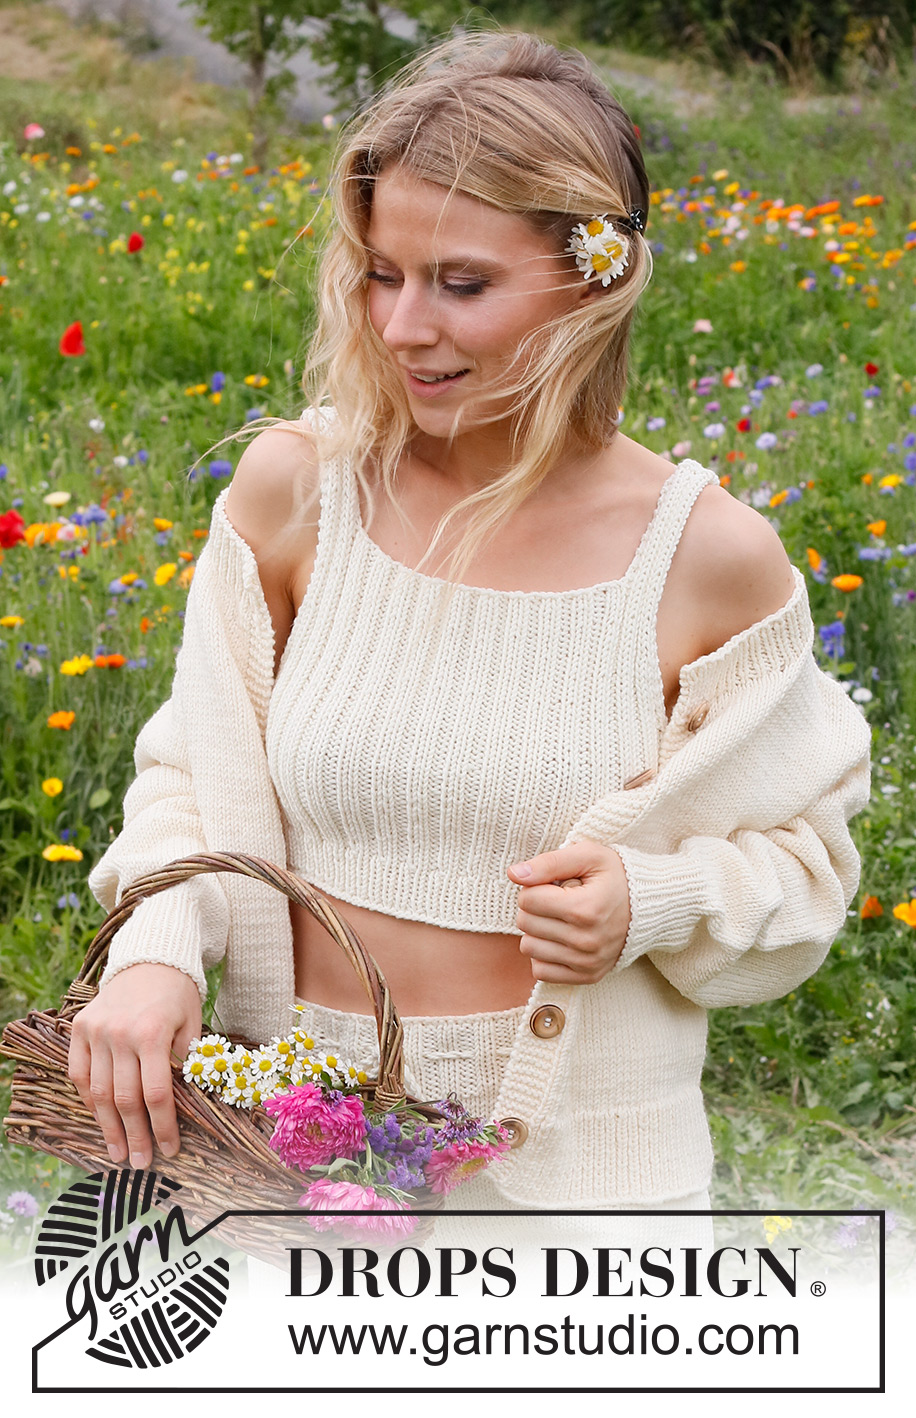
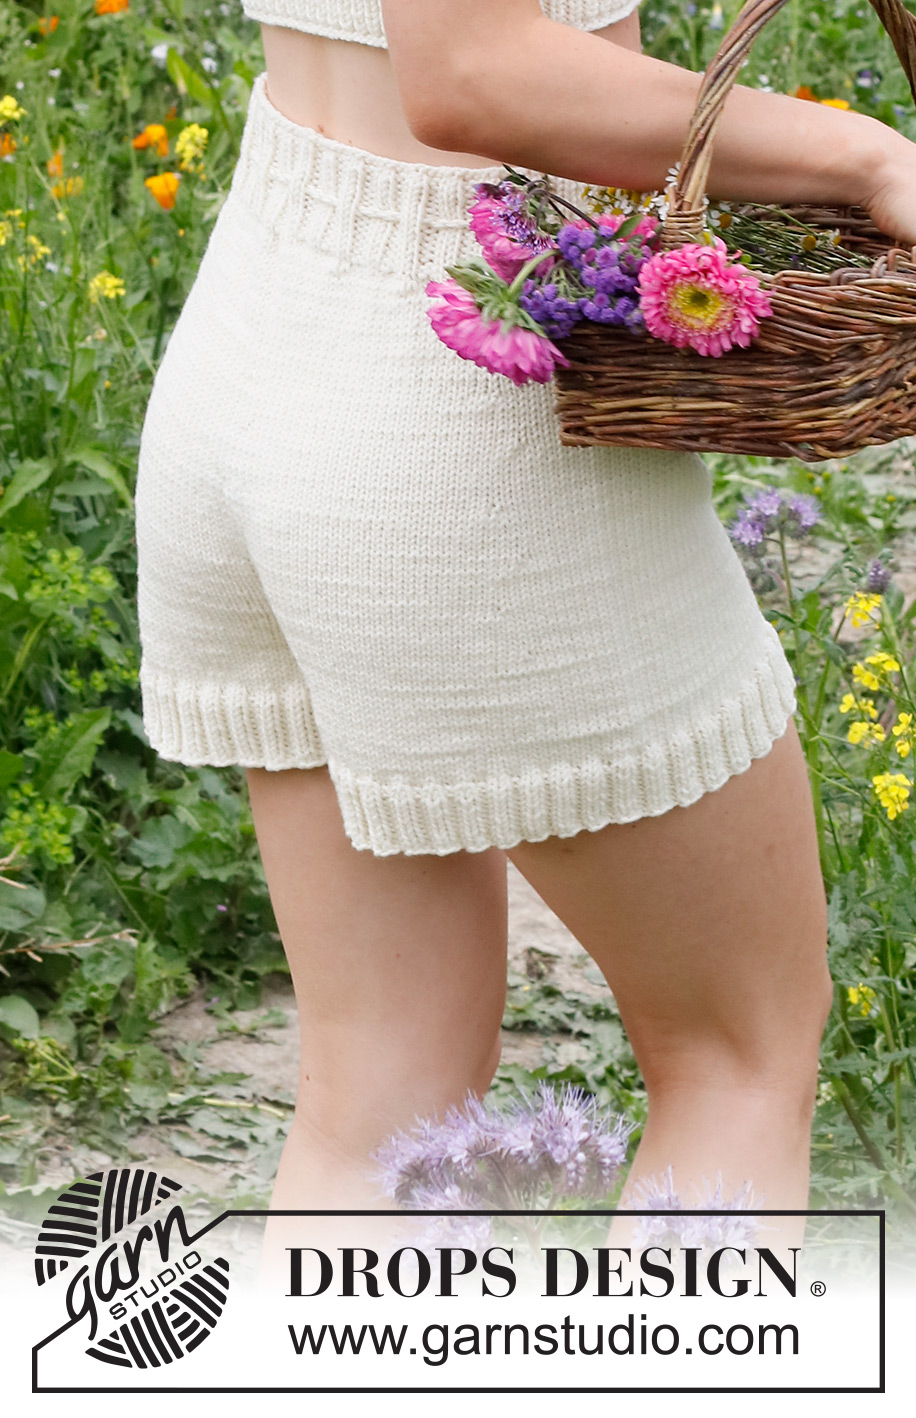
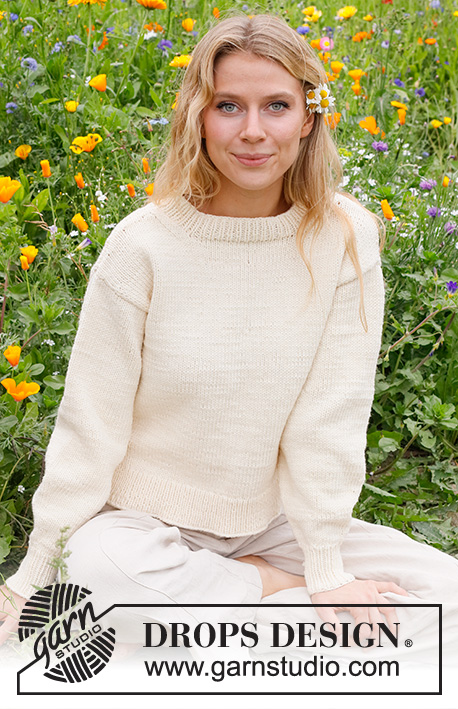
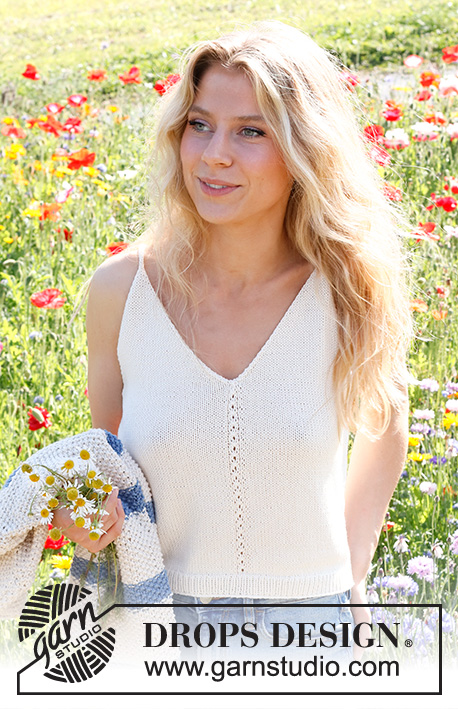
Prairie Rose Set#prairieroseset |
|
 |
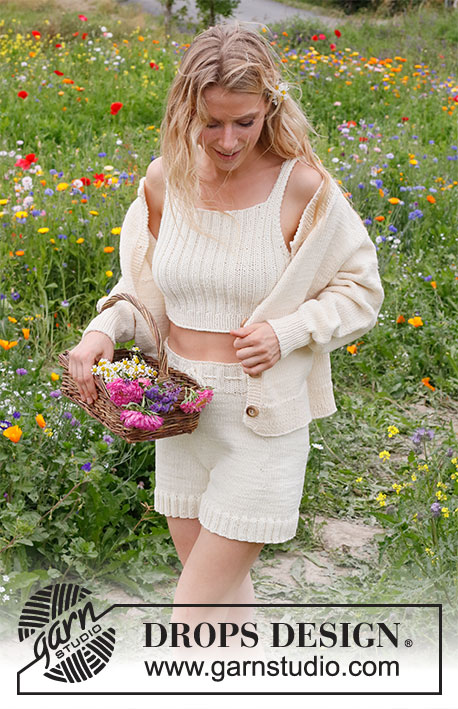 |
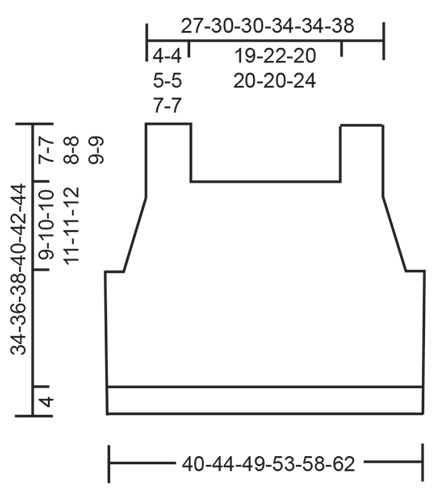
Knitted singlet / crop top and shorts in DROPS Big Merino. Knit the singlet bottom up in rib. Knit the shorts top down in stocking stitch. Size: S - XXXL
DROPS 230-3 |
|
|
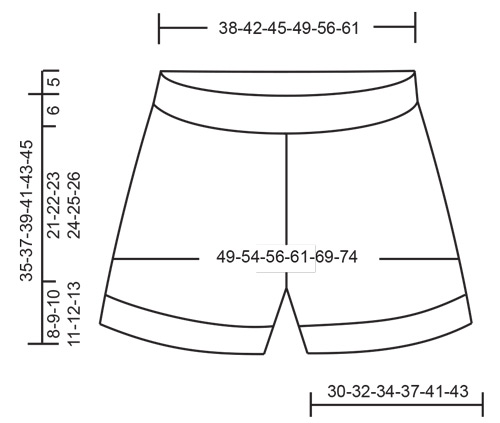
---------------------------------------------------------- EXPLANATION FOR THE PATTERN: ---------------------------------------------------------- GARTER STITCH (worked in the round): 1 ridge vertically = 2 rounds, i.e. knit 1 round and purl 1 round. GARTER STITCH (back and forth): Knit all rows. 1 ridge vertically = knit 2 rows. DECREASE TIP (applies to armholes on singlet): Decrease inside 2 stitches in garter stitch. All decreases are done from the right side! DECREASE AS FOLLOWS AFTER 2 STITCHES IN GARTER STITCH: Slip 1 stitch knitwise, knit 1, pass slipped stitch over stitch worked. DECREASE AS FOLLOWS BEFORE 2 STITCHES IN GARTER STITCH: Work until 2 stitches remain before the 2 stitches in garter stitch, knit 2 together and work 2 stitches in garter stitch. INCREASE TIP (applies to shorts): BEFORE MARKER THREAD: The new stitch is twisted towards the right. Use left needle to pick up yarn between 2 stitches from round below, pick up yarn from the back and knit stitch in front loop of stitch. AFTER MARKER THREAD: The new stitch is twisted towards the left. Use left needle to pick up yarn between 2 stitches from round below, pick up yarn from the front and knit stitch in back loop of stitch. ---------------------------------------------------------- START THE PIECE HERE: ---------------------------------------------------------- SINGLET - SHORT OVERVIEW OF THE PIECE: Work body in the round on circular needle, from the bottom and up to armholes. Then finish front piece and back piece back and forth on circular needle separately until finished measurements. BODY: Cast on 144-160-176-192-208-224 stitches on circular needle size 4 mm with DROPS Big Merino. Knit 1 round. Then work rib as follows: * Purl 1, knit 1 *, repeat from *-* the entire round. When rib measures 4 cm, switch to circular needle size 4.5 mm. Insert 1 marker thread at beginning of round and 1 marker thread after 72-80-88-96-104-112 stitches. Marker threads mark the sides of body – move the marker threads upwards when working. Now work rib as follows: Purl 1, * knit 2, purl 2 *, work from *-* until 3 stitches remain on round, knit 2, and finish with purl 1. Continue rib like this. REMEMBER THE KNITTING TENSION! When piece measures 16-17-18-19-20-21 cm, work 2 ridges in GARTER STITCH – read explanation above, over the middle 10-10-10-18-18-18 stitches in each side (marker threads is in the middle of these 10-10-10-18-18-18 stitches – work the other stitches on row in rib as before). On first round after the 2 ridges, cast off for armholes as follows: Cast off 3-3-3-7-7-7 stitches, work 2 stitches in garter stitch, 62-70-78-78-86-94 stitches in rib as before (begin and end with knit 2), 2 stitches in garter stitch, cast off 6-6-6-14-14-14 stitches (marker thread is in the middle of these 6-6-6-14-14-14 stitches), work 2 stitches in garter stitch, 62-70-78-78-86-94 stitches in rib (begin and end with knit 2), 2 stitches in garter stitch, cast off the last 3-3-3-7-7-7 stitches. Cut the yarn. Finish front and back piece separately. BACK PIECE: = 66-74-82-82-90-98 stitches. Begin from wrong side, and continue rib back and forth with 2 stitches in garter stitch in each side. AT THE SAME TIME on next row from right side, decrease 1 stitch in each side for armholes - read DECREASE TIP. Decrease for armholes like this on every other row 0-0-4-0-3-2 times in total, and then on every 4th row 4-4-4-4-5-6 times in total = 58-66-66-74-74-82 stitches. Continue rib with 2 stitches in garter stitch in each side. When piece measures 27-29-30-32-33-35 cm, cast off for neck as follows: Work the first 10-10-14-14-18-18 stitches as before, and then slip the stitches on a thread for strap, cast off 38-46-38-46-38-46 stitches for neck, and work as before over the last 10-10-14-14-18-18 stitches. Then work straps as explained below. STRAP: = 10-10-14-14-18-18 stitches. Work rib back and forth as before with 2 stitches in garter stitch in each side until piece measures 34-36-38-40-42-44 cm from cast-on edge (strap measures approx. 7-7-8-8-9-9 cm). Cast off. Slip stitches from thread back on circular needle size 4.5 mm , and work strap the same way as first strap. FRONT PIECE: = 66-74-82-82-90-98 stitches. Work the same way as back piece, cast off for neck and work straps the same way as on back piece. ASSEMBLY: Sew straps together inside cast-off edge at the top of each shoulder. ---------------------------------------------------------- SHORTS - SHORT OVERVIEW OF THE PIECE: Worked in the round on circular needle from mid back, top down. To make the shorts higher mid back work an elevation. Then continue piece in the round before dividing for legs. Work each leg in the round on circular needle, top down. Twine a string at the end for edge with eyelet holes in the waist. EDGE: Cast on 128-144-152-168-192-208 stitches on circular needle size 4 mm with DROPS Big Merino. Knit 1 round. Then work rib as follows: Knit 1, * purl 2, knit 2 *, work from *-* until 3 stitches remain on round, purl 2, and finish with knit 1. When rib measures 3 cm, work a round with eyelet holes for tie as follows: Knit 1, * make 1 yarn over, purl 2 together, knit 2 *, work from *-* until 3 stitches remain on round, make 1 yarn over, purl 2 together, and finish with knit 1. Continue rib = knit 2/purl 2 until edge measures 6 cm from cast-on edge. Knit 1 round while increasing 2-2-4-4-6-6 stitches evenly = 130-146-156-172-198-214 stitches. Then work shorts as explained below. SHORTS: Switch to circular needle size 5 mm. Insert 1 marker at beginning of round = mid back. Work elevation as follows: Begin from right side at the marker, knit 8-9-10-11-12-13, turn piece, tighten yarn, purl 16-18-20-22-24-26, turn piece, tighten yarn, knit 24-27-30-33-36-39, turn piece, tighten yarn, purl 32-36-40-44-48-52. Continue back and forth like this by working 8-9-10-11-12-13 stitches more on every turn until 96-108-120-132-144-156 stitches in total have been worked back and forth (do not work over the middle 34-38-36-40-54-58 stitches mid front). When elevation is done, knit until mid back. Shorts now measures approx. 5 cm vertically mid back. Insert 6 marker threads in piece as explained below. Use marker threads when increasing and insert every marker thread between 2 stitches. Replace the marker mid back with a marker thread, count 24-27-29-32-38-41 stitches, insert 1 marker thread before next stitch, count 17-19-20-22-23-25 stitches (in the side on shorts), insert 1 marker thread before next stitch, count 24-27-29-32-38-41 stitches, insert 1 marker thread before next stitch (mid front), count 24-27-29-32-38-41 stitches, insert 1 marker thread before next stitch, count 17-19-20-22-23-25 stitches (in the side on shorts), insert 1 marker thread before next stitch, 24-27-29-32-38-41 stitches remain on round after last marker thread. Work in stocking stitch in the round. When piece measures 2-3-3-3-3-4 cm measured after rib mid front, increase 1 stitch BEFORE every marker thread - read INCREASE TIP (= 6 stitches increased) - NOTE: To avoid moving the marker thread mid back do the increase before this marker thread at the end of round. When piece measures 5-6-6-6-6-7 cm measured after rib mid front, increase 1 stitch AFTER every marker thread- remember INCREASE TIP (= 6 stitches increased). Increase alternately before and after the 6 marker threads every 3 cm 6 times in total = 166-182-192-208-234-250 stitches (remember that the increase before marker thread mid back is done at the end of round). When piece measures 18-19-20-21-22-23 cm measured after rib mid front, remove the marker threads. Now insert 1 marker in first stitch on round, and 1 marker in the 84th-92nd-97th-105th-118th-126th stitch on round (mid back and mid front). On next round increase both BEFORE and AFTER stitches with markers - remember INCREASE TIP (= 4 stitches increased). Increase like this on EVERY round 6 times in total = 190-206-216-232-258-274 stitches. After last increase piece measures approx. 27-28-29-30-31-32 cm from cast-on edge mid front. Now divide the piece at both markers and finish each leg separately. Slip the first 95-103-108-116-129-137 stitches on short circular needle size 5 mm and leave the remaining 95-103-108-116-129-137 stitches on circular needle size 5 mm. Cut the yarn. LEG: = 95-103-108-116-129-137 stitches. Cast on 3-3-4-4-5-5 stitches at the beginning of row, work in stocking stitch over the 95-103-108-116-129-137 stitches, and cast on 3-3-4-4-5-5 stitches at the end of row = 101-109-116-124-139-147 stitches. Slip the piece together, and work in stocking stitch in the round until piece measures 4-5-6-7-8-9 cm, or desired length. Knit 1 round while increasing 31-35-36-36-41-45 stitches evenly = 132-144-152-160-180-192 stitches. Switch to a short circular needle size 4 mm. Work rib in the round = knit 2/purl 2 for 4 cm. Loosely cast off. Leg measures approx. 8-9-10-11-12-13 Slip stitches from the other leg on a short circular needle size 5 mm and work the same way as first leg. ASSEMBLY: Sew opening between legs, i.e. sew seam along mid front to mid back in the 6-6-8-8-10-10 stitches cast on in each side on each leg. TWINED STRING: Cut 3 strands Big Merino of 3½-3½-4½-4½-5½-5½ metres each, twine the strands together until they resist, fold the string double so that it twines again. Make a knot at each end. Begin mid front on shorts and thread tie up and down through eyelet row on edge. |
|
 |
|
 |
|
Have you finished this pattern?Tag your pictures with #dropspattern #prairieroseset or submit them to the #dropsfan gallery. Do you need help with this pattern?You'll find 31 tutorial videos, a Comments/Questions area and more by visiting the pattern on garnstudio.com. © 1982-2026 DROPS Design A/S. We reserve all rights. This document, including all its sub-sections, has copyrights. Read more about what you can do with our patterns at the bottom of each pattern on our site. |
|


With over 40 years in knitting and crochet design, DROPS Design offers one of the most extensive collections of free patterns on the internet - translated to 17 languages. As of today we count 324 catalogues and 12290 patterns translated into English (UK/cm). 12290
We work hard to bring you the best knitting and crochet have to offer, inspiration and advice as well as great quality yarns at incredible prices! Would you like to use our patterns for other than personal use? You can read what you are allowed to do in the Copyright text at the bottom of all our patterns. Happy crafting!
Post a comment to pattern DROPS 230-3
We would love to hear what you have to say about this pattern!
If you want to leave a question, please make sure you select the correct category in the form below, to speed up the answering process. Required fields are marked *.