
Popular categories
Looking for a yarn?


Comments / Questions (93)
![]() Rosa wrote:
Rosa wrote:
Hola de nuevo. La pregunta es : donde empieza el ranglan ; nada más terminar los 4cm del cuello ? Y como reparto los 120 p. entre delantero , espalda y ambas mangas ? Muchísimas gracias por vuestra ayuda. Un saludo.
21.01.2025 - 12:52DROPS Design answered:
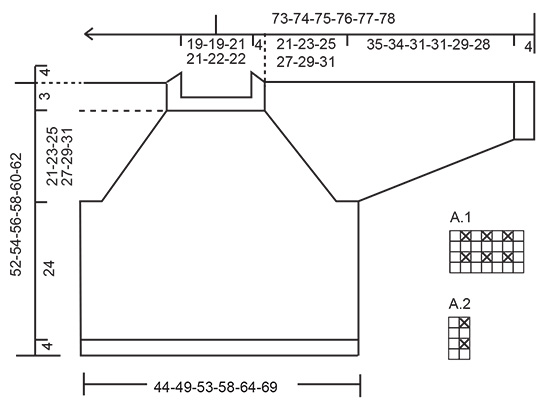
Hola Rosa, los aumentos para el raglán comienzan en el inicio del canesú, después de terminar los 4cm del cuello. Trabajas una vuelta según el patrón, incorporando las rayas y los diagramas; en la siguiente vuelta comienzas con los aumentos. A.1 es la línea del raglán y está en la transición entre cada sección del cuerpo (delantero y espalda) y las mangas. La vuelta comienza en la transición entre la espalda y la manga derecha: A.1 (línea del raglán), 9 pts de A.2 (manga derecha), A.1 (línea del raglán), 37 pts de A.2 (delantero), A.1 (línea del raglán), 9 pts de A.2 (manga izquierda), A.1 (línea del raglán), 37 pts de A.2 (espalda).
25.01.2025 - 17:21
![]() Rosa wrote:
Rosa wrote:
Hola . No entiendo como se aumenta el ranglan . Veo que se empieza a aumentar al terminar el escote . Pregunto : un punto a cada lado del diagrama A-1 /A-2 ?? Gracias por favor contestar. Un saludo
18.01.2025 - 21:58DROPS Design answered:
Hola Rosa, los aumentos para el RAGLÁN se indican en las explicaciones para realizar la labor, antes de empezar con las instrucciones del jersey: Aumentar 1 punto a cada lado de los 7 puntos (= A.1) en cada transición entre el cuerpo y las mangas (= 8 puntos aumentados en la vuelta). Aumentar 1 punto haciendo 1 hebra. En la siguiente vuelta trabajar las hebras retorcidas para evitar que se formen agujeros. Después trabajar los nuevos puntos en el patrón A.2. A.1 es la línea del raglán, por lo que aumentas a cada lado de él. A.2 es el patrón general del canesú, por lo que los puntos aumentados se trabajan dentro de A.2 después.
19.01.2025 - 19:59
![]() Rosa wrote:
Rosa wrote:
Hola , pregunto para una talla M ;cuantos ovillos de cada color necesito . Gracias
15.01.2025 - 12:59DROPS Design answered:
Hola Rosa, si seleccionas la talla M en la sección de materiales te indicarán cuántos gramos necesitas de cada color: 300g del color principal (07) y 150g del color secundario (12). Cada ovillo son 50g, así que divide la cantidad deseada entre 50g para saber la cantidad de ovillos necesaria. Por ejemplo necesitas 6 (300/50)ovillos de DROPS Nord 07 y 3 (150/50) ovillos de DROPS Nord 12.
19.01.2025 - 13:14
![]() Van Hooff wrote:
Van Hooff wrote:
Dus even makkelijk: de verdeling bij 128 steken is 7 (raglan) 9 mouw, 7 raglan, 41 voorpand, 7 raglan, 9, mouw, 7 raglan, 41 achterpand.
25.11.2024 - 12:15
![]() Elke Sturm wrote:
Elke Sturm wrote:
Wo ist der Rundenbeginn bei der Passe? Ich weiß nicht wo ich A1 beginnen soll?
21.10.2024 - 14:19DROPS Design answered:
Liebe Frau Sturm, der Rundbeginn ist am Übergang zwischen Rückenteil und den rechten Ärmel, dh die Runden beginnen mit A.1 = Raglanmaschen. Diagramme stricken Sie von unten nach oben und rechts nach links bei jeder Runde. Viel Spaß beim Stricken!
21.10.2024 - 16:01
![]() Paki Marín Ortega wrote:
Paki Marín Ortega wrote:
Buen día. No comprendo muy bien como seguir los gráficos A1yA2 una vez hecha la separación de ranglan?.Me podían ayudar? Muchas gracias
16.10.2024 - 14:25DROPS Design answered:
Hola Paki, A.2 es simplemente un fragmento de A.1; trabajar A.2 es como trabajar A.1, pero comenzando con una fila de derecho en vez de una fila del patrón. Tal y como se indica, en el cuerpo trabajas simplemente A.2 toda la vuelta, no continúas con A.1. Lo mismo con las mangas: A.1 se usaba para marcar las líneas del raglán, pero ya no hacen falta, así que sigue con A.2.
20.10.2024 - 20:59
![]() Paki Marín Ortega wrote:
Paki Marín Ortega wrote:
Buenos días. No comprendo muy bien como debería seguir el gráfico A1 y el A2 después de hacer las separaciones de ranglan. Me podrían ayudar , gracias
16.10.2024 - 14:22DROPS Design answered:
Hola Paki, A.2 es simplemente un fragmento de A.1; trabajar A.2 es como trabajar A.1, pero comenzando con una fila de derecho en vez de una fila del patrón. Tal y como se indica, en el cuerpo trabajas simplemente A.2 toda la vuelta, no continúas con A.1. Lo mismo con las mangas: A.1 se usaba para marcar las líneas del raglán, pero ya no hacen falta, así que sigue con A.2.
20.10.2024 - 20:58
![]() Tuulia wrote:
Tuulia wrote:
Hei, teen paitaa koossa L ja olen neulonut pääntien reunuksen ja laittanut merkin 44s päähän kerroksen vaihtumiskohdasta. En ymmärrä kerroksen vaihtumiskohdan vaihtumista tai sitä, missä vaiheessa minun pitäisi aloittaa raglanlisäykset. Olen konekääntänyt aikaisempia kysymyksiä ja vastauksia ja katsonut videoita, enkä siltikään ymmärrä. Teenkö ensimmäiset lisäykset heti ensimmäisellä kierroksella, kun neulotaan koko kerros oikein?
07.10.2024 - 11:29DROPS Design answered:
Hei, raglanlisäykset alkavat kaarrokkeen toisella kerroksella, eli kerroksella, jossa neulotaan vuorotellen oikeaa ja nurjaa.
09.10.2024 - 19:27
![]() Thea Parren wrote:
Thea Parren wrote:
Ik heb 136 steken. Dan moet ik 9 steken breien, 45 , 9 , 45.= 108 totaal. Die 9 steken zijn voor de raglanmouw? In de beschrijving staat 7 steken? Waar in de trui komen de steken die ik over heb 136-108= 28? Hartelijk dank.
04.09.2024 - 07:48
![]() Bente S Søreng wrote:
Bente S Søreng wrote:
Vanskelig å forstå dette mønsteret, da det står at bærestk. skal strikkes 9 m A1 og A2 , 37 m A1 og A2, 9 m A1 og A2 og 37 m A1 og A2, hva med di siste 28 maskene på omgangen? Og hvorfor foregår ikke økningene på di omg. som har bare rettmasker? Mvh. Bente
23.08.2024 - 22:35DROPS Design answered:
Hei Bente. Du skal strikke A.1 (= 7 m), deretter skal du strikke A.2 over 9 masker = 1.erme (A.2 består av 2 m og ved å strikke A.2 over 9 m starter og slutter A.2 likt). Så skal du strikke A.1 igjen (A.1 = mønstret som strikkes i raglanlinjene = 4 steder på genseren). Deretter strikker du A.2 over det maskeantallet det er i den str. du strikker etter, 37-37-41-41-45 eller 45 masker = forstykket). Så A.1 igjen, deretter A.2 over 9 m (= 2.erme) og så A.1 over 9 m. Deretter A.2 over 37-37-41-41-45-45 m (=bakstykket). Om du ønsker å øke på omganger med bare rettmasker, gjør det, bare pass på at du får med deg alle økeomgangene. mvh DROPS Design
26.08.2024 - 12:04
|
|||||||
Desert Mirage#desertmiragesweater |
|||||||
 |
 |
||||||
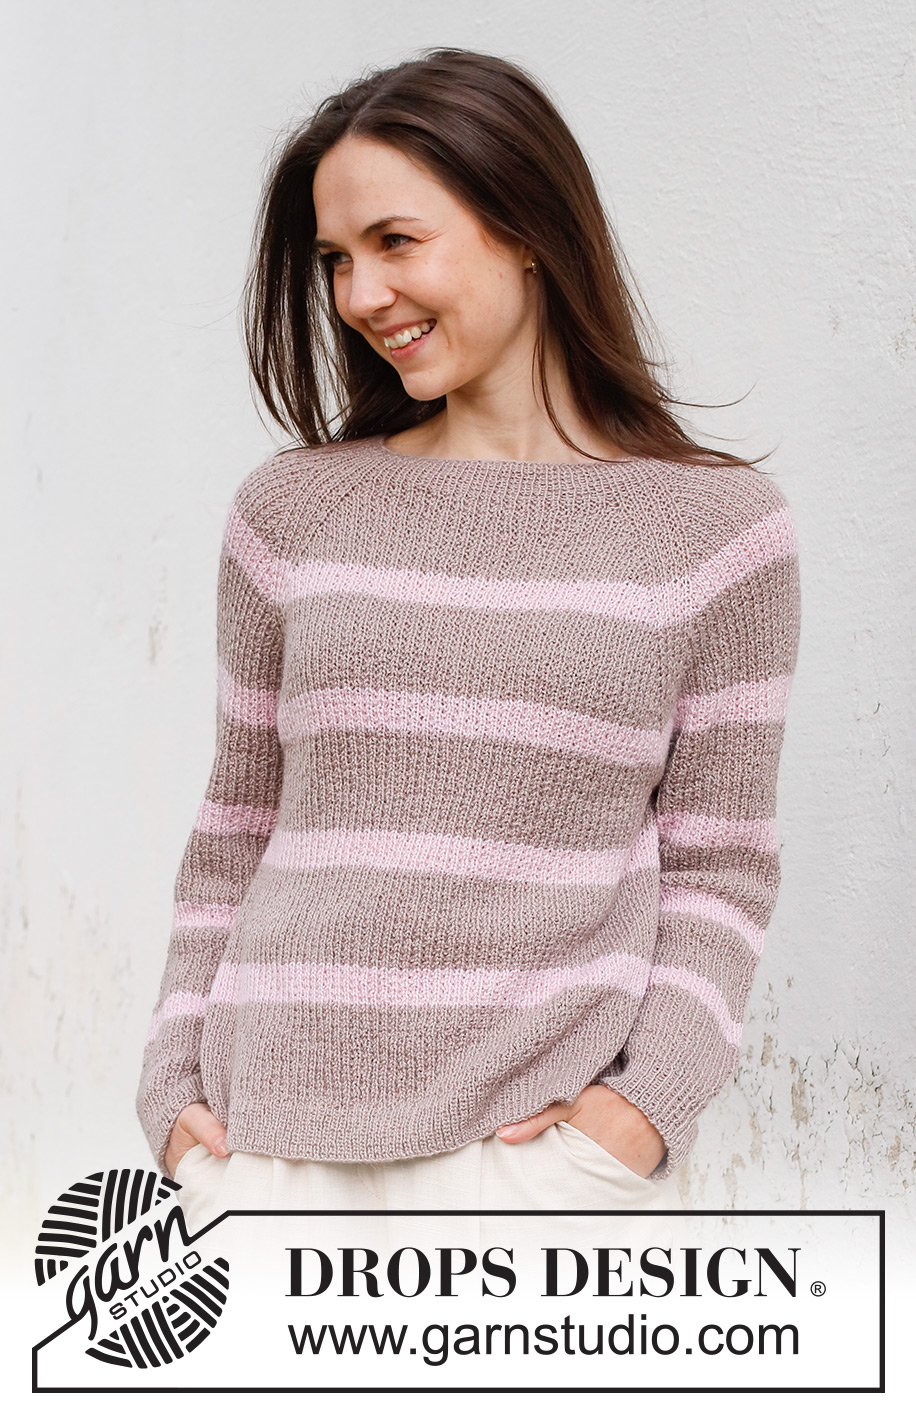
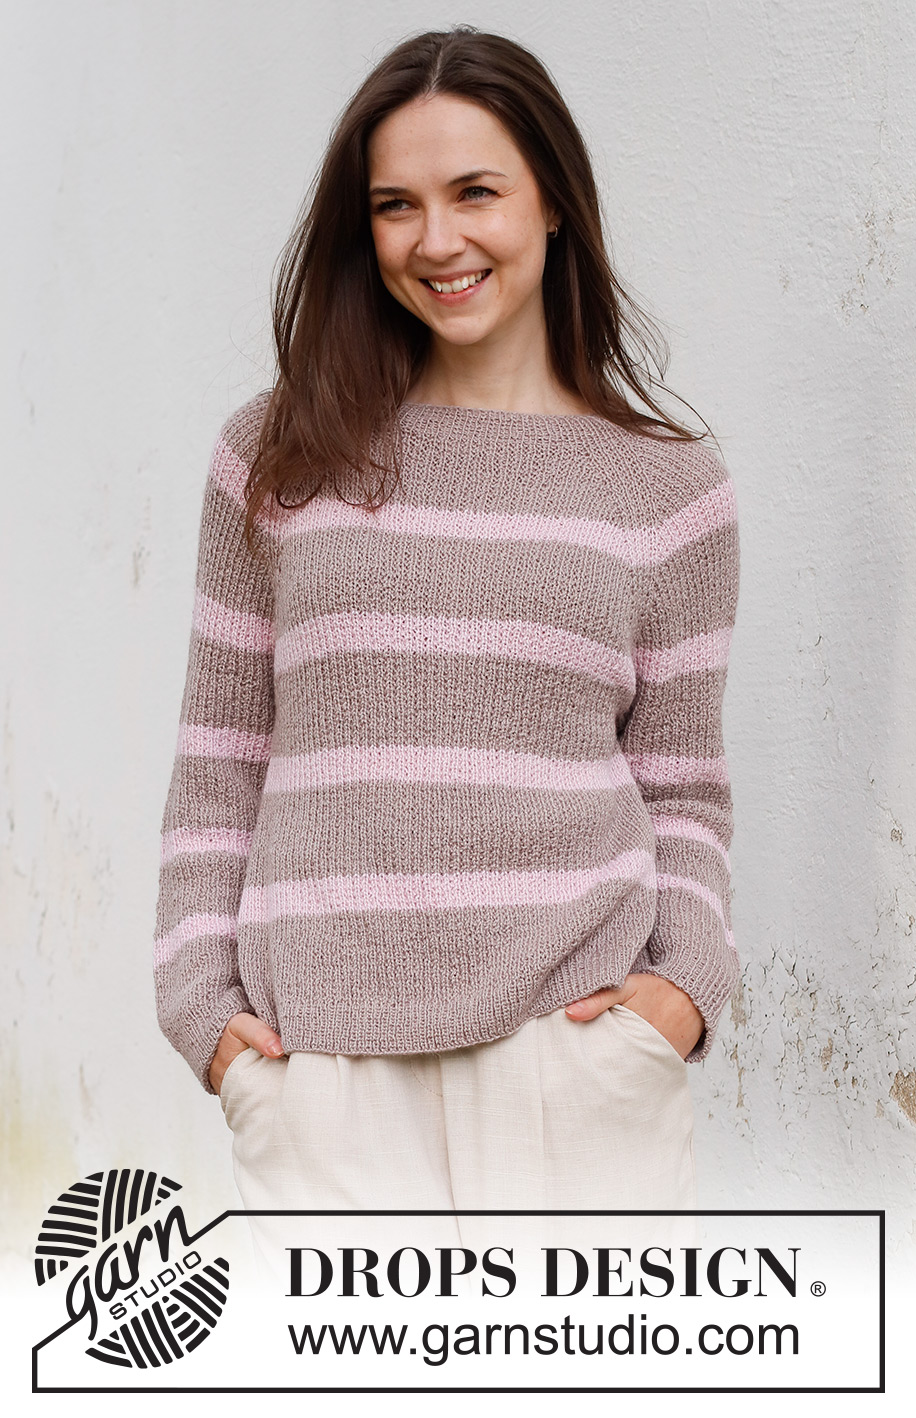
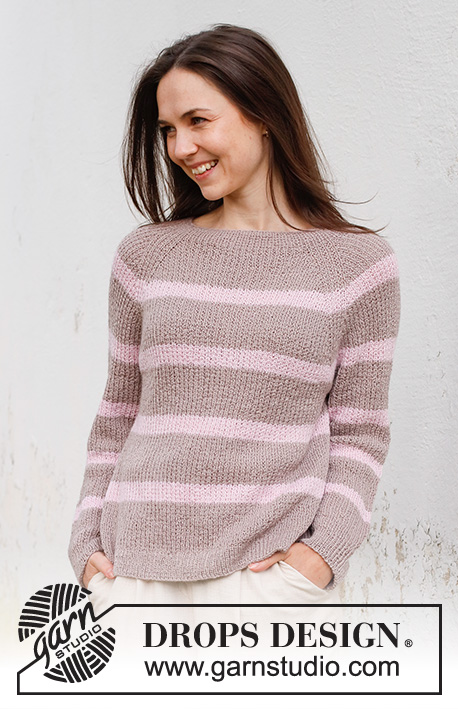
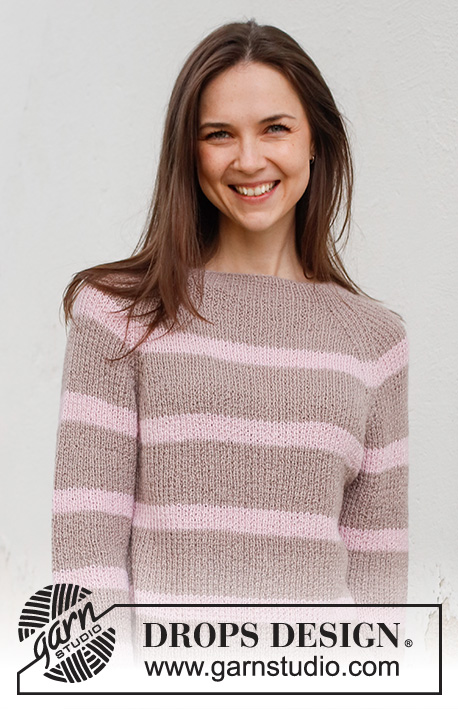
Knitted jumper in DROPS Nord with raglan. Piece is knitted top down with broken rib and stripes. Size: S - XXXL
DROPS 232-16 |
|||||||
|
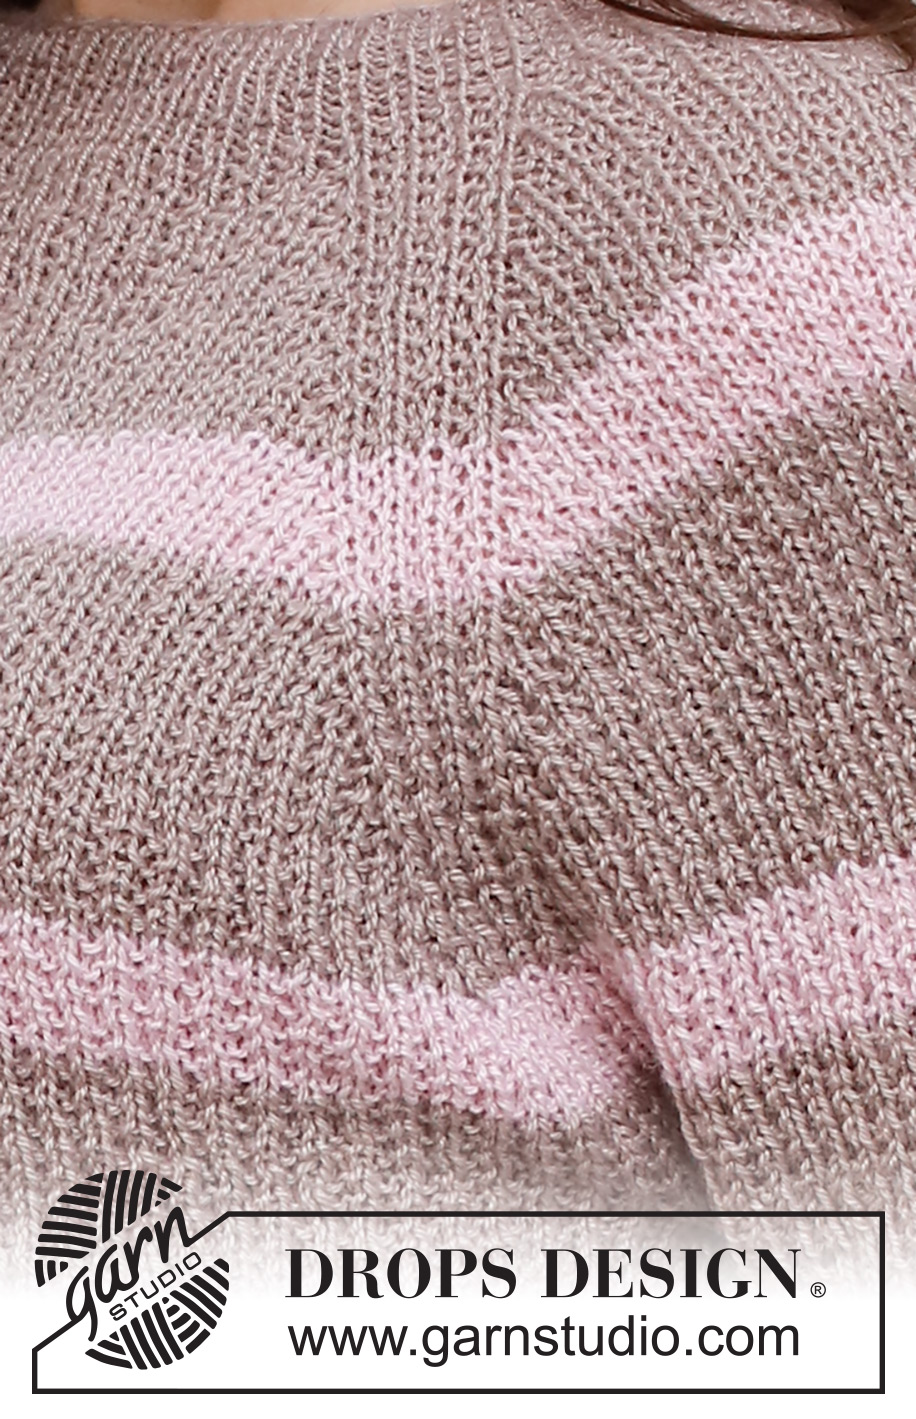
---------------------------------------------------------- EXPLANATION FOR THE PATTERN: ---------------------------------------------------------- PATTERN: See diagrams A.1 and A.2. STRIPES: * Work 7-7-7-8-8-8 cm with colour light beige, work 3 cm with colour powder pink *, work from *-*. RAGLAN: Increase 1 stitch in each side of 7 stitches (= A.1) in every transition between body and sleeves (= 8 stitches increased on round). Increase 1 stitch by making 1 yarn over. On next round work yarn overs twisted to avoid holes. Then work the new stitches in pattern A.2. DECREASE TIP (applies to sleeves): Decrease 1 stitch on each side of marker thread as follows: Work until 3 stitches remain before marker thread and knit 2 together, knit 2 (marker thread is between these 2 stitches), slip 1 stitch knitwise, knit 1, pass slipped stitch over stitch worked. ---------------------------------------------------------- START THE PIECE HERE: ---------------------------------------------------------- JUMPER - SHORT OVERVIEW OF THE PIECE: Neck edge and yoke are worked in the round on circular needle, top down. Now divide yoke for body and sleeves. Work the body in the round on circular needle. Work sleeves in the round on double pointed needles/a short circular needle. NECK EDGE: Cast on 120-120-128-128-136-136 stitches on circular needle size 2.5 mm with colour light beige in DROPS Nord. Knit 1 round. Then work rib (knit 1/purl 1). Work until rib measures 4 cm. Insert 1 marker after approx. 41-41-44-44-46-46 stitches (approx. mid front). Measure yoke from this marker. Work STRIPES - see explanation above. The 4 cm in the neck edge are not counted with the stripes (i.e. work 11-11-11-12-12-12 cm in total with colour light beige before first stripe with colour powder pink). YOKE: The beginning of round is in transition between back piece and right sleeve. Switch to circular needle size 3 mm, and work as follows: A.1, A.2 over the next 9 stitches, A.1, A.2 over the next 37-37-41-41-45-45 stitches, A.1, A.2 over the next 9 stitches, A.1, A.2 over the next 37-37-41-41-45-45 stitches. Continue this pattern, on next round begin increase for RAGLAN – read explanation above (8 stitches increased). Increase like this every other round 26-32-34-40-44-50 times in total = 328-376-400-448-488-536 stitches. REMEMBER THE KNITTING TENSION! Work without increase until piece measures 21-23-25-27-29-31 cm from marker thread. Now divide yoke for body and sleeves: Work the first 4 stitches (back piece), slip the next 67-79-83-95-103-115 stitches on a thread for sleeve and cast on 9-9-11-11-13-13 new stitches on needle (in the side under sleeve), work the next 97-109-117-129-141-153 stitches (front piece), slip the next 67-79-83-95-103-115 stitches on a thread for sleeve and cast on 9-9-11-11-13-13 new stitches on needle (in the side under sleeve), work the next 93-105-113-125-137-149 stitches (back piece). BODY: = 212-236-256-280-308-332 stitches. Work A.2 in the round. Continue with stripes when 4 stripes have been worked in total with colour powder pink, finish the piece with colour light beige. Work until piece measures 24 cm from division. 4 cm remain until finished measurements. Knit 1 round while increasing 46-50-54-58-64-70 stitches evenly = 258-286-310-338-372-402 stitches. Switch to circular needle size 2.5 mm. Work rib (= knit 1/purl 1). Continue rib like this for 4 cm. Cast off. Jumper measures approx. 52-54-56-58-60-62 cm from shoulder and down. SLEEVE: Slip the 67-79-83-95-103-115 stitches from thread in one side of piece back on a short circular needle/double pointed needles size 3 mm, and pick in addition up 1 stitch in each of the 9-9-11-11-13-13 stitches cast on under sleeve = 76-88-94-106-116-128 stitches. Insert a marker thread in the middle of the new stitches. Work pattern as before and continue with stripes. When 5 stripes have been worked in total with colour powder pink, finish the piece with colour light beige. AT THE SAME TIME when piece measures 3-3-3-2-2-3 cm, decrease 2 stitches under sleeve - READ DECREASE TIP. Decrease like this approx. every 6-3-2½-2-1½-1 cm 6-10-10-14-18-22 times in total = 64-68-74-78-80-84 stitches. Continue until piece measures 35-34-31-31-29-28 cm from division. Switch to double pointed needles size 2.5 mm. Work rib (knit 1/purl 1) for 4 cm. Cast off. Sleeve measures approx. 39-38-35-35-33-32 cm from division. Work the other sleeve the same way. |
|||||||
Diagram explanations |
|||||||
|
|||||||
 |
|||||||
Have you finished this pattern?Tag your pictures with #dropspattern #desertmiragesweater or submit them to the #dropsfan gallery. Do you need help with this pattern?You'll find 29 tutorial videos, a Comments/Questions area and more by visiting the pattern on garnstudio.com. © 1982-2026 DROPS Design A/S. We reserve all rights. This document, including all its sub-sections, has copyrights. Read more about what you can do with our patterns at the bottom of each pattern on our site. |
|||||||


With over 40 years in knitting and crochet design, DROPS Design offers one of the most extensive collections of free patterns on the internet - translated to 17 languages. As of today we count 324 catalogues and 12290 patterns translated into English (UK/cm). 12290
We work hard to bring you the best knitting and crochet have to offer, inspiration and advice as well as great quality yarns at incredible prices! Would you like to use our patterns for other than personal use? You can read what you are allowed to do in the Copyright text at the bottom of all our patterns. Happy crafting!
Post a comment to pattern DROPS 232-16
We would love to hear what you have to say about this pattern!
If you want to leave a question, please make sure you select the correct category in the form below, to speed up the answering process. Required fields are marked *.