
Popular categories
Looking for a yarn?


Comments / Questions (135)
![]() Ellen wrote:
Ellen wrote:
Hej, Jag förstår inte beskrivningen på axelbanden. Står bara att sticka rät från rätsidan, men hur ska jag sticka på avigsidan? Och varför betonas det att man ska "strama åt"?
15.05.2024 - 20:49DROPS Design answered:
Hej Ellen, klik på Videor - Hur man stickar en i-cord från rätsidan - så ser du hur man gör :)
20.05.2024 - 15:37
![]() Isabelle wrote:
Isabelle wrote:
Bonjour, je ne comprends pas comment tricoter les bretelles. On tricote en aller et retour ? Merci beaucoup
15.05.2024 - 17:17DROPS Design answered:
Bonjour Isabelle, les bretelles sont tricotées en suivant la technique du "I-cord", autrement dit, comme dans cette vidéo mais sur 5 mailles au lieu de 4 dans la vidéo. Bon tricot!
16.05.2024 - 07:52
![]() Marie wrote:
Marie wrote:
Bonjour ;) es il possible de le tricoter avec des aiguilles droites? Car je ne n’arrive pas a tricoter avec des aiguilles circulaire Merci ;)
06.05.2024 - 06:22DROPS Design answered:
Bonjour Marie, cette leçon pourra vous aider à faire les ajustements nécessaires. Bon tricot!
06.05.2024 - 09:24
![]() Maria wrote:
Maria wrote:
Scusate ma mi pare che il motivo A3 sia sbagliato. Credo che al posto di due insieme a dritto e un gettato si dovrebbe fare un cettato e un accavallato. Solo così si ha simmetria rispetto allo schema in A2. Potreste verificare? Grazie
04.05.2024 - 12:35DROPS Design answered:
Buonasera Maria, non sono state riportate correzioni per il diagramma A.3. Buon lavoro!
16.06.2024 - 21:54
![]() Corina wrote:
Corina wrote:
Hello again! I am stuck at the end of the row with the cast off sts. If I cast off 4 sts, I end up with 1 sts in the middle of the cast off that has no where to go. I can’t seem to realize where the fault is. Thanks in advance for any advice. Thank you!
01.05.2024 - 18:03DROPS Design answered:
Dear Corina, since you are finishing the pieces separately, you should just cut the yarn and pull yarn through last stitch. Then attach the yarn to the place where you continue the knitting. Happy Crafting!
02.05.2024 - 06:16
![]() Corina wrote:
Corina wrote:
Also, please help me understand why I need to only cast off 4 sts (Size S) at the end of row? Am I not suppose to decrease all the ridge sts (5 in size S). Thank you
30.04.2024 - 20:04DROPS Design answered:
Dear Corina, you will keep that one stitch as an edge stitch. Happy Knitting!
01.05.2024 - 13:57
![]() Corina wrote:
Corina wrote:
Hello, I am confused on how to cast off and count the sts here: Cast off 4 stitches for armhole, work 46, etc. There’s 1 sts that carries over the cast off, do I count it when I work the 46 sts? Or do I start counting from the 2nd st? Thank you?
30.04.2024 - 19:48DROPS Design answered:
Dear Corina, If you read through the pattern, you will see, that later the two fronts will continue with 46 stitches and the back will continue with 92 stitches, so you should cast off the 4 stitches so the above amount will be left on your needle. Happy Knitting.
01.05.2024 - 13:57
![]() Delaunay wrote:
Delaunay wrote:
Bonjour, je n'arrive pas à comprendre, je tricote taille L. Au niveau ou c'est écrit, tricoter 9m jersey A1 au dessus des 30m suivantes (= 3 motifs de 10m)A2 37 mailles, A3 au dessus des 30mailles suivantes = 3 motifs de 10m. Que voulez vous dire par au dessus et 3 motifs de 10mailles. Merci beaucoup de bien vouloir m'aider. je voudrais tellement faire votre modèle avec cette jolie laine. Cordialement
26.04.2024 - 16:53DROPS Design answered:
Bonjour Mme Delaunay, les 30 mailles suivantes vont être tricotées en suivant le motif du diagramme A.1, autrement dit, vous répétez 3 fois les 10 mailles du diagramme. Bon tricot!
29.04.2024 - 08:36
![]() Corina wrote:
Corina wrote:
Dear Drops team, I want to make this 4 cm longer (size S), I have enough yarn, where do I add extra cm? Before armhole or would it be a better idea to increase every 6 cm instead of 5cm? Thank you!
22.04.2024 - 17:31DROPS Design answered:
Dear Corina, please understand, that with many thousands of patterns on our site, we cannot modify our patterns to each individual request. Having said that, as a short advice on lengthening the piece, you should add more rows between increases for the sides of the body, like you said, for example you should increase every 6th cm instead of every 5th. You can calculate by determining how many more rows you need for the length you want, and divide those rows between the increases. Happy Knitting!
22.04.2024 - 18:19
![]() Ninna wrote:
Ninna wrote:
Hej. Jeg er nået til at min medium er 25 cm, og skal til at strikke 4 pinde retstrik. Men nu er jeg forvirret. Skal jeg strikke frem og tilbage over bagstykket kun? Jeg har 12 masker på hver side af mit mærke, men opskriften siger jeg kun skal strikke 6? Så jeg kan ikke få det til at passe med hverken at strikke rundt eller frem og tilbage. De venligste hilsner Ninna
20.04.2024 - 18:47DROPS Design answered:
Hej Ninna, jo når du er under det ene ærme, strikker du 6 masker retstrik (rundt) fortsætter over forstykket, strikker 12 masker retstrik i den anden side, fortsætter over bagstykket, strikker de sidste 6 masker retstrik. Samme gør du på totalt 4 pinde, så du får 2 retriller over 12 masker midt under hvert ærme. Nu skal det så deles og du strikker hver stykke færdig for sig :)
23.04.2024 - 13:40
|
||||||||||||||||
Heart on Fire#heartonfiretop |
||||||||||||||||
 |
 |
|||||||||||||||
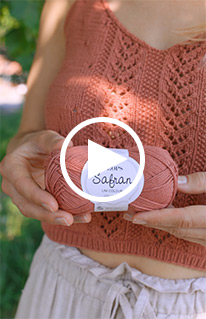
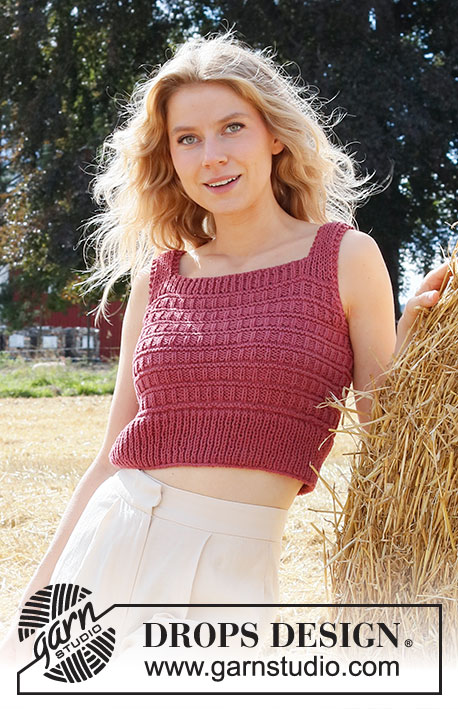
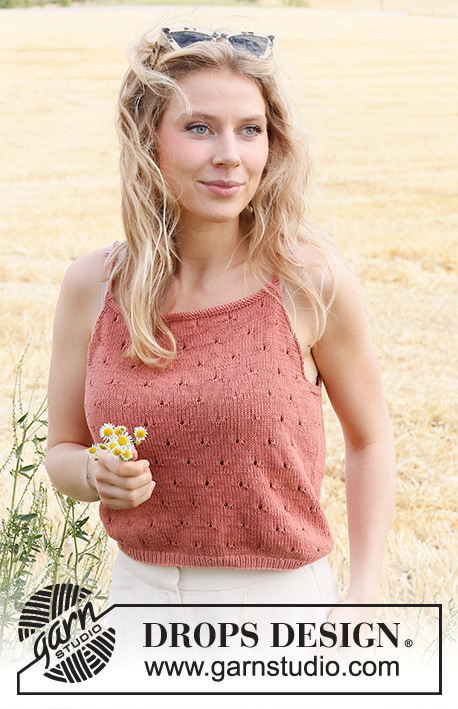
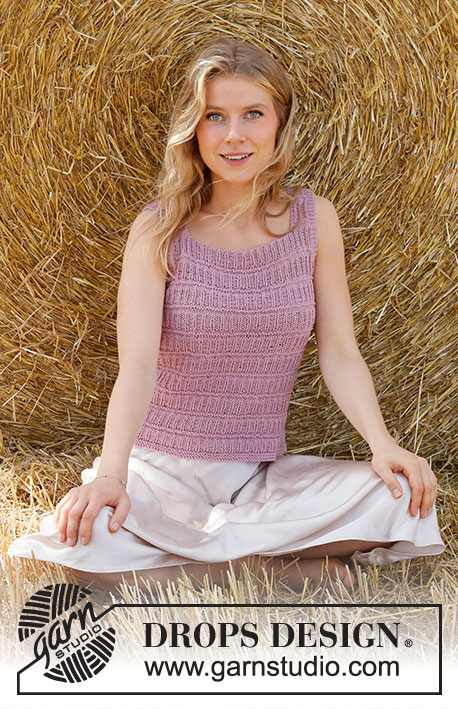
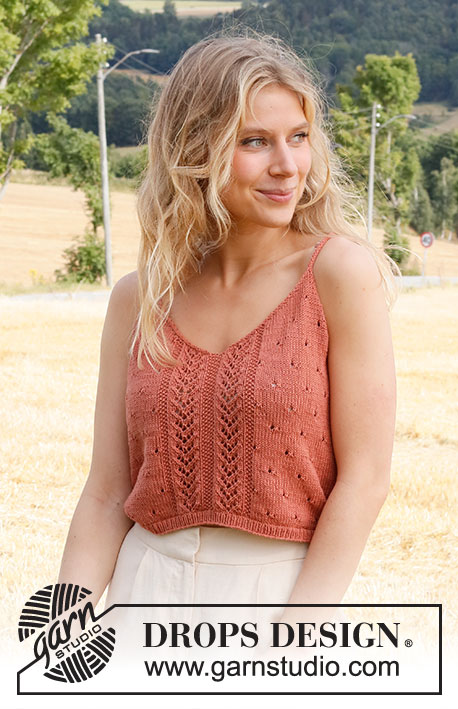
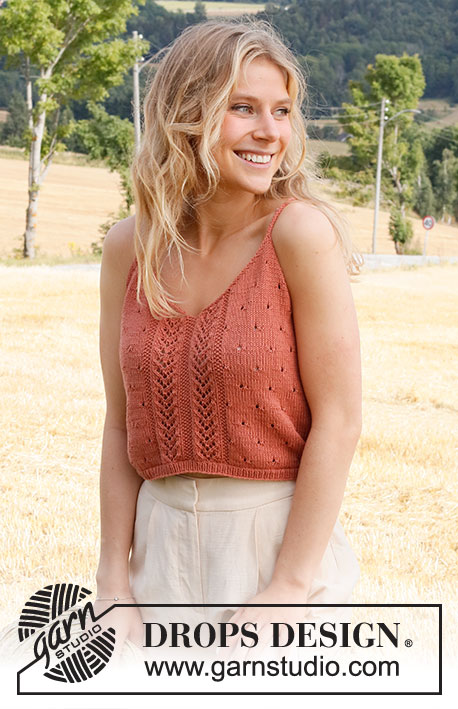
Knitted top in DROPS Safran. Piece is knitted with lace pattern and V-neck. Size: XS - XXL.
DROPS 223-27 |
||||||||||||||||
|
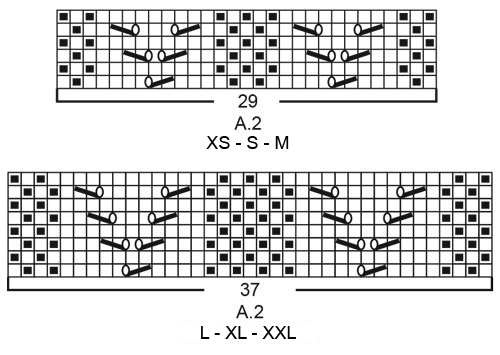
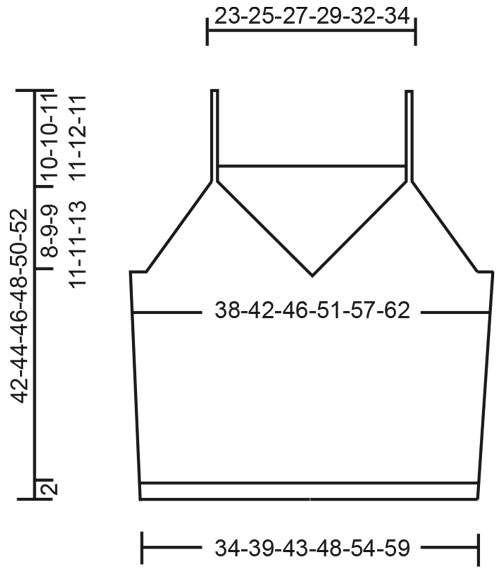
------------------------------------------------------- EXPLANATION FOR THE PATTERN: ------------------------------------------------------- GARTER STITCH (worked in the round): 1 ridge vertically = 2 rounds, i.e. knit 1 round and purl 1 round. GARTER STITCH (back and forth): Knit all rows. 1 ridge vertically = knit 2 rows. PATTERN: See diagrams A.1 to A.4. Choose diagram for your size (applies to A.2). Diagrams show all rows in pattern seen from the right side. DECREASE TIP-1 (evenly spaced): To calculate how to decrease evenly use the total number of stitches on row (e.g. 174 stitches) and divide stitches by number of decreases to be done (e.g. 10) = 17.4. In this example work alternately approx. every 16th and 17th stitch and every 17th and 18th stitch together. DECREASE TIP-2 (applies to the armholes and V-neck): Decrease inside 1 edge stitch in garter stitch. FROM RIGHT SIDE: DECREASE AS FOLLOWS AFTER 1 EDGE STITCH IN GARTER STITCH: Slip 1 stitch knitwise, knit 1, pass slipped stitch over stitch worked DECREASE AS FOLLOWS BEFORE 1 EDGE STITCH IN GARTER STITCH: Work until 2 stitches remain before edge stitch in garter stitch, knit these 2 together. FROM WRONG SIDE: DECREASE AS FOLLOWS AFTER 1 EDGE STITCH IN GARTER STITCH: Purl 2 together. DECREASE AS FOLLOWS BEFORE 1 EDGE STITCH IN GARTER STITCH: Work until 2 stitches remain before edge stitch in garter stitch, purl these 2 twisted together. INCREASE TIP (applies to sides of body): Work until 2 stitches remain before marker thread, make 1 yarn over, knit 4 (marker thread is in the middle of these 4 stitches), make 1 yarn over (= 2 stitches increased at the marker thread and 4 stitches increased on increase round in total). On next round knit yarns over twisted to avoid holes. Then work the new stitches in stocking stitch until they fit the pattern. ------------------------------------------------------- START THE PIECE HERE: ------------------------------------------------------- TOP - SHORT OVERVIEW OF THE PIECE: Work body in the round on circular needle, from the bottom and up to armholes. Then finish front piece and back piece separately. Divide the front piece mid front for V-neck, and work the two parts back and forth on circular needle separately until finished measurements, then work strap on each front piece. Work back piece back and forth on circular needle until finished measurements. Sew straps from front piece on to back piece. BODY: Cast on 174-196-216-244-272-298 stitches on circular needle size 2.5 mm with Safran. Knit 1 round. Then work rib in the round (= knit 1/purl 1) for 1½ to 2 cm. When rib is done, knit 1 round while decreasing 9-11-11-13-13-15 stitches evenly - read DECREASE TIP-1= 165-185-205-231-259-283 stitches. Switch to circular needle size 3 mm. Insert 1 marker thread at beginning of round and 1 marker thread after 83-93-103-115-129-141 stitches. 82-92-102-116-130-142 stitches remain on round for back piece. Move the marker threads upwards when working; they should be used for increase later in the sides on body. Work next round as follows: Work 7-2-7-9-6-2 stitches in stocking stitch, work A.1 over the next 20-30-30-30-40-50 stitches (= 2-3-3-3-4-5 repetitions of 10 stitches), work A.2 (= 29-29-29-37-37-37 stitches), work A.3 over the next 20-30-30-30-40-50 stitches (= 2-3-3-3-4-5 repetitions of 10 stitches), work 14-4-14-18-12-4 stitches in stocking stitch (marker thread is in the middle of these stitches), work A.1 over the next 60-80-80-90-110-130 stitches (= 6-8-8-9-11-13 repetitions of 10 stitches), work A.4 (= 8 stitches), and finish with 7-2-7-9-6-2 stitches in stocking stitch. Continue pattern like this. REMEMBER THE KNITTING TENSION! When piece measures 5-5-5-6-6-6 cm, increase 1 stitch on each side of both marker threads – read INCREASE TIP (= 4 stitches increased). Increase like this every 5-5-5-5½-5½-6 cm 4 times in total in each side = 181-201-221-247-275-299 stitches. Work until piece measures 23-24-25-25-26-27 cm - adjust so that next round is an odd numbered round in A.1 (this is important to avoid the lace pattern begin worked from wrong side when piece is divided into front and back piece). Now work in 2 ridges in GARTER STITCH - read explanation above, over the middle 8-10-12-16-20-26 stitches in each side (i.e. work 4-5-6-8-10-13 stitches in garter stitch on each side of both marker threads – work the other stitches as before). After the 2 ridges cast off for armholes and V-neck, i.e. work next round as follows: Cast off 3-4-5-7-9-12 stitches for armhole, work 42-46-50-54-59-62 stitches as before (= left front piece), cast off 1 stitch (= mid front), work 42-46-50-54-59-62 stitches as before (= right front piece), cast off 6-8-10-14-18-24 stitches for armhole, work as before over stitches on back piece until 3-4-5-7-9-12 stitches remain on round, and cast off the last 3-4-5-7-9-12 stitches for armhole. Cut the yarn and pull yarn through last stitch Finish back piece and front pieces separately. BACK PIECE: = 84-92-100-110-120-126 stitches. Begin from wrong side and continue pattern back and forth with 1 edge stitch in garter stitch in each side. AT THE SAME TIME on next row from right side begin decrease for armholes - read DECREASE TIP-2. Decrease for armholes in each side on every other row (i.e. every row from right side) 14-16-18-20-22-22 times in total in each side = 56-60-64-70-76-82 stitches. After last decrease work 1 row from wrong side as before. Switch to circular needle size 2.5 mm. Work 2 ridges back and forth over all stitches. Cast off knitting from right side. LEFT FRONT PIECE (when garment is worn): = 42-46-50-54-59-62 stitches. Begin from wrong side and continue pattern back and forth with 1 edge stitch in garter stitch in each side. AT THE SAME TIME on next row from right side begin decrease for armholes and V-neck and decrease as explained below – read DECREASE TIP-2: ARMHOLE: Decrease 1 stitch on every other row 13-14-15-17-18-20 times in total. V-NECK: Decrease 1 stitch on every row (i.e. from both right and wrong side) 24-27-30-32-36-37 times total. After all decreases for armholes and V-neck, 5 stitches remain on row for strap. Work strap as explained below. STRAP: Switch to 2 double pointed needles 2.5 mm (slip stitches on one needle and work with the other). * Move stitches to the beginning of row, tighten yarn and knit the 5 stitches from right side *, work from *-* until strap measures approx. 18-18-19-20-21-20 cm (10-10-11-11-12-11 cm of this length belongs to front piece, the rest belongs to back piece - sew strap to back piece). Cut the yarn and pull yarn through the 5 stitches, tighten together and fasten. RIGHT FRONT PIECE (when garment is worn): = 42-46-50-54-59-62 stitches. Begin from wrong side and continue pattern back and forth with 1 edge stitch in garter stitch in each side. AT THE SAME TIME on next row from right side begin decreases for V-neck and armholes and decrease as explained below – read DECREASE TIP-2: V-NECK: Decrease 1 stitch on every row (i.e. from both right and wrong side) 24-27-30-32-36-37 times total. ARMHOLE: Decrease 1 stitch on every other row 13-14-15-17-18-20 times in total. After all decreases for V-neck and armholes, 5 stitches remain on row for strap. Work strap the same way as on left front piece. ASSEMBLY: Sew straps to back piece at the edge in each side. |
||||||||||||||||
Diagram explanations |
||||||||||||||||
|
||||||||||||||||
 |
||||||||||||||||
 |
||||||||||||||||
 |
||||||||||||||||
Have you finished this pattern?Tag your pictures with #dropspattern #heartonfiretop or submit them to the #dropsfan gallery. Do you need help with this pattern?You'll find 26 tutorial videos, a Comments/Questions area and more by visiting the pattern on garnstudio.com. © 1982-2026 DROPS Design A/S. We reserve all rights. This document, including all its sub-sections, has copyrights. Read more about what you can do with our patterns at the bottom of each pattern on our site. |
||||||||||||||||


With over 40 years in knitting and crochet design, DROPS Design offers one of the most extensive collections of free patterns on the internet - translated to 17 languages. As of today we count 324 catalogues and 12290 patterns translated into English (UK/cm). 12290
We work hard to bring you the best knitting and crochet have to offer, inspiration and advice as well as great quality yarns at incredible prices! Would you like to use our patterns for other than personal use? You can read what you are allowed to do in the Copyright text at the bottom of all our patterns. Happy crafting!
Post a comment to pattern DROPS 223-27
We would love to hear what you have to say about this pattern!
If you want to leave a question, please make sure you select the correct category in the form below, to speed up the answering process. Required fields are marked *.