
Popular categories
Looking for a yarn?


Comments / Questions (20)
![]() Anna wrote:
Anna wrote:
Re hood increase. Instruction is ’increase on the inside of the 5 stitches on each side’. Which 5 stitches? There has been no reference of these stitches before now. Previous answers said to increase at the beginning of each side but that isn’t what this instruction implied. Kind regards
12.12.2025 - 10:29DROPS Design answered:
Dear Anna, these are the first last 5 sts on row, ie work from the beginning of the row from right side, work the first 5 stitches as before, increase 1 stitch, work until 5 stitches remain before end of the row, increase 1 stitch, work the last 5 stitches. Happy knitting!
12.12.2025 - 16:31
![]() Allison Cifelli wrote:
Allison Cifelli wrote:
Hi I’m knitting the balaclava for men. I have reached but I don’t understand how to increase mid front or decrease mid back. What does mid back or mid front mean? Can you give me an idiots guide for the instruction how to follow this and what EXACTLY should I do?
21.11.2025 - 15:15DROPS Design answered:
Dear Mrs Cifelli, when you increase mid front you increase at the beginning and at the end of the row from RS, on the sides that will then be towards the face when wearing piece, increase a total of 6 times as explained under INCREASE TIP-1 on every 4th row; at the same time, decrease on mid back 4 times every 4th row (starting at the same time as the 3rd increase towards mid front). Happy knitting!
24.11.2025 - 07:28
![]() Pracht wrote:
Pracht wrote:
Bonjour Je ne sais pas comment répartir les diminutions DIMINUTIONS (milieu dos): Toutes les diminutions se font sur l'endroit! En commençant 5 mailles avant le fil marqueur au milieu dos, tricoter 2 mailles ensemble à l'endroit, 6 mailles endroit (le marqueur est entre ces 6 mailles), glisser 1 maille à l'endroit, 1 maille endroit et passer la maille glissée par-dessus la maille tricotée (= on diminue 2 mailles). Merci beaucoup
18.10.2025 - 21:10
![]() Pracht Marlene wrote:
Pracht Marlene wrote:
Merci pour la réponse précédente Je ne comprends pas ces explications : DIMINUTIONS (milieu dos): Toutes les diminutions se font sur l'endroit! En commençant 5 mailles avant le fil marqueur au milieu dos, tricoter 2 mailles ensemble à l'endroit, 6 mailles endroit (le marqueur est entre ces 6 mailles), glisser 1 maille à l'endroit, 1 maille endroit et passer la maille glissée par-dessus la maille tricotée (= on diminue 2 mailles).
18.10.2025 - 16:06DROPS Design answered:
Bonjour Mme Pracht, vous allez diminuer de part et d'autre des 6 mailles centrales, autrement dit en commençant 5 mailles avant le fil marqueur du milieu dos, tricotez 2 mailles ensemble à l'endroit, puis 3 mailles avant le fil marqueur + 3 mailles après le fil marqueur et diminuez encore 1 maille (glissez 1 m à l'end, 1 m end, passez la m glissée par-dessus la m tricotée). Répétez ces diminutions de la même façon de part et d'autre des 6 mailles du milieu dos (3 de chaque côté du fil marqueur). Bon tricot!
28.10.2025 - 18:32
![]() Marlène Pracht wrote:
Marlène Pracht wrote:
Bonjour Faut il augments de chaque côté 1 maille tous les 4 ou 2 rangs??? « AUGMENTER AU MILIEU DEVANT: Quand l'ouvrage mesure 13-15 cm depuis le marqueur, augmenter 1 maille de chaque côté – voir AUGMENTATIONS-1 (= on augmente 2 mailles). Augmenter ainsi 6 fois au total de chaque côté tous les 4 rangs (tous les 2 rangs sur l'endroit). » Merci beaucoup
18.10.2025 - 08:41DROPS Design answered:
Bonjour Marlène, vous augmentez ici tous les 4 rangs. Bon tricot!
18.10.2025 - 10:43
![]() Doreen George wrote:
Doreen George wrote:
Hi. I'm looking for an adult balaclava pattern using 2 straight needles please
15.10.2025 - 15:38
![]() Guigue Catherine wrote:
Guigue Catherine wrote:
Bonjour, Je ne comprends pas pourquoi il faut couper le fil après avoir rabattu les mailles lisieres Que devient ce fil??
26.11.2024 - 13:08DROPS Design answered:
Bonjour Mme Guigue, vous pouvez rentrer le fil que vous avez coupé, vous allez maintenant relever les mailles de chaque côté de cette partie, en commençant le long du côté droit, sur l'endroit, de la partie tricotée, relevez 32-33 mailles, puis tricotez les 26-28 mailles de cette partie centrale (le fil que vous avez coupé est ici) et relevez 32-33 mailles le long du côté gauche de la partie centrale = 90-94 mailles, tournez et tricotez en allers et retours en jersey, avec 1 maille lisière au point mousse de chaque côté. Bon tricot!
26.11.2024 - 16:36
![]() Heleen Kruger wrote:
Heleen Kruger wrote:
Thanks so much for the free knitting patterns. I REALLY HOPE YOU WILL ALWAYS KEEP ON POSTING FREE PATTERNS. I LOVE YOYR VARIETY AND ENJOY KNITTING FOR A HOBBY. I AM 60 YEARS OLD. DIVORCED AND STAYING ALL ALONE WITH MY DOG. AND LOVE KNITTING ANS CROCHETING DIFFERENT ARTICLES .
24.08.2024 - 23:20
![]() Zsófia wrote:
Zsófia wrote:
Dear All, I like these videos very much, they are very useful. I'm just wondering, why the "comined" method of knitting (making S and F stitches) is missing. I learned that way back then (several decades ago :) ) and I think, that is a very easy and efficient method.
07.12.2023 - 13:13
![]() Susan Nicholson wrote:
Susan Nicholson wrote:
Thank you for your p[revious comments would it be possible to get this helmet [pattern with rib knitting at bottom and face I have done it many but lost my pattern I have no incoming computer so please do in sharing in grateful thanks Susan Ann
12.11.2023 - 23:41DROPS Design answered:
Dear Susan, this pattern is available for free. You can check it online or print it/ download as a PDF by clicking on the button PRINT after the materials section and then selecting a printer or Save as PDF to download it. Happy knitting!
12.11.2023 - 23:47
|
|
Uncharted Territory#unchartedterritory |
|
 |
 |
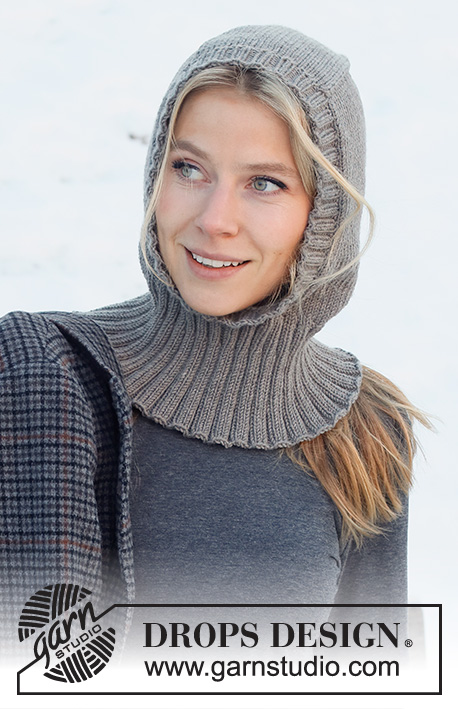
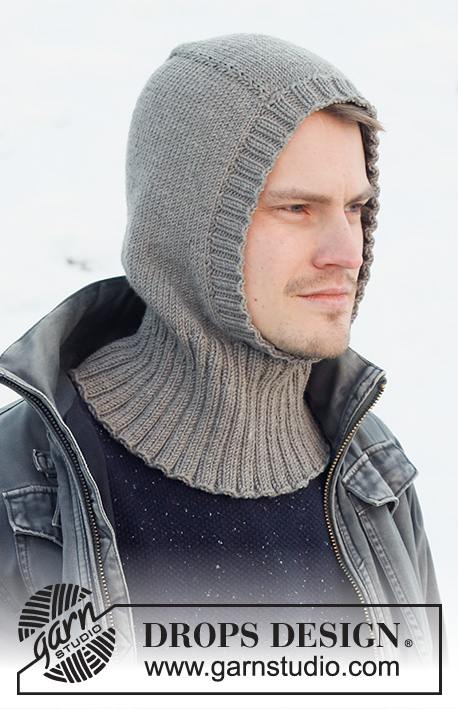
Knitted hat / balaclava for men in DROPS Merino Extra Fine. The piece is worked top down with stocking stitch and ribbed edging.
DROPS 219-22 |
|
|
------------------------------------------------------- EXPLANATIONS FOR THE PATTERN: ------------------------------------------------------- RIDGE/GARTER STITCH (worked back and forth): Knit all rows. 1 ridge in height = Knit 2 rows. INCREASE TIP (for sides of face-opening): Increase on the inside of the 5 stitches on each side. All increases are worked from the right side! Increase 1 stitch by making 1 yarn over. On the next row (wrong side) purl the yarn over twisted to avoid a hole. Then work the new stitches in stocking stitch. INCREASE TIP-2 (evenly spaced): To work out how to increase evenly, count the total number of stitches on the needle (e.g. 102 stitches) and divide by the number of increases to be made (e.g. 22) = 4.6. In this example, increase by making 1 yarn over after alternately each 4th and 5th stitch. On the next round work the yarn overs twisted to avoid holes. DECREASE TIP (mid-back): All decreases are worked from the right side! Start 5 stitches before the marker thread mid-back, knit 2 together, knit 6 (the marker sits between these 6 stitches), slip 1 stitch as if to knit, knit 1 and pass the slipped stitch over the knitted stitch (= 2 stitches decreased). CASTING-OFF TIP: To avoid the cast-off edge being tight you can cast off with a larger size needle. If the edge is still tight, make 1 yarn over after approx. each 4th stitch at the same time as casting off; the yarn overs are cast off as normal stitches. ------------------------------------------------------- START THE PIECE HERE: ------------------------------------------------------- BALACLAVA – SHORT OVERVIEW OF THE PIECE: The mid-section is worked back and forth with circular needle from mid-front and backwards. Stitches are knitted up on each side of the mid-section and the piece continued back and forth before stitches are cast on for the neck. The piece finished in the round. A ribbed edge is worked around the face-opening to finish. MID-SECTION: Cast on 28-30 stitches (including 1 edge stitch on each side) with circular needle size 3.5 mm and Merino Extra Fine. Purl 1 row from the wrong side. Then continue back and forth with stocking stitch and 1 edge stitch in GARTER STITCH on each side – read description above. REMEMBER THE KNITTING TENSION! When the piece measures 14-15 cm, cast off the edge stitches on each side = 26-28 stitches. Cut the strand, then work the hood as described below. HOOD: Knit up stitches on each side of the mid-section from the right side as follows: Knit up 32-33 stitches along the one side inside the 1 edge stitch, work stocking stitch over the 26-28 stitches on the needle and knit up 32-33 stitches along the other side inside the 1 edge stitch = 90-94 stitches. Insert 1 marker thread in the middle of the row (= mid-back). Allow the thread to follow your work onwards, it is used when decreasing mid-back. In addition, insert 1 marker at the beginning of the row. THE PIECE IS NOW MEASURED FROM THIS MARKER! Work stocking stitch back and forth with 1 edge stitch in garter stitch on each side towards mid-front. Then increase each side towards mid-front and decrease mid-back as follows – read the whole section on increasing and decreasing before continuing! INCREASES MID-FRONT: When the piece measures 13-15 cm from the marker, increase 1 stitch on each side towards mid-front – read INCREASE TIP-1 (= 2 stitches increased). Increase like this every 4th row (every 2nd row from the right side) a total of 6 times on each side. DECREASES MID-BACK: AT THE SAME TIME, the 3rd time you increase, decrease 2 stitches mid-back – read DECREASE TIP. Decrease like this every 4th row a total of 4 times (increases and decreases are finished at the same time). After all the increases and decreases there are 94-98 stitches. When the piece measures 20-22 cm from the marker, cast on stitches for the neck (try the hat on and work to desired length before casting on). Cast on 16-18 stitches at the end of the next row from the right side = 110-116 stitches. Continue working in the round as described below. NECK: Work 5 rounds of stocking stitch over all stitches. On the first round increase 30-32 stitches evenly spaced – read INCREASE TIP-2 = 140-148 stitches. Change to circular needle size 3 mm and work rib in the round (knit 2, purl 2) for 3 cm. Now increase all knit 2 to knit 3 by making 1 yarn over after each knitted section (the yarn overs are knitted twisted on the next row to avoid holes) = 175-185 stitches. Continue in the round with knit 3, purl 2 until the rib measures 11-12 cm. Loosely cast off with knit over knit and purl over purl – read CASTING-OFF TIP. The piece measures approx. 39-42 cm from the middle of the mid-section down the side. EDGE AROUND FACE-OPENING: Start from the right side at the bottom of the opening, where stitches were cast on for the neck. Knit up 140 to 156 stitches around the opening, inside the 1 edge stitch using short circular needle size 3 mm and Merino Extra Fine. The number of stitches should be divisible by 4. Work rib in the round (knit 2, purl 2) for 3-3 cm. Loosely cast off with knit over knit and purl over purl – remember CASTING-OFF TIP. |
|
Have you finished this pattern?Tag your pictures with #dropspattern #unchartedterritory or submit them to the #dropsfan gallery. Do you need help with this pattern?You'll find 24 tutorial videos, a Comments/Questions area and more by visiting the pattern on garnstudio.com. © 1982-2026 DROPS Design A/S. We reserve all rights. This document, including all its sub-sections, has copyrights. Read more about what you can do with our patterns at the bottom of each pattern on our site. |
|


With over 40 years in knitting and crochet design, DROPS Design offers one of the most extensive collections of free patterns on the internet - translated to 17 languages. As of today we count 325 catalogues and 12298 patterns translated into English (UK/cm). 12298
We work hard to bring you the best knitting and crochet have to offer, inspiration and advice as well as great quality yarns at incredible prices! Would you like to use our patterns for other than personal use? You can read what you are allowed to do in the Copyright text at the bottom of all our patterns. Happy crafting!
Post a comment to pattern DROPS 219-22
We would love to hear what you have to say about this pattern!
If you want to leave a question, please make sure you select the correct category in the form below, to speed up the answering process. Required fields are marked *.