
Popular categories
Looking for a yarn?


Comments / Questions (88)
![]() Anne-Catherine wrote:
Anne-Catherine wrote:
Bonsoir, j’ai vraiment un problème avec votre modèle, je ne comprends pas comment entre le dernier tour du col où nous avons 60 mailles et le placement des marqueurs, ou j’arrive à un total de 54 mailles (10+5+9+9+5+13+3) on peut « perdre » 6 mailles sans tricoter. Est-ce que j’ai loupé un truc? Ou y a t’il une erreur dans la traduction? Merci d’avance pour votre réponse. Salutations. Anne-Catherine
05.02.2026 - 21:35DROPS Design answered:
Bonjour Anne-Catherine, notez que les marqueurs sont placés chacun dans une maille (et pas entre les mailles), vous aurez ainsi: 10+1+5+1+9+1+9+1+5+1+13+1+3=60 mailles. Bon tricot!
06.02.2026 - 16:59
![]() Anne-Catherine wrote:
Anne-Catherine wrote:
Pour la taille L, il est demandé de monter 90 mailles, un tour à l’endroit et après de tricoter en côtes. Ma question est la suivante: qu’est-ce que je fais de la dernière maille de mon 1er tour? Merci d’avance de votre réponse 🙏
31.01.2026 - 23:52DROPS Design answered:
Bonjour Anne-Catherine, le nombre de mailles des côtes est divisible par 3 = (1 maille en côtes anglaises, 2 mailles envers), vous allez ainsi répéter 30 fois de *à* les tours 1 et 2 des côtes. Bon tricot!
02.02.2026 - 08:43
![]() Elettra wrote:
Elettra wrote:
Buonasera. Non riesco a capire come fare gli aumenti (Aumentare in questo modo ogni 10 giri (ogni 5 giri di maglie visibili a coste inglesi) in tutto 6 volte ai segni 1, 2, 4 e 5 e in tutto 5 volte ai segni 3 e 6 = 188 maglie) Devo alternare gli aumenti ogni 10 giri una volta su 1,2,4,5 e dopo altri 10 giri su 3,6 e poi di nuovo dopo 10 giri su 1,2,4,5 e così via? Ho capito bene? Grazie
29.12.2025 - 18:58DROPS Design answered:
Buongiorno Elettra, deve partire con gli aumenti contemporaneamente su tutti i segnapunti e proseguire per il numero di volte indicato per ogni segnapunti. Buon lavoro!
17.01.2026 - 11:39
![]() Christina wrote:
Christina wrote:
Hej! I stl S har jag nu ökat 5 resp 6 varv, har 188 maskor och arb mäter 20cm, precis som mönstret säger. Jag har hoppat över att öka på 3:e och 6:e markören på sista varvet. Ska nu öka 2 ggr till på 3:e och 6:e markören. Men då blir det ju ett längre avstånd mellan ökningarna fram och bak än innan? Stämmer det verkligen? Stort tack!
08.11.2025 - 19:13DROPS Design answered:
Hej Christina, ja det stemmer at afstanden øger :)
28.11.2025 - 07:55
![]() Linn Thörnvall wrote:
Linn Thörnvall wrote:
Hej. Jag ska precis börja sticka ärmen men förstår inte hur jag ska börja varvet. Ska jag börja varvet när jag lägger upp under ärmen med omslag osv eller kommer det efter första varvet? Hoppas ni förstår min fråga. Tack.
16.10.2025 - 19:26DROPS Design answered:
Hei Linn. Du legger ikke opp masker, men strikker opp 1 ny maske i hver av de 7 maskene som ble lagt opp under ermet. Maskene som ble strikket opp under ermet strikkes på første omgang uten å strikkes sammen med kast. mvh DROPS Design
27.10.2025 - 09:57
![]() Anita Gerrits wrote:
Anita Gerrits wrote:
Hallo, Heb nog een vraagje, Klopt het, Midden voor iedere kant 9 steken en midden achter iedere kant 13 steken? Dan wordt achterpand breder of langer Of zie ik dit verkeerd Brei xl Groetjes Anita
16.03.2025 - 18:37DROPS Design answered:
Dag Anita,
Markeerdraden 3 en 6 zitten op het voor- en achterpand en je meerdert even vaak op beide markeerdraden. Voor maat L heb je in totaal 8 meerderingen op midden voor en 8 meerderingen op midden achter.
13.04.2025 - 15:12
![]() Birgit Driefer wrote:
Birgit Driefer wrote:
Liebes Drops Design Team, ich habe die Halsblende plus die Markierer angebracht, es sind 3 M. übrig. Wie gehe ich mir den 3 M. um, bzw. wie stricke ich die? LG Birgit3
13.03.2025 - 12:29DROPS Design answered:
Liebe Frau Driefer, nach dem 6. und letzen Markierer , sind es 3 Maschen bis Ende der Runde übrig, so es sieht richtig aus. Viel Spaß beim Stricken!
13.03.2025 - 16:08
![]() Anita Gerrits wrote:
Anita Gerrits wrote:
Hallo, Ik ben helemaal opnieuw begonnen, kom nu uit met de steken tellen. Denk dat ik iets verkeerd heb gedaan Groetjes Anita
10.03.2025 - 14:35
![]() Anita Gerrits wrote:
Anita Gerrits wrote:
Hallo Ik ben bij de hals, xl 12 cm, eindigen met nld 2 van de boordsteek. Nu komt het, moet minderen van 90 naar 60 steken Maar ik kom niet aan de 60 steken, Als ik de omslagen niet erbij tel heb ik wel 60, is dit de bedoeling? Groetjes Anita
08.03.2025 - 16:19DROPS Design answered:
Dag Anita,
Klopt, de omslag tel je niet mee.
12.03.2025 - 10:55
![]() Anita Gerrits wrote:
Anita Gerrits wrote:
Hallo Ik ben bij de hals, xl 12 cm, eindigen met nld 2 van de boordsteek. Nu komt het, moet minderen van 90 naar 60 steken Maar ik kom niet aan de 60 steken, Als ik de omslagen niet erbij tel heb ik wel 60, is dit de bedoeling? Groetjes Anita
08.03.2025 - 15:17
|
|
Dublin Winter Sweater#dublinwintersweater |
|
 |
 |
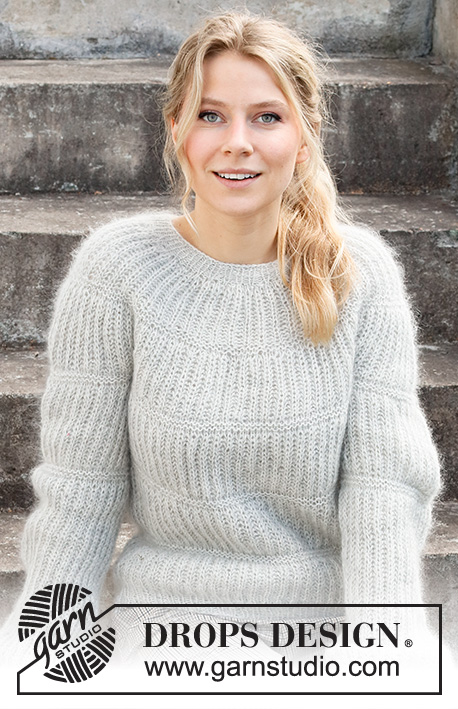
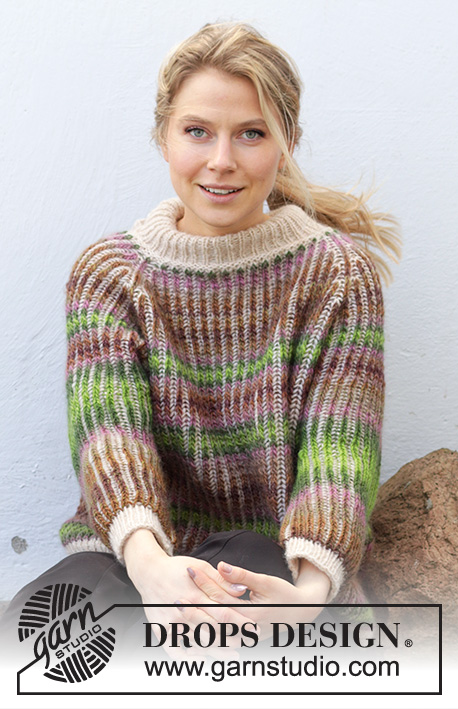
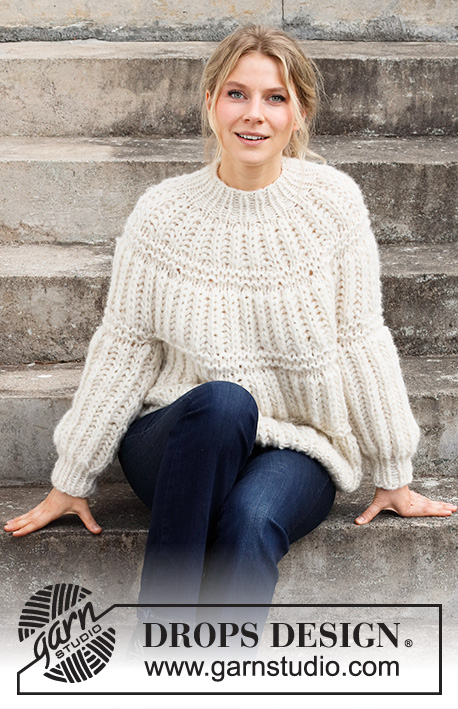
Knitted jumper with round yoke in DROPS Air. The piece is worked top down with English rib and A-shape. Sizes XS - XXL.
DROPS 215-12 |
|
|
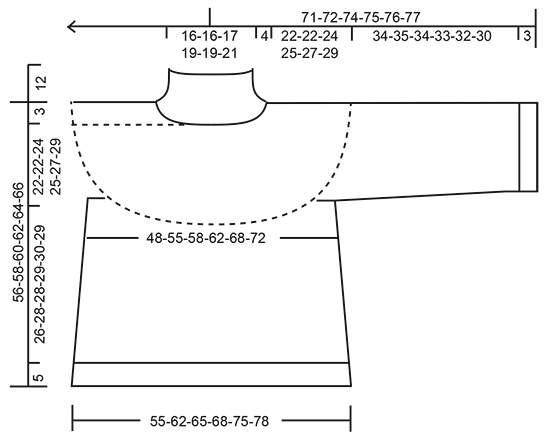
------------------------------------------------------- EXPLANATIONS FOR THE PATTERN: ------------------------------------------------------- RIB (in the round): ROUND 1: * Make 1 yarn over, slip 1 stitch as if to purl, purl 2 *, work from *-* to end of round. ROUND 2: * Knit together the yarn over and slipped stitch, purl 2 *, work from *-* to end of round. Repeat rounds 1 and 2. ENGLISH RIB (in the round): ROUND 1: * Knit together the yarn over and slipped stitch, make 1 yarn over, slip 1 stitch as if to purl, *, repeat from *-* to end of round. ROUND 2: * 1 yarn over, slip 1 stitch as if to purl, purl together the yarn over and slipped stitch *, repeat from *-* to end of round. Repeat rounds 1 and 2. INCREASE TIP (for increases in English rib stitch): All increases are worked on a round where the yarn overs and knitted stitches are knitted together (i.e. Round 1 in English rib). Increase 4 stitches in the English rib stitch as follows: Knit together the yarn over and knitted stitch, but do not slip them from the needle, make 1 yarn over the right needle, knit together the yarn over and knitted stitch again, move the marker to this stitch (= mid-stitch), make 1 yarn over the right needle, knit together the yarn over and knitted stitch again (= 3 stitches and 2 yarn overs), slip the stitches from the left needle. On the next round work the increased stitches as follows: * Make 1 yarn over, slip 1 stitch as if to purl, purl 1 *, work from *-* a total of 2 times, make 1 yarn over, slip 1 stitch as if to purl (= 3 knitted stitches and 2 purled stitches). The marker sits in the middle stitch of the increased stitches (in a knitted stitch). DECREASE TIP (mid under sleeve): All decreases are worked on a round where the yarn overs and knitted stitches are knitted together (i.e. Round 1 in English rib). Start mid under the sleeve (i.e. before the marker-stitch) and decrease 4 stitches on the round as follows: Work the first 2 stitches in English rib as before, slip the next stitch + its yarn over as if to knit, knit together the next 2 stitches + and their yarn overs and pass the slipped stitch + and its yarn-over over the knitted together stitches. Work until there are 4 stitches left before the marker stitch (= mid-stitch under the sleeve), knit together the next 3 stitches + and their yarn overs (= 2 stitches decreased), work the last stitch on the round. CASTING-OFF TIP: To avoid the cast-off edge being tight you can cast off with a larger size needle. If the edge is still tight, make 1 yarn over after approx. each 3rd stitch at the same time as casting off; the yarn overs are cast off as normal stitches. ------------------------------------------------------- START THE PIECE HERE: ------------------------------------------------------- JUMPER – SHORT OVERVIEW OF THE PIECE: The neck and yoke are worked in the round with circular needle, top down. On yoke, increase in 6 stitches marked with markers. The yoke is divided for body and sleeves and the body continued in the round with circular needle. The sleeves are worked in the round with short circular needle, top down. NECK: Cast on 78-78-84-90-90-96 stitches with circular needle size 4 mm and Air. Knit 1 round. Then work RIB – read description above, for 12 cm; finish after round 2. The next round is worked as follows: * Make 1 yarn over, slip 1 stitch as if to purl, purl 2 together *, work from *-* to end of round = 52-52-56-60-60-64 stitches. Change to circular needle size 6 mm. Insert 1 marker thread at the beginning of the round; the yoke is measured from this marker thread. YOKE: Insert 6 markers in the piece as described below (without working the stitches). All markers are in knitted stitches and are used when increasing on the yoke. Count 8-8-8-10-10-10 stitches, insert marker 1 in the next stitch (= back right sleeve), count 5-5-7-5-5-7 stitches, insert marker 2 in the next stitch (= raglan-line in front), count 7-7-7-9-9-9 stitches, insert marker 3 in the next stitch (= mid-front), count 7-7-7-9-9-9 stitches, insert marker 4 in the next stitch (= raglan-line in front), count 5-5-7-5-5-7 stitches, insert marker 5 in the next stitch (= back left sleeve), count 11-11-11-13-13-13 stitches, insert marker 6 in the next stitch (= mid-back), there are 3 stitches left on the round. Work ENGLISH RIB in the round – read description above. REMEMBER THE KNITTING TENSION! When you have worked 2-2-6-2-6-2 rounds of English rib, increase stitches on the next round as follows: Increase 4 stitches in all 6 marker-stitches - read INCREASE TIP (= 24 stitches increased on the round). Increase like this every 12th-10th-10th-10th-8th-10th round (every 6th-5th-5th-5th-4th-5th round of visible English rib stitches) a total of 5-6-6-7-8-8 times at markers 1, 2, 4 and 5 and a total of 4-5-6-6-7-8 times at markers 3 and 6 = 164-188-200-220-244-256 stitches on the needle. If the knitting tension is correct in height, the piece measures approx. 20-20-22-24-24-28 cm from the marker on the neck. Increases at markers 3 and 6 continue two more times on the piece (i.e. a total of 6-7-8-8-9-10 increases mid-front and mid-back); if the piece is shorter than 20-20-22-24-24-28 cm, some of these increases might be on the yoke. The number of stitches when dividing the yoke for body and sleeves will then not be the same as described below. The extra stitches will be on the front and back pieces. (Markers 1 and 5 also have further increases after the division, but these are described under SLEEVE.) Continue working until the piece measures 22-22-24-25-27-29 cm from the marker on the neck. On the next round divide for the body and sleeves as follows: Work the first 14-16-16-18-20-20 stitches as before, place the next 31-35-37-43-47-49 stitches on a thread for the sleeve, cast on 7 stitches under the sleeve, work the next 51-59-63-67-75-79 stitches as before, place the next 31-35-37-43-47-49 stitches on a thread for the sleeve, cast on 7 stitches under the sleeve and work the remaining 37-43-47-49-55-59 stitches as before. BODY: = 116-132-140-148-164-172 stitches – this stitch-count is only applicable if you have increased 4-5-6-6-7-8 times at markers 3 and 6 on the yoke. If you have increased more times on the yoke there will be more stitches on the needle now). Continue in the round with English rib as before and work the last 2 increases at markers 3 and 6 if necessary. The stitches under the sleeve are worked without knitting together stitches and yarn overs on the first round. When all the increases are finished there are 132-148-156-164-180-188 stitches on the body. Work until the piece measures 26-28-28-29-30-29 cm from the division (adjust so the next round is one where stitches and yarn overs are knitted together). There is approx. 5 cm left to finished length; try the jumper on and work to desired length. Change to circular needle size 4 mm and work rib as follows: * Knit the first stitch and yarn over together as before, 1 yarn over (= 1 stitch increased), purl 1 *, work from *-* to end of round = 198-222-234-246-270-282 stitches. Then work the same rib as on the neck for 5 cm (yarn overs worked twisted on the first round). Loosely cast off with knit over knit and purl over purl - read CASTING-OFF TIP! The jumper measures approx. 56-58-60-62-64-66 cm from the shoulder down. SLEEVE: Place the 31-35-37-43-47-49 stitches from the thread on the one side of the piece on short circular needle size 6 mm and knit up 1 stitch in each of the 7 stitches cast on under the sleeve = 38-42-44-50-54-56 stitches. Insert a marker thread in the middle of the 7 stitches under the sleeve (a knitted stitch in the English rib pattern). This stitch will be where you decrease under the sleeve later. Start the round before the mid-stitch and work as follows: Continue in the round with English rib as before; the knitted-up stitches under the sleeve are worked without knitting together stitches and yarn overs on the first round. At the same time increase at marker 1 (or 5 depending on which sleeve you are working) from the yoke and decrease stitches under the sleeve as described below: INCREASES: Continue to increase as before at marker 1/5 (= 4 stitches increased on each increase-round). Increase like this every 12th-10th-10th-10th-8th-10th round a total of 4 times. After the first increase there are 42-46-48-54-58-60 stitches (subsequently the number of stitches stays the same as you decrease at the same time as you increase). DECREASES: When working increase 2, decrease at the same time under the sleeve – read DECREASE TIP (= 4 stitches decreased on each decrease-round). Decrease like this on every round where you also increase (a total of 3 times). In other words, at increase 1, you are left with 42-46-48-54-58-60 stitches. Then the number of stitches remains the same on subsequent increase/decrease rounds. Continue with English rib until the sleeve measures 34-35-34-33-32-30 cm (there are 3 cm left to finished length). Now work the next round in rib in the same way as on the body; i.e. the yarn overs and knitted stitches are knitted together, increase 1 stitch after each knitted stitch and purl the purled stitch = 63-69-72-81-87-90 stitches. Change to circular needle size 4 mm and work rib as on the neck (1 English rib stitch, purl 2) for 3 cm. Loosely cast off with knit over knit and purl over purl - remember CASTING-OFF TIP. The sleeve measures approx. 37-38-37-36-35-33 cm from the division. Work the other sleeve in the same way. |
|
 |
|
Have you finished this pattern?Tag your pictures with #dropspattern #dublinwintersweater or submit them to the #dropsfan gallery. Do you need help with this pattern?You'll find 23 tutorial videos, a Comments/Questions area and more by visiting the pattern on garnstudio.com. © 1982-2026 DROPS Design A/S. We reserve all rights. This document, including all its sub-sections, has copyrights. Read more about what you can do with our patterns at the bottom of each pattern on our site. |
|


With over 40 years in knitting and crochet design, DROPS Design offers one of the most extensive collections of free patterns on the internet - translated to 17 languages. As of today we count 324 catalogues and 12290 patterns translated into English (UK/cm). 12290
We work hard to bring you the best knitting and crochet have to offer, inspiration and advice as well as great quality yarns at incredible prices! Would you like to use our patterns for other than personal use? You can read what you are allowed to do in the Copyright text at the bottom of all our patterns. Happy crafting!
Post a comment to pattern DROPS 215-12
We would love to hear what you have to say about this pattern!
If you want to leave a question, please make sure you select the correct category in the form below, to speed up the answering process. Required fields are marked *.