
Popular categories
Looking for a yarn?


Comments / Questions (34)
![]() Rita Mauti wrote:
Rita Mauti wrote:
Quando nella spiegazione c’è scritto: Diminuire in questo modo ogni 4 ferri 5 volte e a ferri alterni 11 volte (= 16 maglie diminuite in totale) che cosa si intende? Le diminuzioni vanno fatte a ferri alterni o ogni 4 ferri? Grazie
03.03.2026 - 23:42DROPS Design answered:
Buonasera Rita, deve seguire quanto indicato: deve diminuire prima ogni 4 ferri per 5 volte e poi ogni 2 ferri 11 volte. Buon lavoro!
04.03.2026 - 22:43
![]() Tina wrote:
Tina wrote:
Very nice pattern but I could use a little help. I do not understand part of the pattern ( I am makim M size so I need to do 11, I kniw that): Work 2 stitches in garter stitch, knit 2, purl 2 (= band), knit and decrease 13-11-13-11-13-11. Does this men I have to do 11 sts and than 1 decreases (2 sts) and so on till it is 6 last sts?
02.11.2025 - 16:27
![]() Christine wrote:
Christine wrote:
Ik ben ondertussen aan de v-hals. Moet ik eerst 7 keer iedere 4de naald 1steek minderen en dan 9 keer iedere andere rij? Of moet dit gelijktijdig? Want dan ga je iedere rechte rij 14 keer 1st minderen en dan nog 2keer 1 om de 4rijen
26.10.2025 - 19:56DROPS Design answered:
Dag Christine,
Je mindert eerst 7 keer iedere 4e naald 1 steek en dan 9 keer iedere ander naald. Dus niet tegelijkertijd.
28.10.2025 - 20:40
![]() Christine wrote:
Christine wrote:
Ik brei maat XL. Heb net op 12cm 4 steken geminderd dus nu heb ik nog 207 steken. 55 -97-55. Als ik het patroon moet volgen 2-2-2-3-(5-14-6)-3-2-2-2 komt dit niet uit. Moet ik ergens een telsteek laten vallen? Hoe is dan de telling? Dank voor je antwoord
17.10.2025 - 17:14DROPS Design answered:
Dag Christine,
Dit staat inderdaad niet goed aangegeven, maar het is de bedoeling dat je het patroon zo goed mogelijk boven elkaar door laat lopen op de panden. Dat betekent dat de ajourpatroontjes in de zijnaden af en toe dichter bij elkaar komen te zitten door de minderingen.
19.10.2025 - 20:11
![]() Laine wrote:
Laine wrote:
Dragon Fly Wings pattern. I’m working the shoulder at the back. Pattern says cast off 1 stitch two times (decrease 2 stitches per row) on every row at neck. Is this every row or every RIGHT side row? How many rows do I decrease? How many shoulder stitches should I end up with before casting off remaining stitches?
11.09.2025 - 23:42DROPS Design answered:
Hi Laine, you have to decrease 1 stitch per row (right side and wrong side, you decrease in 2 rows) from the neck side. You will do it for each shoulder separately. At the end you have 17-18-21-22-27-30 stitches for each shoulder (see your size). Happy knitting!
12.09.2025 - 08:14
![]() Gail wrote:
Gail wrote:
I am making the medium size but am having trouble with decrease stitches for V-neck. I understand that I need to decrease 1 stitch on each of the next four rows (5 sts total) and every other row 11 x =16 sts total. Is this 8 sts decreased each side by the band? It would be helpful if you are able to tell me how many sts I should have before I begin to decrease for band, right side, body, left side and band. Thank you.
27.12.2024 - 19:31DROPS Design answered:
Dear Gail, first decrease 1 stitch before/after the band stitches (since you work the whole body you need to decrease by each band). This decrease is worked every 4th row (so work 3 normal rows, decrease in the next row) 5 times. Then decrease like this every 2nd/on alternate/every other row (so 1 row without decreases, one with decreases) 11 times. So you decrease 16 times for each band; it should be 32 in total. You should have 191 stitches at the start of the decreases and, by the time you divide the back piece and front piece, you shouldn't be finished with the V-neck decreases. Happy knitting!
30.12.2024 - 00:44
![]() Lisbeth Von Walden wrote:
Lisbeth Von Walden wrote:
Ska sjalkragen stickas i endast 7cm på varja framstycke ? (strl XL) det räcker ju inte
27.03.2024 - 15:17DROPS Design answered:
Hej Lisbeth, de yderste 6 masker mod midt foran er sjalskraven, de sidste 7 cm (i begge sider) er de masker som syes til halskanten bag i nakken :)
05.04.2024 - 09:09
![]() Georgette Jorritsma wrote:
Georgette Jorritsma wrote:
Bij de minderingen voor de V-hals wordt toch iedere naald 2 steken geminderd, dus hoe komt het totaal geminderde steken op slechts 16 uit ipv 32, bij L. En wat betekent ‘minderen in iedere andere naald’. Verder een geweldig mooi patroon!!
08.11.2023 - 21:30DROPS Design answered:
Dag Georgette,
Je 16 steken aan elke kant en inderdaad 32 steken in totaal. Iedere andere naald betekent om de naald, dus de ene naald wel en de andere naald niet.
13.11.2023 - 06:33
![]() Sophia wrote:
Sophia wrote:
Good morning.after 2 dec for v neck and cast off sts 12 total for small size, I have 33sts for right front 64 sts for back piece and 36sts for left front what i have done wrong. all sts until now it’s ok.thank you
25.09.2023 - 09:45DROPS Design answered:
Dear Sophia, if you have decreased 2 sts for V-neck after dividing, you should have then: Back piece 83 sts - 14 sts decreased on the sides - 6 sts cast off for armhole = 63 sts - front pieces = 47 sts - 7 sts on the side - 2 sts for neck - 3 sts for armhole = 35 sts. Hope it can help. Happy knitting!
25.09.2023 - 10:57
![]() Katarzyna wrote:
Katarzyna wrote:
Witam ! Jestem poczatkujacym samoukiem i mam problem ze zrozumieniem opisu . Chodzi mi najbardziej o to PONAD …. 🙈 nie potrafię tego zrozumieć. Proszę o pomoc ☺️ A.2 (= 14 oczek) ponad 154-168-182-182-210-224 następnymi oczkami (= 11-12-13-13-15-16 razy na szerokość),
02.11.2022 - 08:46DROPS Design answered:
Witaj Kasiu, ponad znaczy 'przez' ileś oczek. W tym przypadku przerabiasz schemat A.2 11-12-13-13-15-16 razy w rzędzie (wybierz odpowiednią liczbę w zależności od wykonywanego rozmiaru): 14 oczek w schemacie A.2 x 11 powtórzeń w rozmiarze S daje łącznie 154 oczka, na których będzie wykonywany schemat A.2. Jak czytać schematy na drutach znajdziesz TUTAJ. Pytaj śmiało jeśli pojawią się kolejne kłopoty. Pozdrawiamy!
02.11.2022 - 10:20
|
|||||||||||||
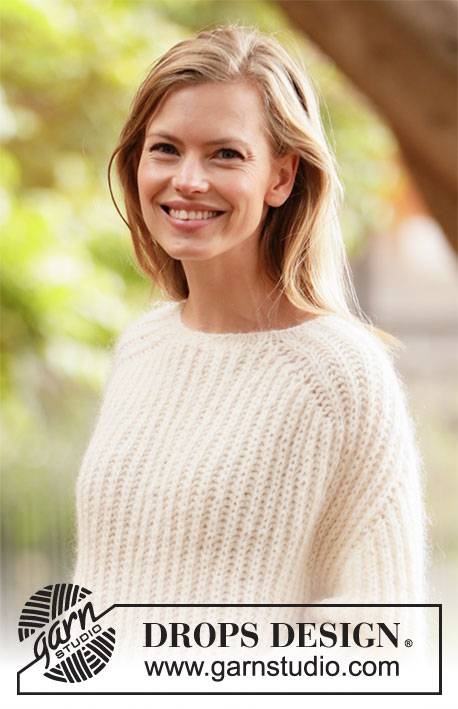
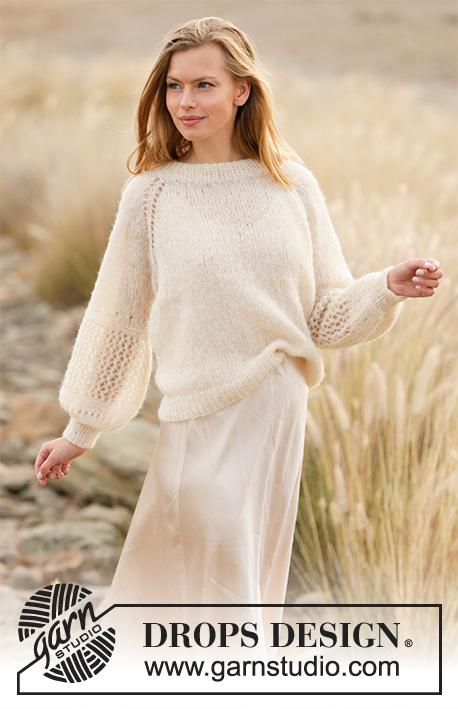
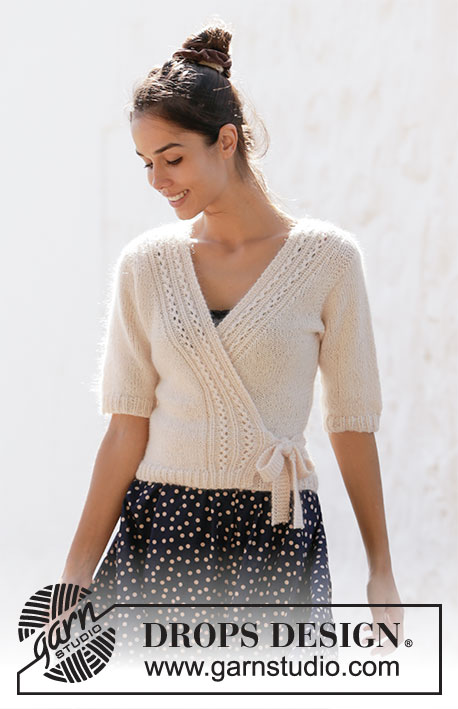
Dragonfly Wings Jacket#dragonflywingsjacket |
|||||||||||||
 |
 |
||||||||||||
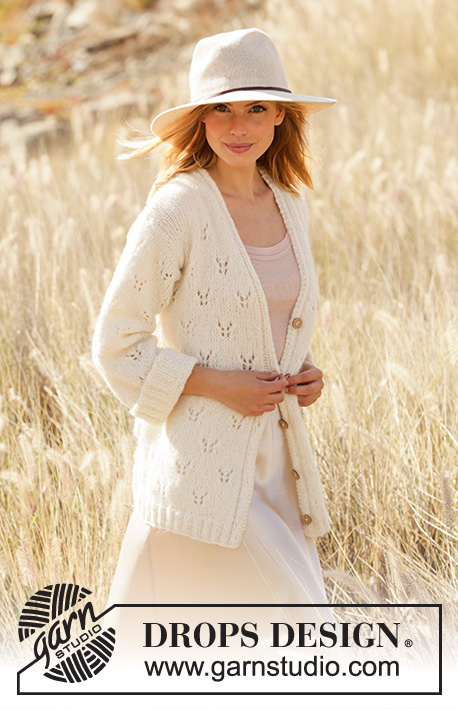
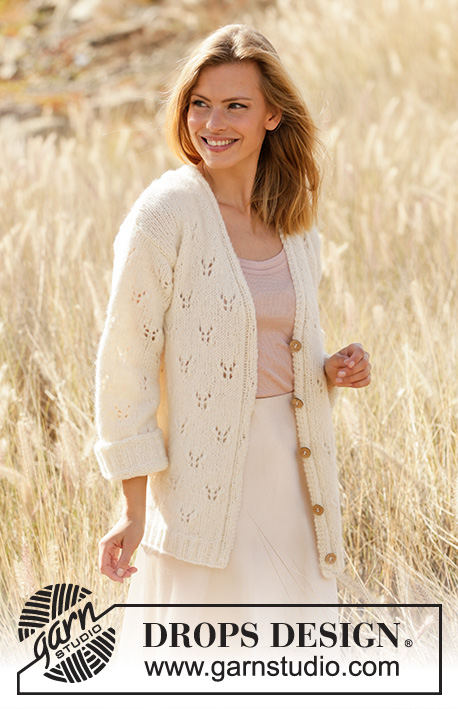
Knitted long jacket in DROPS Air. Piece is knitted with lace pattern, shawl collar and V-neck. Size: S - XXXL
DROPS 212-27 |
|||||||||||||
|
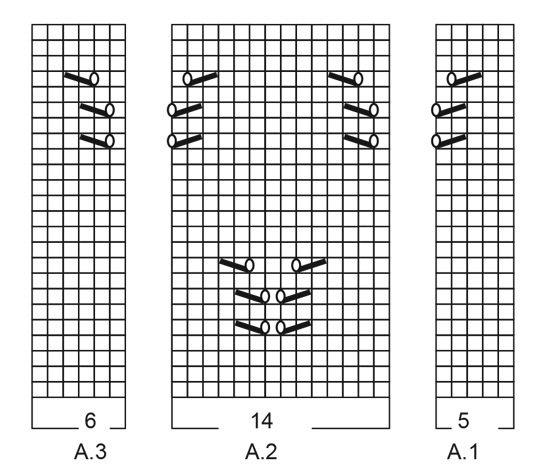
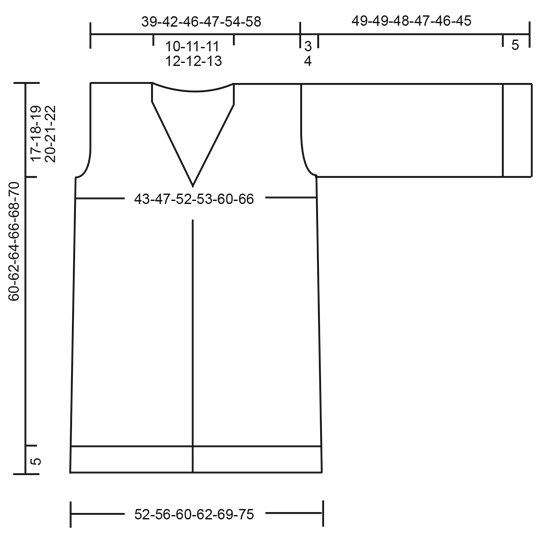
---------------------------------------------------------- EXPLANATION FOR THE PATTERN: ---------------------------------------------------------- GARTER STITCH (back and forth): Knit all rows. 1 ridge vertically = knit 2 rows. PATTERN: See diagrams A.1 to A.3. DECREASE TIP-1 (applies to sides): All decreases are done on a row from right side. Adjust to not decrease in the middle of a lace pattern, i.e. if there is a lace pattern right where decrease should be, decrease when lace pattern has been worked. Work until 4 stitches remain before marker thread in the side and knit 2 together, knit 4 (marker thread is in the middle of these stitches), slip 1 stitch knitwise, knit 1, pass slipped stitch over stitch worked. DECREASE TIP-2 (applies to V-neck): All decreases are done on a row from right side. Right front piece: Decrease at the beginning of row from right side: Work the 6 band stitches as before, slip 1 stitch knitwise, knit 1, pass slipped stitch over stitch worked. Left front piece: Decrease at the end of row from right side: Work until 8 stitches remain, knit 2 together, work the 6 edge stitches as before. CAST-OFF TIP: To avoid a tight cast-off edge you may use a larger needle. If this also is too tight, make 1 yarn over after approx. every 4th stitch and cast off these as regular stitches. BUTTONHOLES (bottom up): All decreases for buttonholes are done on a row from right side. Decrease for buttonholes on right band. 1 BUTTONHOLE = knit third and fourth stitch from edge together and make 1 yarn over. On next row (= from wrong side) purl yarn over = hole. Decrease for buttonholes when piece measures: S: 5, 14, 23, 31 and 39 cm M: 5, 14, 23, 32 and 41 cm L: 5, 14, 23, 32 and 41 cm XL: 5, 13, 21, 29, 36 and 43 cm. XXL: 5, 13, 21, 29, 36 and 43 cm. XXXL: 5, 13, 21, 29, 37 and 45 cm. ---------------------------------------------------------- START THE PIECE HERE: ---------------------------------------------------------- JACKET - SHORT OVERVIEW OF THE PIECE: Work body back and forth. Decrease stitches for V-neck, cast off stitches for armholes, and work front pieces and back piece separately until finished measurements. Work sleeves back and forth on needle. BODY: Cast on 190-202-218-222-246-262 stitches (including 6 band stitches in each side of piece) on circular needle size 4.5 mm with Air. Purl 1 row from wrong side. Then work rib as follows: Work 2 stitches in GARTER STITCH - read explanation above, * knit 2, purl 2 *, repeat from *-* until 4 stitches remain, finish with knit 2 and 2 stitches in garter stitch. When rib measures 5 cm, work next row from right side as follows: Work 2 stitches in garter stitch, knit 2, purl 2 (= band), knit and decrease 13-11-13-11-13-11 stitches evenly until 6 stitches remain, finish with purl 2, knit 2 and 2 stitches in garter stitches over band = 177-191-205-211-233-251 stitches. Switch to circular needle size 5.5 mm. Decrease for BUTTONHOLES on right band - read explanation above. Work 1 row from wrong side with knit over knit, purl over purl and garter stitch over garter stitch. Insert 1 marker thread 47-51-54-56-61-66 stitches in from each side, marker threads mark the sides of garment and should be used for decrease in each side later (= 83-89-97-99-111-119 stitches on back piece) On next row from right side work pattern as follows: Work 2 stitches in garter stitch, knit 2, purl 2 (= band), 0-0-0-3-0-2 stitches in stocking stitch, A.1 (= 5 stitches, work A.2 (= 14 stitches) over 154-168-182-182-210-224 stitches (= 11-12-13-13-15-16 times in width), A.3 (= 6 stitches), 0-0-0-3-0-2 stitches in stocking stitch and purl 2, knit 2, and 2 stitches in garter stitch over band. Continue pattern like this. REMEMBER THE KNITTING TENSION! READ ALL OF THE FOLLOWING SECTION BEFORE CONTINUING! Decrease stitches in each of the sides, decrease stitches for V-neck and cast off stitches for armholes as follows: If a whole lace pattern does not fit in width, work the remaining stitches in stocking stitch. DECREASE STITCHES IN THE SIDES AS FOLLOWS: When piece measures 12 cm, decrease 1 stitch on each side of each marker thread - read DECREASE TIP-1 (= 4 stitches decreased). Decrease like this every 4½-4½-5-5-5½-5½ cm 7 times in total. DECREASE STITCHES FOR V-NECK AS FOLLOWS: When piece measures 39-41-41-43-43-45 cm, begin decrease for V- neck on next row from right side as follows: Decrease 1 stitch inside 6 band stitches – read DECREASE TIP-2. Decrease like this every 4th row 6-5-7-7-8-8 times and every other row 8-11-8-9-8-9 times (= 14-16-15-16-16-17 stitches decreased in total). CAST OFF STITCHES FOR ARMHOLES AS FOLLOWS: When piece measures 43-44-45-46-47-48 cm, cast off stitches for armholes on next row from right side as follows: Cast off 3-4-5-5-5-6 stitches on each side of marker thread (= 6-8-10-10-10-12 stitches cast off for armholes in each side). Finish the part separately (continue to decrease for V-neck on front pieces). Cut the yarn. Leave the stitches for front pieces on needle while working over stitches on back piece. BACK PIECE: = 63-67-73-75-87-93 stitches. Continue pattern as before but work outermost stitch in each side in garter stitch. Work only lace pattern that fit in width, work the remaining stitches in stocking stitch. When piece measures 54-56-58-60-62-64 cm from cast-on edge, cast off the middle 25-27-27-27-29-29 stitches on next row from right side (= 19-20-23-24-29-32 stitches on each shoulder). Finish any started lace pattern vertically but do not work more repetitions vertically - work stitches in stocking stitch with 1 edge stitch in garter stitch in each side of piece onwards. Finish the shoulders separately. Cast off stitches on every row from the neck as follows: Cast off 1 stitch 2 times = 17-18-21-22-27-30 stitches. Cast off when piece measures 60-62-64-66-68-70 cm from cast-on edge. Work the other shoulder the same way. LEFT FRONT PIECE: Continue to decrease for V-neck on front piece, as explained above. When piece measures 54-56-58-60-62-64 cm from cast-on edge, finish any started lace patterns vertically but do not work more repetitions vertically – work stitches in stocking stitch with 1 edge stitch in garter stitch in each side of piece onwards. When all decreases for V-neck are done, 23-24-27-28-33-36 stitches remain on needle. When piece measures 60-62-64-66-68-70 cm from cast-on edge, cast off the first 17-18-21-22-27-30 stitches on next row from right side= 6 stitches remain for shawl collar. Continue with pattern as before over the 6 stitches until shawl collar measures approx. 6-7-7-7-9-9 cm. Cast off stitches with knit over knit, garter stitch over garter stitch and purl over purl. RIGHT FRONT PIECE: Work as left front piece until piece measures 60-62-64-66-68-70 cm from cast-on edge. On next row from right side work pattern over the first 6 stitches as before, cast off the remaining 17-18-21-22-27-30 stitches. Cut the yarn. Continue with pattern over the 6 stitches until shawl collar measures approx. 6-7-7-7-9-9 cm, adjust according to left front piece. Cast off stitches with knit over knit, garter stitch over garter stitch and purl over purl. SLEEVES: Cast on 62-66-66-66-70-70 stitches (including 1 edge stitch in each side) on circular needle size 4.5 mm with Air. Purl 1 row from wrong side. Then work as follows from right side: Work 1 edge stitch in garter stitch, knit 1, * purl 2, knit 2 *, repeat from *-* until 4 stitches remain, purl 2, knit 1 and 1 edge stitch in garter stitch. When rib measures 5 cm, knit 1 row from right side while at the same time decreasing 4-6-6-4-6-6 stitches evenly = 58-60-60-62-64-64 stitches. Switch to circular needle size 5.5 mm. Now work pattern as follows: Work 1 edge stitch in garter stitch, 0-1-1-2-3-3 stitches in stocking stitch, A.2 4 times in width in total, 0-1-1-2-3-3 stitches in stocking stitch and 1 edge stitch in garter stitch. Repeat pattern vertically. When sleeve measures 16 cm, increase 0-0-1-1-1-1 stitch in each side of piece inside 1 edge stitch (= 0-0-2-2-2-2 stitches increased). Increase like this every 6 cm 0-0-1-2-3-4 times in total = 58-60-62-66-70-72 stitches. Work the increased stitches in stocking stitch. When sleeve measures 47-46-45-44-43-41 cm from cast-on edge, insert 1 marker inside 1 edge stitch at the beginning of next row – marker marks where bottom of armhole begins. Do not start any more lace pattern, finish any patterns already started. Then work in stocking stitch with 1 edge stitch in garter stitch in each side. Cast off when sleeve measures 49-49-48-47-46-45 cm in total - read CAST-OFF TIP! Work the other sleeve the same way. ASSEMBLY: Sew shoulder seams inside cast-off edge. Sew shawl collar together mid back with grafting/kitchener stitches, and sew collar to neck line in the back of neck – the seam should be in towards the wrong side. Sew sleeve seam together but leave a vent 3-3-3-3-4-4 cm at the top of sleeve (i.e. up to marker on sleeve). Sew vent at the top of sleeve to the bottom of armhole and then sew sleeve in body. Sew the buttons on to the left band. |
|||||||||||||
Diagram explanations |
|||||||||||||
|
|||||||||||||
 |
|||||||||||||
 |
|||||||||||||
Have you finished this pattern?Tag your pictures with #dropspattern #dragonflywingsjacket or submit them to the #dropsfan gallery. Do you need help with this pattern?You'll find 22 tutorial videos, a Comments/Questions area and more by visiting the pattern on garnstudio.com. © 1982-2026 DROPS Design A/S. We reserve all rights. This document, including all its sub-sections, has copyrights. Read more about what you can do with our patterns at the bottom of each pattern on our site. |
|||||||||||||


With over 40 years in knitting and crochet design, DROPS Design offers one of the most extensive collections of free patterns on the internet - translated to 17 languages. As of today we count 324 catalogues and 12290 patterns translated into English (UK/cm). 12290
We work hard to bring you the best knitting and crochet have to offer, inspiration and advice as well as great quality yarns at incredible prices! Would you like to use our patterns for other than personal use? You can read what you are allowed to do in the Copyright text at the bottom of all our patterns. Happy crafting!
Post a comment to pattern DROPS 212-27
We would love to hear what you have to say about this pattern!
If you want to leave a question, please make sure you select the correct category in the form below, to speed up the answering process. Required fields are marked *.