
Popular categories
Looking for a yarn?


Comments / Questions (82)
![]() Rosanne wrote:
Rosanne wrote:
Heeft u a.u.b. nog een antwoord voor mij op onderstaande vraag?
28.09.2023 - 20:28
![]() Rosanne wrote:
Rosanne wrote:
Hai, ik ben begonnen met de mouwen maar begrijp niet goed hoe ik de meerderingen in het patroon A1b moet combineren. De meerderingen moeten 1steek voor en na het midden, maar vallen dan middenin patroon A1b. Waardoor de volgende toer niet meer klopt. Of moet ik de meerderingen toch direct voor en na de mddendraad maken, dus tussen de patroondelen van A1b in?
15.09.2023 - 14:38DROPS Design answered:
Dag Rosanne,
Wanneer je met het meerderen midden onder de mouw begint, ben je al met A.3 begonnen, deze is 12 steken breed. Na een paar naalden van A.3 zitten er aan beide zijden van A.3 tricotsteken, waardoor je 1 steek voor en 1 steek na het midden onder de mouw kunt meerderen. Het aantal herhalingen in de breedte van patroon A.3 blijft steeds hetzelfde en je krijgt dus (door het meerderen) steeds meer tricotsteken midden onder de mouw.
03.10.2023 - 06:40
![]() Caroline Löfstedt wrote:
Caroline Löfstedt wrote:
Ska ökningarna på armarna påbörjas direkt efter resåren eller efter mönstret?
07.07.2023 - 10:59
![]() Caroline wrote:
Caroline wrote:
Hej!! Är diagrammen uppdaterade här på sidan? Får inte ihop det riktigt då det är pilar. Stickar storlek xs. Maskantalet ska väl alltid vara 161 då jag stickar mönstret? Vid pilarna är ju mönstret förskjutet. Men det ska alltid vara 6maskor över diagrammet på a1b väl? Mvh Caroline
28.06.2023 - 11:19DROPS Design answered:
Hej Caroline, Ja diagrammen är uppdaterade! Ja du har 6 m i A.1b :)
29.06.2023 - 14:43
![]() Fron wrote:
Fron wrote:
Ras
04.06.2023 - 19:48
![]() Anna Selderijk wrote:
Anna Selderijk wrote:
Wat bedoelt u met iedere andere naald minderen (raglan)? Moet ik dan elke rechte naald minderen en averechts niet? Of moet ik steeds een rechte naald overslaan? Naald 1, 5, 9 etc..
16.05.2023 - 19:00DROPS Design answered:
Dag Anna,
Alle minderingen voor de raglan worden aan de goede kant gemaakt, dus je mindert aan de goede kant en breit de steken aan de verkeerde kant, zoals ze zich voordoen. Dus maakt de minderingen om de naald; de ene naald (goede kant) wel, de andere naald (verkeerde kant) niet.
17.05.2023 - 17:41
![]() Elaine McParland wrote:
Elaine McParland wrote:
I have knitted up to the point where the sleeves have been put back on the circular needle and realise now that I have been knitting the xs size instead of the small. I am a 34in bust & don't think that the top part will fit me in xs. Is there a way of increasing stitches to allow for my bust or do I have to rip right back to the beginning 😱 I'm hoping you have an idea 💡! Many thanks, Elaine
17.09.2022 - 01:17DROPS Design answered:
Dear Elaine, unfortunately, due to working this piece from the bottom up, it's almost impossible to readjust the width. You could redo a part of the body, working some increases on the sides to reach the necessary width. Otherwise, you will need to start from the beginning again. Happy knitting and good luck!
17.09.2022 - 16:05
![]() Viviane wrote:
Viviane wrote:
Beste Waarom moeten we zoveel steken minderen na de boord ?
07.09.2022 - 10:56DROPS Design answered:
Dag Viviane,
Deze steken moeten geminderd worden om uit te komen met de maten als je het ajourpatroon op het lijf gaat breien, zoals aangegeven in de maattekening.
08.09.2022 - 16:57
![]() Mila Georgieva wrote:
Mila Georgieva wrote:
Lieber Drops Team, Wie soll ich das verstehen: "gleichmäßig verteilt abnehmen – ABNAHMETIPP lesen = 161-179-185-209-227-245 Maschen. 1 Rück-Reihe links stricken (die Umschläge links verschränkt stricken und die Blenden weiter kraus rechts stricken)" Welche Umschläge meinen Sie hier? Danke und schönen Aberd!
18.05.2022 - 20:49DROPS Design answered:
Liebe Frau Georgieva, hier sollen Sie das nur vergessen, es wird von der Anleitung aus, es sind keine Umschläge. Danke für den Hinweis, Viel Spaß beim stricken!
19.05.2022 - 09:03
![]() Eva Merrild wrote:
Eva Merrild wrote:
Har købt en del ngl. DROPS Brushed Alpaca Silk og ville gerne lave bolero ell. lille trøje som denne (opskrift DROPS 212-12) men i str. 6 år og 9 år. Kan desværre ikke finde opskrift jeg kan bruge - måske har jeg ikke ledt rigtige sted - kan I hjælpe mig ? Mvh. Eva
21.03.2022 - 14:26DROPS Design answered:
Hej Eva, alle disse kan du strikke i DROPS Brushed Alpaca Silk: Jakker & Boleroer til børn - 16-17 masker på 10 cm
22.03.2022 - 13:11
|
||||||||||||||||||||||
Late Nights Jacket#latenightsjacket |
||||||||||||||||||||||
 |
 |
|||||||||||||||||||||
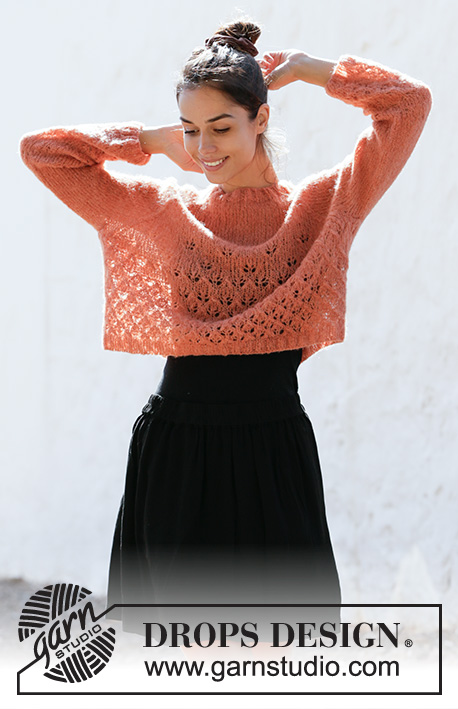
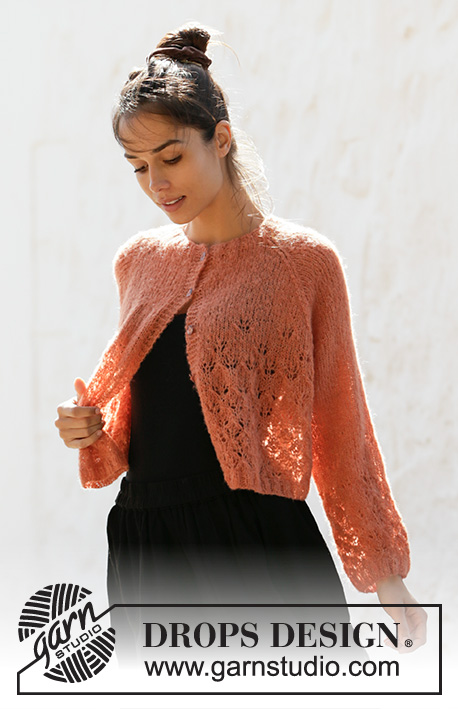
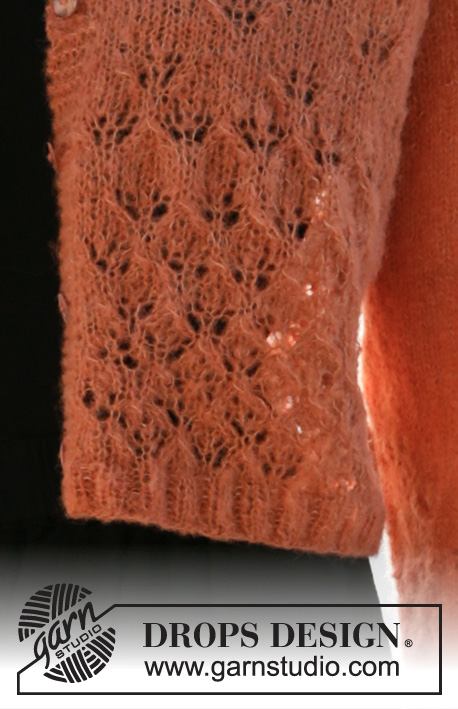
Knitted jacket with raglan in DROPS Brushed Alpaca Silk. Piece is knitted with lace pattern. Size XS–XXL.
DROPS 212-12 |
||||||||||||||||||||||
|
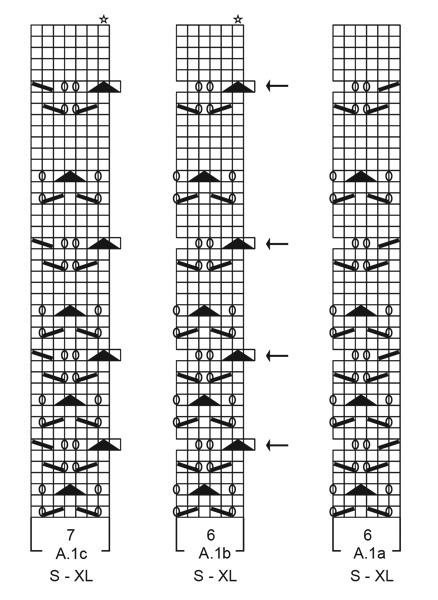
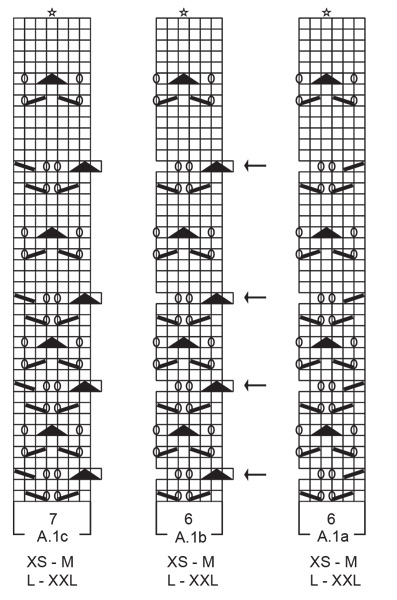
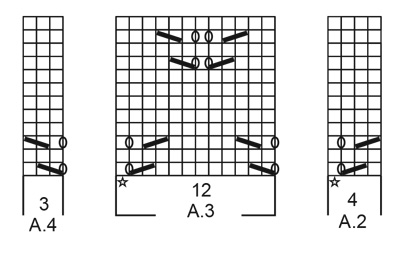
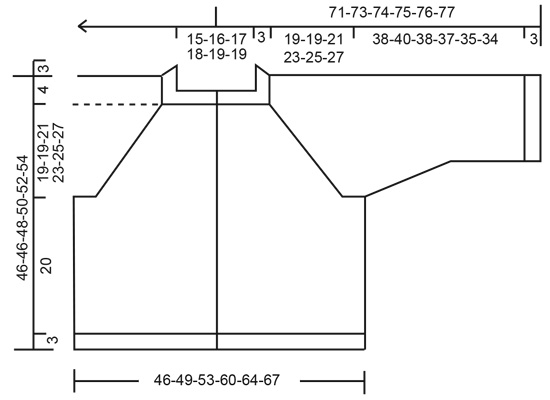
---------------------------------------------------------- EXPLANATION FOR THE PATTERN: ---------------------------------------------------------- GARTER STITCH (back and forth): Knit all rows. 1 ridge vertically = knit 2 rows. PATTERN: See diagrams A.1 to A.4. Choose diagram for your size (applies to A.1a until A.1c). DECREASE TIP (evenly): To calculate how to decrease evenly, use the total number of stitches on row (e.g. 184 stitches), minus bands (e.g. 10 stitches) and divide the remaining stitches by number of decreases to be done (e.g. 23) = 7.5. In this example decrease by knitting alternately every 6th and 7th stitch and every 7th and 8th stitch together. INCREASE TIP (applies to sleeves): Work until 2 stitches remain before marker thread, 1 yarn over, knit 4 (marker thread is in the middle of these stitches), 1 yarn over. On next round knit yarn overs twisted to avoid holes. Then work the new stitches in stocking stitch. RAGLAN: All decreases are done from the right side! Decrease 1 stitch on each side of marker thread in every transition between sleeves and body (= 8 stitches decreased) as follows: Work until 2 stitches remain before marker thread, knit 2 together, marker thread is here, slip 1 stitch knitwise, knit 1, pass slipped stitch over stitch worked. BUTTONHOLES (bottom up): Decrease for buttonholes on right band. 1 BUTTONHOLE = knit third and fourth stitch from edge together and make 1 yarn over. On next row knit yarn over = hole. Decrease for buttonholes when piece measures: XS: 5, 12½, 20, 27½, 35 and 42½ cm S: 5, 12½, 20, 27½, 35 and 42½ cm M: 4, 12, 20, 28, 36 and 44 cm L: 4, 11, 18, 25, 32, 39 and 46 cm XL: 3, 10½, 18, 25½, 33, 40½, and 48 cm XXL: 5, 12½, 20, 27½, 35, 42½ and 50 cm ---------------------------------------------------------- START THE PIECE HERE: ---------------------------------------------------------- JACKET - SHORT OVERVIEW OF THE PIECE: Work body back and forth from mid front on circular needle size, bottom up, up to armholes. Then work the sleeves in the round on double pointed needles/a short circular needle up to armholes. Then slip sleeves on to same circular needle as body. Worked yoke and neck edge back and forth from mid front. BODY: Cast on 184-208-216-244-264-284 stitches (including 5 band stitches in each side towards mid front) on circular needle size 4 mm with Brushed Alpaca Silk. Purl 1 row from wrong side. Then work rib as follows: 5 band stitches in GARTER STITCH - read explanation above - * knit 2, purl 2 *, repeat from *-* until 7 stitches remain, knit 2, 5 band stitches on needle in garter stitch. Continue rib like this for 3 cm – remember BUTTONHOLES on right band – read explanation above. When rib is done, knit 1 row from right side while at the same time decreasing 23-29-31-35-37-39 stitches evenly - read DECREASE TIP = 161-179-185-209-227-245 stitches. Purl 1 row from wrong side (work bands in garter stitches). Switch to circular needle size 5 mm. Now work pattern as follows – choose diagram for your size: 5 band stitches in garter stitch, A.1a over the first 6 stitches, A.1b until 12 stitches remain on needle (= 23-26-27-31-34-37 repetitions in total of 6 stitches), A.1c over next 7 stitches, 5 band stitches in garter stitch. Continue back and forth like this. REMEMBER THE KNITTING TENSION! When 1 row remains in A.1a to A.1c, piece measures approx. 23 cm. Work next row from wrong side as follows: Work the first 37-43-43-48-54-60 stitches (= left front piece), cast off the next 9-9-9-11-11-11 stitches for armhole, work the next 69-75-81-91-97-103 stitches (= back piece), cast off the next 9-9-9-11-11-11 stitches for armhole, work the remaining 37-43-43-48-54-60 stitches (= right front piece). There are now 143-161-167-187-205-223 stitches on needle. Cut the yarn. Put piece aside and work the sleeves. SLEEVE: Cast on 52-56-56-64-64-68 stitches on double pointed needles size 4 mm with Brushed Alpaca Silk. Knit 1 round. Then work rib (= knit 2/purl 2) in the round for 3 cm. Knit 1 round while decreasing 10-8-8-10-10-8 stitches evenly = 42-48-48-54-54-60 stitches. Switch to double pointed needles size 5 mm. Insert a marker thread at beginning of round (= mid under sleeve). Now pattern A.1b - choose diagram for your size, in the round (= 7-8-8-9-9-10 repetitions of 6 stitches). When A.1b has been worked vertically, sleeve measures approx. 23 cm. Now work as many repetitions with lace pattern A.3 there is room for on round - Adjust so that star in A.3 is worked over star in A.1b! Work the remaining stitches on round in stocking stitch. AT THE SAME TIME on first round begin increase under sleeve- read INCREASE TIP. Increase like this approx. every 3-4-3-2-1-1 cm 6-5-6-7-10-10 times in total = 54-58-60-68-74-80 stitches. When diagrams have been worked vertically, continue with stocking stitch until finished measurements. When sleeve measures 41-43-41-40-38-37 cm, cast off 9-9-9-11-11-11 stitches under sleeve (cast off 5-5-5-6-6-6 stitches before marker thread and 4-4-4-5-5-5 stitches after marker thread) = 45-49-51-57-63-69 stitches for sleeve. Put piece aside and knit the other sleeve the same way. YOKE: Slip sleeves on to same circular needle as body where armholes were cast off = 233-259-269-301-331-361 stitches. Now insert 4 marker threads in the piece. Insert marker threads 2-0-2-2-0-2 stitches in on front pieces and back piece (measured from transition between body and sleeves). I.e. in size S and XL insert marker threads in transition between body and sleeves. And in size XS, M, L, XXL insert marker threads so that 2 stitches in each side of body are on the sleeves. Now work pattern as follows: Work right front piece as follows: 5 band stitches in garter stitch, work 6-3-0-6-3-6 stitches in stocking stitch, A.2 (= 4 stitches), A.3 over the next 12-24-24-24-36-36 stitches (= 1-2-2-2-3-3 repetitions of 12 stitches), A.4 over the next 3 stitches, work 5-4-5-4-3-4 stitches in stocking stitch, marker thread is here. Work right sleeve as follows: Work in stocking stitch over the next 49-49-55-61-63-73 stitches (= right sleeve), marker thread is here. Work back piece as follows: work 5-4-5-4-3-4 stitches in stocking stitch, A.2 (= 4 stitches), A.3 over the next 48-60-60-72-84-84 stitches (= 4-5-5-6-7-7 repetitions of 12 stitches), A.4 (= 3 stitches), work 5-4-5-4-3-4 stitches in stocking stitch, marker thread is here. Work left sleeve as follows: Work in stocking stitch over the next 49-49-55-61-63-73 stitches, marker thread is here. Work left front piece: Work 5-4-5-4-3-4 stitches in stocking stitch, A.2 over the next 4 stitches, A.3 over the next 12-24-24-24-36-36 stitches (= 1-2-2-2-3-3 repetitions of 12 stitches), A.4 over the next 3 stitches, work 6-3-0-6-3-6 stitches in stocking stitch, 5 band stitches in garter stitch. Continue back and forth like this. When yoke measures 3-2-2-1-2-2 cm, begin decrease for RAGLAN – read explanation above. Decrease like this on every other row 18-19-21-24-25-28 times in total = 89-107-101-109-131-137 stitches. When A.2 to A.4 have been worked 1 time vertically, continue with stocking stitch until finished measurements. The piece measures approx. 19-19-21-23-25-27 cm from where the body and sleeves were placed together. Now work the neck as described below. NECK EDGE: Knit 1 row from right side while decreasing 5-19-9-13-31-37 stitches evenly = 84-88-92-96-100-100 stitches. Switch to circular needle size 4 mm. Purl 1 row from wrong side. Work rib as follows: 5 band stitches in garter stitch, * knit 2, purl 2 *, repeat from *-* until 7 stitches remain on needle, knit 2, 5 band stitches in garter stitch. Continue rib like this for 3 cm. Cast off stitches with knit over knit and purl over purl. Jacket measures approx. 46-46-48-50-52-54 cm from shoulder and down. ASSEMBLY: Sew the openings under the sleeves. Sew the buttons on to left band. |
||||||||||||||||||||||
Diagram explanations |
||||||||||||||||||||||
|
||||||||||||||||||||||
 |
||||||||||||||||||||||
 |
||||||||||||||||||||||
 |
||||||||||||||||||||||
 |
||||||||||||||||||||||
Have you finished this pattern?Tag your pictures with #dropspattern #latenightsjacket or submit them to the #dropsfan gallery. Do you need help with this pattern?You'll find 24 tutorial videos, a Comments/Questions area and more by visiting the pattern on garnstudio.com. © 1982-2026 DROPS Design A/S. We reserve all rights. This document, including all its sub-sections, has copyrights. Read more about what you can do with our patterns at the bottom of each pattern on our site. |
||||||||||||||||||||||


With over 40 years in knitting and crochet design, DROPS Design offers one of the most extensive collections of free patterns on the internet - translated to 17 languages. As of today we count 324 catalogues and 12290 patterns translated into English (UK/cm). 12290
We work hard to bring you the best knitting and crochet have to offer, inspiration and advice as well as great quality yarns at incredible prices! Would you like to use our patterns for other than personal use? You can read what you are allowed to do in the Copyright text at the bottom of all our patterns. Happy crafting!
Post a comment to pattern DROPS 212-12
We would love to hear what you have to say about this pattern!
If you want to leave a question, please make sure you select the correct category in the form below, to speed up the answering process. Required fields are marked *.